THE 1966 COUPE DEVILLE IS BACK
Through a couple of car trades within my Cadillac friend community, the car became available again, and my dear friend Georg helped me to get it back.
I can't thank Georg enough - without him I would have never gotten the car back!
Today was the day to pick it up at my Georgs garage and drive it home, although I do not really have enough garage space anymore…
READ MORE!

Taking over the keys - THANKS MY FRIEND!!!!
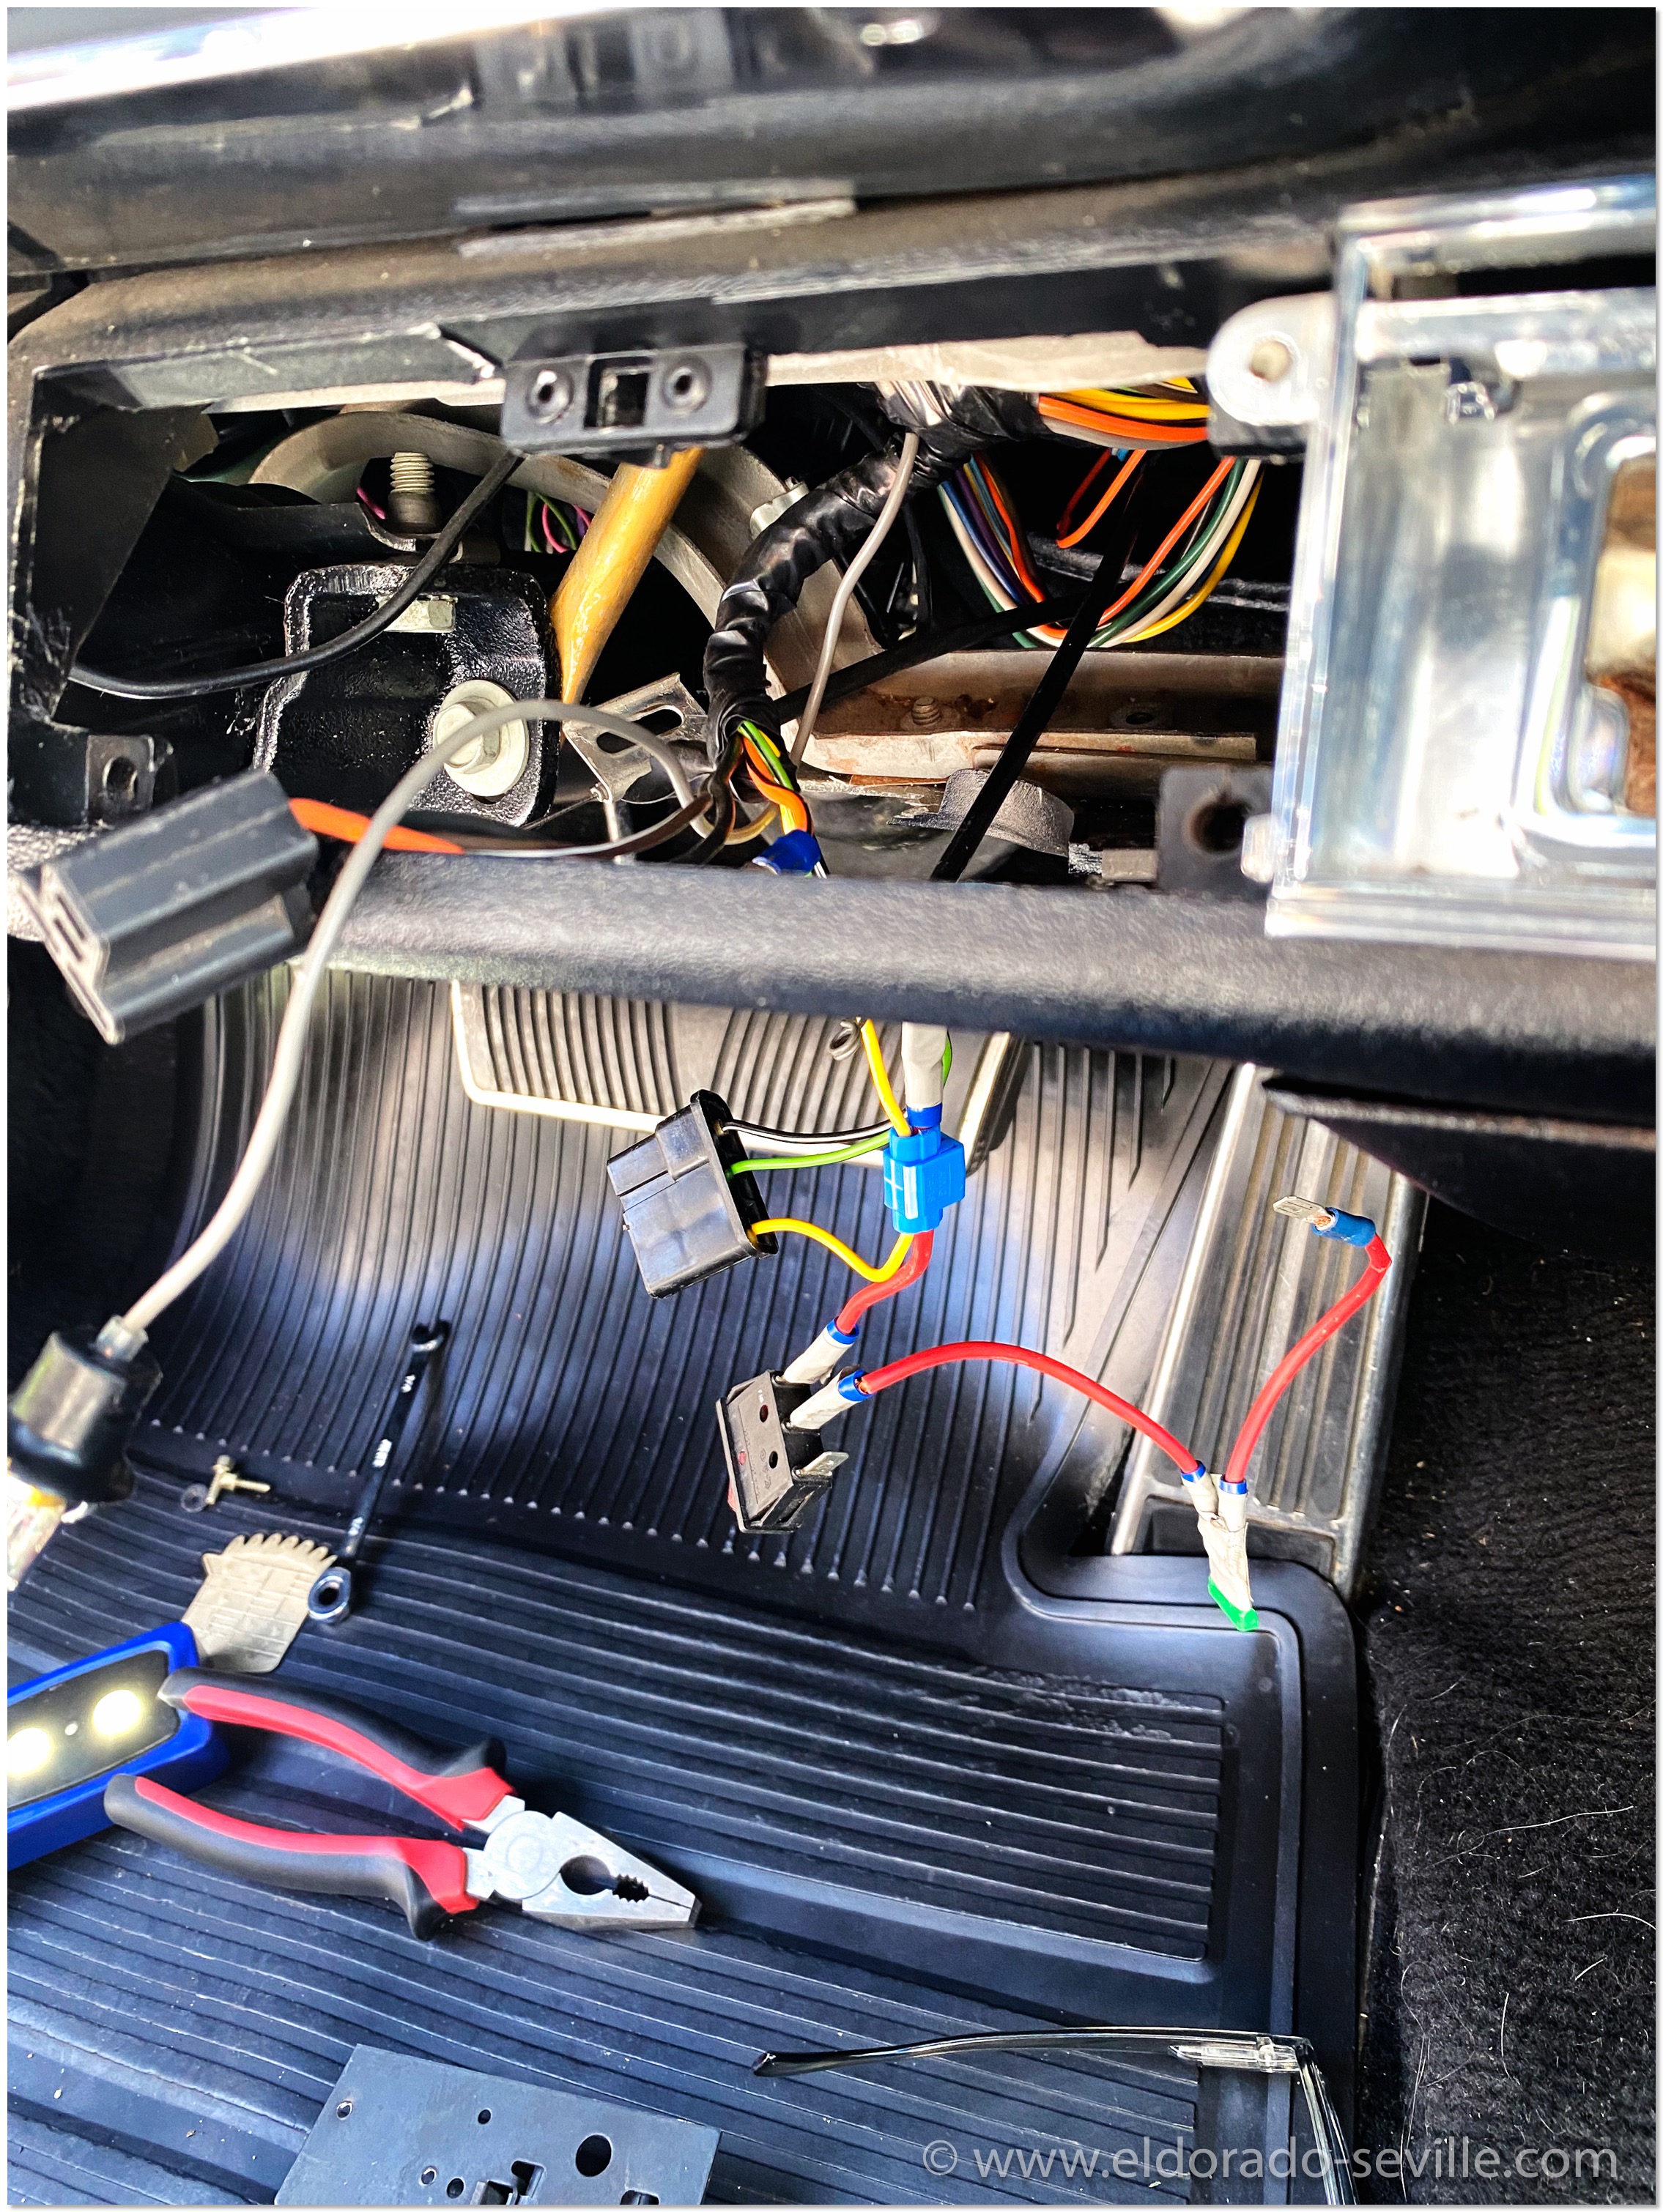
This is how the shop messed up the ATC system of the car… I reversed everything back to original!
READ MORE...REPAIRING THE 1978 ATC PROGRAMMER (AGAIN)
***This is an update to an older article as I had a very similar problem in the past already.***
I finally found the time to take the 1978 Eldorado out of winter storage. It started right up after many months of inactivity and I checked all accessories and options for operability.
Everything checked out fine but the air-condition… It only blew warm air out of the heater outlets and would not change modes, blower speed or temperature.
I immediately suspected a problem in the ATC programmer again. I already fixed it last year when the system would only work in full AC mode.
Last time I had a bad contact at the transducer which is the most important part in the programmer as it regulates the vacuum supply to the system.
The shop manual mentions that when the system is stuck in full heater mode, most probably an electrical problem is the main cause.
So I tried to push the transducer in again but the system did not come back to life like it did last time when I did this.
The MKII programmer which you can access through the glove box had to come out again for inspection.
This is how it looks with the cover removed:
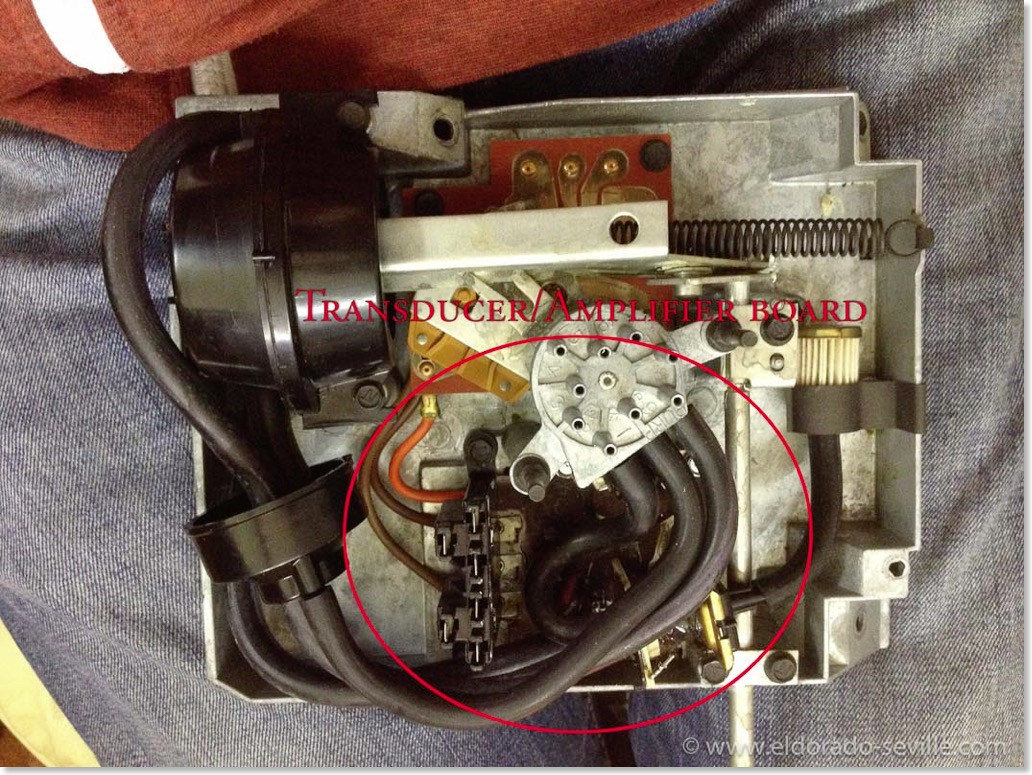
The 1978 MKII programmer with the cover removed.
I decided to take the transducer/amplifier board out of the programmer this time to see where the problem could be. It can be removed very easily - it's only held in place by 4 screws. Be careful not to turn the gear wheel with the potentiometer though as you would have to recalibrate it again afterwards.
After the board came out, I quickly found out where the problem was. Below is a picture of the removed board:
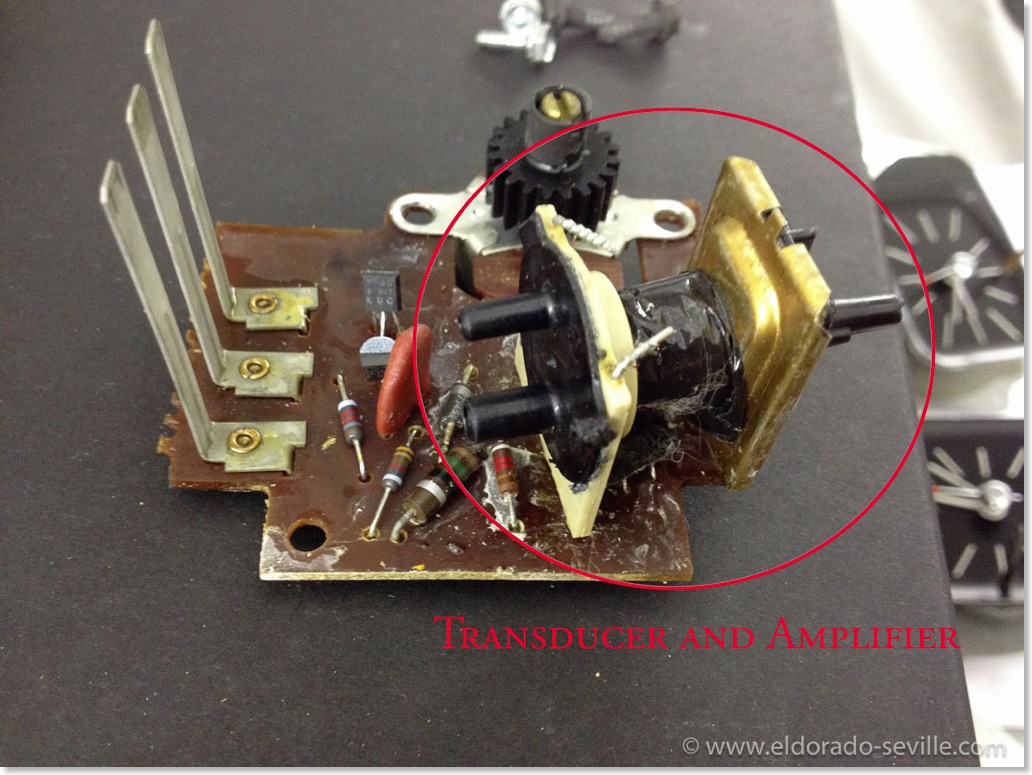
The transducer/amplifier board.
The transducer/amplifier unit was sitting pretty loosely on the circuit board, and one of the very thin and fragile wires going to the coil was broken, as you can see on the picture below:
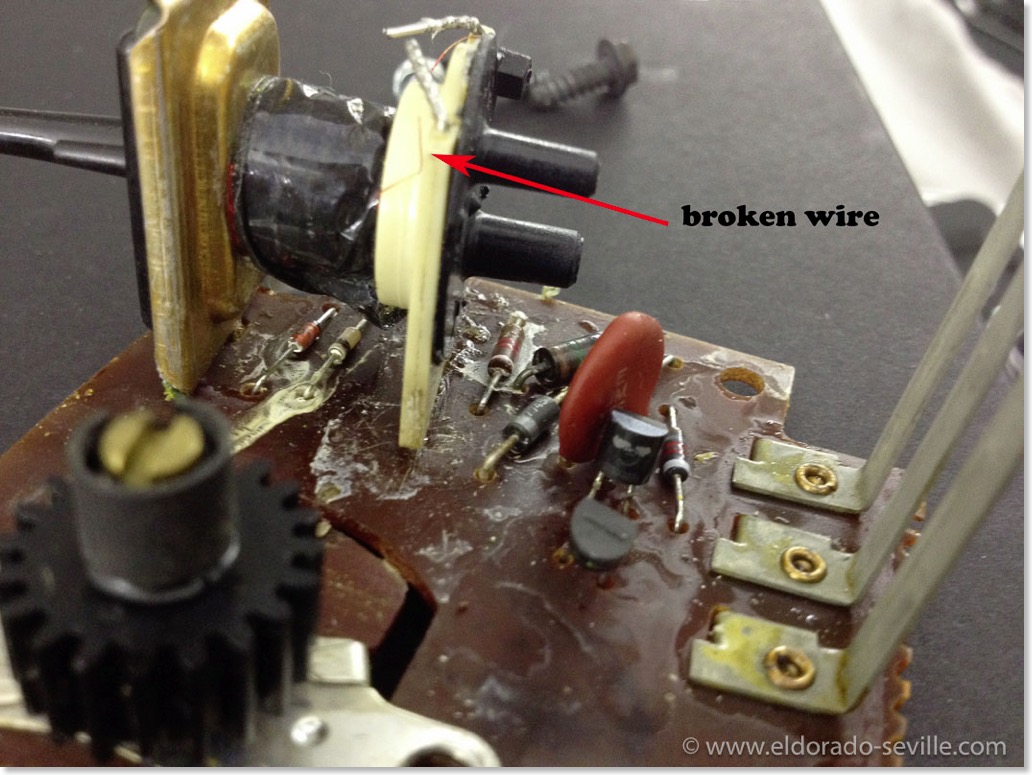
A broken wire at the coil of the transducer.
When I turned the circuit board around I could see that the soldering points on the circuit going to the transducer and the amplifier were broken and that they no longer were making good contact. That was the reason why the system did no longer work.
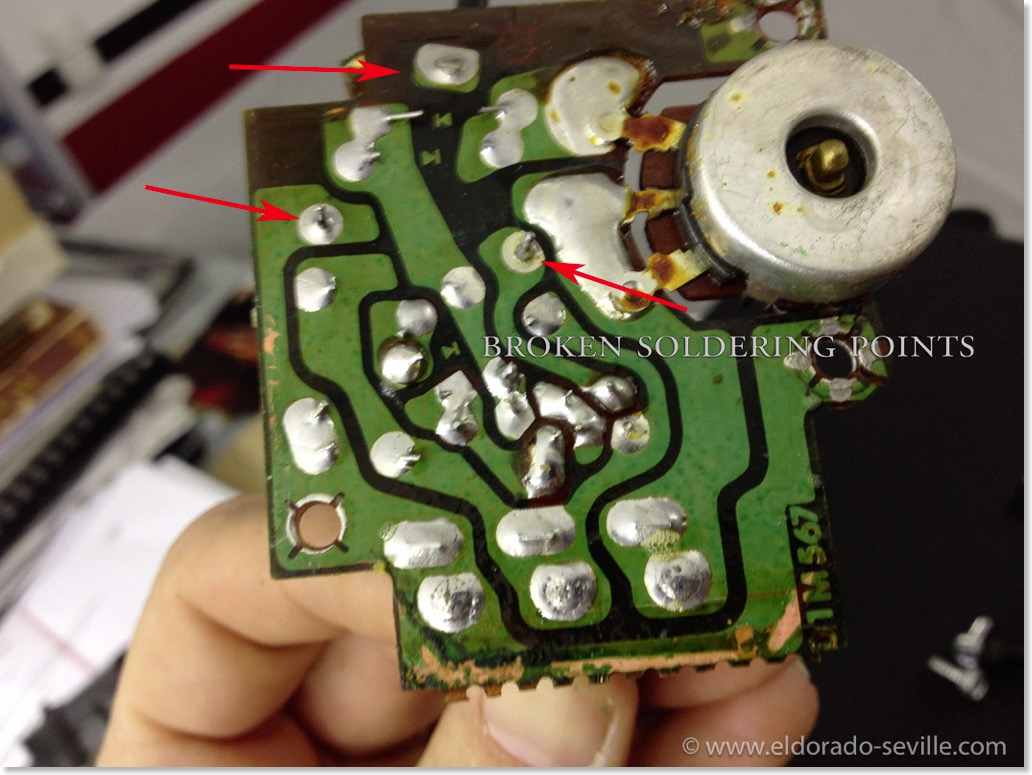
Broken soldering points at the rear of the circuit board.
The pretty simple solution was to re-solder the 3 soldering points and fix the broken wire going to the coil. I then put everything back together and now have a perfectly working ATC again. These old circuit boards can be very troublesome and I think that most of the time when a programmer goes bad on these 70s cars its probably a fixable problem like this. I was very worried that I would need an expensive rebuilt programmer and I am very glad that I could fix it by myself.
I have no idea though why everything worked when I put the car into storage last fall and how it broke while the car was inoperative…
Check my older post of the MKII programmer to also see the electrical diagram for the ATC system.
Fixing the 1978 Cadillac Eldorado´s ATC programmer. The AC works again.
****UPDATE****
An update to the article below can be found here as I had to repair the programmer again in May 2015:
The air-condition in my 1978 Biarritz did not work correctly. For some reason the system always stayed in full AC mode and no matter to where I put the temperature dial on the control head I could not get the heat on, no matter what I tried.
The shop manual is very helpful in trouble shooting the system. Its covered in the 1977 factory shop manual (FSM) as there were no changes made to the system in 1978.
It took me a while to fully understand how the system works - so I had to read the FSM multiple times to get the grip what is going on in the system.
First I inspected all the vacuum lines in the car to make sure that there was no leak anywhere, as the heating mode requires a very high vacuum at the vacuum motor in the controller.
All lines were in very good condition. I also checked the control head connections in the dash which were good as well.
I then suspected the vacuum motor in the programmer as it did not move. I removed the programmer from the car. You can access it from underneath the dash on the passenger side or even better if you remove the glove box lining through the glove box.
From there you only have to unscrew 5 screws, unplug the wires and the vacuum lines to get it out.
When I had it out of the car I checked the vacuum motor. I just sucked air through the hose and it moved and held vacuum perfectly.
The transducer or the amplifier in the programmer were most likely the problem.
When I checked the transducer which regulates the vacuum supply to the vacuum motor, I noticed that it seemed to not be connected to the electrical board as it should. I pressed it in, so that it made good contact with the board again and put the programmer back into the car and connected everything again.
***UPDATE 2015 - its not connected with pins but soldered to the circuit board - 3 of this soldering points were broken - the “repair“ I made here only temporarily worked. You have to check the soldering points for a permanent fix***
I started the car and the AC came back to life again immediately. I could see how the vacuum motor went through all the modes as it should according to the position of the temperature dial on the control head.
The build quality of the programmer obviously is not very good and the transducer somehow came loose causing the ATC to not work as it should. ***Update 2015 - it did no come loose but the soldering points broke***
After I tested everything I put the parts back together and can now enjoy a full working ATC in my 78 Biarritz again ;-)
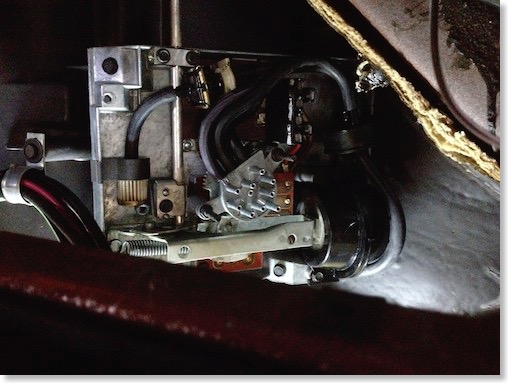
The programmer as seen through the glove box with the connectors and the plastic case removed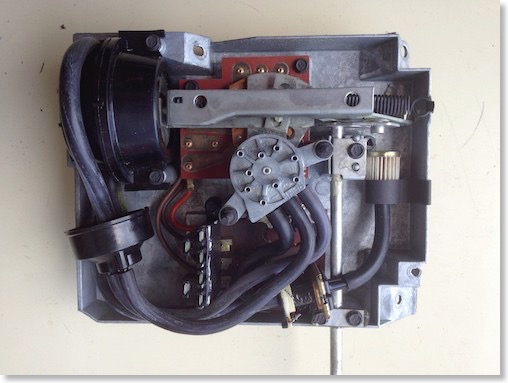
The 1977 / 1978 Eldorado MK II Automatic Temperature Control Programmer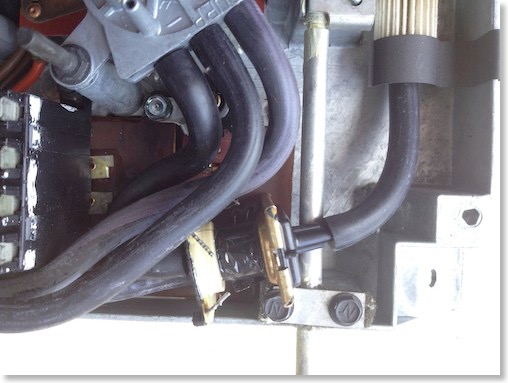
The transducer which caused the problem (the golden part with the single vacuum line going into it)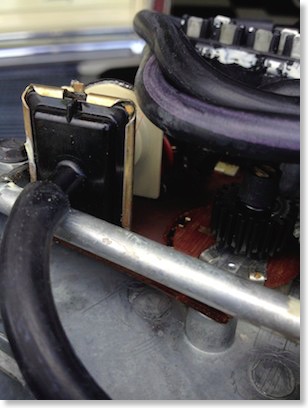
The transducer is connected to the electrical board through a couple of pins - it was not connected properly and somehow became loose over the years - that was why the system did not work.
***UPDATE 2015 - its not connected with pins but soldered to the circuit board - 3 of this soldering points were broken***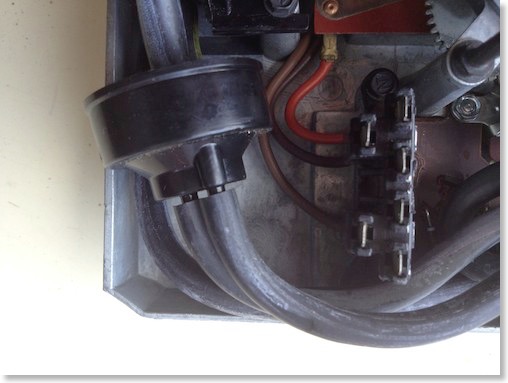
The vacuum checking relay and the electric connectors.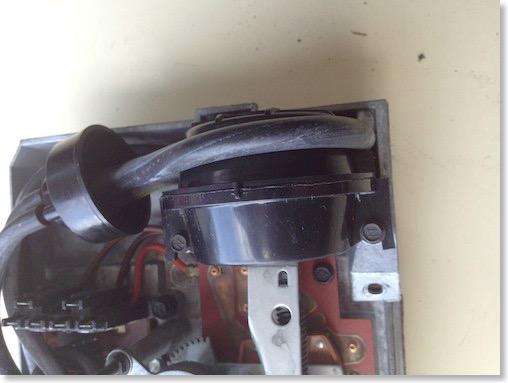
The vacuum power motor
from the 1977 FSM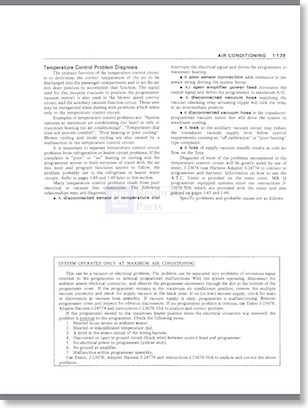
Trouble shooting guide for when the system works in full AC mode only.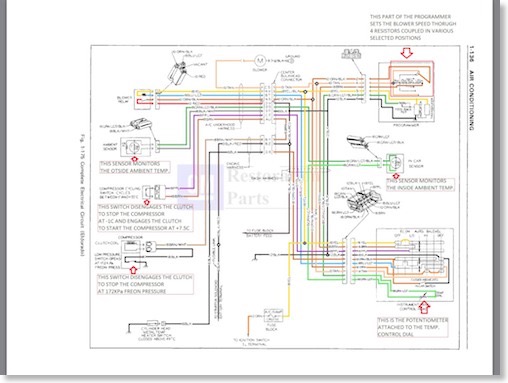
A color coordinated electrical schematic with annotations to describe the various functions of the system.
THE 1967 CADILLAC AUTOMATIC CLIMATE CONTROL SYSTEM - MORE ISSUES - AND A FINAL FIX? RESTORING THE POWER SERVO VALVE!
The 67 Eldorado lost its complete charge of refrigerant over the winter - so it will have to go back to the shop to see where it is leaking. All components were replaced with new ones last year and so I have no idea where it could have leaked out. A tracer was put in before the last recharge so we should be able to find the leak. I guess that it will be one of the original hoses are a bad fitting.
Another thing that bothered me was that the system basically worked most of the time, but sometimes I had to wait for a long time before the system came on, or I had to switch to “FOG“ or “ICE“ position before the blower would come on in the “Auto“ position. Then sometimes the blower would cut out again if the temperature dial was moved to a colder temperature. Sometimes the temperature would move to full heat regardless off the selected temperature in the 67 Eldorado.
I had the very same problems on my 67 Deville as well - but there also the “Vent“ and “Low“ position did not work at all...
So I started trying to find the issues and finally wanted to fix them. Sounded easy - but it took me 4 full days with long nights in the garage to fix it...
BTW - Cadillactim has an excellent trouble shooting guide for the ACC on his website - its for sale for $ 45.- and I can highly recommend it if you are troubleshooting your 1967 or 1968 Air Condition System.
A great troubleshooting guide for 1967 and 1968 Cadillac´s Automatic Climate Control Systems I got from Gary Sisk - owner of a 1968 Cadillac.
This is a very easy to follow explanation which will save you a lot of time and you do not even need any special tools.
It was written by Lynn Nicholls and can be found on Stampies Cadillac page - here is the direct link to it. I used some excerpts from his document in the explanation below:
I first suspected a vacuum leak to be responsible for most of the erratic behavior of the system. A clear indication was that the system would initially have to be switched to the “ICE“ position to make the blower come on.
Lynn Nicholls writes:
“Sometimes the dash control can be switched to the fog or ice positions to bring the blower motor on and then when it is switched back to auto the blower may stay on and the system seems to work fine until the car is shut off. If the vacuum leak is only moderate there may be enough vacuum to hold the master switch closed once it gets , but not enough to pull it closed in the first place. When the dash control is switched to fog or ice, it assumes the air temperature is cold and that the engine is not yet warmed up, but that the blower is needed immediately for defrosting the windshield. So it supplies vacuum to the master switch through another circuit, bypassing the temperature controlled vacuum switch on the heater core shutoff valve on the right fender well. This source of vacuum is enough to close the master switch.When the dash control is switched back to auto this vacuum source is shut off, but there may be just enough vacuum left from other circuits to hold the switch closed. This routine will work for a while but as the leak gets worse, there won’t be enough vacuum left to hold the master switch closed anymore and the blower will shut off again as soon as the system is switched back to auto.With these symptoms and behavior the problem is most likely the power servo. This is half the brains of the system; the other half is the control panel in the dash. The power servo is controlled by a varying vacuum signal from the transducer. This vacuum supply is a completely separate circuit from that which supplies vacuum to the master switch. High vacuum moves the servo to the maximum heater position, and with low vacuum, a return spring moves it to the maximum AC position. In between these two extremes, it regulates the air temperature door to blend warm air and cool air, and simultaneously regulates the blower speed. It also spins an internal rotary vacuum valve back and forth that makes various connections between the several small vacuum lines on the top. This rotary valve controls the various vacuum motors of the system that operate the AC, heater, and defrost functions. It is this rotary valve that goes bad. l have seen these things visibly warped, and very badly so. It must be caused by engine heat, because there is also one inside the car on the control panel that is moved back and forth by the dash control lever, but that one seldom seems to cause any trouble. A warped rotary valve leaks all kinds of vacuum and the first part of the system to be affected by low vacuum is the master switch; there’s not enough vacuum there to close it and turn on the blower. To verify this is the problem, take some spare vacuum line, some scraps of 1/8 inch pressure line (like for air shocks), and a vacuum T and manually make the connections that the rotary valve should make in the maximum AC position. The connections that the rotary valve makes in various positions are shown in the factory shop manual. Disconnect the black connector with the striped vacuum lines from the power servo. Connect the yellow, red, and purple lines together with a T; also connect the tan and blue lines together and connect the orange and green lines together. If this rotary valve is the one and only culprit the AC will now work beautifully and the blower motor will come on every time, like magic. With the dash control on high the system should be recirculating air and there will be a lot of air noise coming from under the right side of the dash; when the dash control is moved to auto the air door should move to provide fresh air and the system will become much quieter. Of course with these manual connections the system is not fully automatic and the heater won’t work right at all, however this is enough to diagnose the problem.“
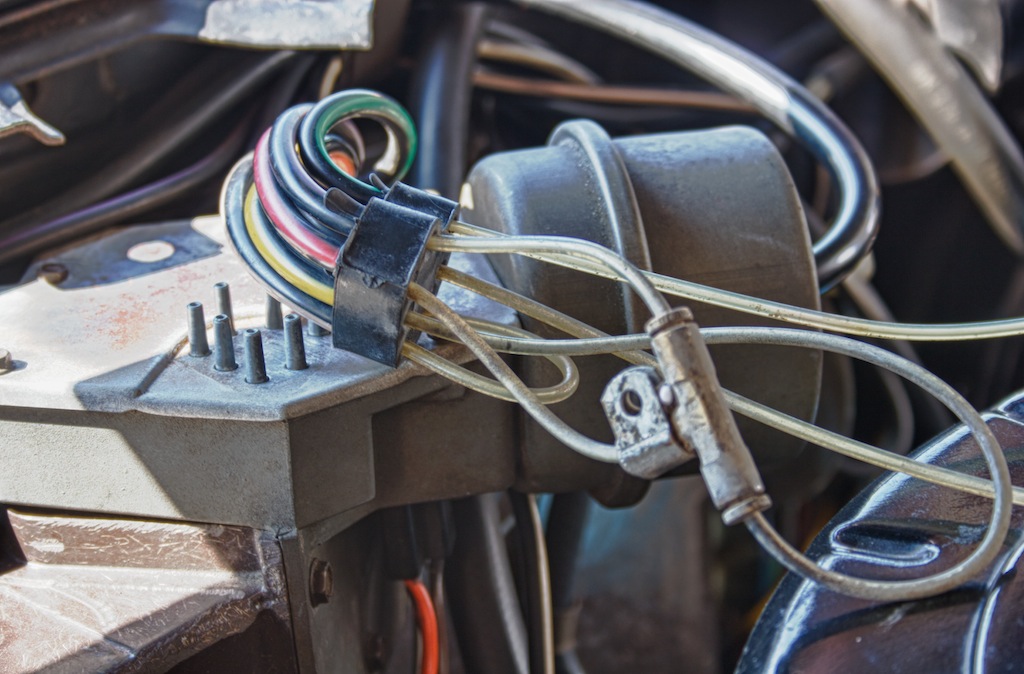
I did this test (see picture below) - and with the power servo bypassed everything worked as it should. This way I knew that the power servo was to blame for some of my problems.
So this rotary valve needed to be repaired...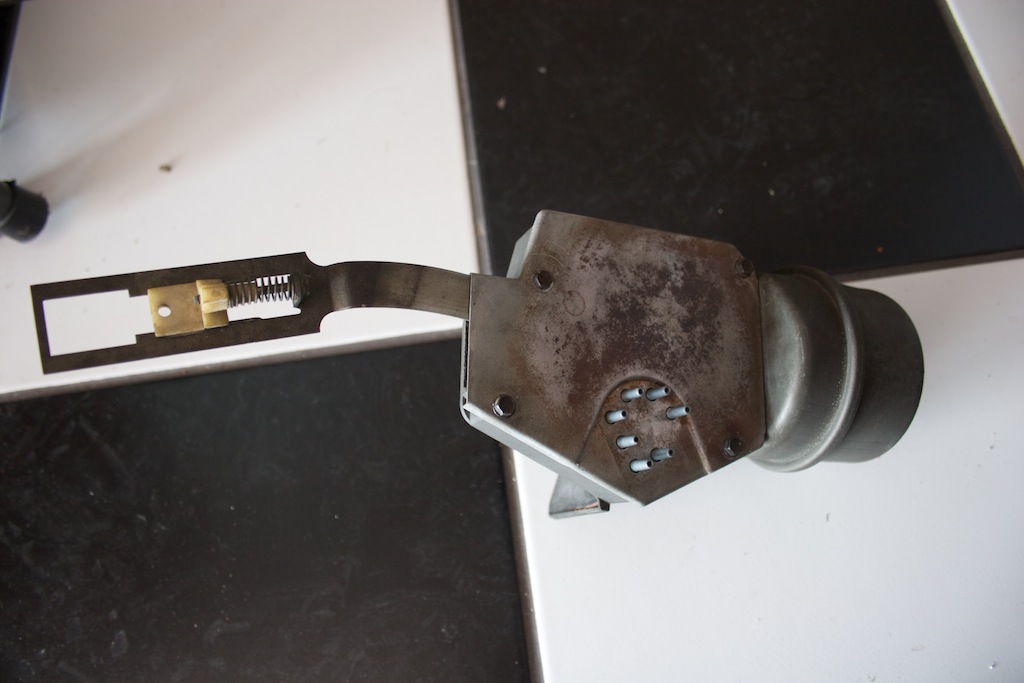
I removed it from the power servo and disassembled everything.
The removed power servo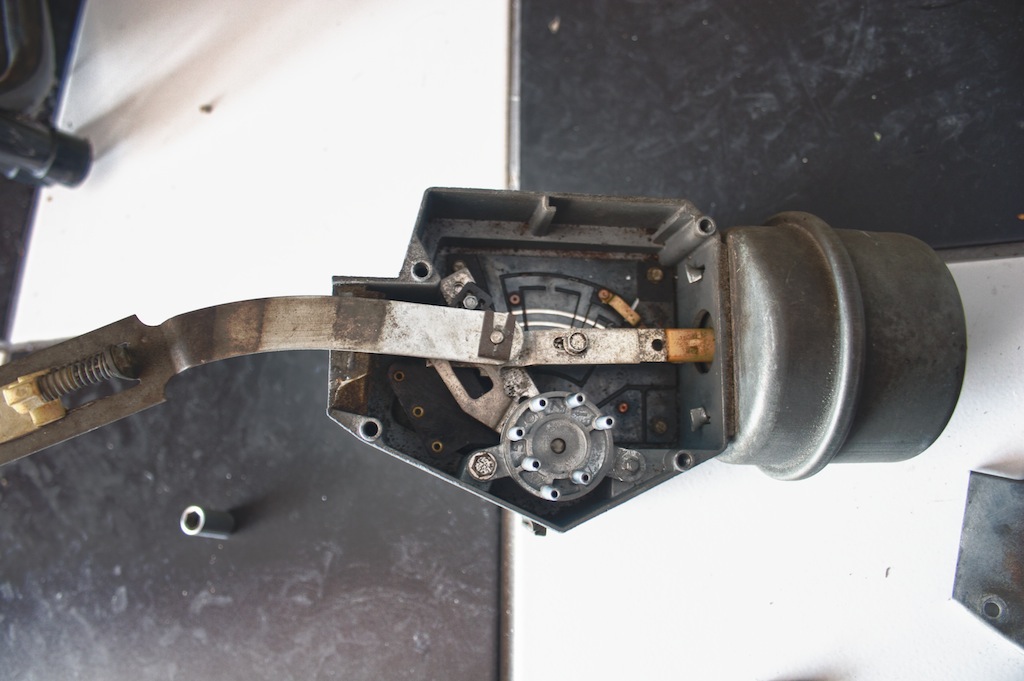
After opening the cover, you can see the rotary valve in the lower center.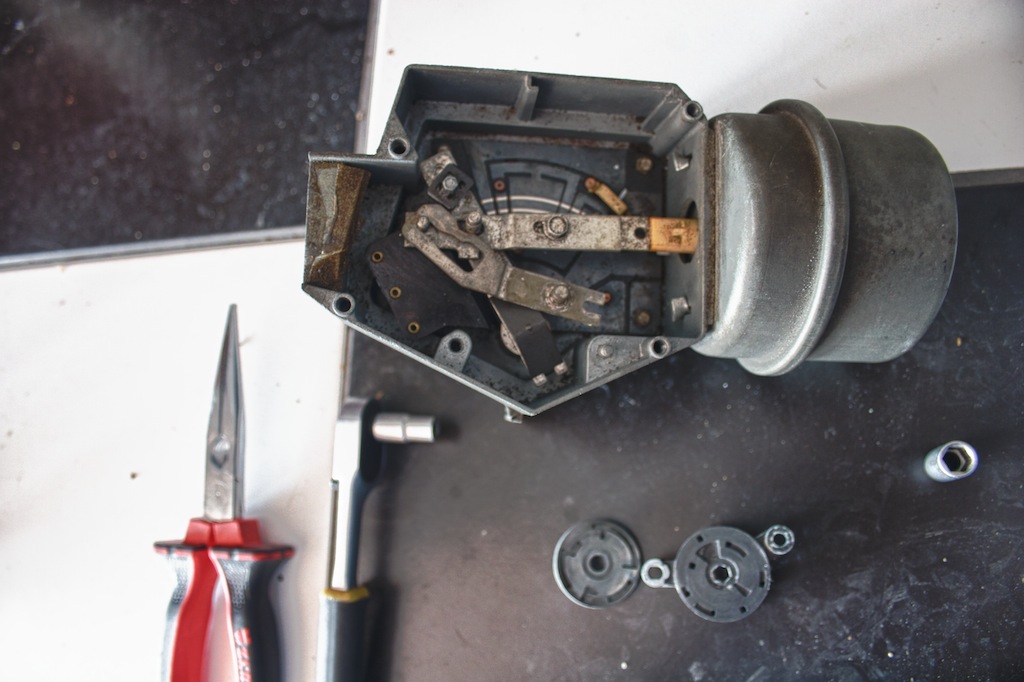
Remove one screw and a clip and the rotary valve comes out.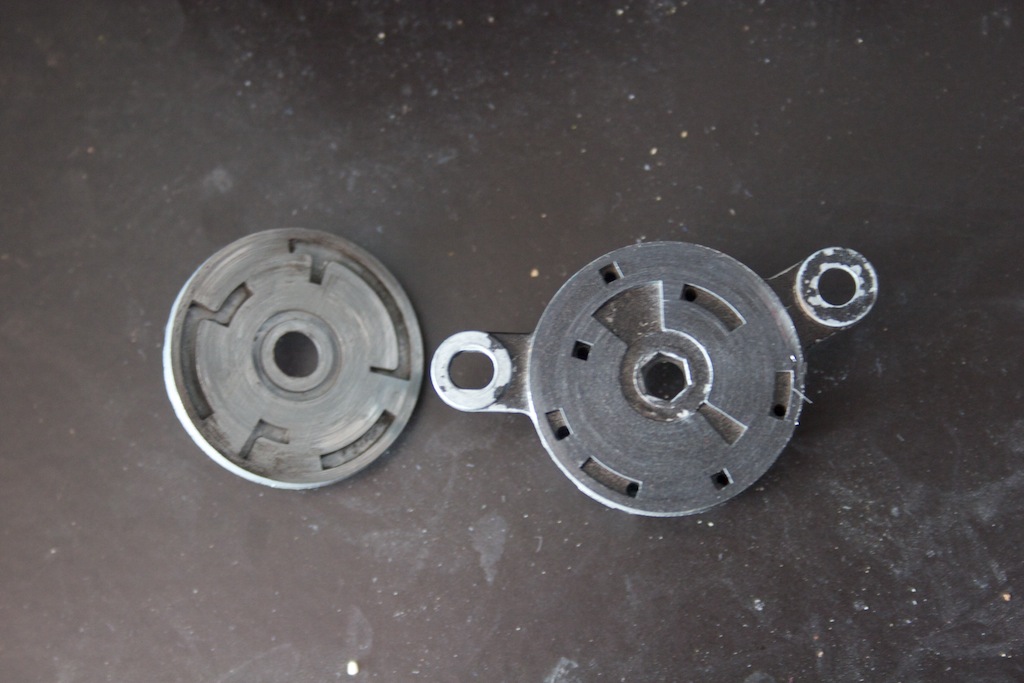
The rotary valve consists of two halves which make the connections - as you can see it was very dirty and rough - and slightly warped.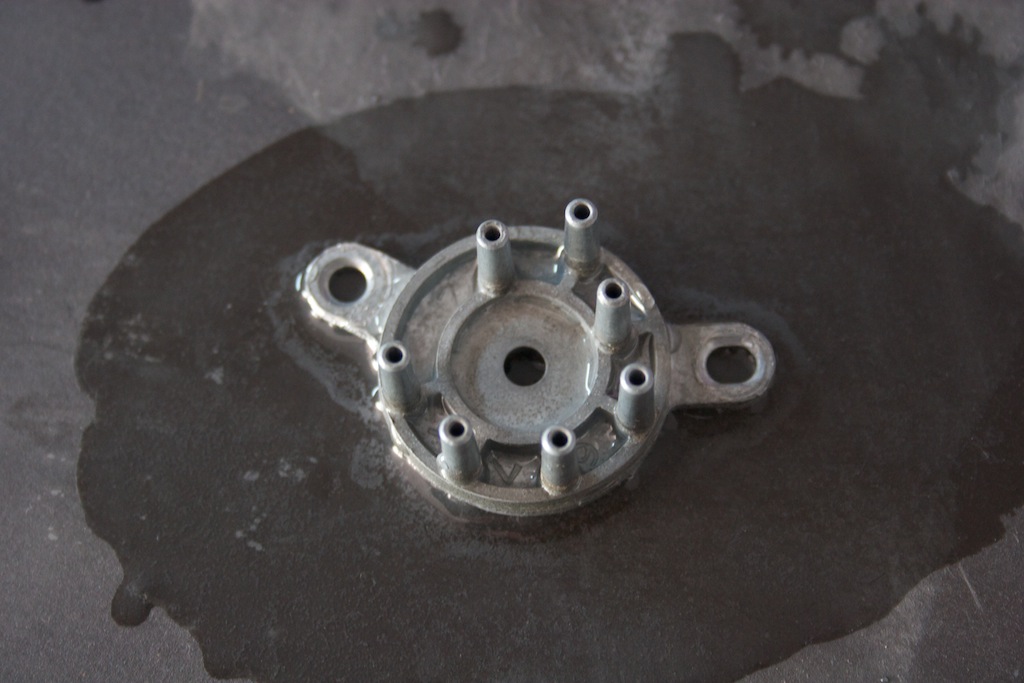
I started to wet sand both halves with 800 grit sandpaper.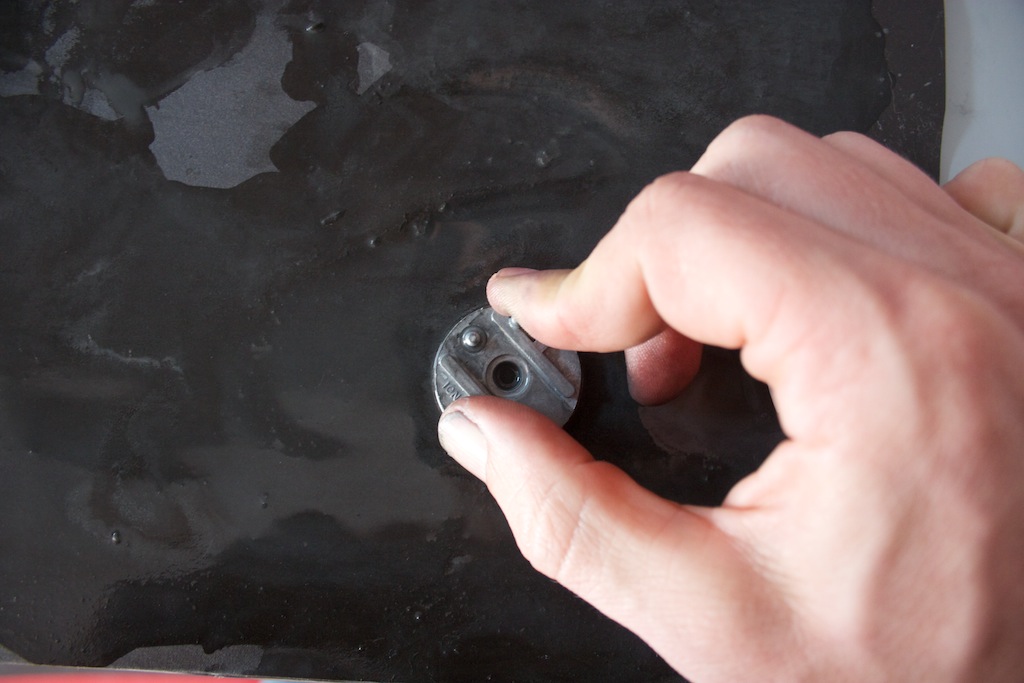
When everything was flat and shiny again I used some 2000 grit sandpaper for a perfect finish.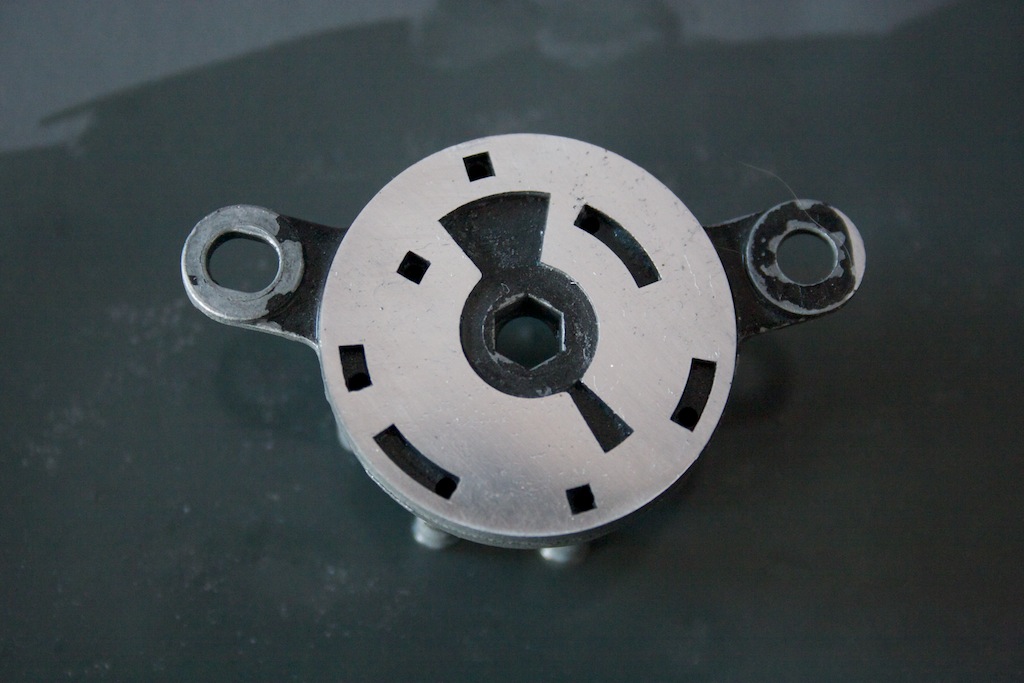
Looks shiny and flat again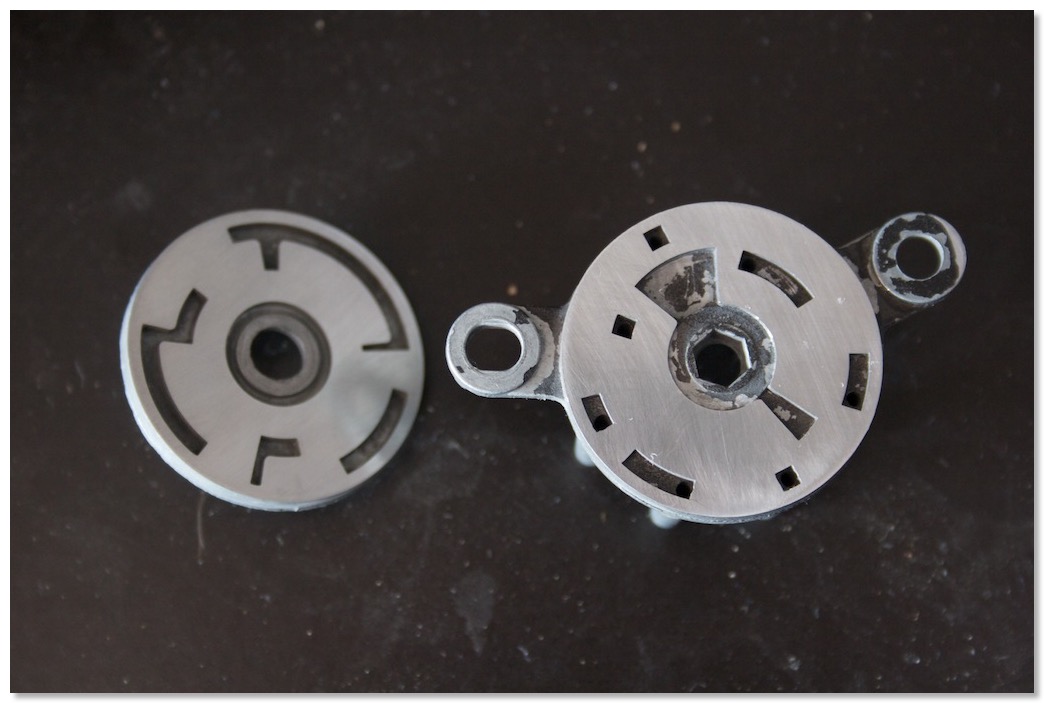
Make sure that none of the ports are clogged - I used compressed air to clean everything.
When you put the two halves together lubricate with WD40 to make sure that when you put them back into the power servo that they are properly held together with the underlying spring.
After I reinstalled them into my cars - almost everything worked as it should. In the 67 Eldorado I still had the problem that in the “AUTO“ position the fan would always be slow - so I knew that the control head in the dash had a problem with the “LOW - AUTO“ switch as well.
In the 67 DeVille the “VENT“ and “LOW“ position still did not work at all...
So I switched the control panels between the two cars and suddenly everything in the 67 Eldorado worked perfectly. I never had such a perfectly working system before. Its like it just left the factory!
In the DeVille I still had no “VENT“ and “LOW“ settings working... So out came the control panels again... (its a pain in the a*** to remove and install them...)
As it turned out the “LOW-AUTO“ switch on one panel was stuck in the “LOW“ position. You can easily remove it and readjust it to work again - sorry I forgot to take pictures. Make sure that all switches on the control head are adjusted properly or they wont work as they should!
So I knew that both control heads were working correctly by installing it back to the 67 Eldorado and the other panel back to the 67 DeVille.
While the 67 Eldorado was perfectly fixed now with everything working as it should - the 67 DeVille was still giving me the problem with a non working “VENT“ position...
I studied the shop manual for hours and could not find what the problem could be. I knew that the power servo was working perfectly now and I knew that the control head was in perfectly working order as well. I verified this once again by switching these parts between the cars once again and everything worked as it should in the Eldorado but not in the DeVille.. I´m really good in switching these parts between my cars now ;-)
I started to look for electric connection problems and finally found out that no electricity was coming out of one of the three power servo connectors, but I did not know why...
After I removed the power servo once again to re-check it again it struck me - one of the pins was slightly bent and the wire connector did not make proper contact. This problem was not visible with the power servo installed in the car. It took me 2 long nights to find this little flaw... I just bent it straight and everything works as it should on both of my 67 Cadillacs. Now I have to recharge the systems and I should have perfectly working AC again... I will also install new dryers and a re-calibrated R134 POA valve before the recharge.
One the one hand the 1967 ACC is very complicated but once you know how it works its pretty easy to fix. The rotary valve in the power servo is pretty easy to refurbish, the dash servo valve is riveted together unfortunately, so its not such an easy fix, but NOS valves are still available at “Classic Auto Air“
*UPDATE 2022* - Check out this article and video as well as I had to repair my switch again in 2022 on my 66 DeVille!
Here is a video about the Master Switch that a gentleman posted on youtube
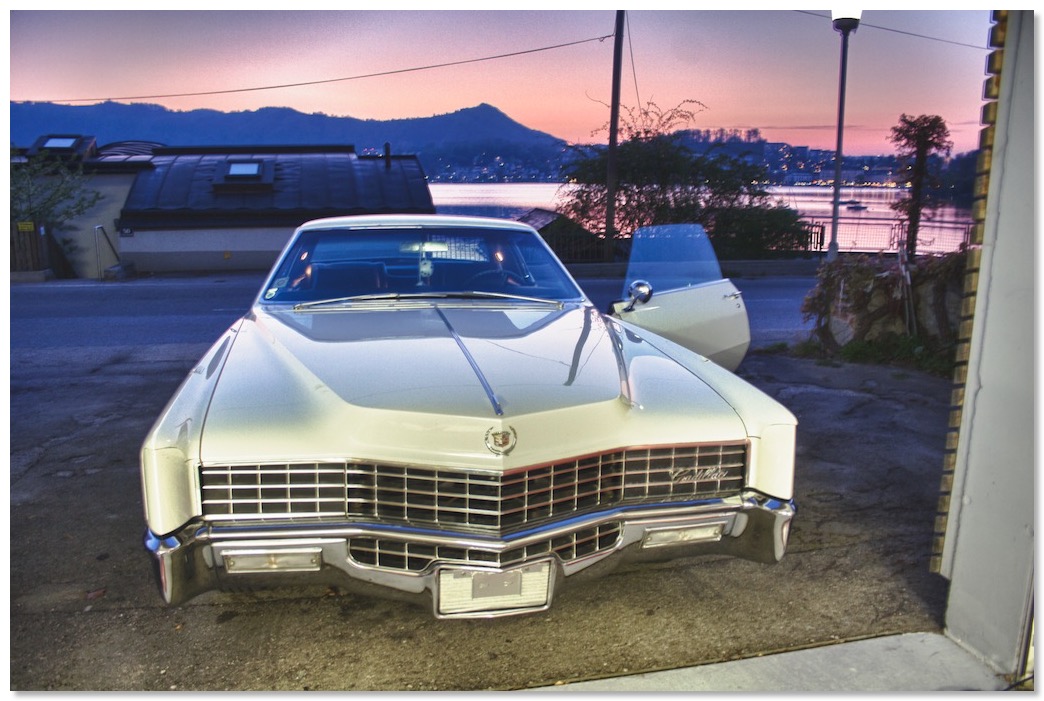
The 67 Eldorado in front of the garage after the AC system was fixed.
1966 Cadillac Coupe deVille (16)
1967 Cadillac DeVille (54)
1967 Cadillac Eldorado (73)
1971 Lincoln Continental Mark III (24)
1974 Cadillac Coupe deVille (46)
1978 Cadillac Eldorado Biarritz (25)
1996 Buick Roadmaster (20)
Cadillac BIG Meet (2)
Car Shows (55)
Cruising (4)
CT6 (1)
For Sale (3)
Garage Stuff (32)
Pacer (1)
Restoration (140)
Various (55)
Video (20)
Website News (31)
- 6 way power seat
- 8-track
- 10 Ohm
- 429
- 1932
- 1957
- 1958
- 1958 Cadillac Eldorado Seville
- 1958 Cadillac Repair Tip
- 1959 Cadillac Eldorado Seville
- 1964
- 1965
- 1966
- 1966 Cadillac Coupe deVille
- 1966 Cadillac Repair Tips
- 1967
- 1967 Cadillac DeVille
- 1967 Cadillac Eldorado Repair Tip
- 1967 Cadillac Repair Tip
- 1967 Eldorado
- 1968
- 1970 Cadillac Eldorado
- 1971
- 1971 Lincoln Continental Mark III
- 1974
- 1974 Cadillac Coupe DeVille
- 1974 Cadillac Repair Tip
- 1976
- 1977
- 1978
- 1978 Cadillac Eldorado Biarritz
- 1978 Cadillac Repair Tip
- 1980 Cadillac Eldorado Biarritz
- 1996
- 2012
- 2014
- 2017
- 2018
- 2019
- 2022
- 2023
- 2025
- 3063206
- 7027235
- 7800483
- 7805675
- 7805676
- 12355706
- 17058531
- 17059968
- 17059969
- 22010515
- 22010661
- A.I.R
- A6
- AC
- AC Compressor
- AC Electrical Diagram
- ACC
- Accelerator Pump
- Accelorator pump
- Accident
- Actuators
- Adriatic Blue Metallic
- Ads
- Aftermovie
- Air Pump
- Aircondition
- AIRPUMP
- ALC
- Alternator
- AM
- AM-Transmitter
- Antenna
- Anti Rattle Clips
- Antique Gold
- Arizona Vintage Parts
- Arrival
- Article
- ASC
- Ash Tray removal
- ATC
- Atlantis Blue Firemist
- Austria
- Austro Classic
- Autolite SP-459
- Automatic Seat Back Release
- Award
- Banner
- Barn Find
- Battery
- Battery Tray
- Beach Race
- Bearing
- Bendix
- Biarritz
- Bigfoot
- Bill Hirsch Engine Enamel
- Bleeder Screws
- Bleeding
- Blower
- Bodywork
- Bolts
- Book
- Borg
- Brake Booster
- Brake Fluid
- Brake Gray
- Brakes
- Broken Bolt
- Brougham
- Bucket seats
- Buick
- Bumper End
- Bushings
- Cadillac
- Cadillac BIG Meet
- Cadillac BIG Meet
- Cadillac birthday cake
- Cadillac Blue
- Cadillac Color Selections Dealer Book
- Cadillac Coupe deVille
- Cadillac Dealer
- CADILLAC GRAND EUROPEAN
- Cadillac Meeting
- Cadillac Mini Meeting
- Camaro RS
- Caorle
- Car Show
- Carburetor
- Card
- Carpet
- Carter AFB
- Cavalry Twill Vinyl
- CB
- CBM
- CCCD
- Choke
- Christmas
- Citizens Band
- Classic Cadillac Club Deutschland
- Clay Towel
- Cleaning
- Clock
- Clockwork
- Clutch
- Clutch Coil
- Collector
- Colonial Yellow
- Color Coded Springs
- Commercial
- Compound
- Compressor
- Condenser
- Continental Mark III
- Control Head
- Conversion
- Convertible top
- Coolant
- Corona
- Cowl
- Cruise Control
- Cruising
- CT6
- CV Boots
- CV JOINTS
- D6230
- Dash Trim
- Decal Removal
- Decals
- Decoration
- Dehumidifier
- Delco Moraine
- Der Standard
- detailing
- Deville
- Diagnosis Chart
- Diagram
- Dial
- Digital Rotary Drum Clock
- Diner
- Disc Brakes
- Distributor
- Diverter Valve
- Door Jamb Switch
- Door Rubber Conduit
- Dornbirn
- Dot3
- Drive Shaft
- Driving tour
- Drum brakes
- Dry Ice Blasting
- Dry Ice Cleaning
- DVD
- Eastwood
- Eldorado
- Electric Choke Thermostat
- Electrical schematic
- Elvis
- Engine Bay
- Ep
- Epoxy floor
- Europe
- Evaporator
- Exide
- Factory Markings
- Fender Skirt
- Floor
- Flushing
- Flyer
- Foam
- For Sale
- Front AXLE
- Front brakes
- Front bumper filler
- Front Floor
- Front wheel bearing
- Fuel Filter
- Fuel Pump
- Fuel Sending Unit
- Fusible Link
- Garage
- Garage Cabinets
- Gasket
- GE
- Gear indicator
- General Time
- Glove box light
- Grand European
- H4
- Haus of Hot Rod
- Headlight Actuator
- Headlight doors
- Headlights
- Heater Core
- Heater Hose
- Heater Valve
- High Idle
- History
- Holley
- Honest John
- Hood
- Hood Emblem
- Hood Ornament
- Hose Clamp
- Hot Choke
- Hot Water Valve
- HotRod
- How to
- Hödlmayr
- Ignition Diagram
- Illuminated Entry
- John D‘Agostino
- John Foust
- Klassikwelt Bodensee
- Kremsmünster
- LaSalle
- Leather seats
- Light Switch
- Limited
- Lincoln
- Lincoln Mark III Repair Tip
- Low Mileage
- Magazine
- Marilyn Monroe
- Mark III
- Master Cylinder
- Master Switch
- Master Vacuum Switch
- Media Blasting
- Meeting
- Meguiras
- MK II
- Mobile
- Model
- Moldings
- Mom
- Mopar Nationals
- Mostkost Kustom
- Movie
- Munich
- Neon
- NOS
- Oberösterreicher des Tages
- oilchange
- ORF
- Overspray
- Pacer
- Paint
- Paint correction
- Paintjob
- Part Number
- Parts
- Patch Panel
- Perfect Circle
- Permabag
- Persian Lime
- Photo shooting
- Photoshooting
- Pictures
- PinUp
- POA Valve
- Power Antenna
- Power Servo
- Power Vent Windows
- Power Window
- Printed Circuit Board
- Programmer
- Pulley
- Quadrajet
- Quarter Panel
- Quartz Conversion
- R134
- Radiator
- Radio
- Rattle
- Rear brakes
- Rebuild
- Recalibrate
- RediRad
- Reed Switch
- Relais
- Relaunch
- Removing Overspray
- Repaint
- Repair
- Restoration
- RIP
- Roadhouse
- Roadmaster
- Rochester
- Rocker Arm Cover
- Rocker Panel Extension Clips
- Rostio
- Rotary Valve
- Rotterdam
- Rupes
- Rust removal
- Rust removal gel
- Sabre Wheels
- Sand Blasting
- Sandblasting
- Screed
- Season Greetings
- Seasons Greetings
- Seat Back Locks
- Seat Padding
- Seat Transmission
- See through ornament
- Self adjusters
- Self Starter
- Sepp's Garage
- Seville
- Sheetmetal
- Shocks
- shop manual
- short
- Sign
- Solenoid
- Spark Plug Wire Routing
- Speakers
- Special Award
- Speed Bleeder Screws
- Splash Guard
- Starter Diagram
- Starter Motor
- Steering Column
- Storage
- suction throttling valve
- sunroof
- suspension
- Swirl Mark removal
- Switzerland
- T3
- Taillight Cover
- Texan´s Choice Award
- Thermostat
- Tilt and Telescope
- Time capsule
- Tomsclub
- Torque Specifications
- Tower Hose Clamp
- Towtruck
- Trailer
- Transducer
- Transmission
- transmission control selector
- transmission control selector indicator light
- transmission shift indicator
- Treadle Vac
- Treffen
- Tri-Band
- Troubleshooting
- Trunk Cardboard Kit
- Trunk lid
- Trunk lining
- Trunk to bumper cover
- Turn Signal Switch
- TV
- Typisierung
- Ultimate Garage
- Underbody
- Undercarriage
- Undercoating
- Undercoating Removal
- Vacuum Booster
- Vacuum diagram
- Vacuum hoses
- Vacuum Master Switch
- Vacuum Schematic
- Vacuum Valve
- Valve Cover
- Various
- Vent Window Switch
- Vibration
- Vibrator
- Vicodec roof
- Video
- Vinegar
- Vinyl Roof
- Visitor
- Washer Fluid Float
- Washer Fluid Low Level Indicator
- Water Pump
- Wax
- Weatherstripping
- Website News
- Westclox
- Wheel Bearings
- Wheel Housing
- Wiesbaden
- Windlace
- Winter
- Wiring
- Wiring Diagram
- Wonderbar
- Workbench
- Zurzach
 GERALD´S CADILLACS - NEWS