REMOVING AND REPLACING THE 1974 CADILLAC HEATER CORE
There could have been 3 possible scenarios why it was disconnected:
- The heater core is leaking
- The heater core is blocked
- The heat could not be turned off in the heating system due to a problem in the ATC
Most probably the core is leaking on such old cars. So I had ordered a new core a while ago, but I never really wanted to tackle this job as it needs quite a bit of effort to get it done and it is not a very funny job. It's not that technically challenging but very tedious. I finally bit the bullet and decided to finally do it.
You can normally detect a defective heater core by fog build up inside the car and by the smell of coolant.
I studied the shop manual and started to tear the dash apart to get access to the heater box which houses the heater core.
I found out that the shop manual lists a lot of necessary work and does not show all the screws that you have to remove to get the box out. Some of the screws are very well hidden and finding them was the most frustrating part of this job.
Here is how to remove the heater core: (text in black is from the shop manual - my remarks are in green)
First you have to remove the Instrument Panel Pad
Removal of Instrument Panel Pad
- Disconnect negative battery cable.
- Remove three climate control outlet grilles - right, left and right center (see picture below on how it is done with a special tool - I just did it with two flat screwdrivers)
- Working through outlet openings, remove 3 fasteners securing pad to instrument panel support.
- Remove screws securing pad to instrument panel horizontal support.
- Pull pad outward and disconnect electrical connector from windshield wiper switch.
- Remove pad.
Heater Case Removal
- Drain radiator. (not necessary if you just clamp the hoses off, but flushing the system never can hurt)
- Remove hoses from heater core nipples and plug nipples to prevent spilling coolant remaining in core. (Thats indeed extremely important as you have to move the heater case around and it would definitely spill any remains of coolant on your carpet. Also make sure that there are no traces of leaked coolant underneath the carpet from the bad core.)
- Remove instrument panel pad. (As described in the chapter above.)
- Remove center A/C outlet support and connector from position between cowl and horizontal support, Fig. 1-36. (Scroll down to see the illustration, You basically only have to unhook the rubber part of the outlet and push it downwards.)
- Remove left A/C outlet hose from A/C distributor. (There are some steel clips inside the tube where it is mounted to the plastic distributor. You have to reach in and unclip them to be able to remove the hose without using a lot of force and maybe damaging it. See the picture where I put my arm into the opening below.)
- Remove center support and associated braces as shown in Fig. 1-36. ( I can´t see any reason why this should be done - I removed only one of the braces, and it was completely unnecessary. You only have to remove the round bent brace on the bottom of the heater case as its in the way to get it out - see the picture where I am unscrewing it below.)
- Remove two screws securing A/C distributor to heater case and remove distributor, Fig. 1-36. (If you did not remove the braces mentioned above like I did, you can´t get this part out. I just put it to the side where the glove box normally is, which you will also have to remove anyways - see later.)
- Remove one screw securing defroster nozzle and remove nozzle. (You have to remove the screw - but leave the nozzle in place. There is no whatsoever reason to take it out. And its also impossible to get out if you did not remove ALL the braces and brackets.)
- Remove glove compartment liner. (Its self explanatory - just remove all the philips screws you see inside.)
- Remove vacuum and electrical connectors from programmer. (You can do this now through the glove box opening.)
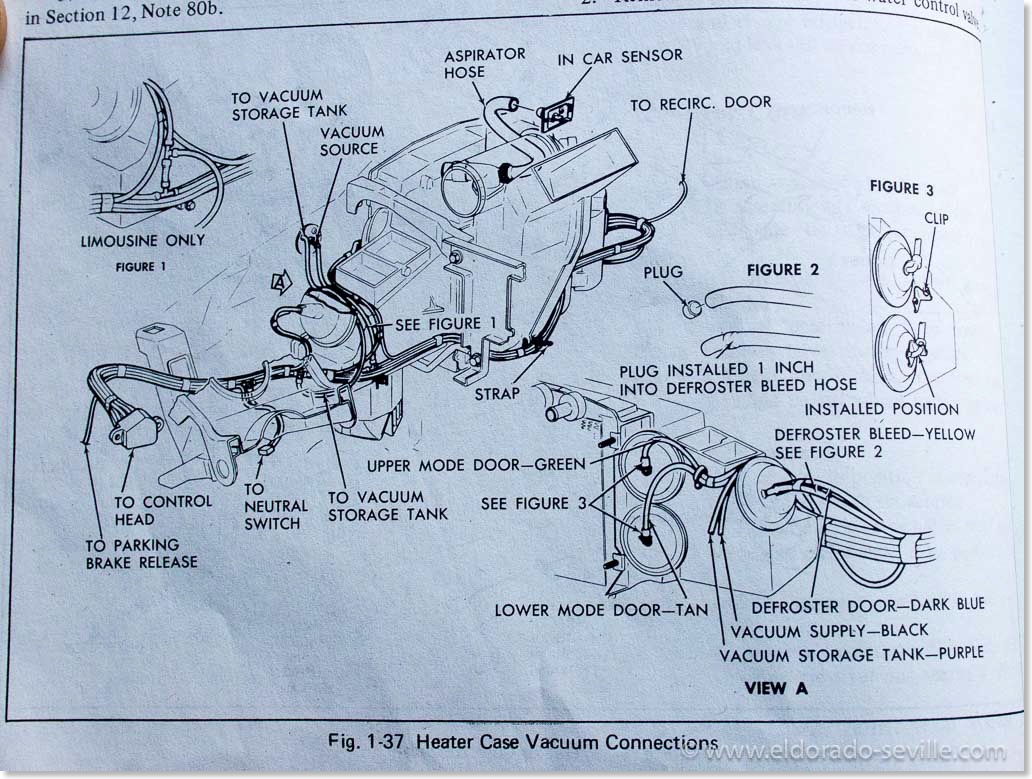
- Disconnect vacuum hose from recirc door actuator (Orange - near the right door kick panel.) , defroster door actuator (You can see it on the left side of the heater box with a blue and a yellow hose going into it.), mode door actuator (There is no way you can remove these hoses now, as they are on the back of the heater case. The upper mode door is green and the lower one is tan. You can really only remove them once the entire box comes out.) and position vacuum harness out of way, Fig. 1-37.
- Disconnect aspirator hose from in car sensor. (The thick black hose on top of the heater box)
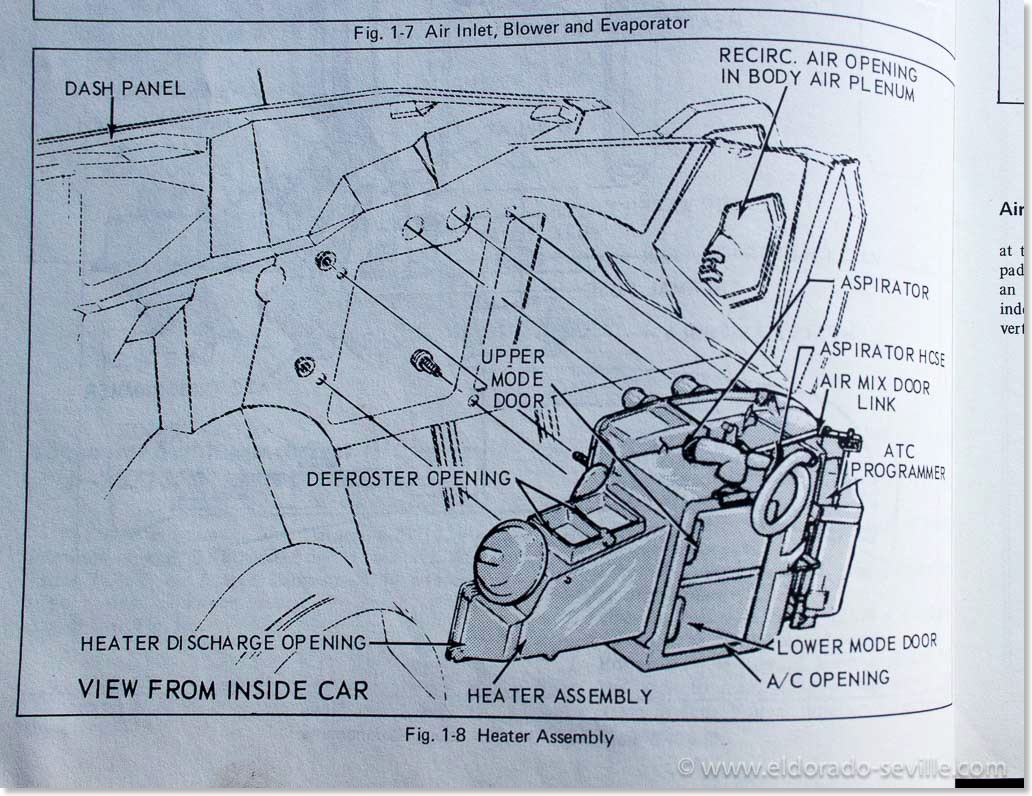
- Remove three nuts and one screw securing heater case to cowl on engine side of cowl, Fig. 1-8. (It was the most tricky part for me to find these screws. See my picture below where I have marked the location of the screws as seen from the engine bay.)
- Remove heater case from position under instrument panel .(See picture how you have to position it to get it out - remove the two vacuum hoses mentioned before on the back now. Be careful - they are attached with metal clips)
- Replace heater core. (Only 2 screws - self explanatory - also re-use the rubber seals from your old core around the water nipples.)
You can then put everything back together which should be much faster, but before you could also remove the clock, which is very easily accessible now and clean and lubricate it (the shop manual recommends to do this every 2 years). You also have access to all the dash lights, tell tale and warning lights and to the speakers (which are shot on my car due to a defect in the amplifier in my radio) while everything is apart. While I had the heater box out of the car I also cleaned the inside of the programmer and re-lubricated it with white lithium grease. I used electronic cleaner to clean the electric contacts inside the programmer while it was open, as most probably the contacts will have some oxidation on your car as well. While the heater box is out you can also lubricate the various doors and clean out all the dust which has collected inside the box over the last decades.
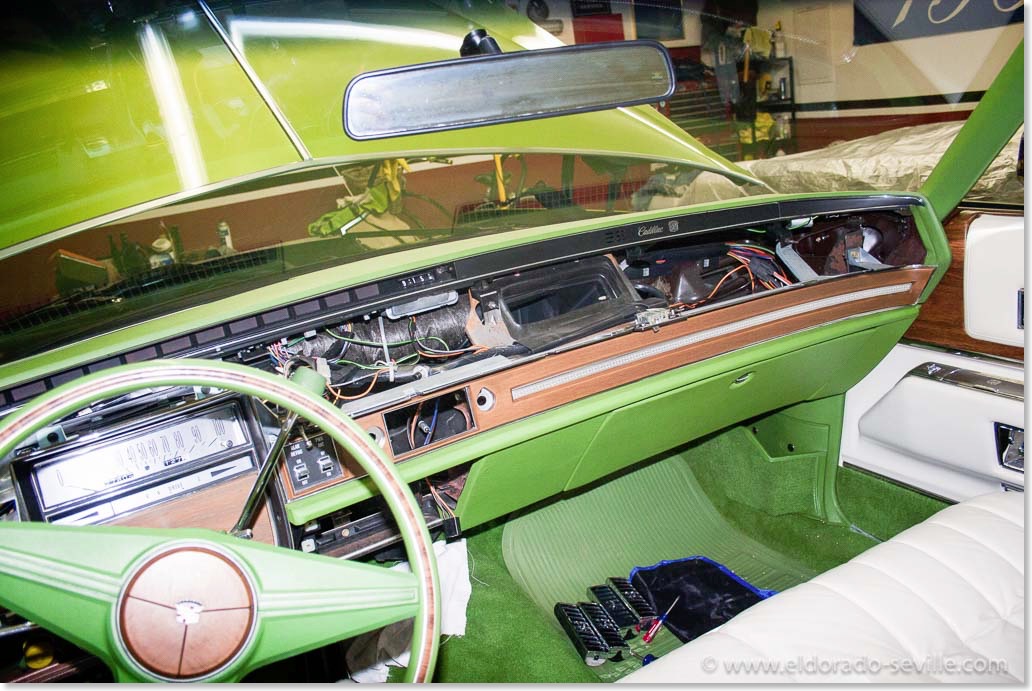
The dash removed. The radio is also out for repair.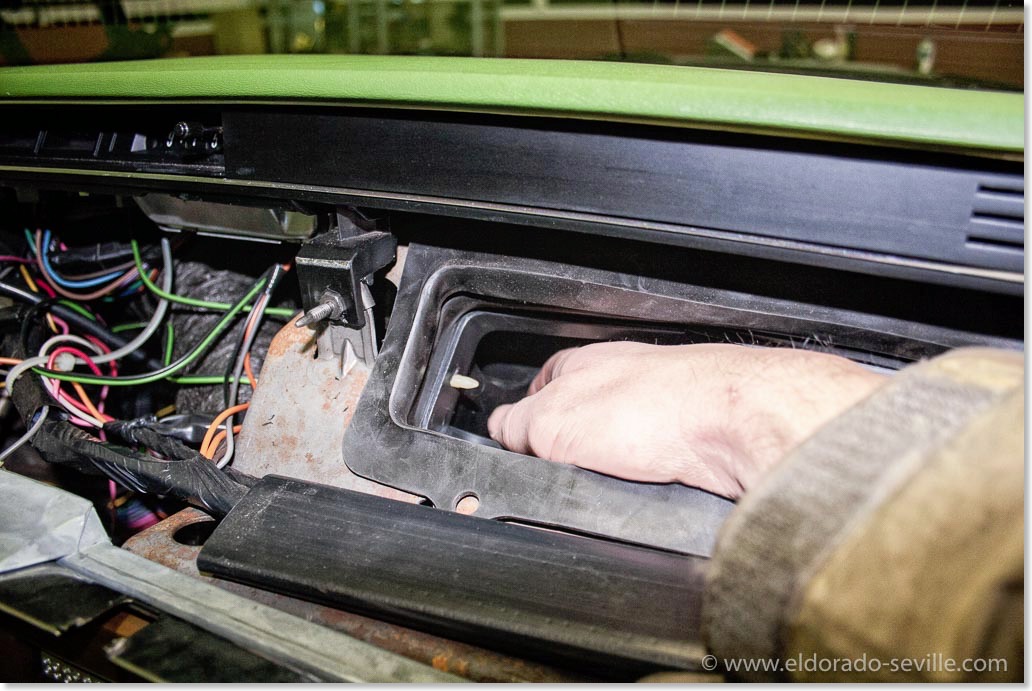
There are metal clips inside holding the left A/C hose in place. You have to reach in and unclip them.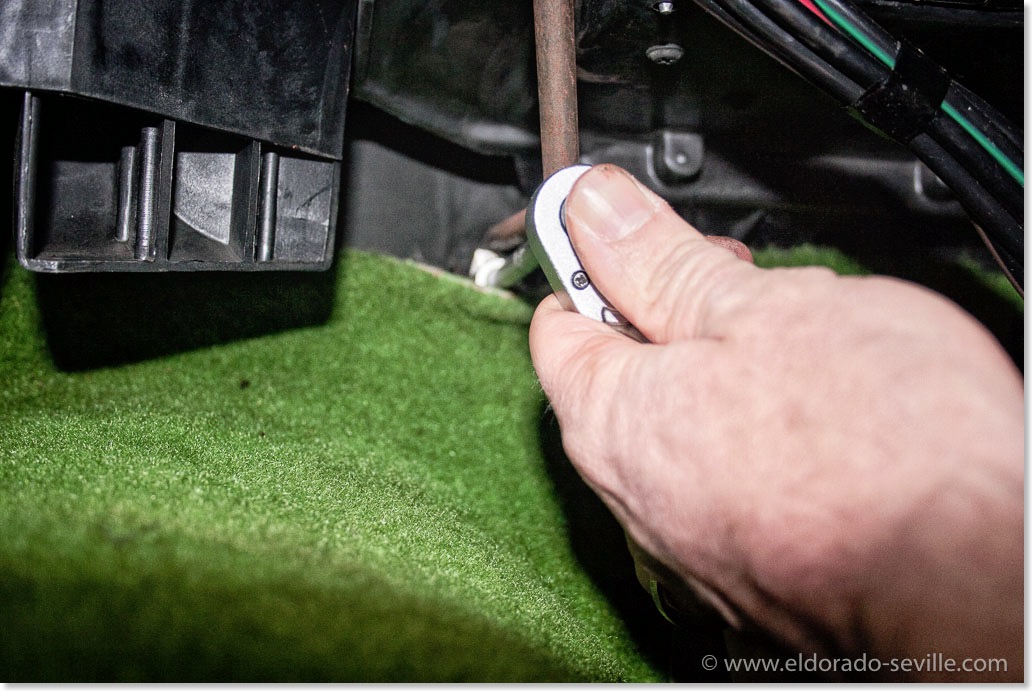
You will have to remove this support bracket.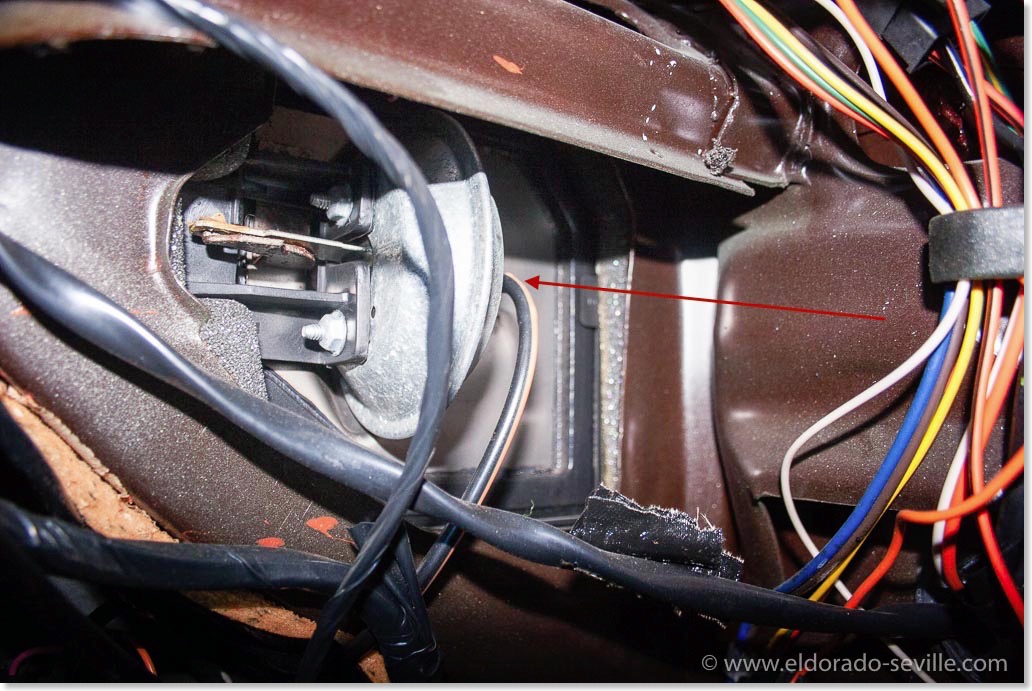
Recirculation door - un-plug the orange vacuum hose.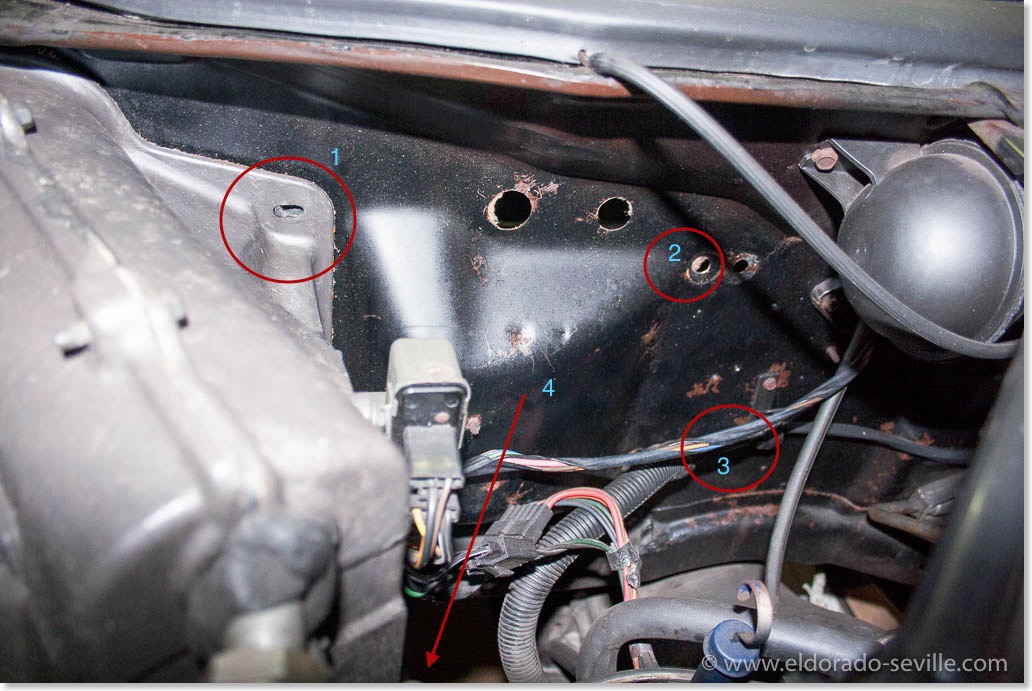
You have to remove these 4 screws/nuts on the firewall. You can access number 4 from underneath the car only. Number 3 is hidden underneath the cables.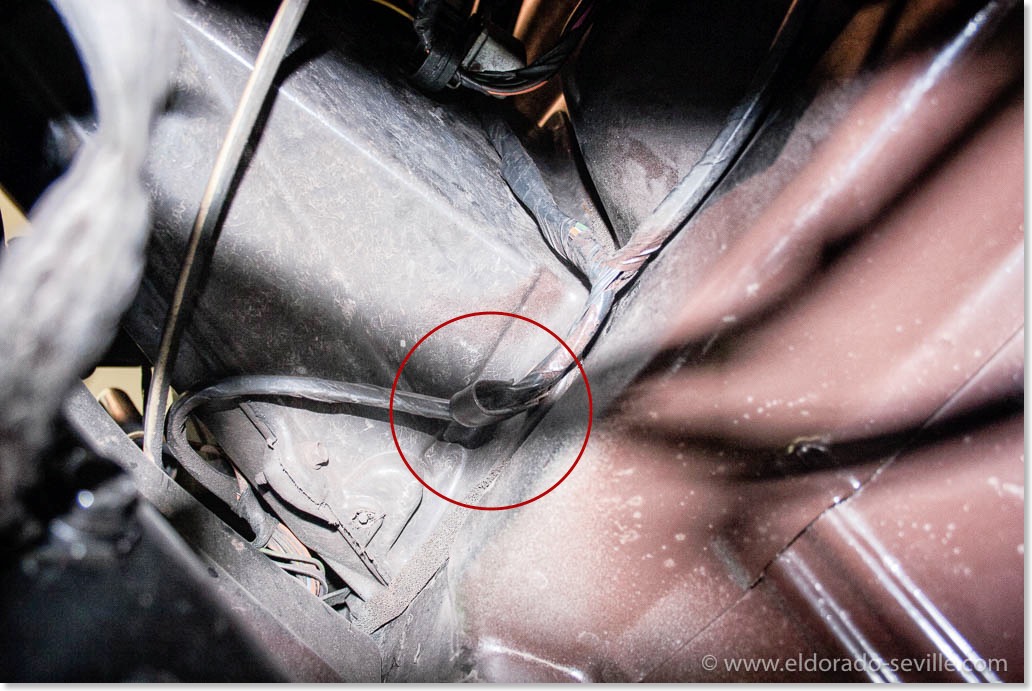
The number 4 screw on the cowl is holding a cable clip in place and the other end is the right bottom screw of the heater box - you need a second person with a 7/8 wrench to release it from the side under the car while you unscrew it from inside the car with a 3/8.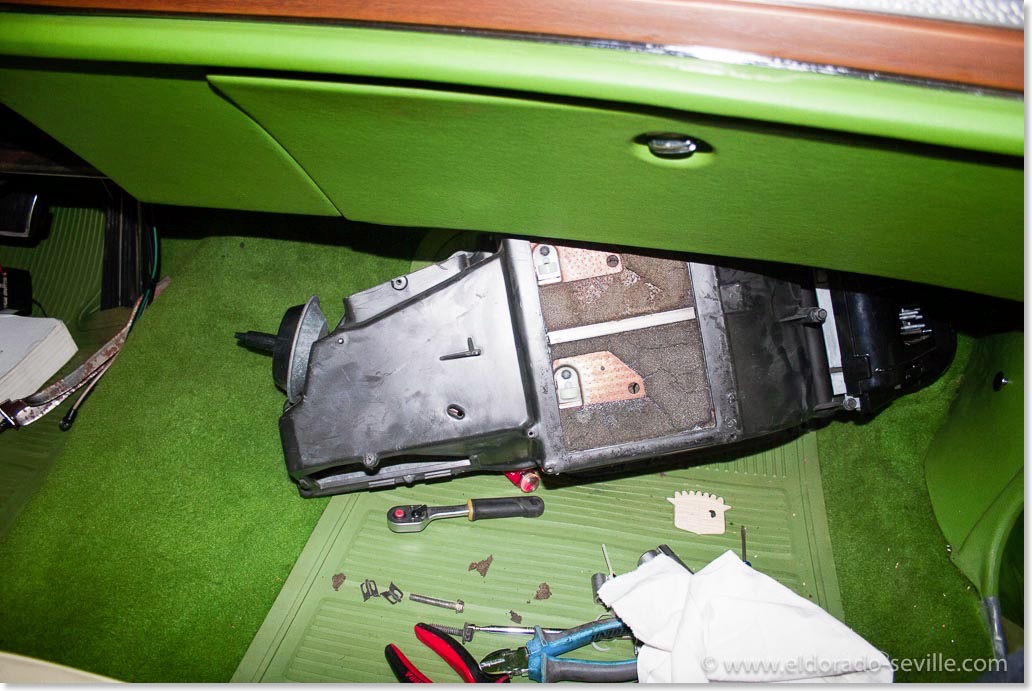
Once all the screws are off you can carefully remove the box. You have to slip it to the passenger side to get it out.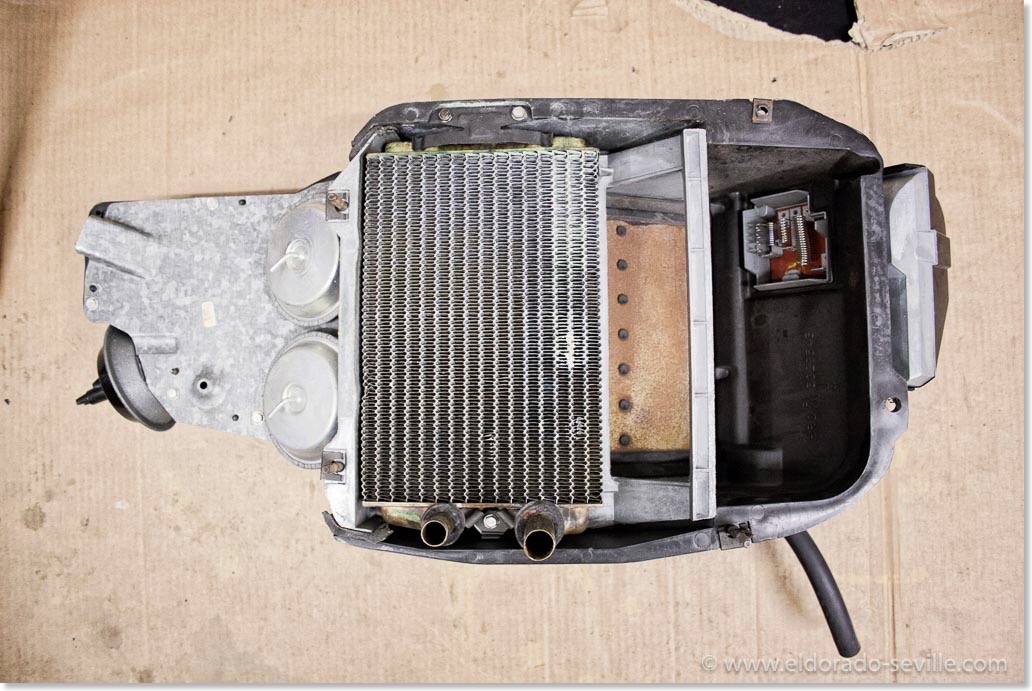
The old core in the heater case.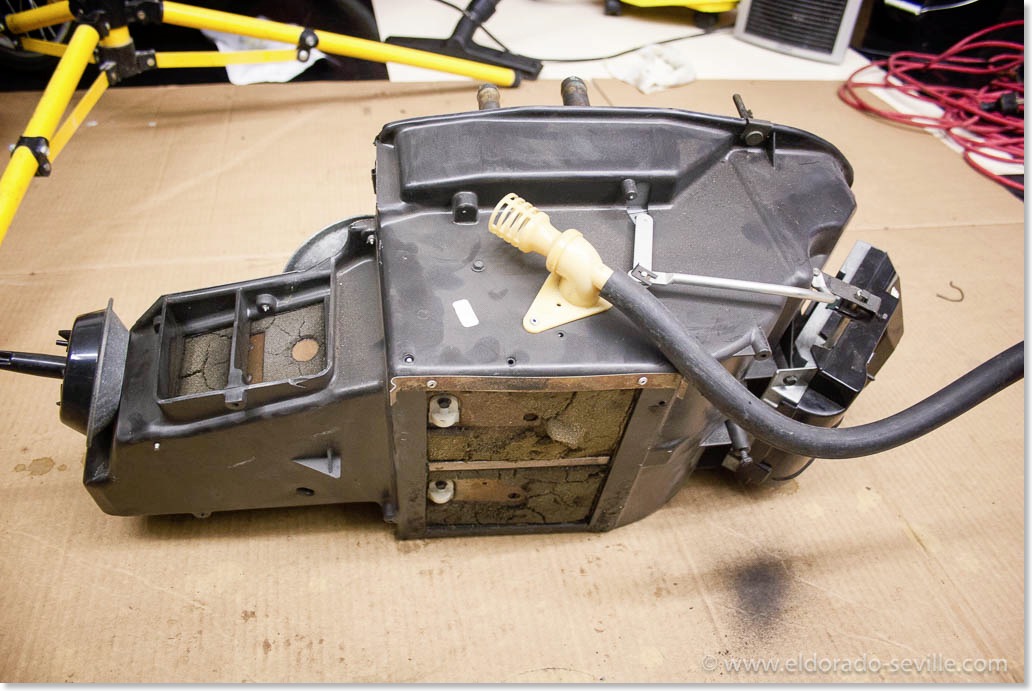
The 1974 Cadillac heater case and heater core. You can see the two mode doors here and on the right is the recirculation door. The thick hose on top is the aspirator hose going to the temperature sensor in the dash.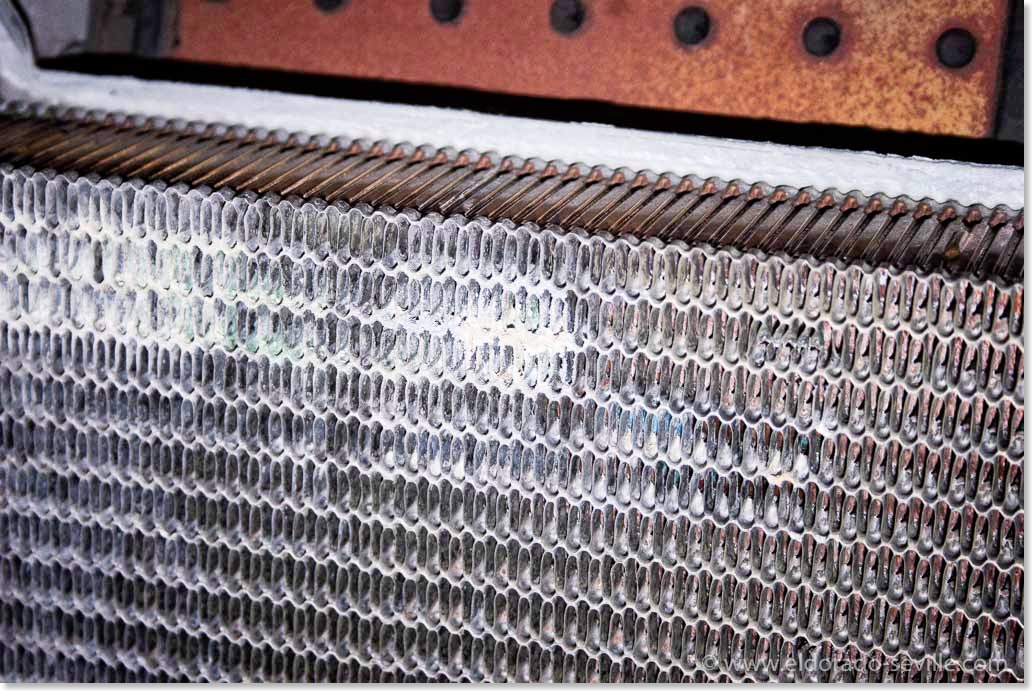
This is where the old core had developed a leak.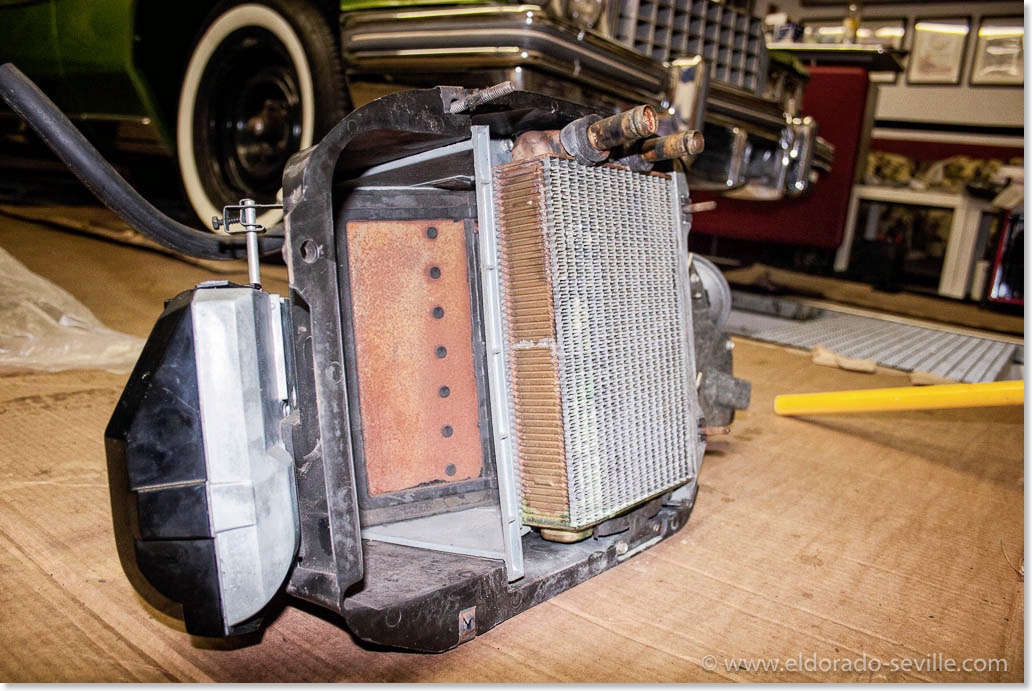
The old core still in place. Note the rubber seals on the tubes of the heater core. You have to move them over to the new core.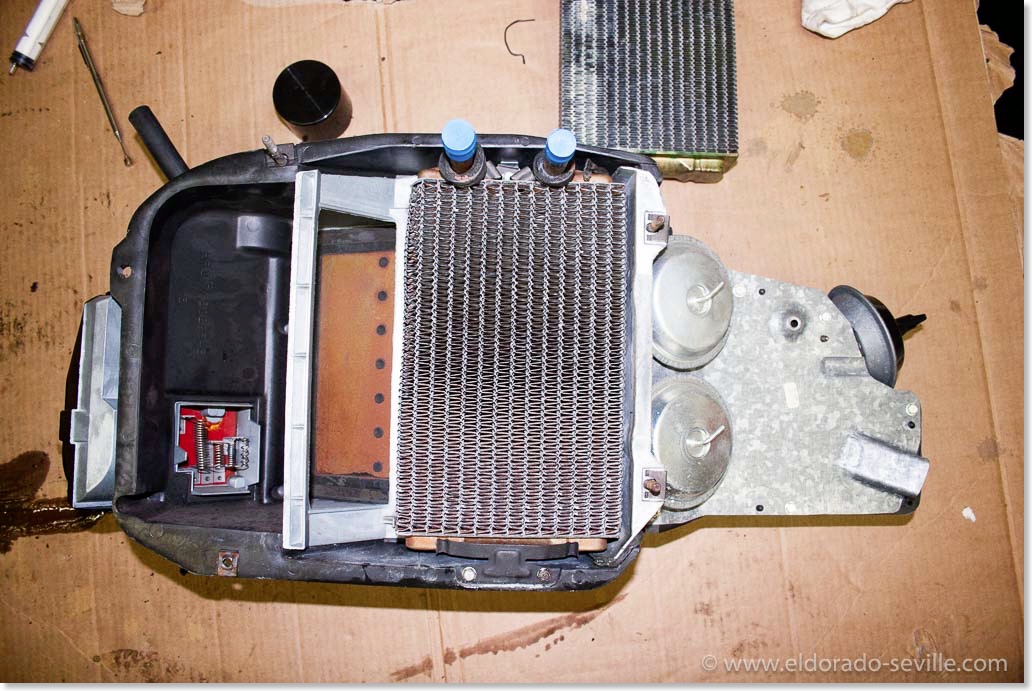
The new heater core in place. I got mine from rockauto.com. Its very similar - the only difference is how the two tubes are braced to the core, but that is no problem at all.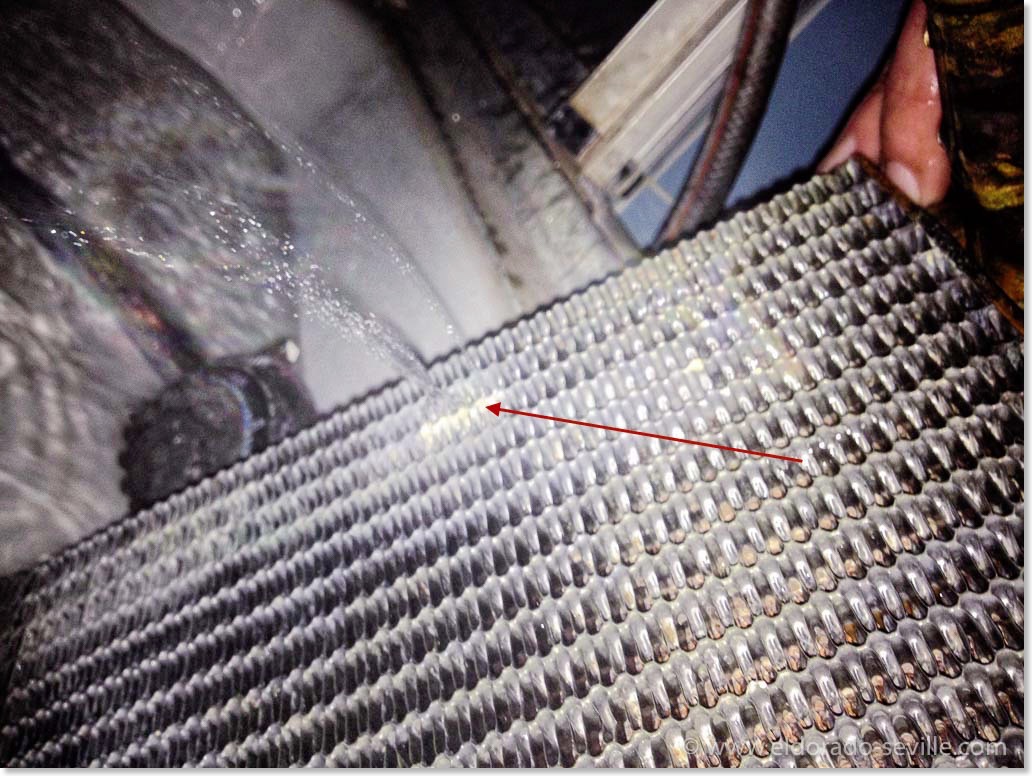
Out of curiosity I checked where the old core was leaking, and the leak was pretty obvious as you can see.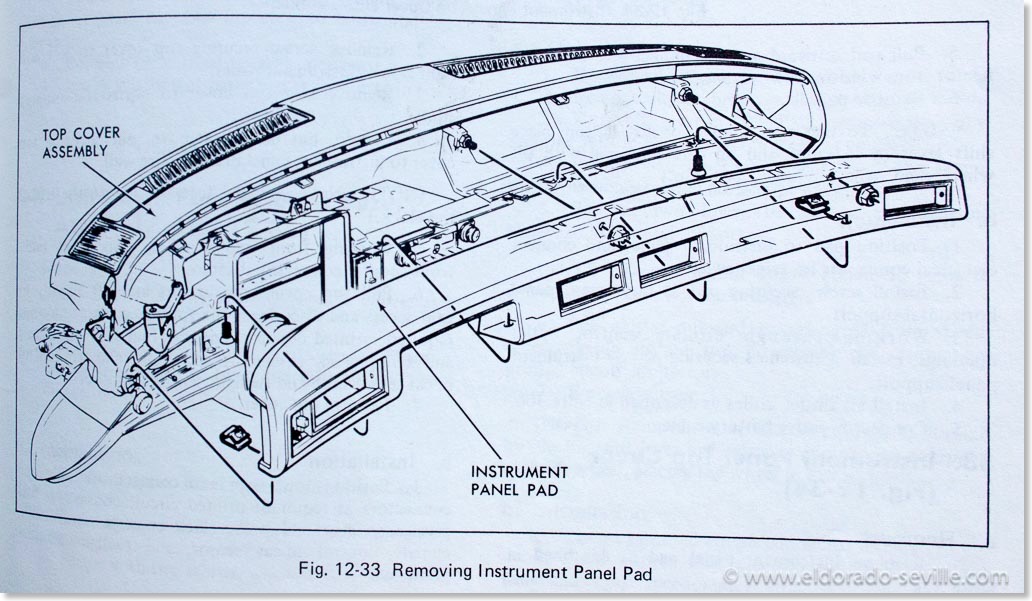
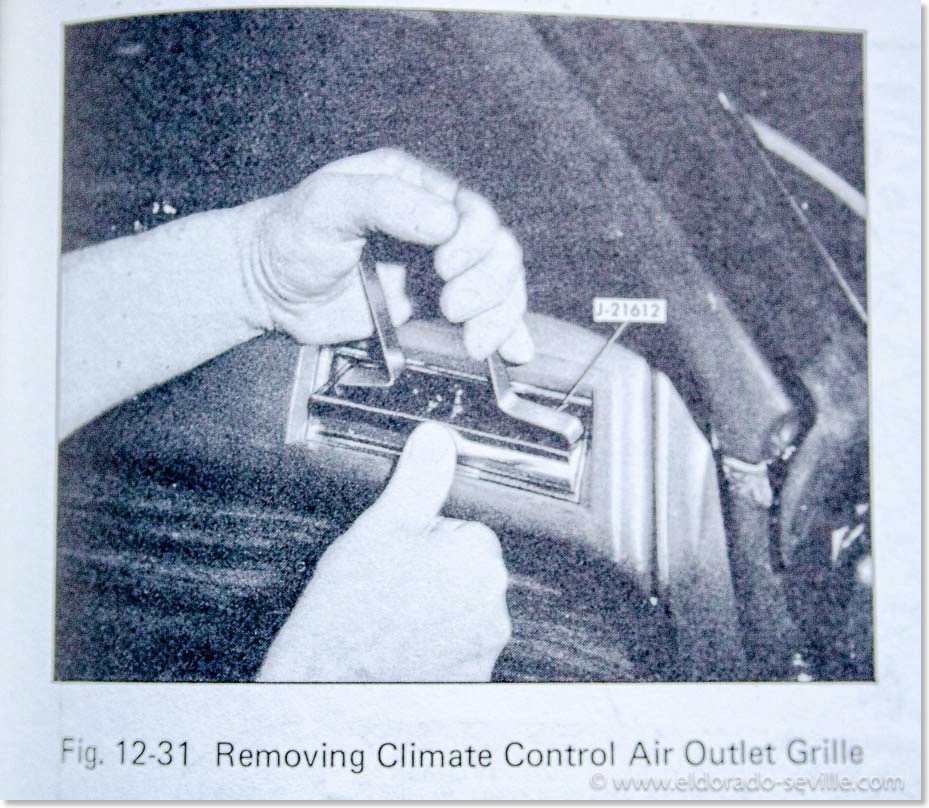
I just used two flat screwdrivers instead of this special tool.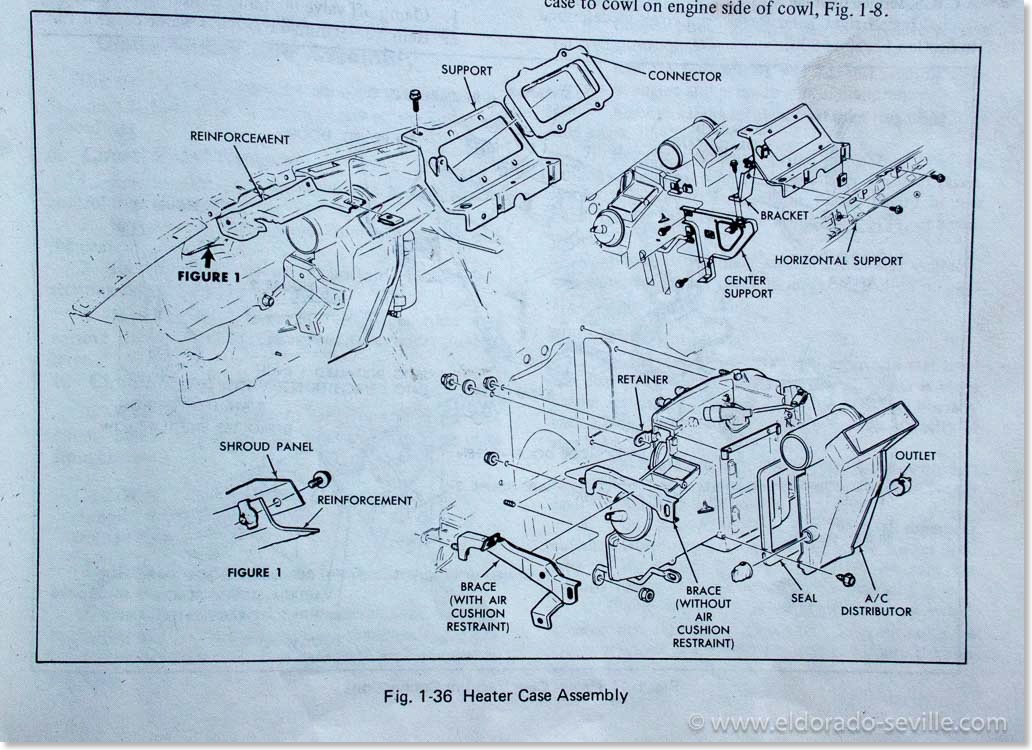
Additional information for Eldorado owners regarding the heater core:
Dan Mercer reached out to me and wrote the following: (Thanks Dan for letting us know!)
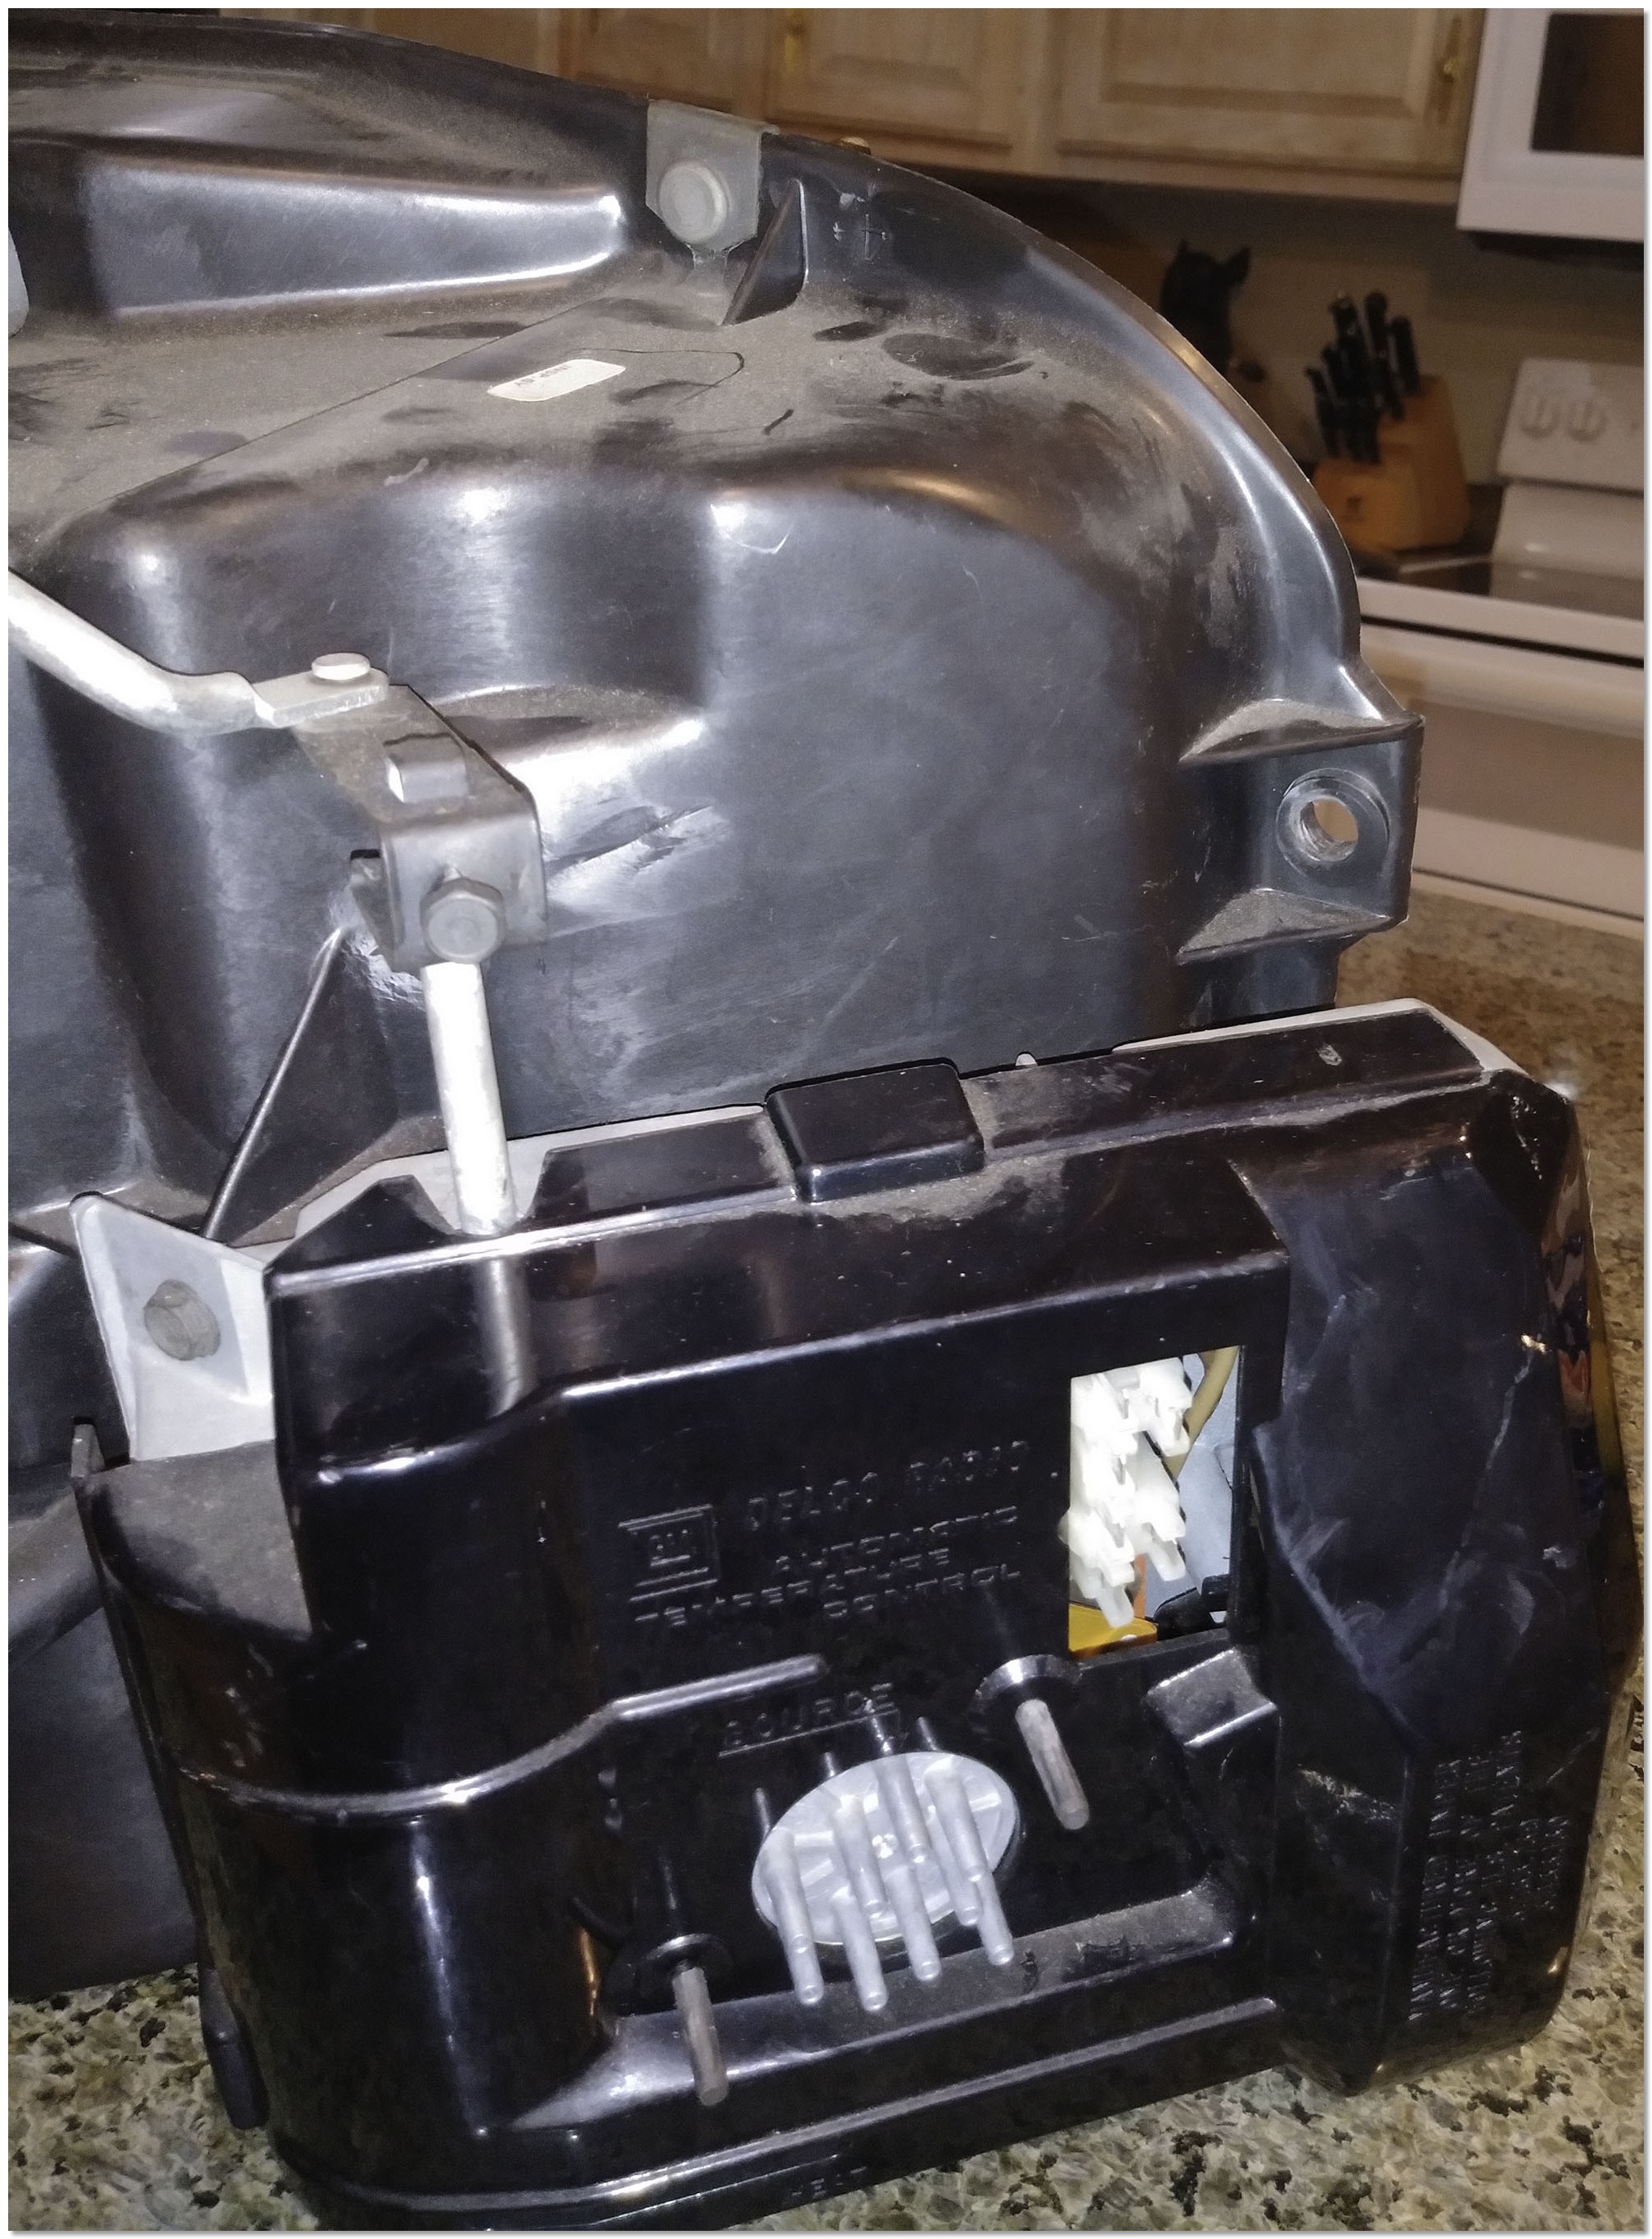
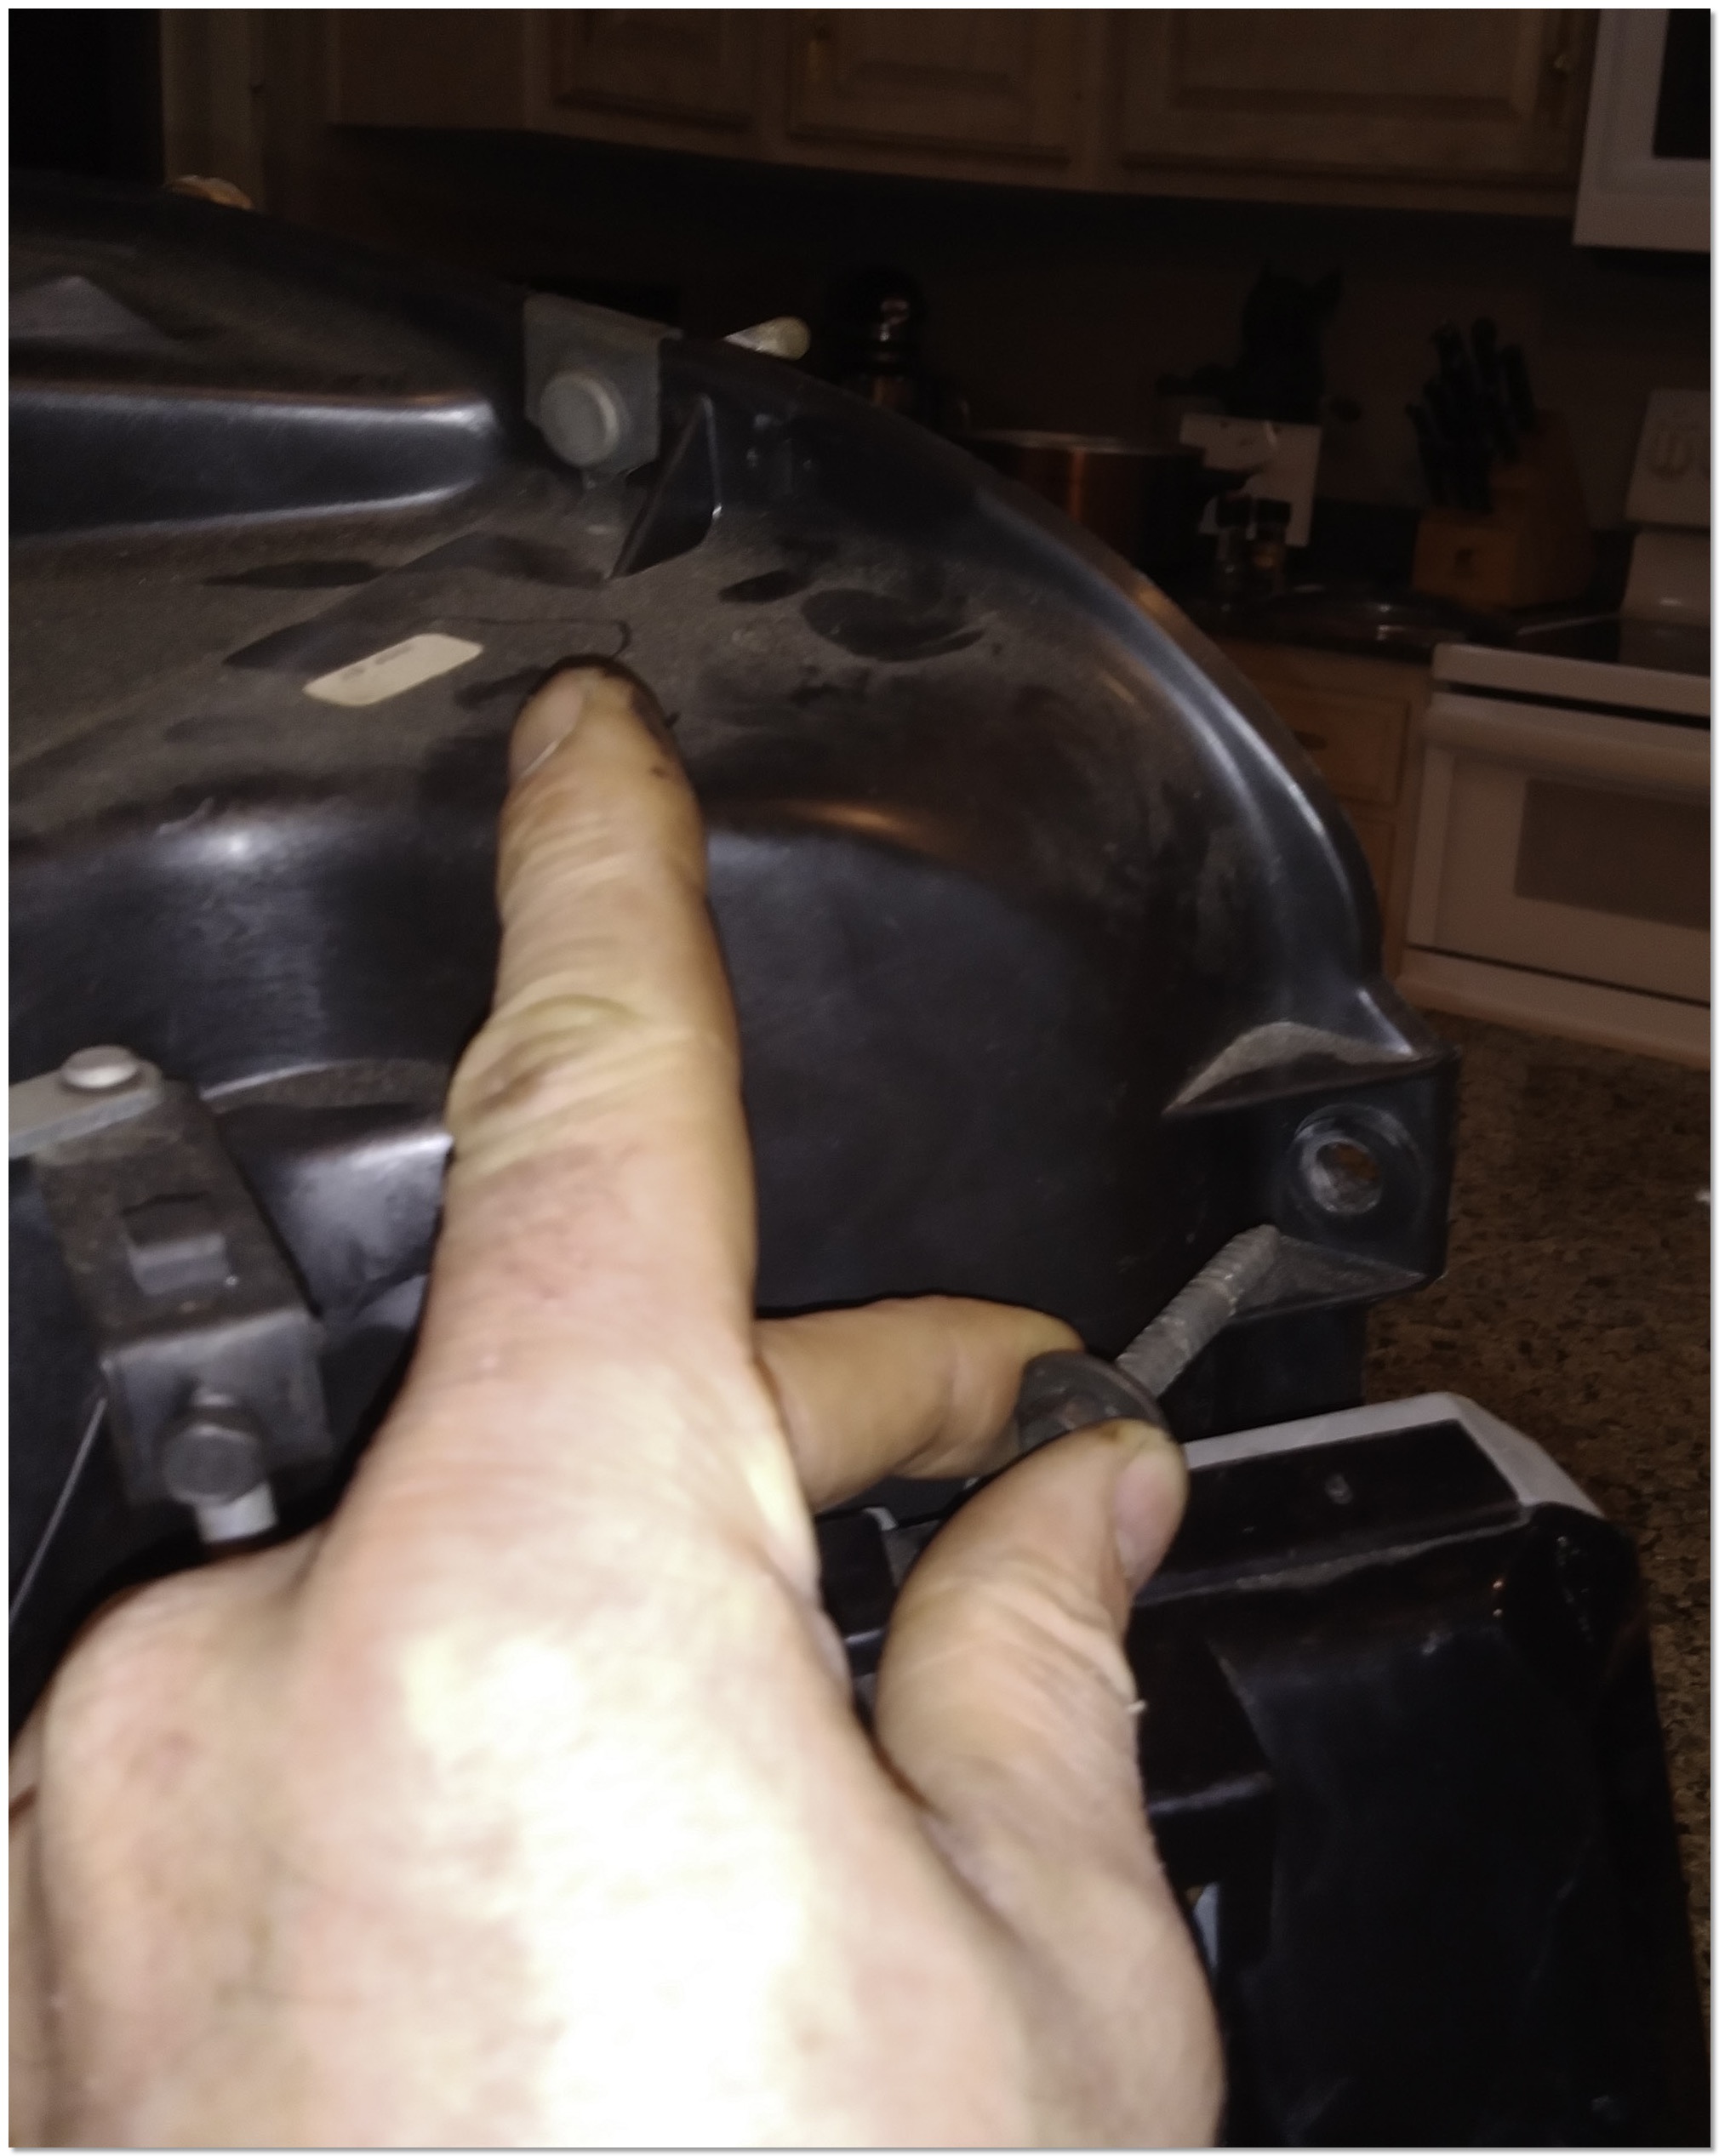
As a favor to Eldorado owners who will undoubtedly come across your repair process and use it in the future, would you be so kind as to add one addendum to it?1976 Eldorados have a FIFTH fastener attaching the heater box to the firewall! For the life of me I can't really figure out how this would have been necessary on an Eldorado but not a DeVille, but it's true. The 7/16's screw that needs to be removed is just above the right side of the ATC, in between the upper attachment and the lower one you have to get at underneath the car. Due to where it sits somewhat behind the ATC, it's impossible to see from any angle in the car.
I've attached pictures below.
1966 Cadillac Coupe deVille (16)
1967 Cadillac DeVille (54)
1967 Cadillac Eldorado (73)
1971 Lincoln Continental Mark III (24)
1974 Cadillac Coupe deVille (46)
1978 Cadillac Eldorado Biarritz (25)
1996 Buick Roadmaster (20)
Cadillac BIG Meet (2)
Car Shows (55)
Cruising (4)
CT6 (1)
For Sale (3)
Garage Stuff (32)
Pacer (1)
Restoration (140)
Various (55)
Video (20)
Website News (31)
- 6 way power seat
- 8-track
- 10 Ohm
- 429
- 1932
- 1957
- 1958
- 1958 Cadillac Eldorado Seville
- 1958 Cadillac Repair Tip
- 1959 Cadillac Eldorado Seville
- 1964
- 1965
- 1966
- 1966 Cadillac Coupe deVille
- 1966 Cadillac Repair Tips
- 1967
- 1967 Cadillac DeVille
- 1967 Cadillac Eldorado Repair Tip
- 1967 Cadillac Repair Tip
- 1967 Eldorado
- 1968
- 1970 Cadillac Eldorado
- 1971
- 1971 Lincoln Continental Mark III
- 1974
- 1974 Cadillac Coupe DeVille
- 1974 Cadillac Repair Tip
- 1976
- 1977
- 1978
- 1978 Cadillac Eldorado Biarritz
- 1978 Cadillac Repair Tip
- 1980 Cadillac Eldorado Biarritz
- 1996
- 2012
- 2014
- 2017
- 2018
- 2019
- 2022
- 2023
- 2025
- 3063206
- 7027235
- 7800483
- 7805675
- 7805676
- 12355706
- 17058531
- 17059968
- 17059969
- 22010515
- 22010661
- A.I.R
- A6
- AC
- AC Compressor
- AC Electrical Diagram
- ACC
- Accelerator Pump
- Accelorator pump
- Accident
- Actuators
- Adriatic Blue Metallic
- Ads
- Aftermovie
- Air Pump
- Aircondition
- AIRPUMP
- ALC
- Alternator
- AM
- AM-Transmitter
- Antenna
- Anti Rattle Clips
- Antique Gold
- Arizona Vintage Parts
- Arrival
- Article
- ASC
- Ash Tray removal
- ATC
- Atlantis Blue Firemist
- Austria
- Austro Classic
- Autolite SP-459
- Automatic Seat Back Release
- Award
- Banner
- Barn Find
- Battery
- Battery Tray
- Beach Race
- Bearing
- Bendix
- Biarritz
- Bigfoot
- Bill Hirsch Engine Enamel
- Bleeder Screws
- Bleeding
- Blower
- Bodywork
- Bolts
- Book
- Borg
- Brake Booster
- Brake Fluid
- Brake Gray
- Brakes
- Broken Bolt
- Brougham
- Bucket seats
- Buick
- Bumper End
- Bushings
- Cadillac
- Cadillac BIG Meet
- Cadillac BIG Meet
- Cadillac birthday cake
- Cadillac Blue
- Cadillac Color Selections Dealer Book
- Cadillac Coupe deVille
- Cadillac Dealer
- CADILLAC GRAND EUROPEAN
- Cadillac Meeting
- Cadillac Mini Meeting
- Camaro RS
- Caorle
- Car Show
- Carburetor
- Card
- Carpet
- Carter AFB
- Cavalry Twill Vinyl
- CB
- CBM
- CCCD
- Choke
- Christmas
- Citizens Band
- Classic Cadillac Club Deutschland
- Clay Towel
- Cleaning
- Clock
- Clockwork
- Clutch
- Clutch Coil
- Collector
- Colonial Yellow
- Color Coded Springs
- Commercial
- Compound
- Compressor
- Condenser
- Continental Mark III
- Control Head
- Conversion
- Convertible top
- Coolant
- Corona
- Cowl
- Cruise Control
- Cruising
- CT6
- CV Boots
- CV JOINTS
- D6230
- Dash Trim
- Decal Removal
- Decals
- Decoration
- Dehumidifier
- Delco Moraine
- Der Standard
- detailing
- Deville
- Diagnosis Chart
- Diagram
- Dial
- Digital Rotary Drum Clock
- Diner
- Disc Brakes
- Distributor
- Diverter Valve
- Door Jamb Switch
- Door Rubber Conduit
- Dornbirn
- Dot3
- Drive Shaft
- Driving tour
- Drum brakes
- Dry Ice Blasting
- Dry Ice Cleaning
- DVD
- Eastwood
- Eldorado
- Electric Choke Thermostat
- Electrical schematic
- Elvis
- Engine Bay
- Ep
- Epoxy floor
- Europe
- Evaporator
- Exide
- Factory Markings
- Fender Skirt
- Floor
- Flushing
- Flyer
- Foam
- For Sale
- Front AXLE
- Front brakes
- Front bumper filler
- Front Floor
- Front wheel bearing
- Fuel Filter
- Fuel Pump
- Fuel Sending Unit
- Fusible Link
- Garage
- Garage Cabinets
- Gasket
- GE
- Gear indicator
- General Time
- Glove box light
- Grand European
- H4
- Haus of Hot Rod
- Headlight Actuator
- Headlight doors
- Headlights
- Heater Core
- Heater Hose
- Heater Valve
- High Idle
- History
- Holley
- Honest John
- Hood
- Hood Emblem
- Hood Ornament
- Hose Clamp
- Hot Choke
- Hot Water Valve
- HotRod
- How to
- Hödlmayr
- Ignition Diagram
- Illuminated Entry
- John D‘Agostino
- John Foust
- Klassikwelt Bodensee
- Kremsmünster
- LaSalle
- Leather seats
- Light Switch
- Limited
- Lincoln
- Lincoln Mark III Repair Tip
- Low Mileage
- Magazine
- Marilyn Monroe
- Mark III
- Master Cylinder
- Master Switch
- Master Vacuum Switch
- Media Blasting
- Meeting
- Meguiras
- MK II
- Mobile
- Model
- Moldings
- Mom
- Mopar Nationals
- Mostkost Kustom
- Movie
- Munich
- Neon
- NOS
- Oberösterreicher des Tages
- oilchange
- ORF
- Overspray
- Pacer
- Paint
- Paint correction
- Paintjob
- Part Number
- Parts
- Patch Panel
- Perfect Circle
- Permabag
- Persian Lime
- Photo shooting
- Photoshooting
- Pictures
- PinUp
- POA Valve
- Power Antenna
- Power Servo
- Power Vent Windows
- Power Window
- Printed Circuit Board
- Programmer
- Pulley
- Quadrajet
- Quarter Panel
- Quartz Conversion
- R134
- Radiator
- Radio
- Rattle
- Rear brakes
- Rebuild
- Recalibrate
- RediRad
- Reed Switch
- Relais
- Relaunch
- Removing Overspray
- Repaint
- Repair
- Restoration
- RIP
- Roadhouse
- Roadmaster
- Rochester
- Rocker Arm Cover
- Rocker Panel Extension Clips
- Rostio
- Rotary Valve
- Rotterdam
- Rupes
- Rust removal
- Rust removal gel
- Sabre Wheels
- Sand Blasting
- Sandblasting
- Screed
- Season Greetings
- Seasons Greetings
- Seat Back Locks
- Seat Padding
- Seat Transmission
- See through ornament
- Self adjusters
- Self Starter
- Sepp's Garage
- Seville
- Sheetmetal
- Shocks
- shop manual
- short
- Sign
- Solenoid
- Spark Plug Wire Routing
- Speakers
- Special Award
- Speed Bleeder Screws
- Splash Guard
- Starter Diagram
- Starter Motor
- Steering Column
- Storage
- suction throttling valve
- sunroof
- suspension
- Swirl Mark removal
- Switzerland
- T3
- Taillight Cover
- Texan´s Choice Award
- Thermostat
- Tilt and Telescope
- Time capsule
- Tomsclub
- Torque Specifications
- Tower Hose Clamp
- Towtruck
- Trailer
- Transducer
- Transmission
- transmission control selector
- transmission control selector indicator light
- transmission shift indicator
- Treadle Vac
- Treffen
- Tri-Band
- Troubleshooting
- Trunk Cardboard Kit
- Trunk lid
- Trunk lining
- Trunk to bumper cover
- Turn Signal Switch
- TV
- Typisierung
- Ultimate Garage
- Underbody
- Undercarriage
- Undercoating
- Undercoating Removal
- Vacuum Booster
- Vacuum diagram
- Vacuum hoses
- Vacuum Master Switch
- Vacuum Schematic
- Vacuum Valve
- Valve Cover
- Various
- Vent Window Switch
- Vibration
- Vibrator
- Vicodec roof
- Video
- Vinegar
- Vinyl Roof
- Visitor
- Washer Fluid Float
- Washer Fluid Low Level Indicator
- Water Pump
- Wax
- Weatherstripping
- Website News
- Westclox
- Wheel Bearings
- Wheel Housing
- Wiesbaden
- Windlace
- Winter
- Wiring
- Wiring Diagram
- Wonderbar
- Workbench
- Zurzach
 GERALD´S CADILLACS - NEWS