REPLACING THE CV-JOINTS AND AXLES OF MY 1978 ELDORADO
But now with spring approaching fast and the car season only a few weeks away, I had to start finishing some projects waiting for me inside my garage.
My 1978 Cadillac Eldorado Biarritz had some problems with both of its CV boots which splattered grease all over the front of the car. The still 100% original rubber boots were not torn, but decided to slip from the outer end and released some of the grease. I could not find a way to re-fasten them properly and the rubber also felt pretty hard after 41 years on the car anyways…
I decided to not replace the boots as it is rather complicated to do, but go for new axles instead which are not much more expensive than new rubber boots alone.
First I had to buy some special tools like a 1 ½" or 38mm socket for the axle spindle nut and 12 point sockets for the axle bolts.
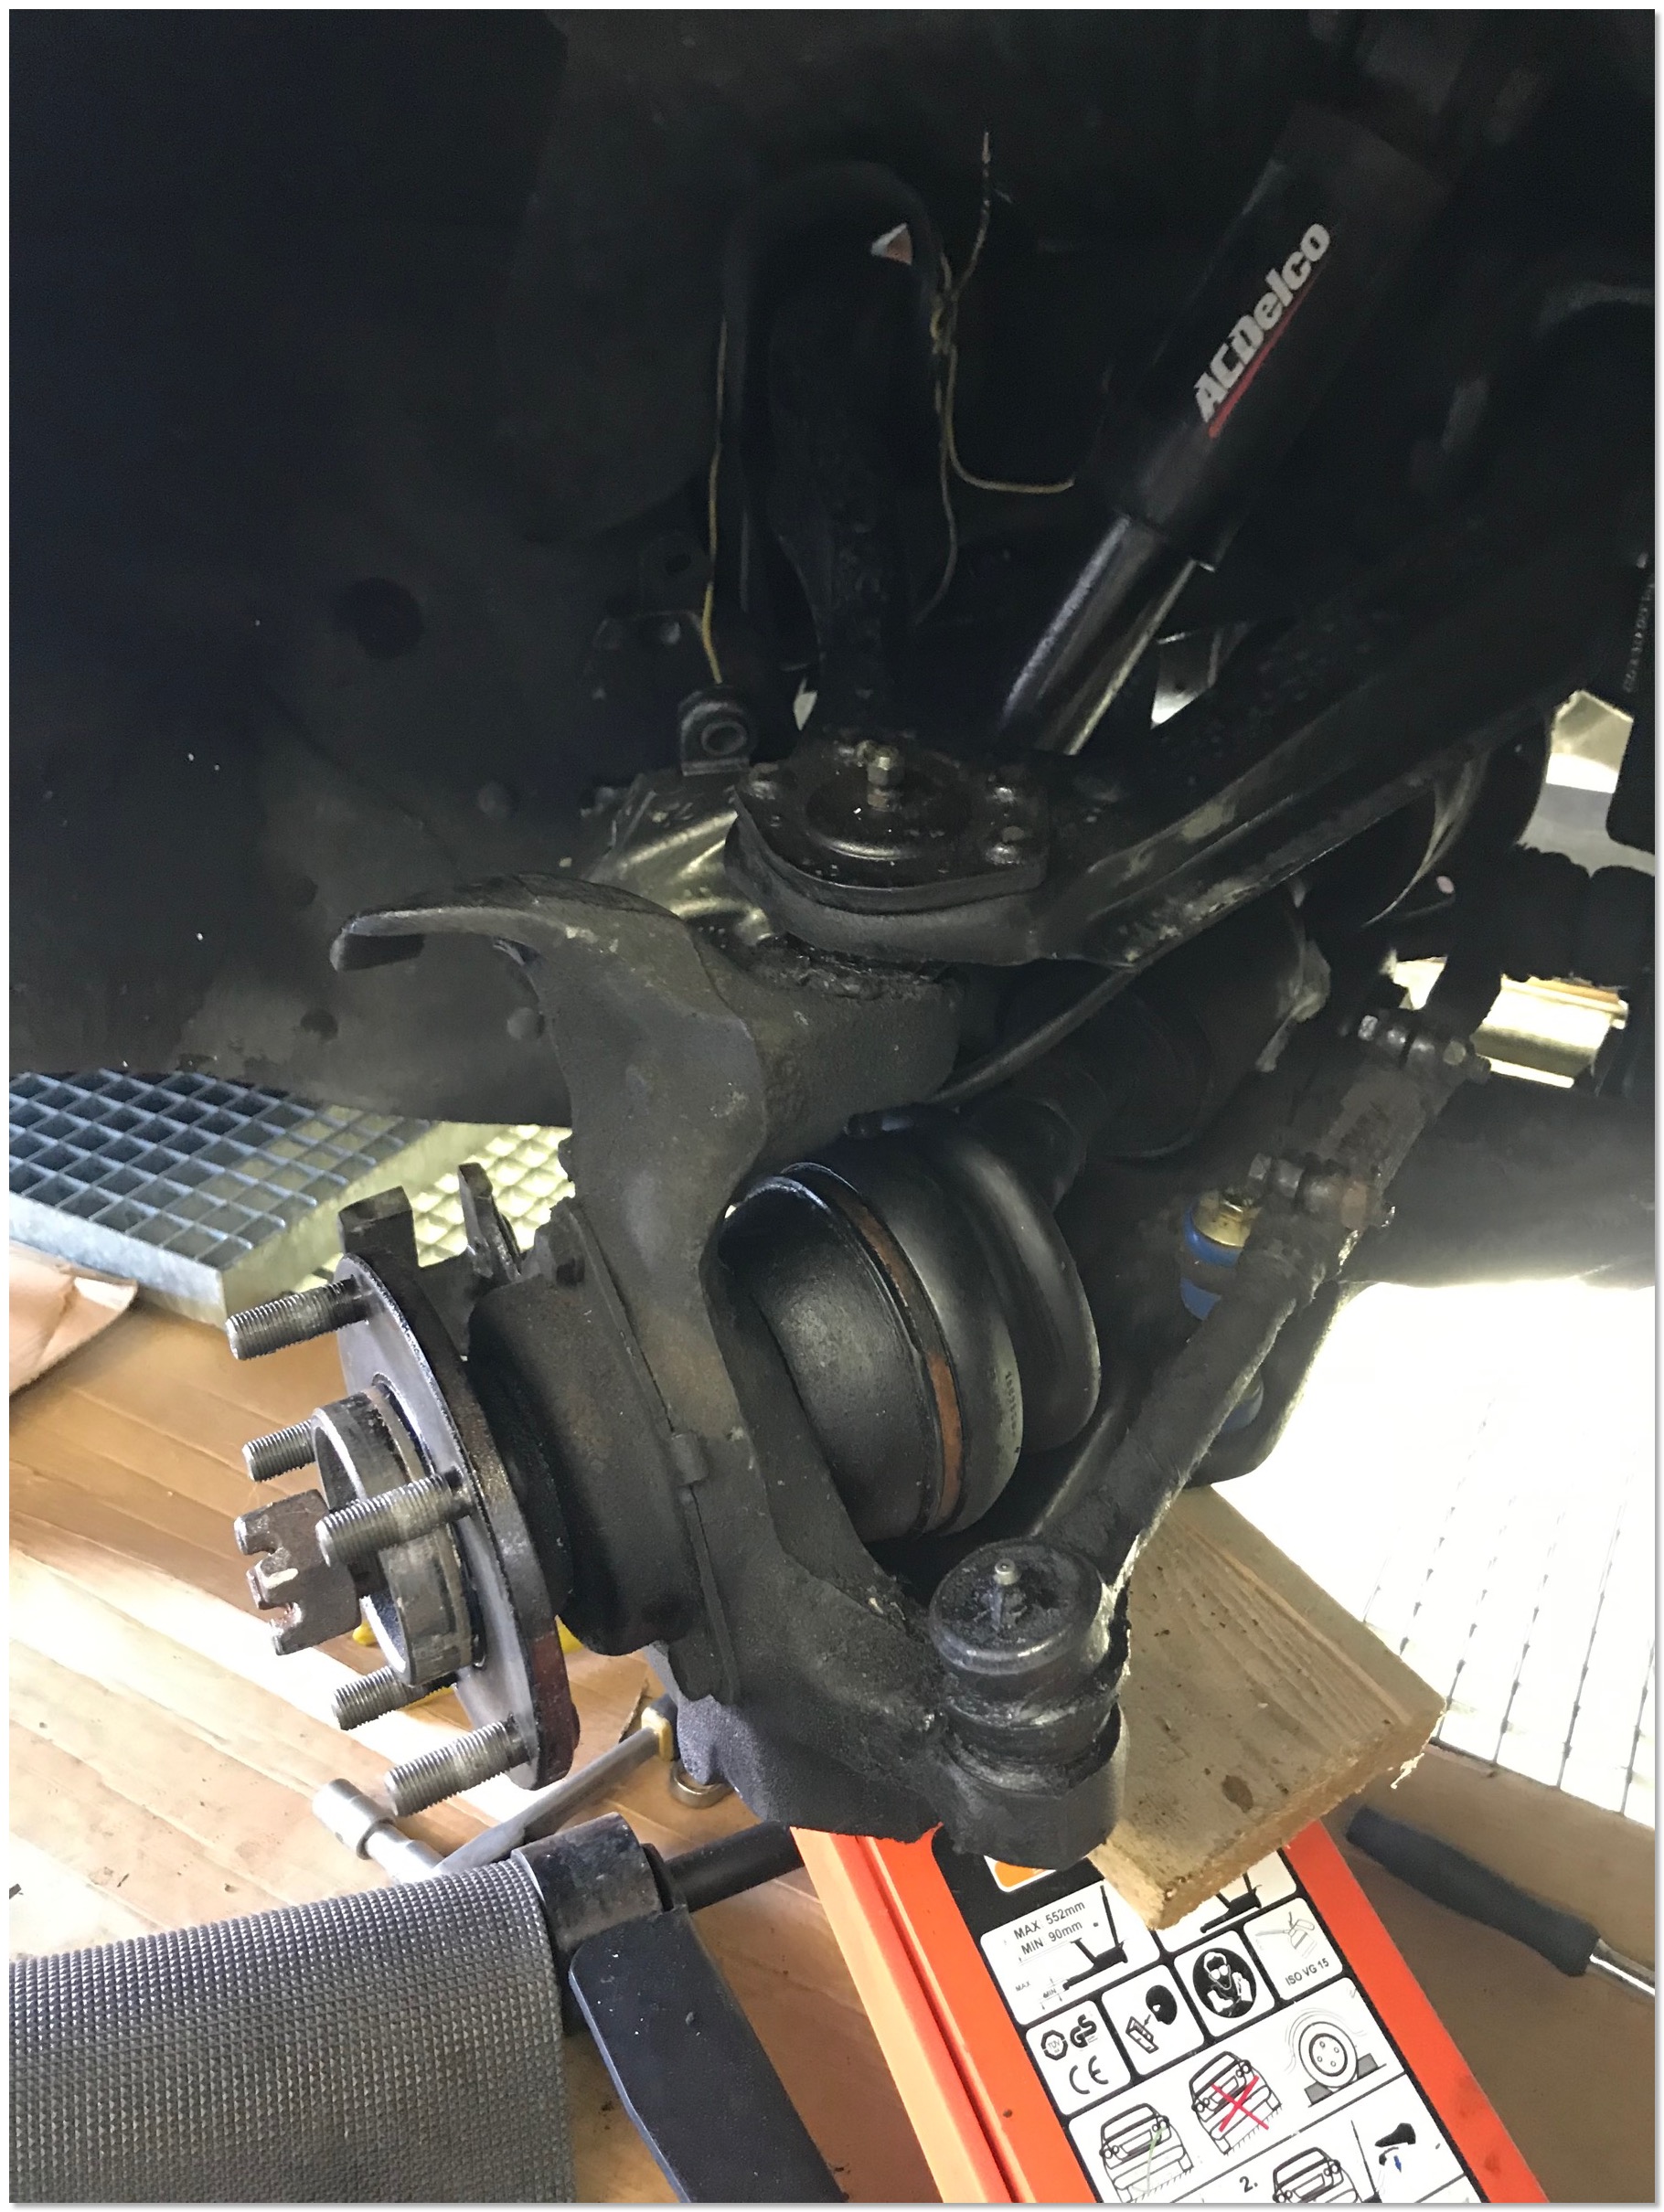
After all the tools and parts had arrived I completely did the driver side axle on the 1978 Eldorado in October 2017 as per the instructions in the shop manual. The most annoying and complicated part was to get the upper control arm detached from the steering knuckle.
After I finished the left side axle I decided to take a break and do the other side later this spring. (Pictures from the left side can be found here)
The replacement axles I bought are slightly different as the inboard mounting area is slightly slimmer - I also had to use an additional washer at the axle nut on the driver side axle, otherwise the cotter pin wouldn’t have worked.
I also had to use additional washers at the inner end of the left axle as the original bolts would have been slightly too long for the new axle, and without the washers the bolt ends would have hit something... thanks to my friend Richard Vobr for helping me out with washers!
IMPORTANT UPDATE! APRIL 2020!
One thing I completely overlooked when I installed replacement axles on my 1978 Biarritz is the fact that the mounting holes for the drive axle to output shaft are bigger on the replacement axles than the original ones. Because of this there is some play.
I did not notice this fact, but my friend Lucky found this problem when he wanted to install a replacement axle to a 1967 Eldorado he had been working on, which every parts supplier lists for the 1967 Eldorado, and which have the same parts number as those for the 78. (btw: There are no fitting replacement axles available that would fit on a 67/68 Eldorado - you will always have to rebuild your original ones!)
Lucky came up with a perfect solution for this issue though. He found some reduction bushings from 7/16" to ⅜" made by Bates at a Harley Davidson parts shop.
These bushings are a perfect fit and also solve the problem of the too long bolts on the driver side axle. These bolts are too long because the mounting surface of the replacement axle is thinner than the original, and because of that I had to install spacers before.
With these bushings the original bolts do fit perfectly again!
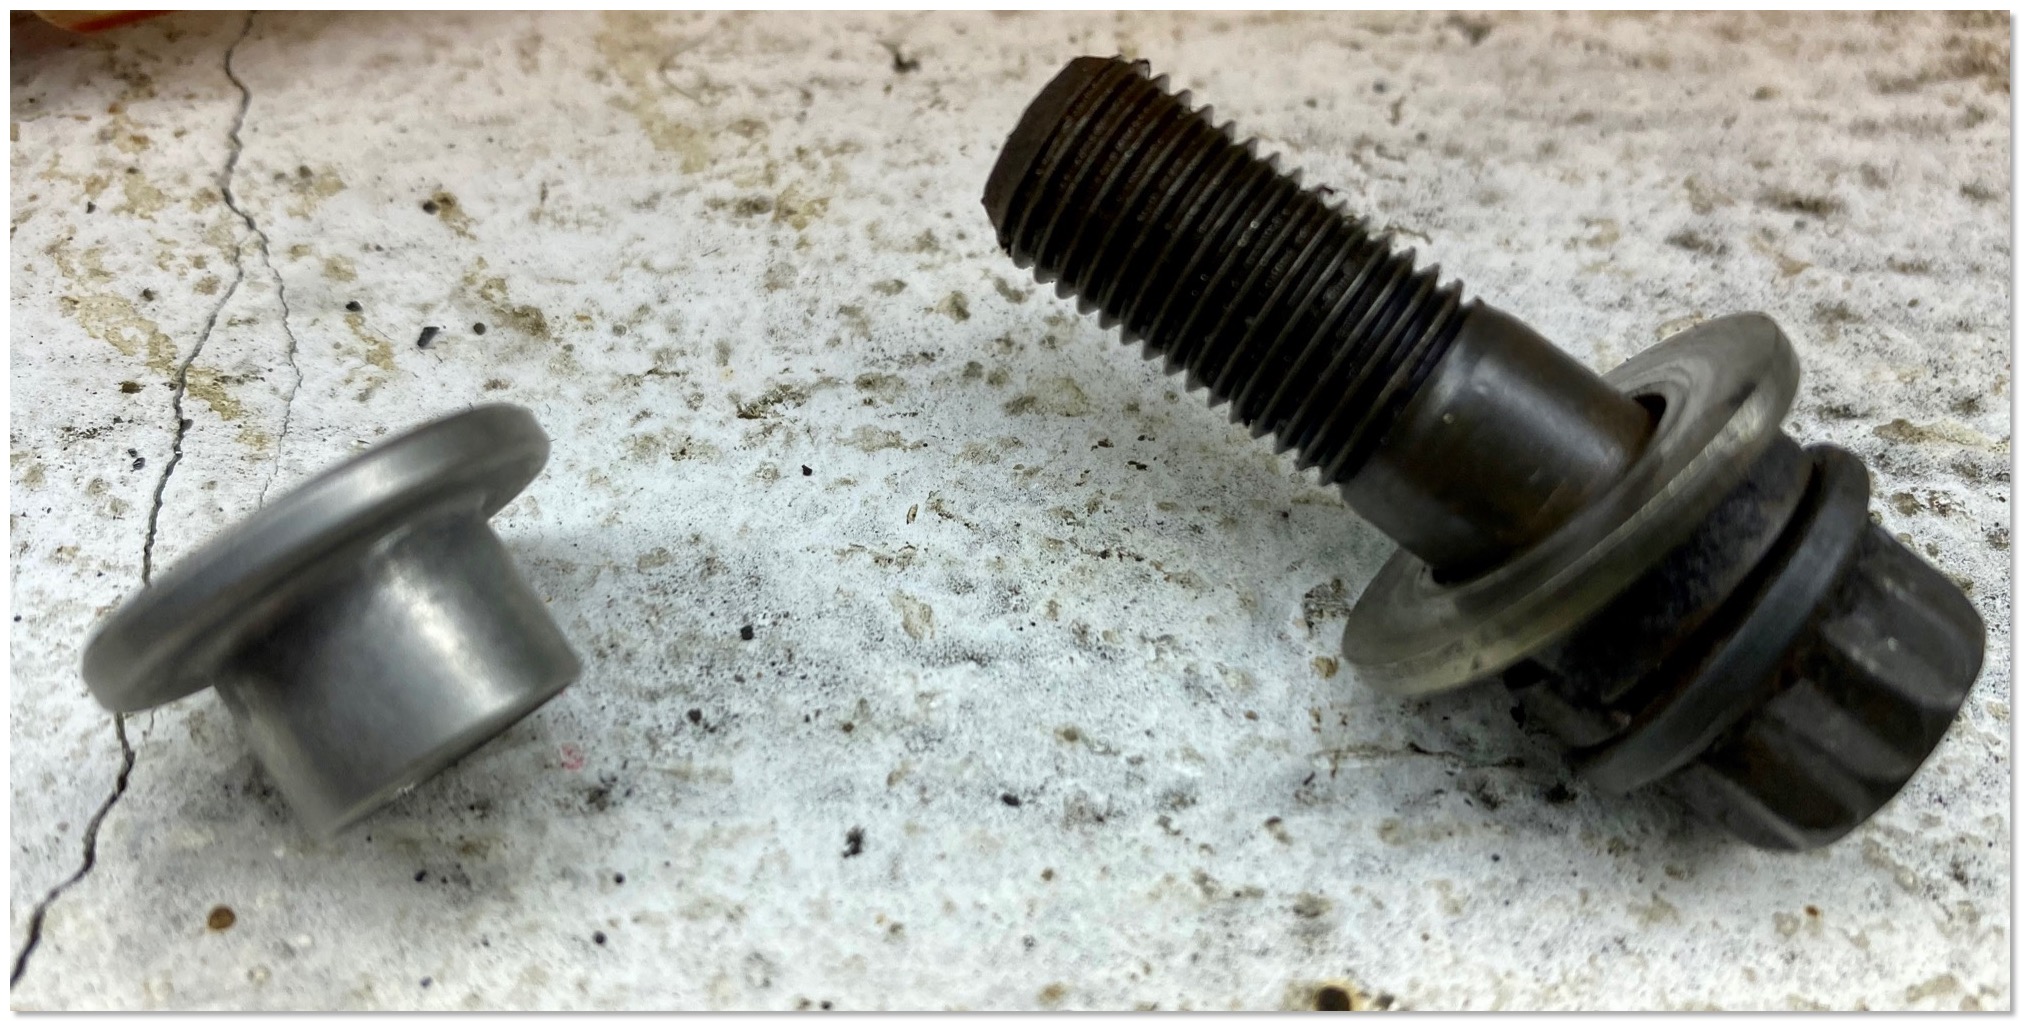
The bushing on the left - the bolt with a now no longer necessary spacer on the right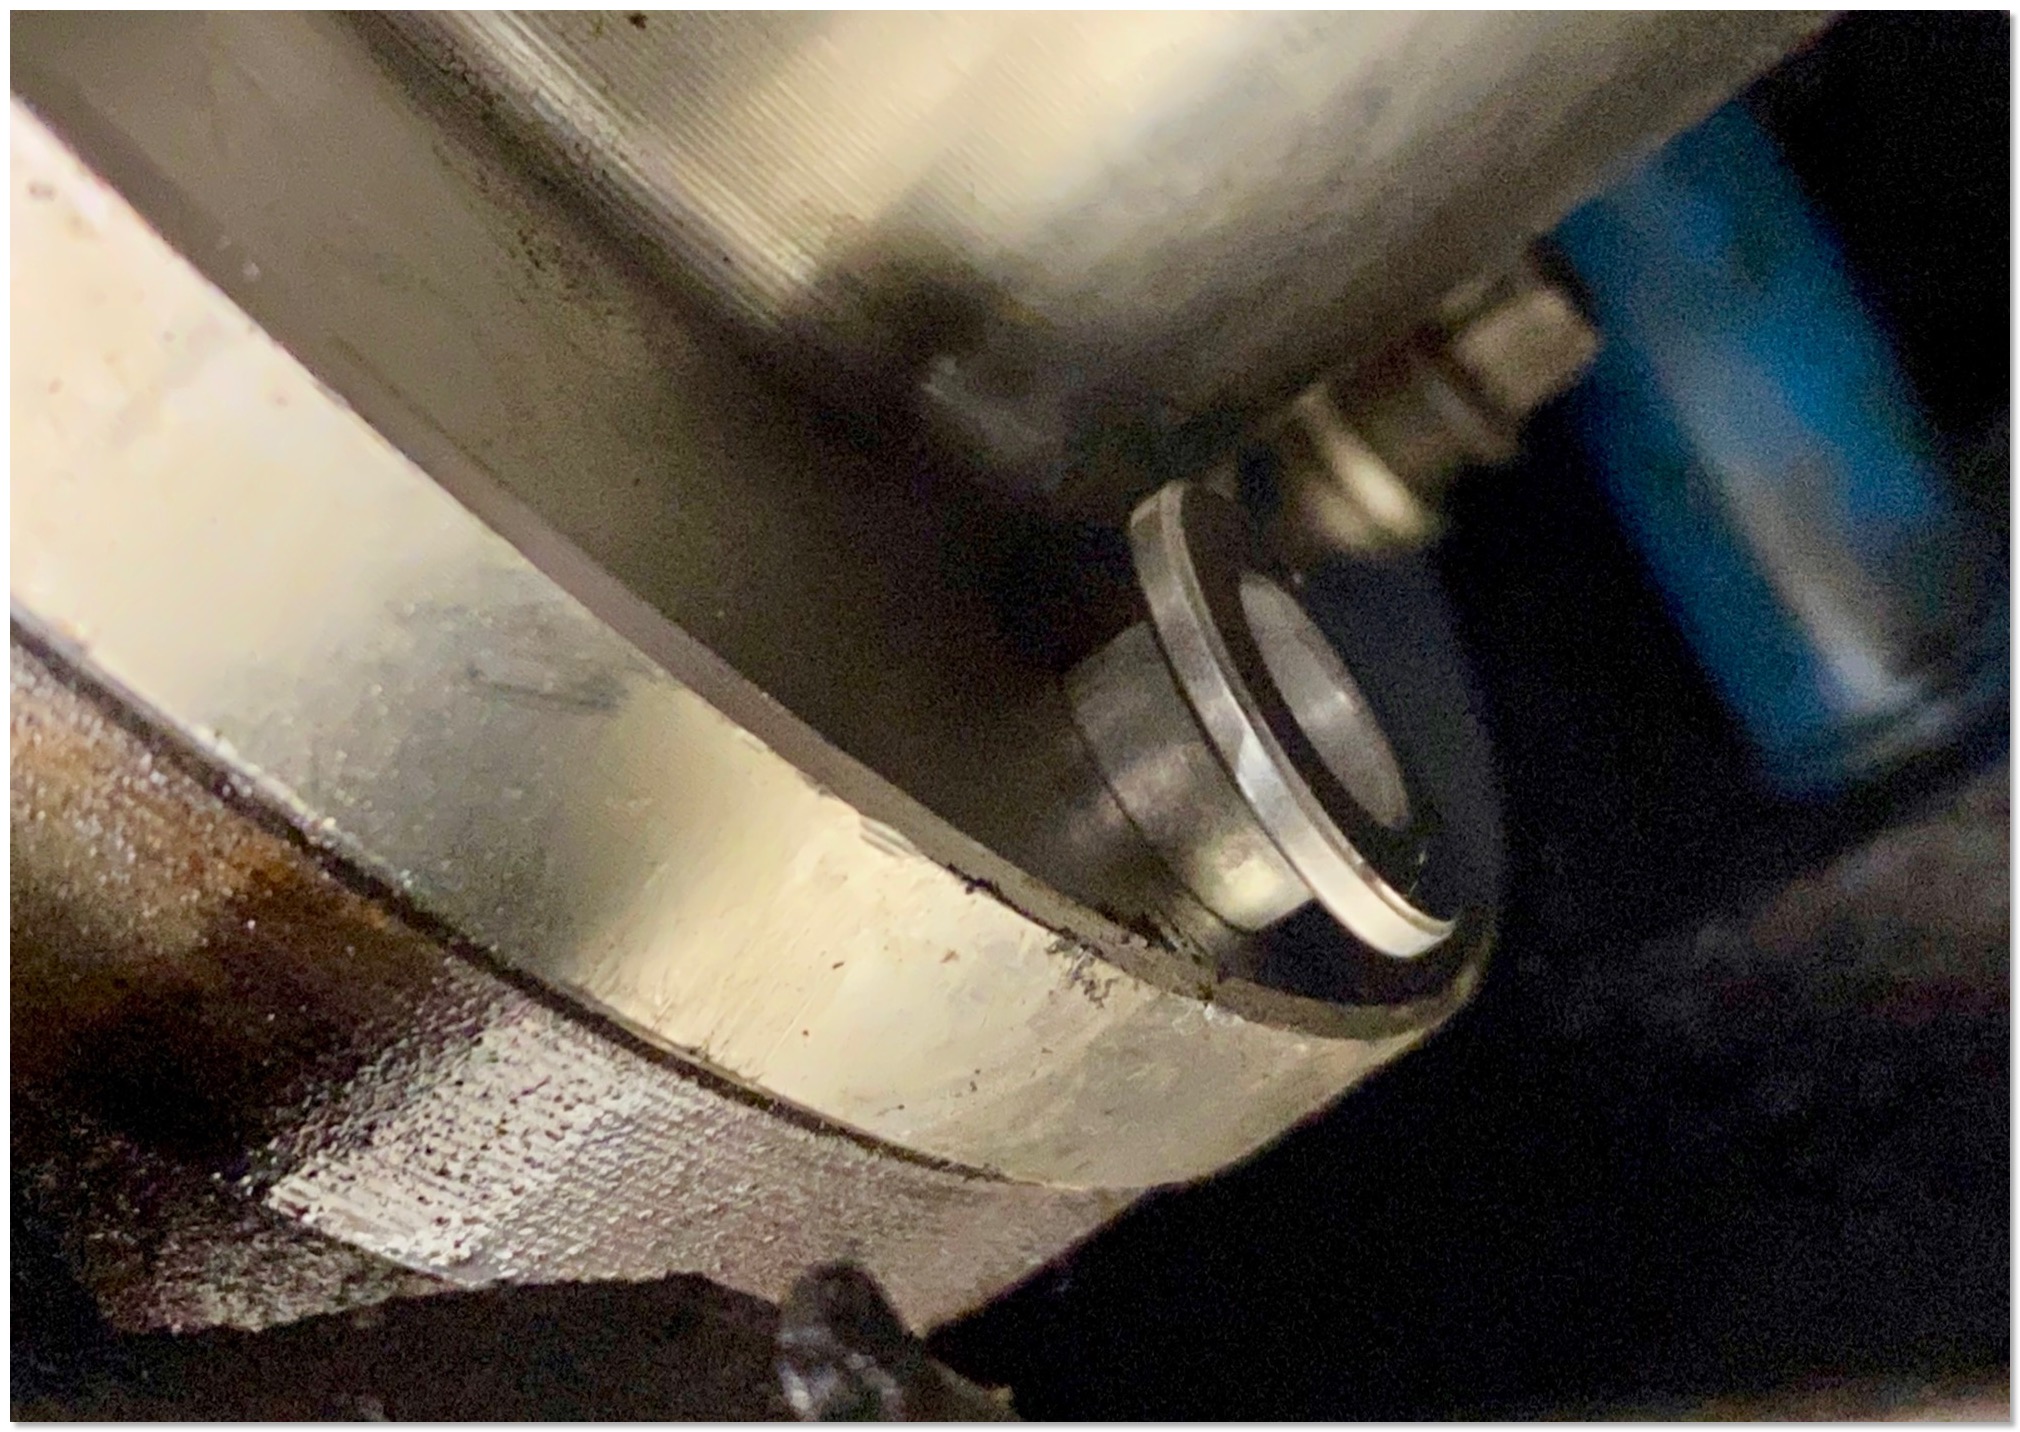
The bushing in place
Today I did the passenger side axle. I tried to do it exactly like it was described in the shop manual, but due to the original rubber dampener on the right axle it was impossible to remove the axle. It doesn’t work as described in the shop manual as in 1978 they added these rubber dampeners to the right axle. It's so thick that it wont just slip out and could be pushed away enough to get the output shaft out of the car . I had to disconnect the upper control arm from the steering knuckle to get more clearance but I could not get the ball joint on the upper arm loose with the tools I had.
As I did not have the necessary tools to proceed, I desperately called my local mechanic what to do and he immediately agreed to come over to have a look and help me. With his help we got the upper control arm detached with a giant breaker bar he had brought along. Then I got the output shaft out and the new axle just slid in 🙂 no problem without the dampener!
All replacement axles come without the dampener. This torsional dampener was used to avoid torque steer, but I could not notice any difference driving without it…
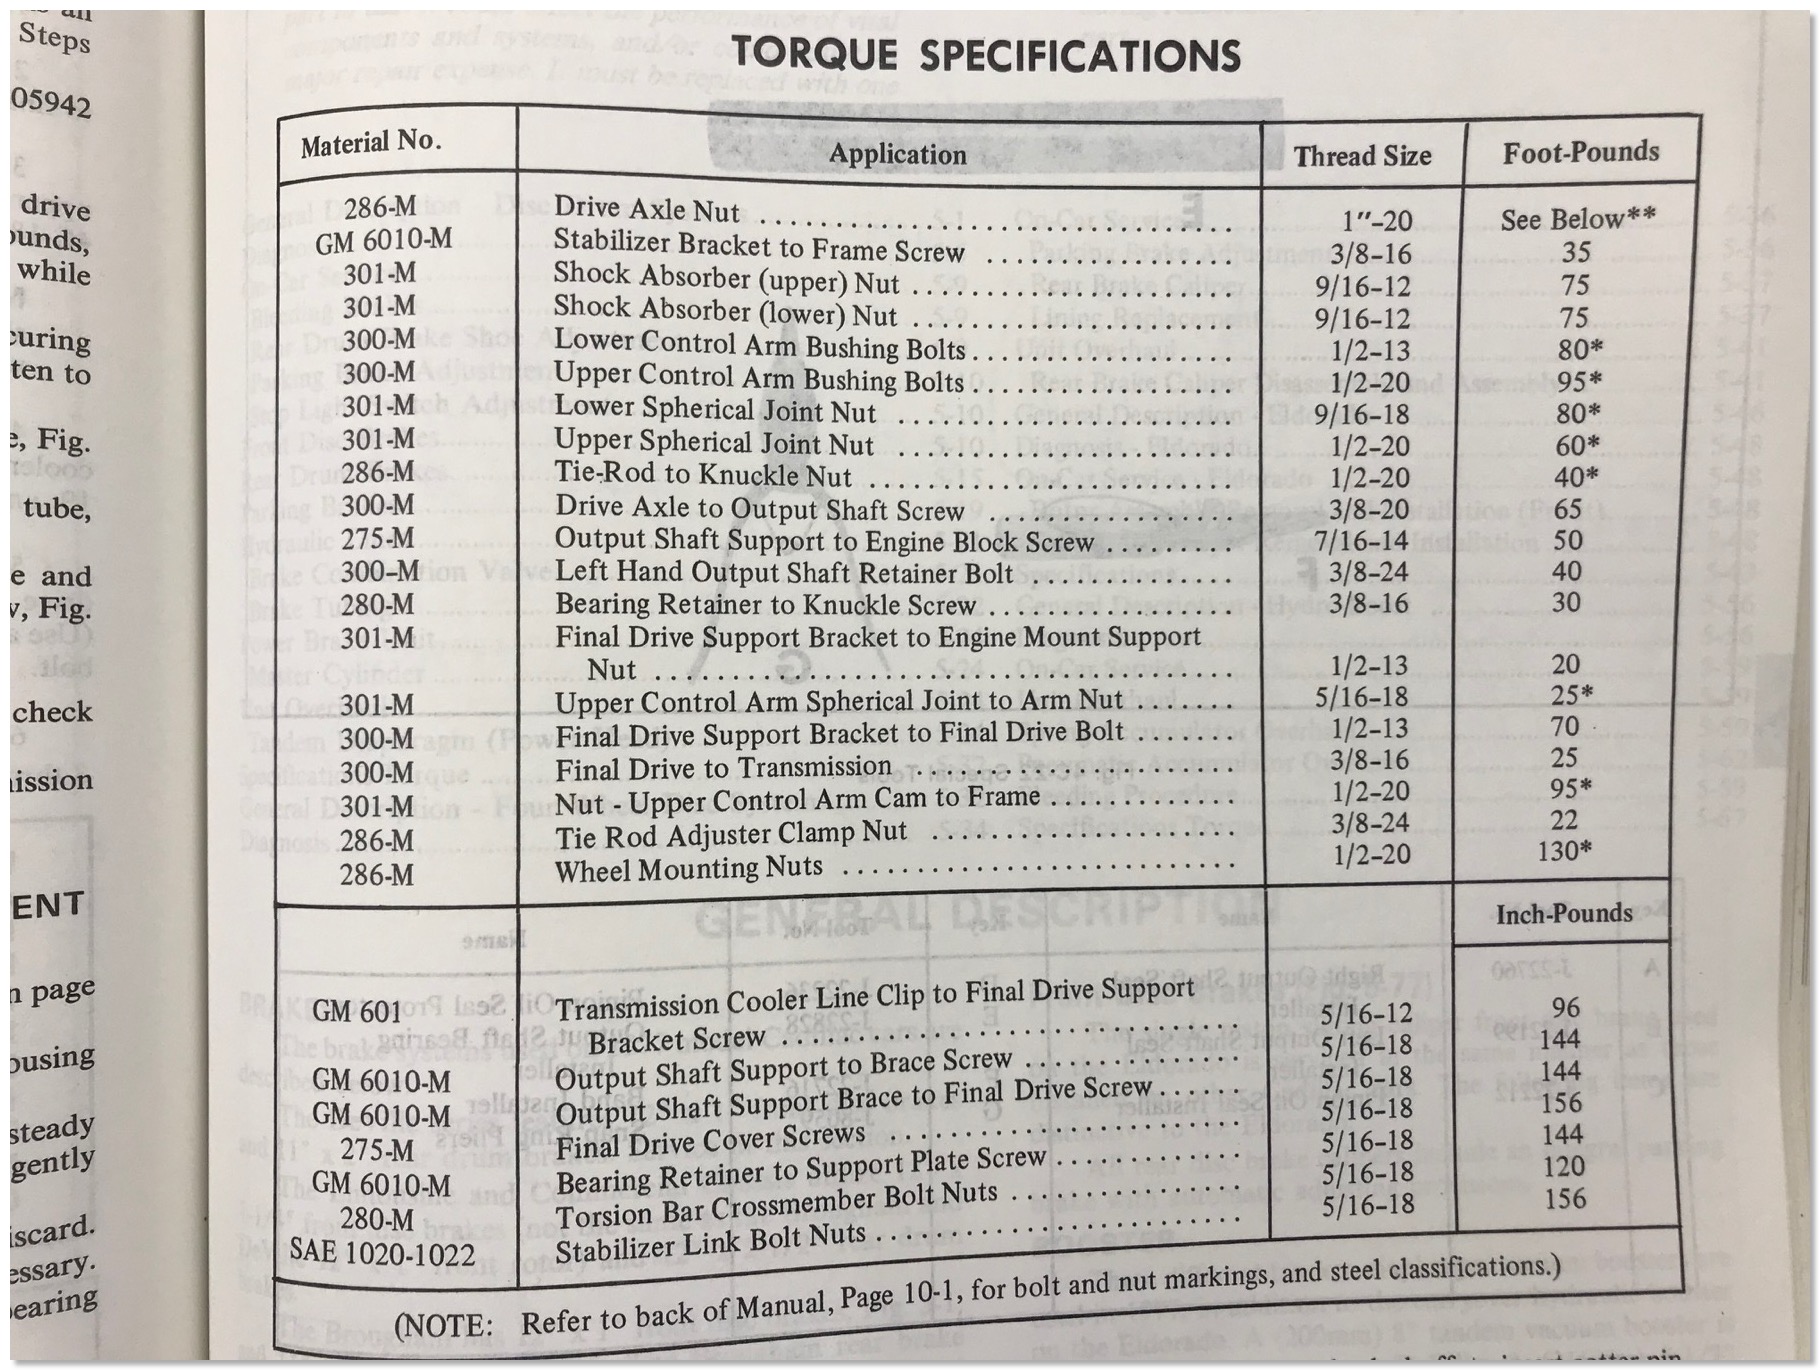
Below you can find the instructions from the shop manual - as mentioned before Step 7 and 10 (marked yellow) did not work for me and I additionally had to remove the upper control arm on the right side to get enough clearance to remove the output shaft. If you already have a replacement axle in your car without a dampener it will work exactly as described in the shop manual. Make sure to torque everything to specs as listed below!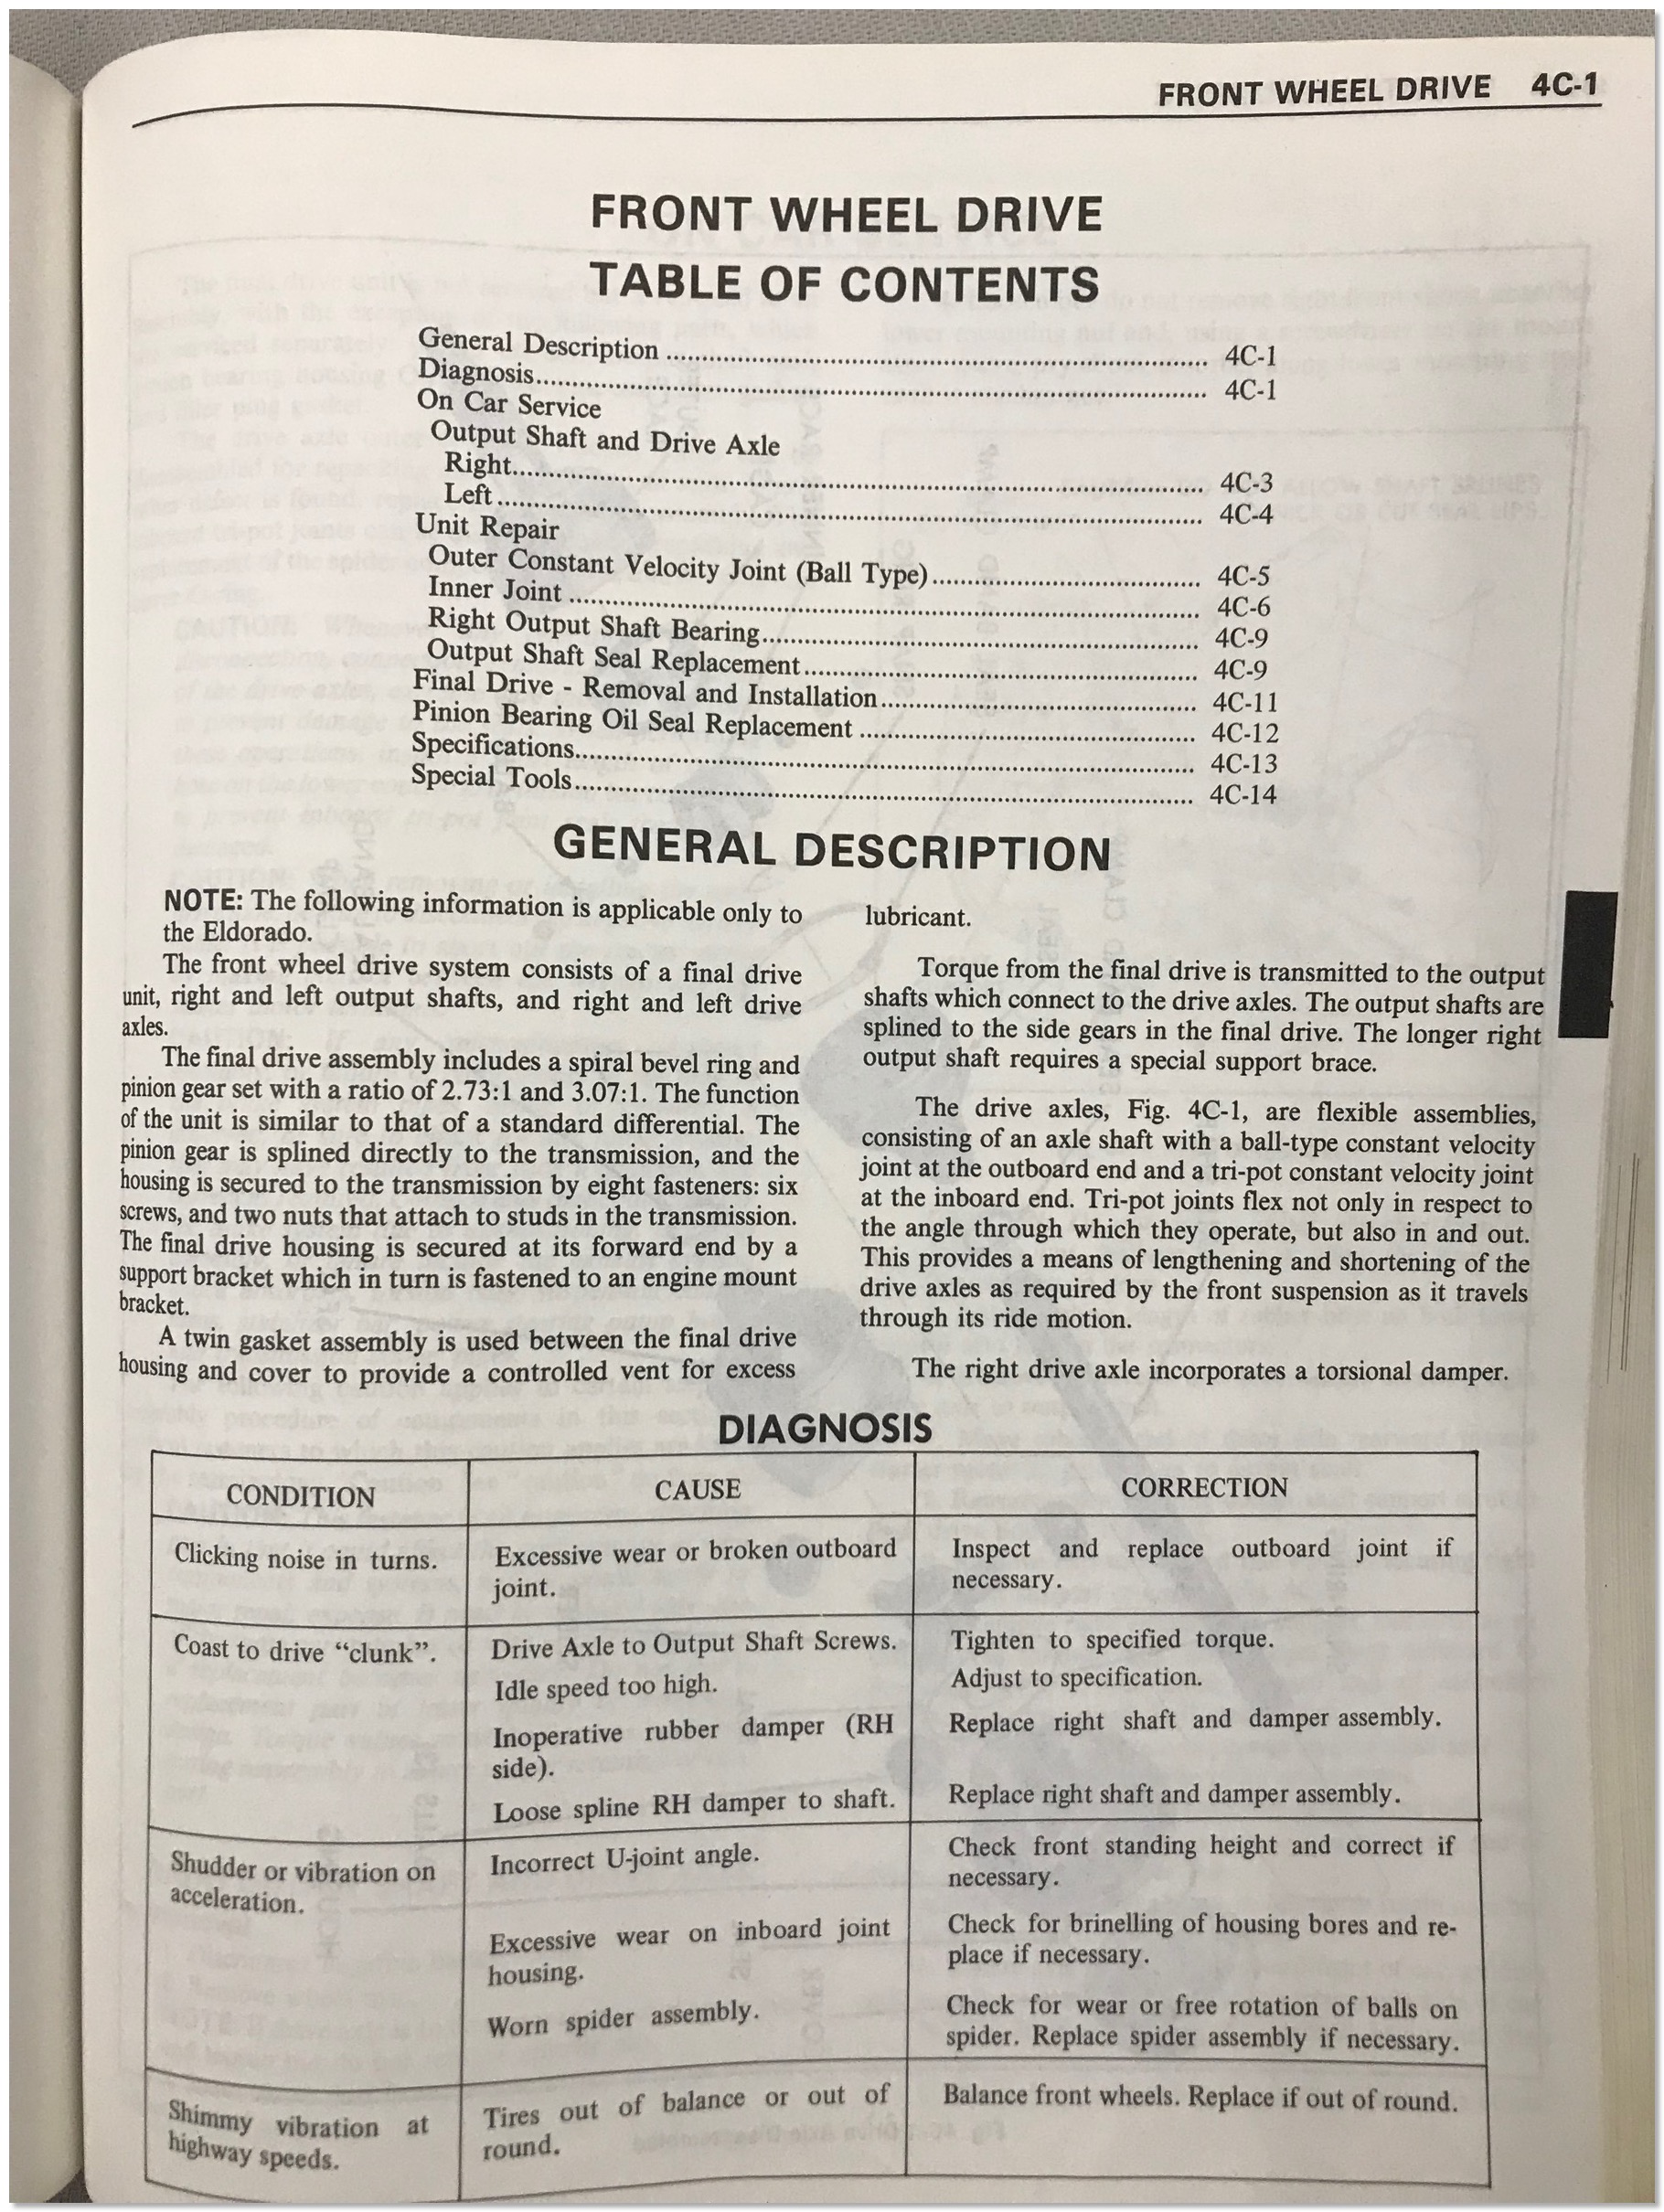
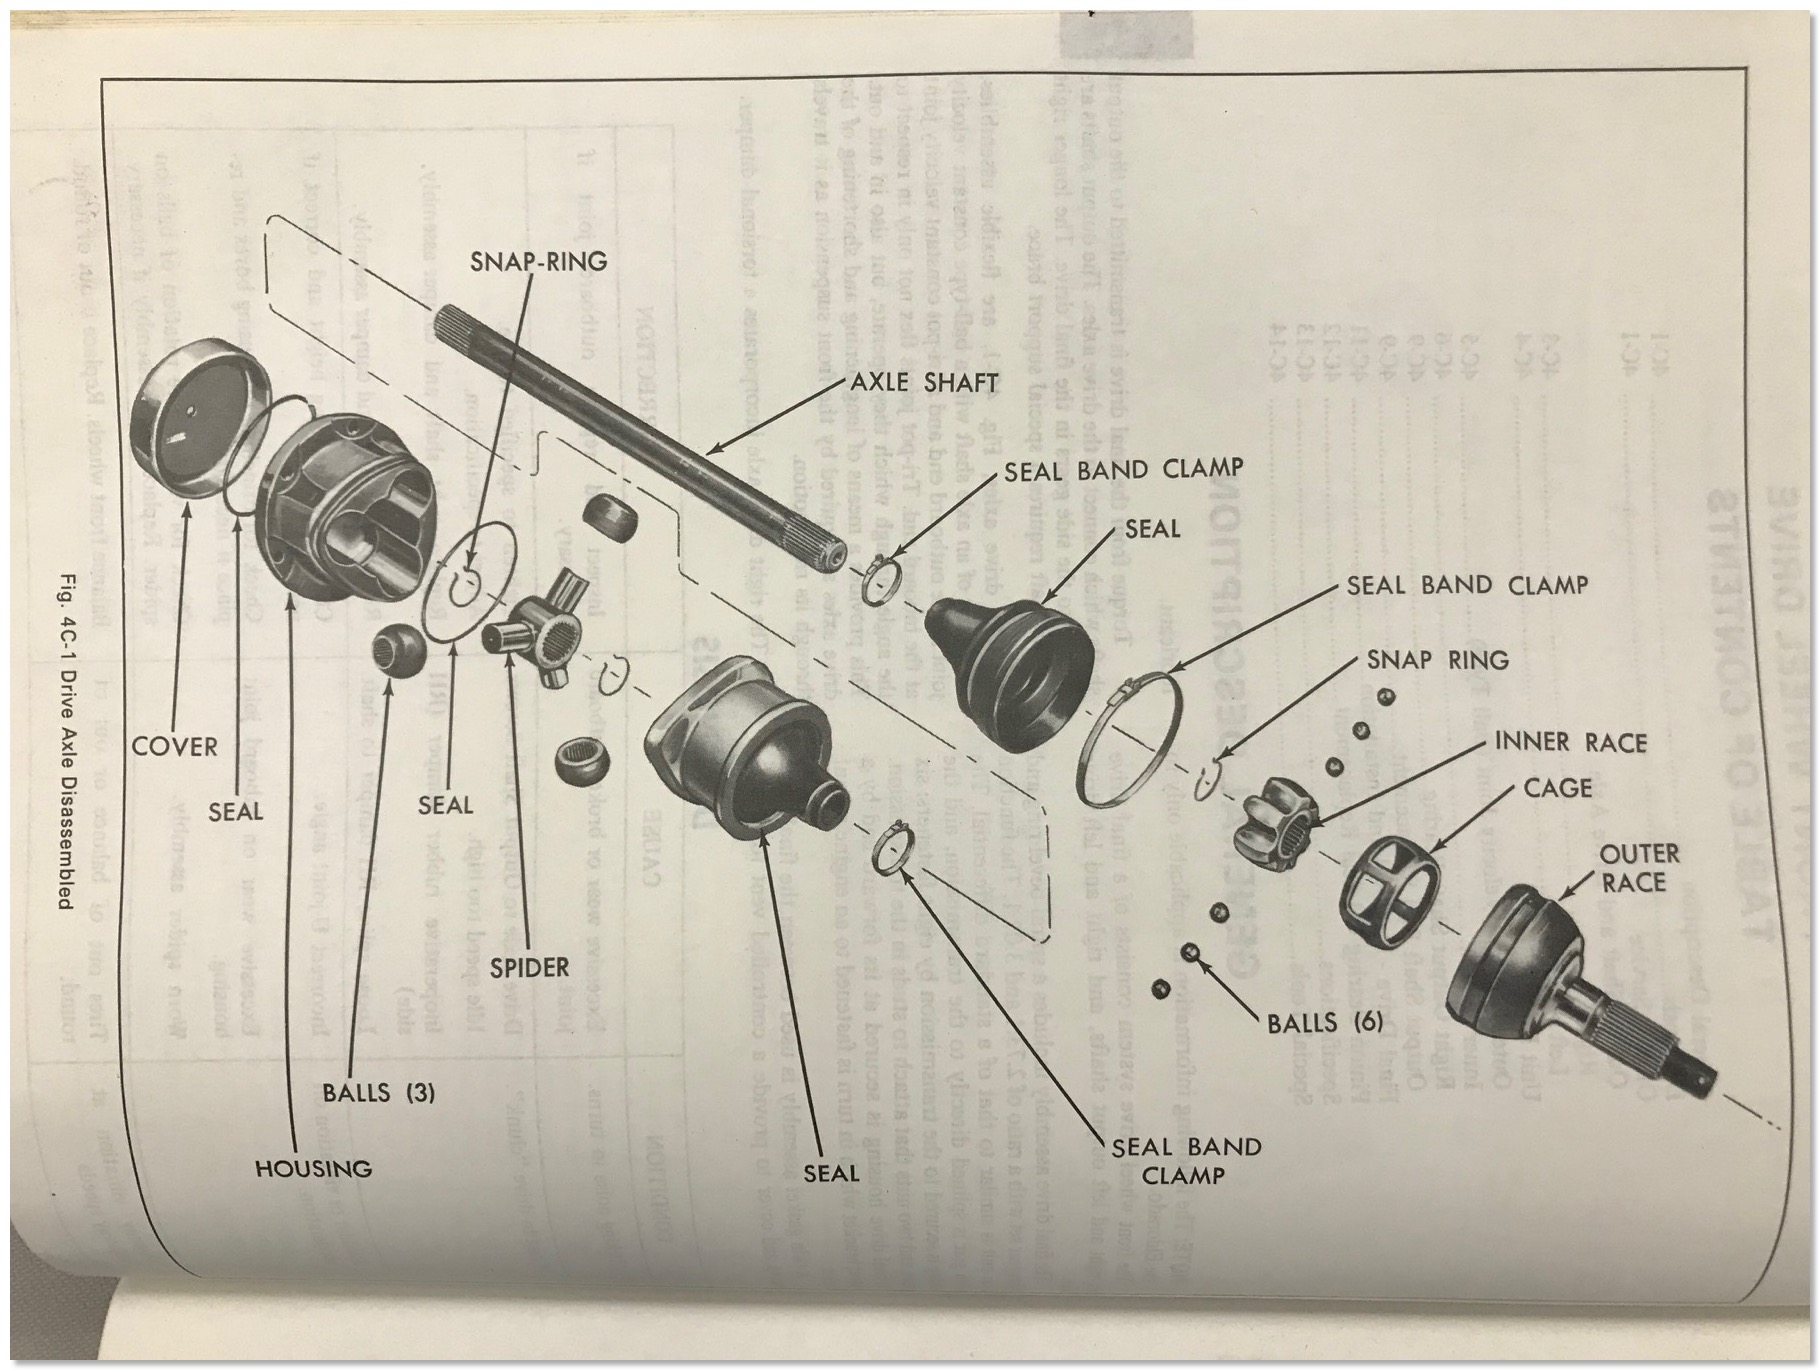
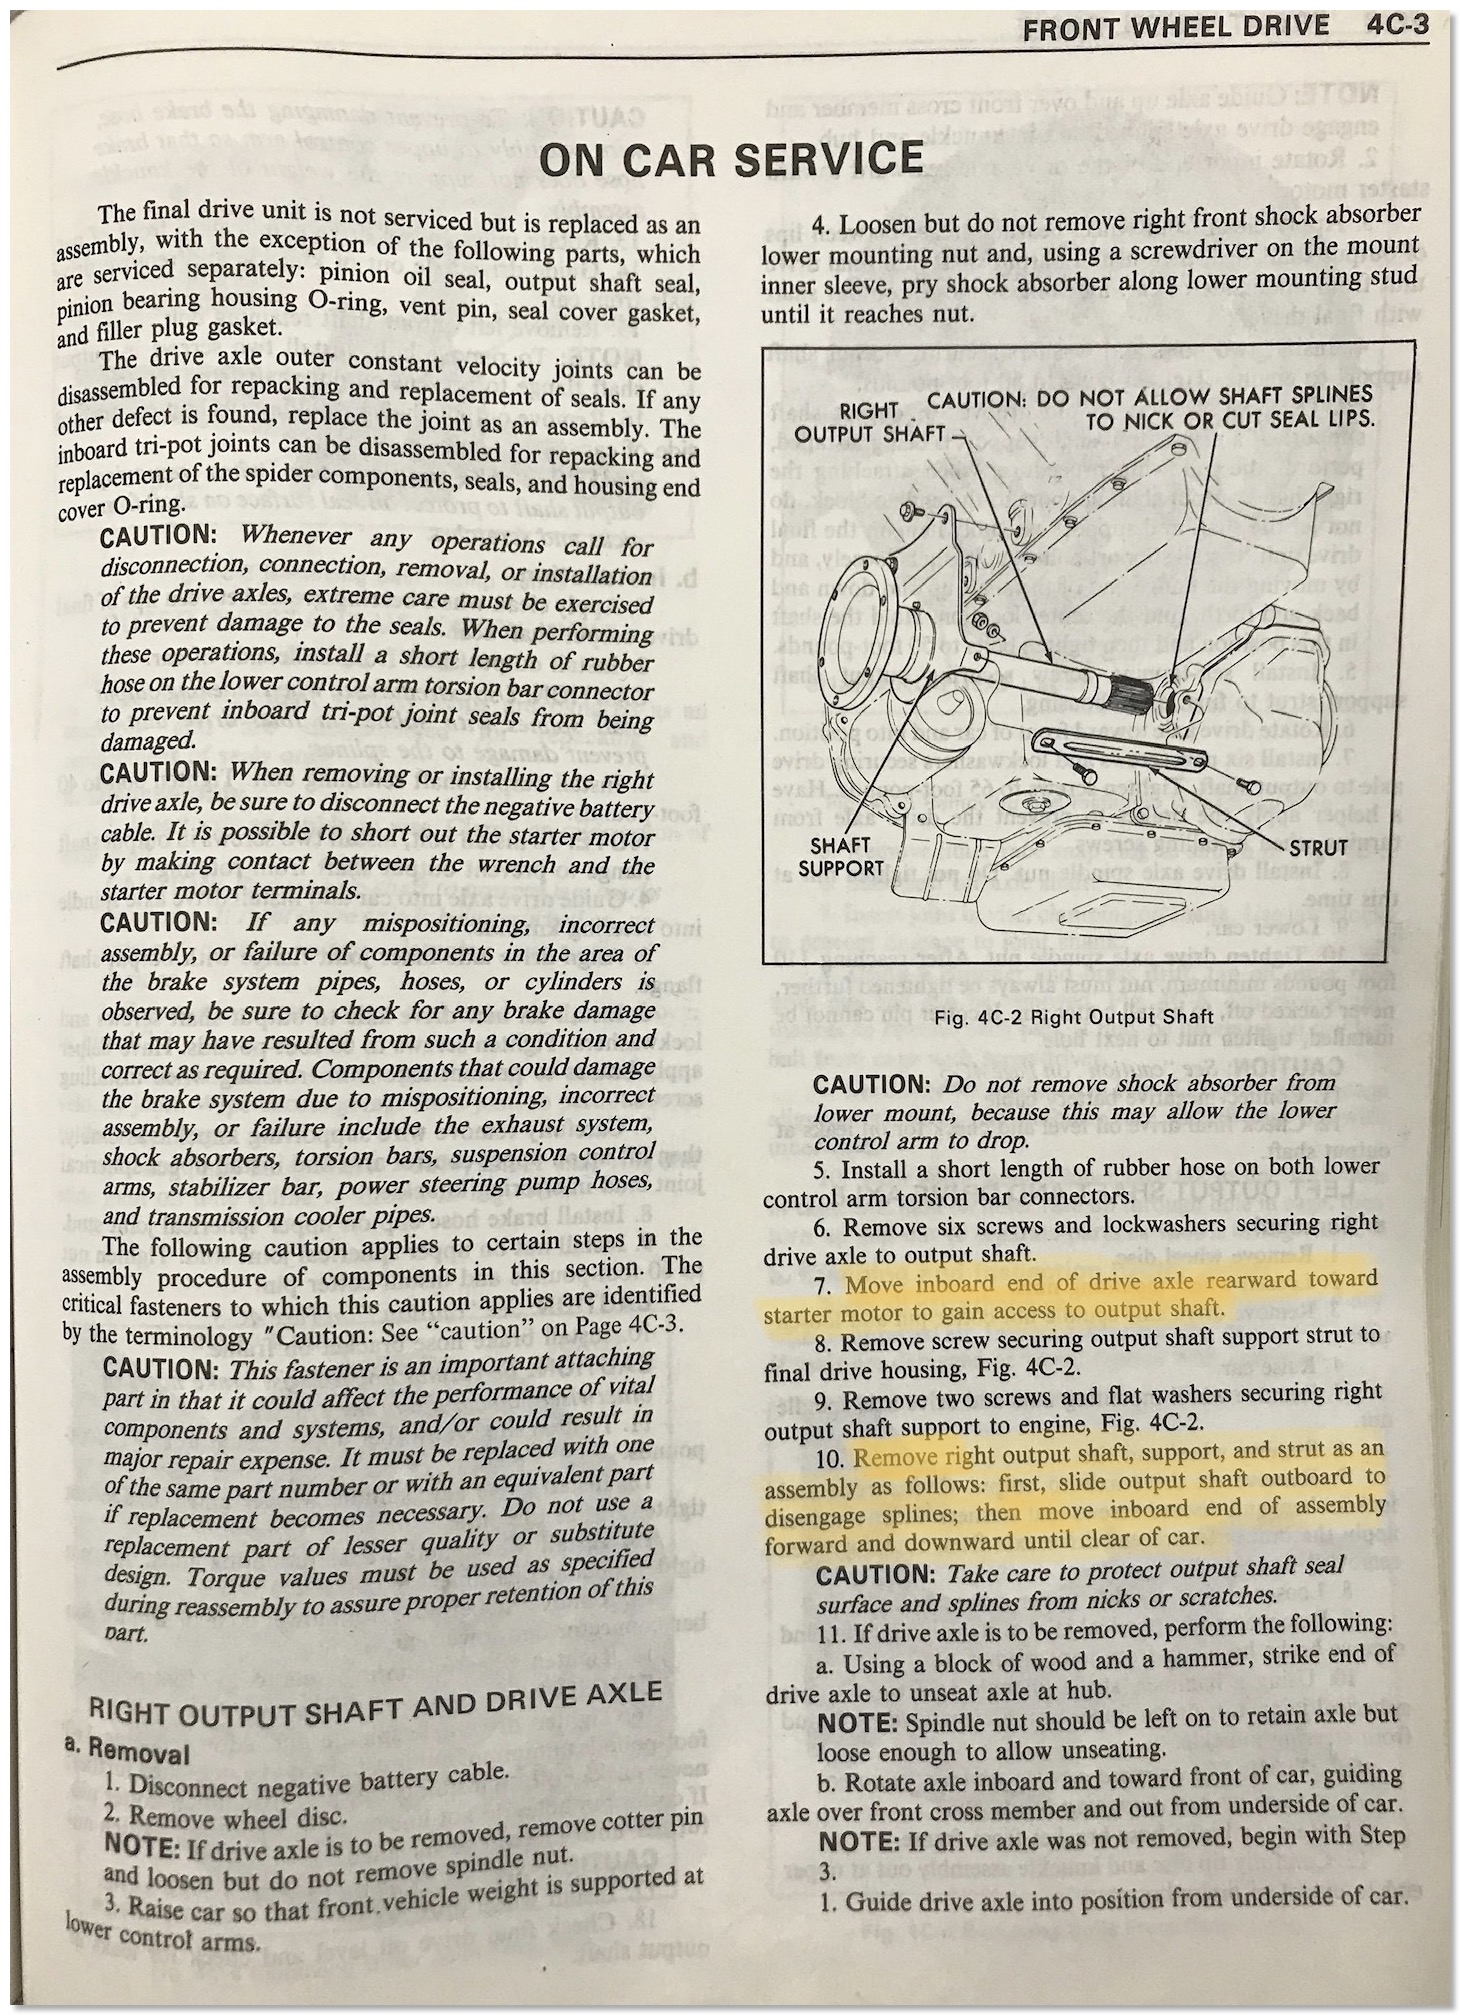
Step 7 and 10 (marked in yellow) did not work for me - I also had to detach the upper control arm from the steering knuckle like it is described for the left axle.
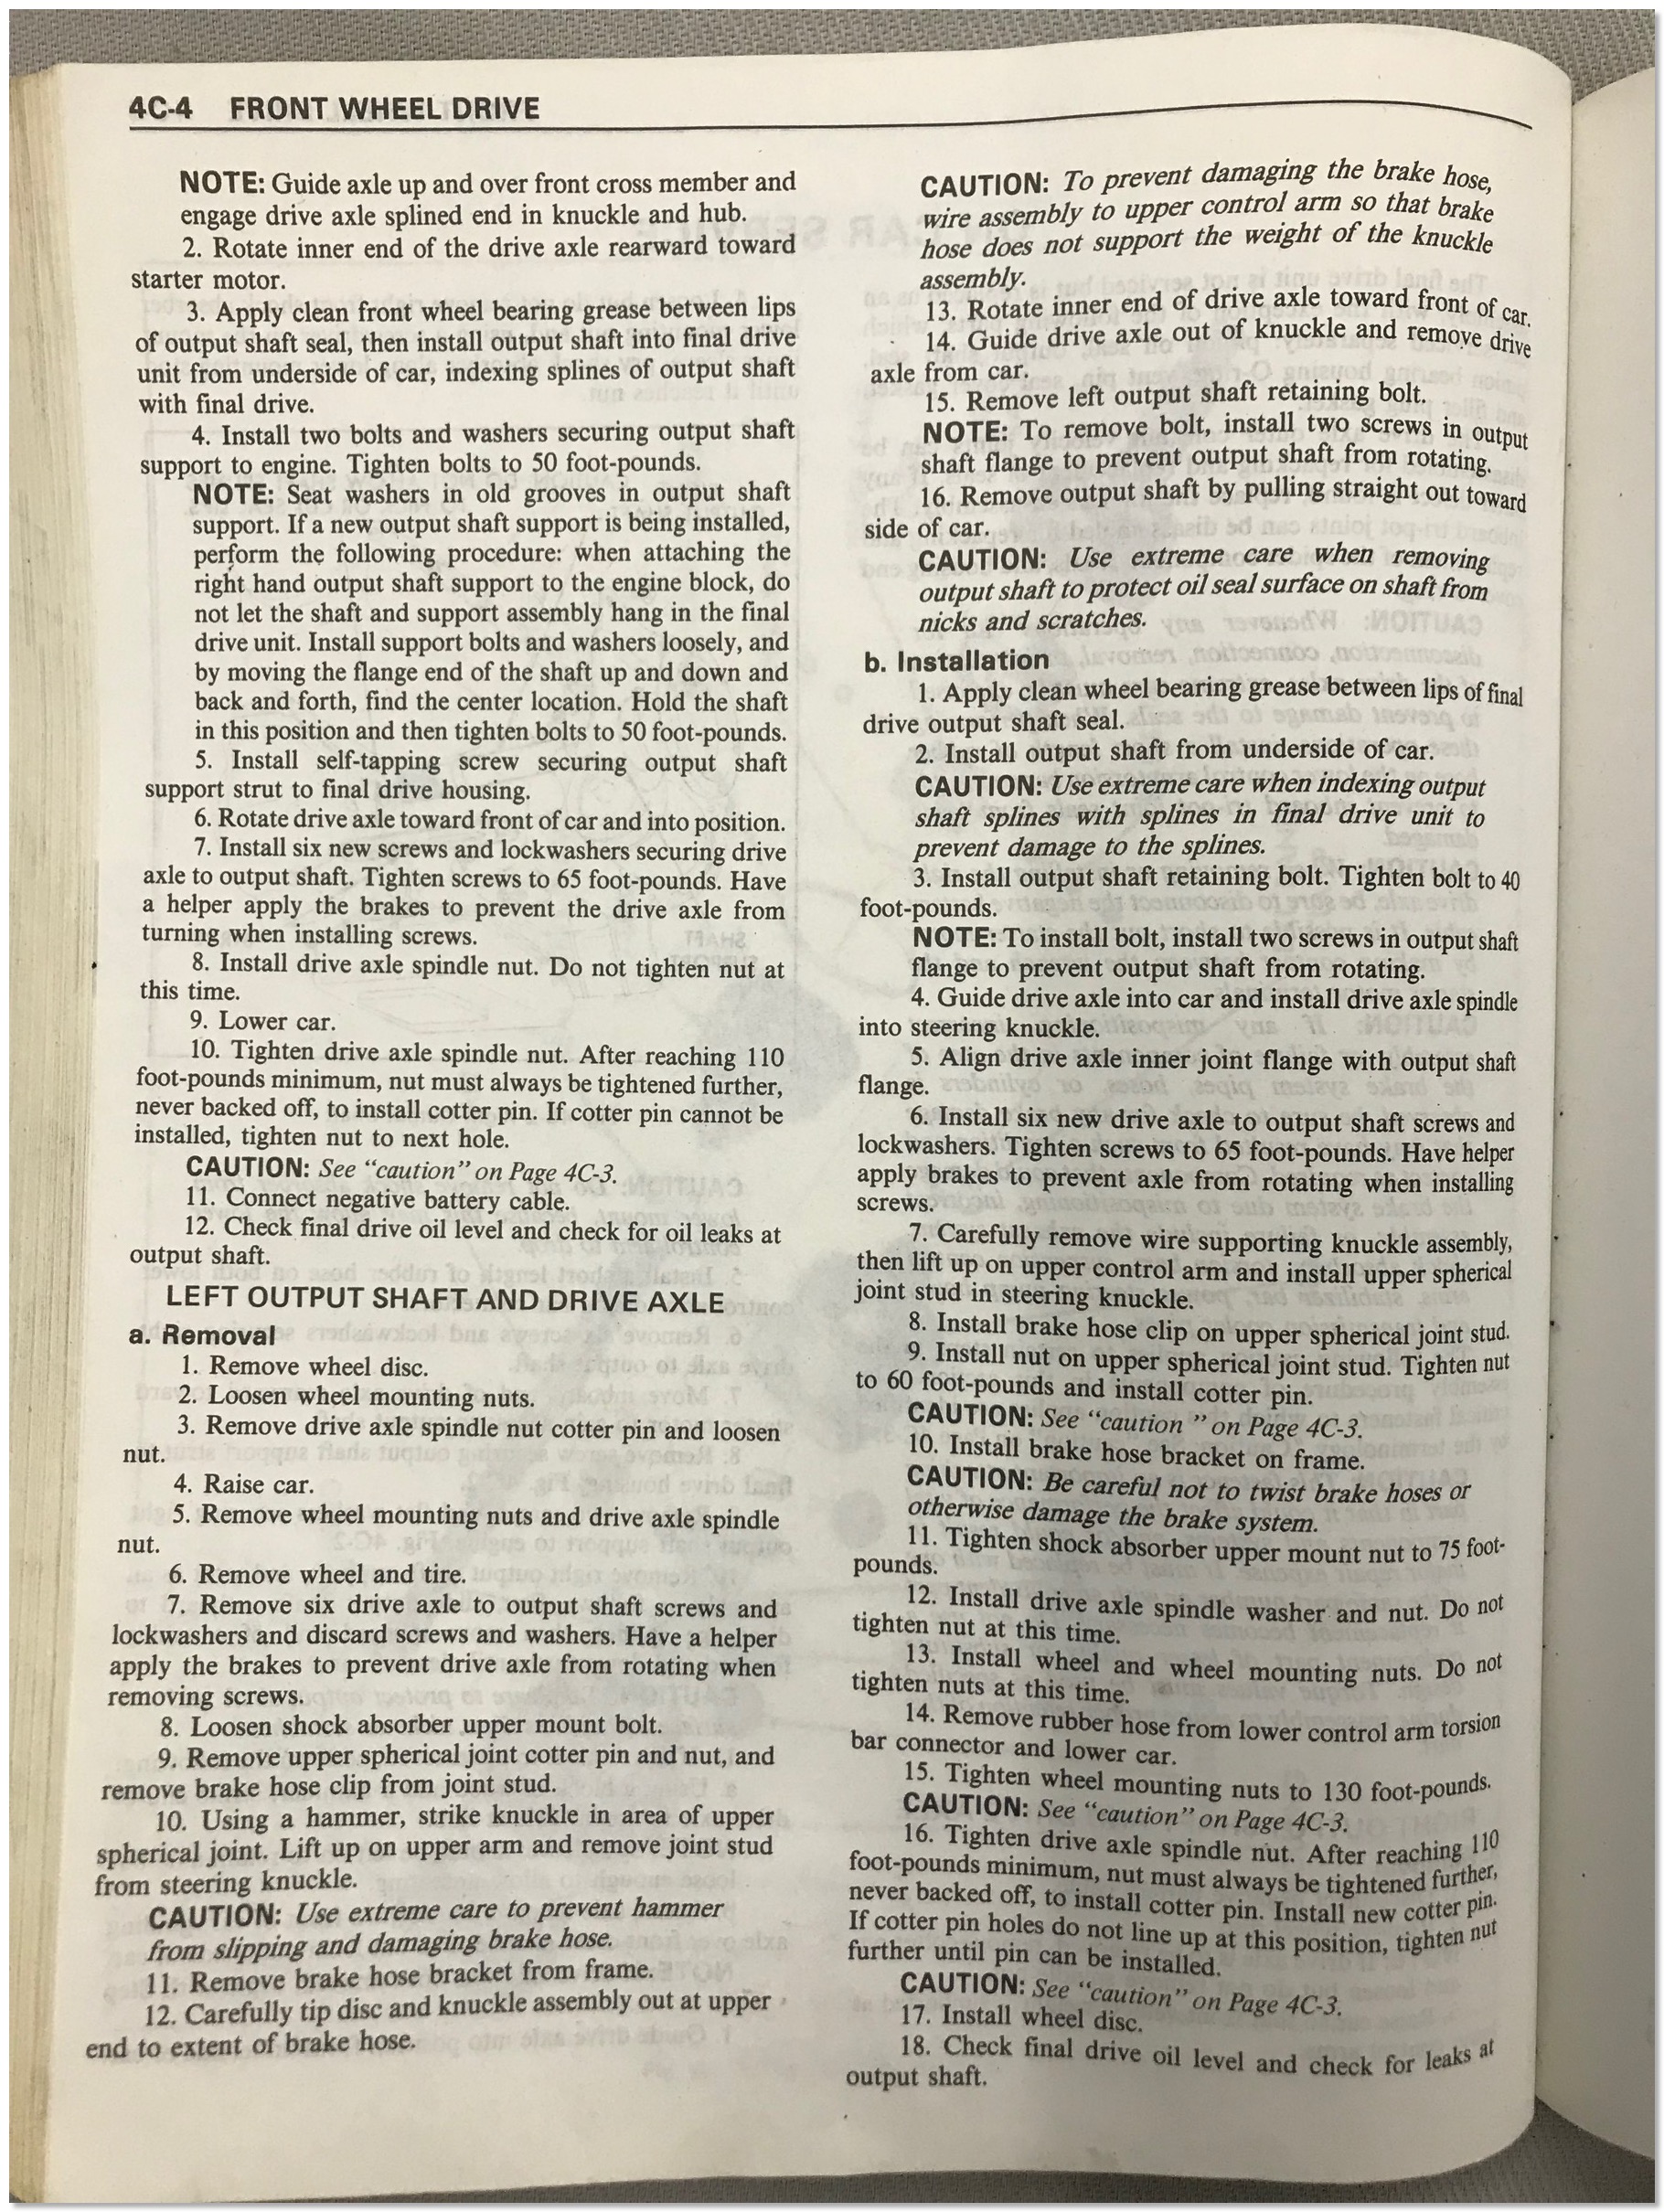
The original axle and rubber boot still in place.
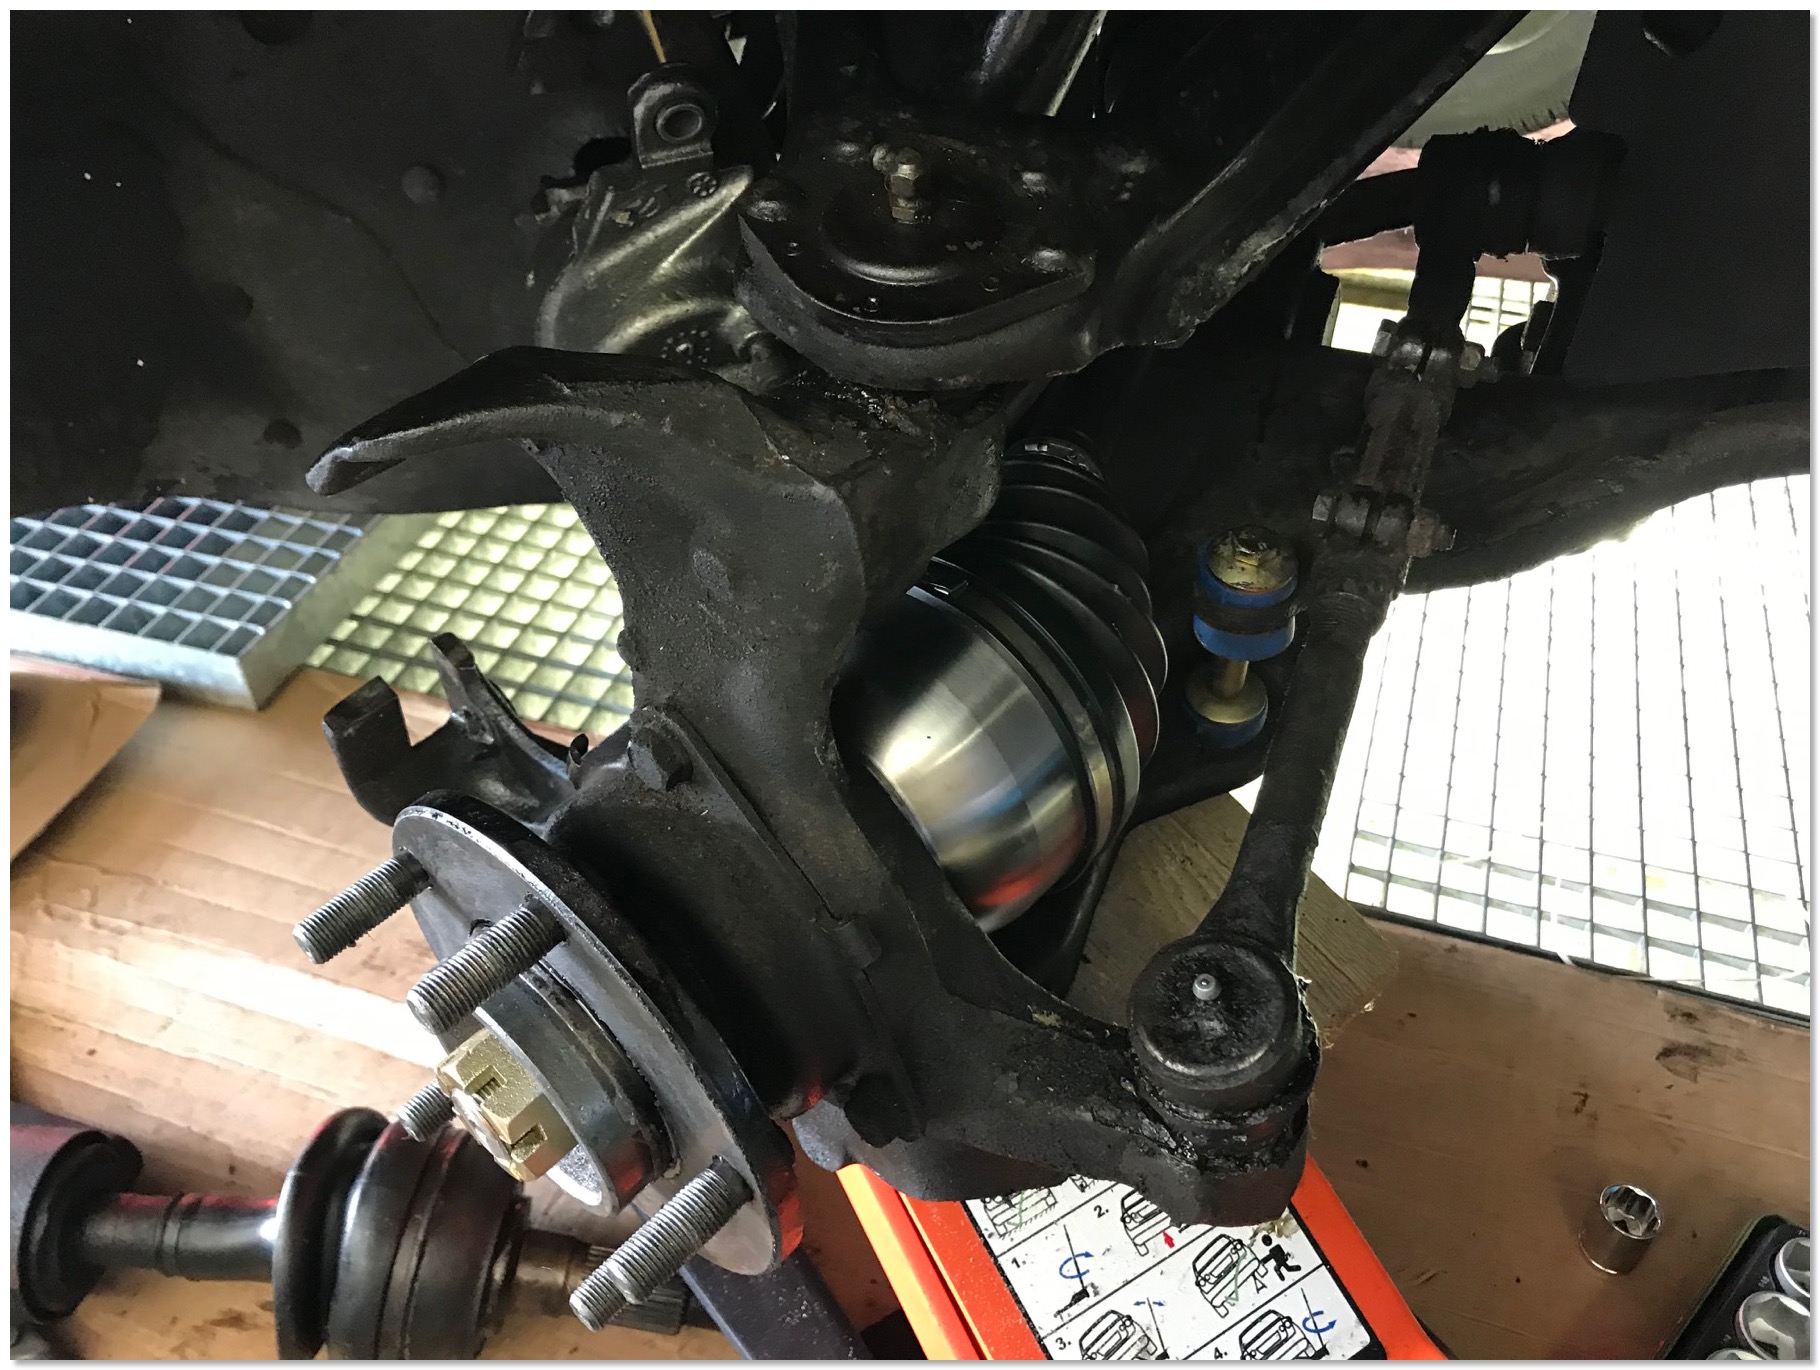 The replacement axle installed.
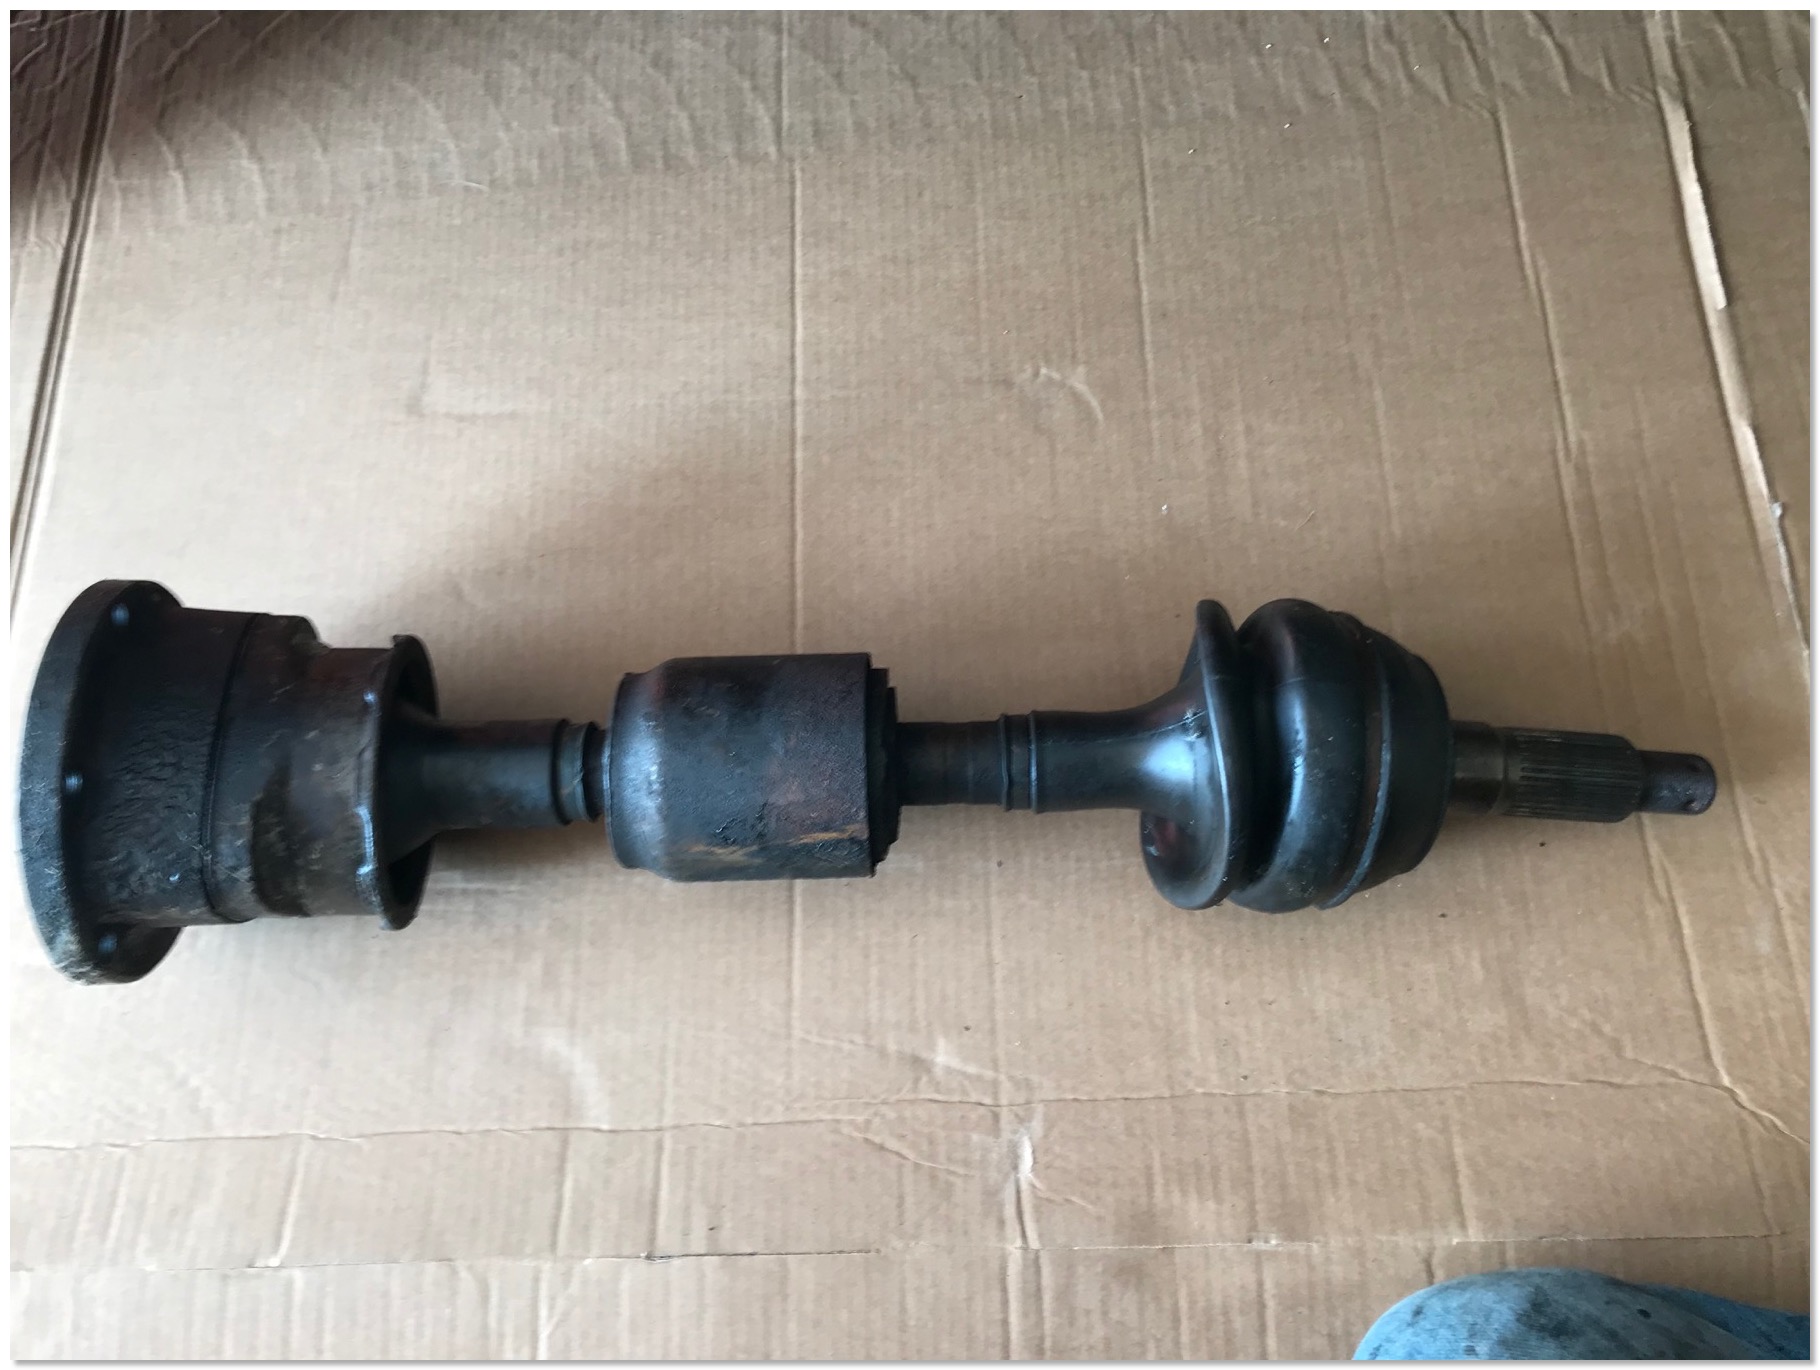
This is what Cadillac installed originally into the 1978 Cadillac Eldorado on the right side. The rubber dampener was used to minimize torque steer. Replacement axles do come without any dampener. Also note the different rubber boot design compared to modern replacements which use boots with 5 ribs.
1966 Cadillac Coupe deVille (16)
1967 Cadillac DeVille (54)
1967 Cadillac Eldorado (73)
1971 Lincoln Continental Mark III (24)
1974 Cadillac Coupe deVille (46)
1978 Cadillac Eldorado Biarritz (25)
1996 Buick Roadmaster (20)
Cadillac BIG Meet (2)
Car Shows (55)
Cruising (4)
CT6 (1)
For Sale (3)
Garage Stuff (32)
Pacer (1)
Restoration (140)
Various (55)
Video (20)
Website News (31)
- 6 way power seat
- 8-track
- 10 Ohm
- 429
- 1932
- 1957
- 1958
- 1958 Cadillac Eldorado Seville
- 1958 Cadillac Repair Tip
- 1959 Cadillac Eldorado Seville
- 1964
- 1965
- 1966
- 1966 Cadillac Coupe deVille
- 1966 Cadillac Repair Tips
- 1967
- 1967 Cadillac DeVille
- 1967 Cadillac Eldorado Repair Tip
- 1967 Cadillac Repair Tip
- 1967 Eldorado
- 1968
- 1970 Cadillac Eldorado
- 1971
- 1971 Lincoln Continental Mark III
- 1974
- 1974 Cadillac Coupe DeVille
- 1974 Cadillac Repair Tip
- 1976
- 1977
- 1978
- 1978 Cadillac Eldorado Biarritz
- 1978 Cadillac Repair Tip
- 1980 Cadillac Eldorado Biarritz
- 1996
- 2012
- 2014
- 2017
- 2018
- 2019
- 2022
- 2023
- 2025
- 3063206
- 7027235
- 7800483
- 7805675
- 7805676
- 12355706
- 17058531
- 17059968
- 17059969
- 22010515
- 22010661
- A.I.R
- A6
- AC
- AC Compressor
- AC Electrical Diagram
- ACC
- Accelerator Pump
- Accelorator pump
- Accident
- Actuators
- Adriatic Blue Metallic
- Ads
- Aftermovie
- Air Pump
- Aircondition
- AIRPUMP
- ALC
- Alternator
- AM
- AM-Transmitter
- Antenna
- Anti Rattle Clips
- Antique Gold
- Arizona Vintage Parts
- Arrival
- Article
- ASC
- Ash Tray removal
- ATC
- Atlantis Blue Firemist
- Austria
- Austro Classic
- Autolite SP-459
- Automatic Seat Back Release
- Award
- Banner
- Barn Find
- Battery
- Battery Tray
- Beach Race
- Bearing
- Bendix
- Biarritz
- Bigfoot
- Bill Hirsch Engine Enamel
- Bleeder Screws
- Bleeding
- Blower
- Bodywork
- Bolts
- Book
- Borg
- Brake Booster
- Brake Fluid
- Brake Gray
- Brakes
- Broken Bolt
- Brougham
- Bucket seats
- Buick
- Bumper End
- Bushings
- Cadillac
- Cadillac BIG Meet
- Cadillac BIG Meet
- Cadillac birthday cake
- Cadillac Blue
- Cadillac Color Selections Dealer Book
- Cadillac Coupe deVille
- Cadillac Dealer
- CADILLAC GRAND EUROPEAN
- Cadillac Meeting
- Cadillac Mini Meeting
- Camaro RS
- Caorle
- Car Show
- Carburetor
- Card
- Carpet
- Carter AFB
- Cavalry Twill Vinyl
- CB
- CBM
- CCCD
- Choke
- Christmas
- Citizens Band
- Classic Cadillac Club Deutschland
- Clay Towel
- Cleaning
- Clock
- Clockwork
- Clutch
- Clutch Coil
- Collector
- Colonial Yellow
- Color Coded Springs
- Commercial
- Compound
- Compressor
- Condenser
- Continental Mark III
- Control Head
- Conversion
- Convertible top
- Coolant
- Corona
- Cowl
- Cruise Control
- Cruising
- CT6
- CV Boots
- CV JOINTS
- D6230
- Dash Trim
- Decal Removal
- Decals
- Decoration
- Dehumidifier
- Delco Moraine
- Der Standard
- detailing
- Deville
- Diagnosis Chart
- Diagram
- Dial
- Digital Rotary Drum Clock
- Diner
- Disc Brakes
- Distributor
- Diverter Valve
- Door Jamb Switch
- Door Rubber Conduit
- Dornbirn
- Dot3
- Drive Shaft
- Driving tour
- Drum brakes
- Dry Ice Blasting
- Dry Ice Cleaning
- DVD
- Eastwood
- Eldorado
- Electric Choke Thermostat
- Electrical schematic
- Elvis
- Engine Bay
- Ep
- Epoxy floor
- Europe
- Evaporator
- Exide
- Factory Markings
- Fender Skirt
- Floor
- Flushing
- Flyer
- Foam
- For Sale
- Front AXLE
- Front brakes
- Front bumper filler
- Front Floor
- Front wheel bearing
- Fuel Filter
- Fuel Pump
- Fuel Sending Unit
- Fusible Link
- Garage
- Garage Cabinets
- Gasket
- GE
- Gear indicator
- General Time
- Glove box light
- Grand European
- H4
- Haus of Hot Rod
- Headlight Actuator
- Headlight doors
- Headlights
- Heater Core
- Heater Hose
- Heater Valve
- High Idle
- History
- Holley
- Honest John
- Hood
- Hood Emblem
- Hood Ornament
- Hose Clamp
- Hot Choke
- Hot Water Valve
- HotRod
- How to
- Hödlmayr
- Ignition Diagram
- Illuminated Entry
- John D‘Agostino
- John Foust
- Klassikwelt Bodensee
- Kremsmünster
- LaSalle
- Leather seats
- Light Switch
- Limited
- Lincoln
- Lincoln Mark III Repair Tip
- Low Mileage
- Magazine
- Marilyn Monroe
- Mark III
- Master Cylinder
- Master Switch
- Master Vacuum Switch
- Media Blasting
- Meeting
- Meguiras
- MK II
- Mobile
- Model
- Moldings
- Mom
- Mopar Nationals
- Mostkost Kustom
- Movie
- Munich
- Neon
- NOS
- Oberösterreicher des Tages
- oilchange
- ORF
- Overspray
- Pacer
- Paint
- Paint correction
- Paintjob
- Part Number
- Parts
- Patch Panel
- Perfect Circle
- Permabag
- Persian Lime
- Photo shooting
- Photoshooting
- Pictures
- PinUp
- POA Valve
- Power Antenna
- Power Servo
- Power Vent Windows
- Power Window
- Printed Circuit Board
- Programmer
- Pulley
- Quadrajet
- Quarter Panel
- Quartz Conversion
- R134
- Radiator
- Radio
- Rattle
- Rear brakes
- Rebuild
- Recalibrate
- RediRad
- Reed Switch
- Relais
- Relaunch
- Removing Overspray
- Repaint
- Repair
- Restoration
- RIP
- Roadhouse
- Roadmaster
- Rochester
- Rocker Arm Cover
- Rocker Panel Extension Clips
- Rostio
- Rotary Valve
- Rotterdam
- Rupes
- Rust removal
- Rust removal gel
- Sabre Wheels
- Sand Blasting
- Sandblasting
- Screed
- Season Greetings
- Seasons Greetings
- Seat Back Locks
- Seat Padding
- Seat Transmission
- See through ornament
- Self adjusters
- Self Starter
- Sepp's Garage
- Seville
- Sheetmetal
- Shocks
- shop manual
- short
- Sign
- Solenoid
- Spark Plug Wire Routing
- Speakers
- Special Award
- Speed Bleeder Screws
- Splash Guard
- Starter Diagram
- Starter Motor
- Steering Column
- Storage
- suction throttling valve
- sunroof
- suspension
- Swirl Mark removal
- Switzerland
- T3
- Taillight Cover
- Texan´s Choice Award
- Thermostat
- Tilt and Telescope
- Time capsule
- Tomsclub
- Torque Specifications
- Tower Hose Clamp
- Towtruck
- Trailer
- Transducer
- Transmission
- transmission control selector
- transmission control selector indicator light
- transmission shift indicator
- Treadle Vac
- Treffen
- Tri-Band
- Troubleshooting
- Trunk Cardboard Kit
- Trunk lid
- Trunk lining
- Trunk to bumper cover
- Turn Signal Switch
- TV
- Typisierung
- Ultimate Garage
- Underbody
- Undercarriage
- Undercoating
- Undercoating Removal
- Vacuum Booster
- Vacuum diagram
- Vacuum hoses
- Vacuum Master Switch
- Vacuum Schematic
- Vacuum Valve
- Valve Cover
- Various
- Vent Window Switch
- Vibration
- Vibrator
- Vicodec roof
- Video
- Vinegar
- Vinyl Roof
- Visitor
- Washer Fluid Float
- Washer Fluid Low Level Indicator
- Water Pump
- Wax
- Weatherstripping
- Website News
- Westclox
- Wheel Bearings
- Wheel Housing
- Wiesbaden
- Windlace
- Winter
- Wiring
- Wiring Diagram
- Wonderbar
- Workbench
- Zurzach
 GERALD´S CADILLACS - NEWS