The 67 Eldorado´s Automatic Climate Control System is back in working order
I suspected a vacuum leak somewhere in the system. Troubleshooting began with going through all the vacuum hoses. I replaced some which were a little worn out at the connectors. I also cut off the ends of most hoses, as they were all becoming a little loose during the last 40 years. I then plugged them in again.
Not much did change though.
When I came to the hose of the hot water valve and the delay relay, I had the first success. At least the blower motor would stay on in all “Auto” modes, even when the car was idling - but would still go off in “Fog” and “Ice”. I then suspected a leak in the power servo or in the dash controller. So I installed the power servo from my 67 DeVille where everything works perfectly, to be able to rule out any problems. Nothing changed though - the blower would still come on and off depending on the throttle position.
I then soon found the culprit of the whole issue - it was the master vacuum switch - which seems to have a problem with the internal electric switch. As I had a spare one around I installed it - and voilá - everything worked as it should. It always looked good when I checked it before.
I´m very happy that everything is back in working order. The only thing which I still have to repair is the fast idle diaphragm which completely dried out and is no longer functioning. Fortunately I do have a spare 429 engine in the garage from where I can grab and use this part - so I will repair it soon.
I then need a new condenser which is already on the way across the Atlantic coming from Old Auto Air.
By the way - Cadillactim has an excellent trouble shooting guide for the ACC on his website.
The evaporator had to be replaced as well along with the heater core. This is a pretty big task as you can see on the pictures below. You even have to remove the hood to get access to the whole unit. The fiberglass AC enclosure had to be repaired at my car as well as the previous owner tried to repair the evaporator and missed a screw and made a tear into the enclosure. The restoration shop repaired this professionally and it looks like new now.
The best troubleshooting guide for 1967 and 1968 Cadillac´s Automatic Climate Control Systems I got today from Gary Sisk - owner of a 1968 Cadillac.
This is a very easy to follow explanation which will save you a lot of time and you do not even need any special tools.
It was written by Lynn Nicholls and can be found on Stampies Cadillac page - here is the direct link to it.
Below you can find some pictures of my system:
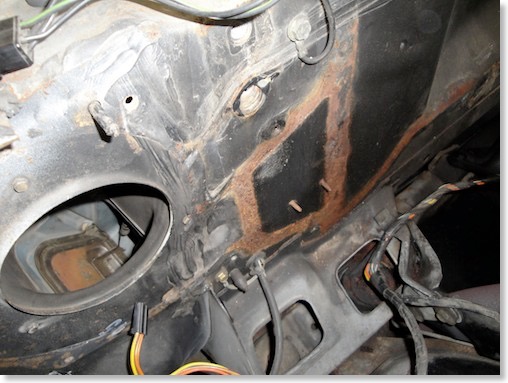
The whole AC unit has to be removed to get access to the evaporator and heater core... The slight surface rust that showed up where the gaskets were, was removed as well of course...
The big hole on the left is where the blower motor is installed.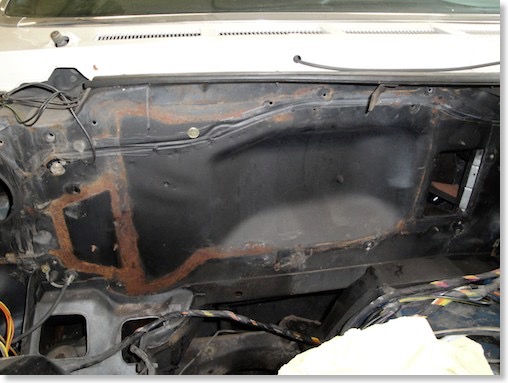
This is where the AC box usually is installed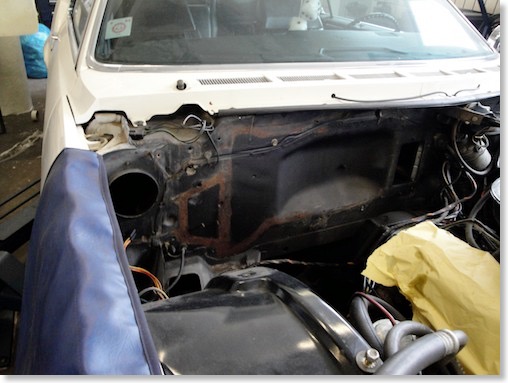
You can see how much has be removed just to get to the evaporator and heater core...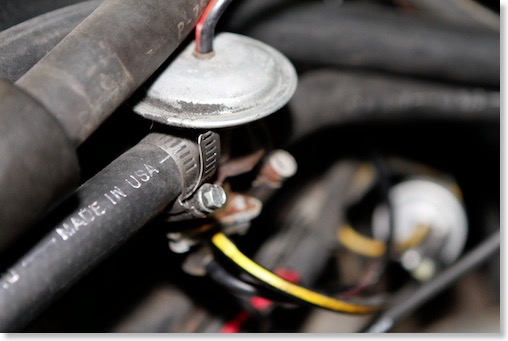
I discovered the first issue at the hot water valve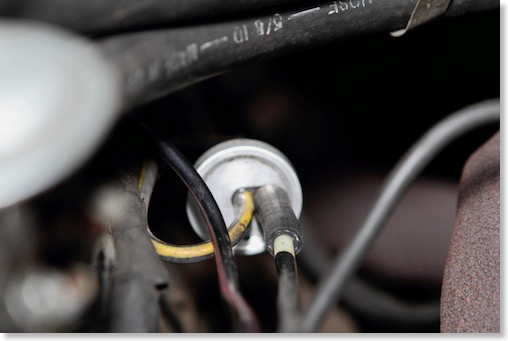
The hoses around the time relay delay were leaking a little bit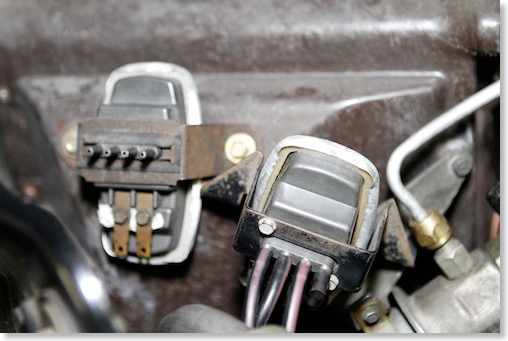
For testing purposes I hung a spare master vacuum switch into the car - this solved the problem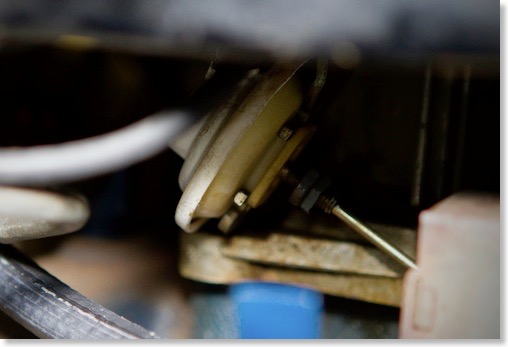
The old fast idle diaphragm was leaking and brittle and was replaced with a better one...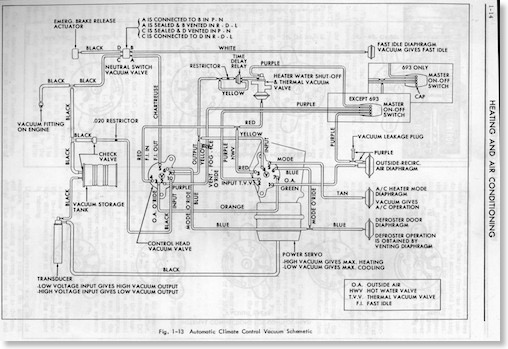
The 1967 Cadillac Automatic Climate Control Vacuum Schematic from the shop manual -
1968 is almost identical BTW... Click on the image for a larger view!
Here is a video about the Master Switch that a gentleman posted on youtube
1967 ELDORADO HEADLIGHT ISSUE - ONE STEP FURTHER
Glen wrote the following:
“If you take the panel under the steering column off I think you can reach up and disconnect the connector from the light switch. Or you maybe able to get a meter probe up there to check voltage. The battery connection to the switch for the headlights is on the 14 gauge yellow wire. This only supplies the headlights and front parking lights. If you have 12 volts there then your problem is in the switch. There is a circuit breaker in the switch and it may be bad or the contacts in the switch are bad. IIRC these switches have a vacuum switch on the side that operates the headlight doors. This makes them hard to find. They do not interchange with the 68 Eldorado because in 67 the parking lights only come on when the switch is pulled out to the first position while in 68 the parking lights come on with the headlights also. If you do not have voltage on the yellow wire then you should check the fusible link on the starter. It is an 18 gauge dark green wire that changes to a 14 gauge red with white tracer before it gets to the connector. Check for 12 volts at the connector and check the contacts in the connector. “
Glen was spot on with his diagnose and it turned out that the green 18 gauge fusible link was the culprit for my headlight problem as it came apart for unknown reasons.
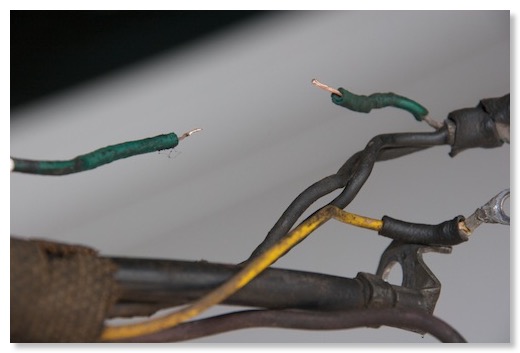
the green wire once was a fusible link - it fell into pieces when I slightly pulled on it
As a follow-up Glen recommended the following:
“You might want to look closely at the break in the link. See if it is melted or did was it broken by mechanical means. If it was just pulled apart or cut then you have to check what caused that.
To trouble shoot this if it was actually melted due to over current, I would unplug the headlights and front parking lights, and temporarily connect a headlight or other big light bulb, in place of the fusible link. You can then try things without blowing fuses. With the troubleshooting light in place it will light up brightly if there is a direct short. With the headlights and front parking lights disconnected the test light should not light up at all under any condition. You should be able to move change the position of the headlight switch, switch from high to low beam (light switch in the headlight position); wiggle the wire harness anywhere and not light up the test light. If it does you have found the short.”
I did this procedure today but it did not show any shorts. I then reconnected the front lights and everything did work again. I will now have to find a replacement fusible link which is very uncommon over here in Europe. I will replace it together with the positive battery cable where the clamp is almost falling apart. I hope the issue wont come back. It looks like the fusible link maybe only fell apart due to age as it did not show any signs of burning. Its located very close to the starter and the exhaust manifold - so maybe 42 years of dirt and heat just made it crumble into pieces....
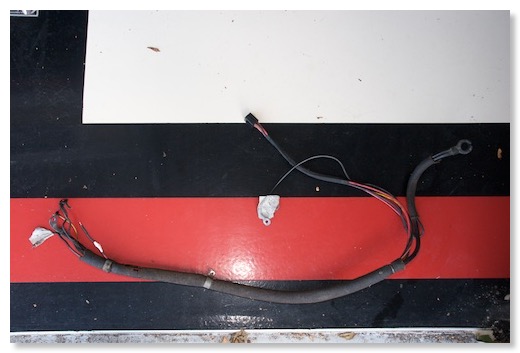
the completely removed positive battery cable harness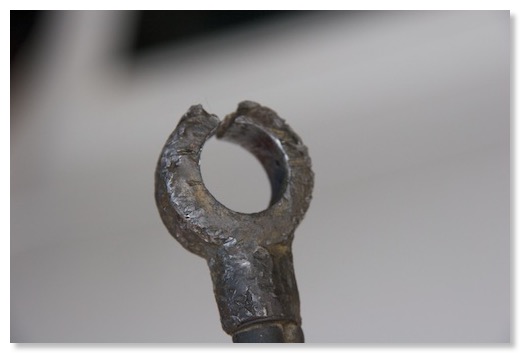
the original battery clamp - its already missing the spring part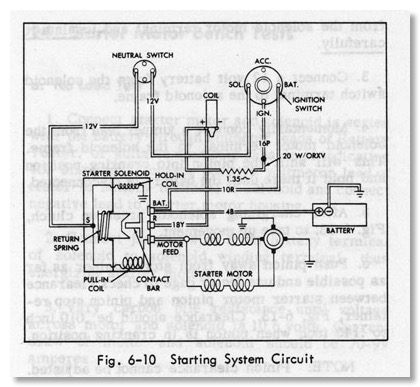
The starting circuit diagram is showing the battery cables - Click for larger picture!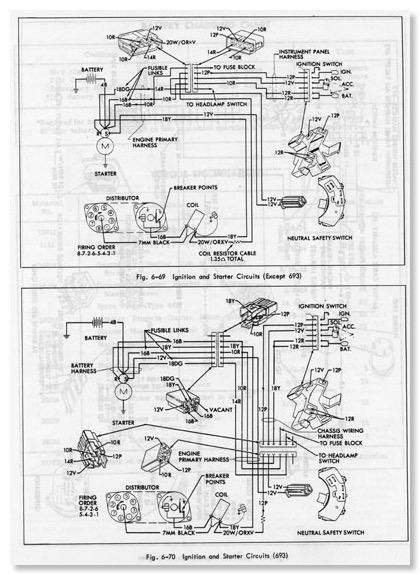
The Iginition and Starter Circuit Diagram for the Eldorado (693) and the other Cadillacs of 1967.
Click for larger version!
1966 Cadillac Coupe deVille (15)
1967 Cadillac DeVille (54)
1967 Cadillac Eldorado (71)
1971 Lincoln Continental Mark III (23)
1974 Cadillac Coupe deVille (45)
1978 Cadillac Eldorado Biarritz (24)
1996 Buick Roadmaster (19)
Car Shows (53)
Cruising (4)
For Sale (3)
Garage Stuff (32)
Pacer (1)
Restoration (137)
Various (55)
Video (16)
Website News (30)
- 6 way power seat
- 8-track
- 10 Ohm
- 429
- 1932
- 1957
- 1958
- 1958 Cadillac Eldorado Seville
- 1958 Cadillac Repair Tip
- 1959 Cadillac Eldorado Seville
- 1964
- 1965
- 1966
- 1966 Cadillac Coupe deVille
- 1966 Cadillac Repair Tips
- 1967
- 1967 Cadillac DeVille
- 1967 Cadillac Eldorado Repair Tip
- 1967 Cadillac Repair Tip
- 1967 Eldorado
- 1968
- 1970 Cadillac Eldorado
- 1971
- 1971 Lincoln Continental Mark III
- 1974
- 1974 Cadillac Coupe DeVille
- 1974 Cadillac Repair Tip
- 1976
- 1977
- 1978
- 1978 Cadillac Eldorado Biarritz
- 1978 Cadillac Repair Tip
- 1980 Cadillac Eldorado Biarritz
- 1996
- 2012
- 2014
- 2017
- 2018
- 2019
- 2022
- 2023
- 3063206
- 7027235
- 7800483
- 7805675
- 7805676
- 12355706
- 17058531
- 17059968
- 17059969
- 22010515
- 22010661
- A.I.R
- A6
- AC
- AC Compressor
- AC Electrical Diagram
- ACC
- Accelerator Pump
- Accelorator pump
- Actuators
- Adriatic Blue Metallic
- Ads
- Aftermovie
- Air Pump
- Aircondition
- AIRPUMP
- ALC
- Alternator
- AM
- AM-Transmitter
- Antenna
- Anti Rattle Clips
- Antique Gold
- Arizona Vintage Parts
- Arrival
- Article
- ASC
- Ash Tray removal
- ATC
- Atlantis Blue Firemist
- Austria
- Austro Classic
- Autolite SP-459
- Automatic Seat Back Release
- Award
- Banner
- Barn Find
- Battery
- Battery Tray
- Beach Race
- Bearing
- Bendix
- Biarritz
- Bigfoot
- Bill Hirsch Engine Enamel
- Bleeder Screws
- Blower
- Bolts
- Borg
- Brake Booster
- Brake Fluid
- Brake Gray
- Brakes
- Broken Bolt
- Brougham
- Bucket seats
- Buick
- Bumper End
- Bushings
- Cadillac
- Cadillac BIG Meet
- Cadillac BIG Meet
- Cadillac birthday cake
- Cadillac Blue
- Cadillac Color Selections Dealer Book
- Cadillac Coupe deVille
- Cadillac Dealer
- Cadillac Meeting
- Cadillac Mini Meeting
- Camaro RS
- Caorle
- Car Show
- Carburetor
- Card
- Carpet
- Carter AFB
- Cavalry Twill Vinyl
- CB
- CBM
- CCCD
- Choke
- Christmas
- Citizens Band
- Classic Cadillac Club Deutschland
- Clay Towel
- Cleaning
- Clock
- Clockwork
- Clutch
- Clutch Coil
- Collector
- Colonial Yellow
- Color Coded Springs
- Commercial
- Compound
- Compressor
- Condenser
- Continental Mark III
- Control Head
- Conversion
- Convertible top
- Coolant
- Corona
- Cowl
- Cruise Control
- Cruising
- CV Boots
- CV JOINTS
- D6230
- Dash Trim
- Decal Removal
- Decals
- Decoration
- Dehumidifier
- Delco Moraine
- Der Standard
- detailing
- Deville
- Diagnosis Chart
- Diagram
- Dial
- Digital Rotary Drum Clock
- Diner
- Disc Brakes
- Distributor
- Diverter Valve
- Door Jamb Switch
- Door Rubber Conduit
- Dornbirn
- Dot3
- Drive Shaft
- Driving tour
- Drum brakes
- Dry Ice Blasting
- Dry Ice Cleaning
- DVD
- Eastwood
- Eldorado
- Electric Choke Thermostat
- Electrical schematic
- Elvis
- Engine Bay
- Ep
- Epoxy floor
- Europe
- Evaporator
- Exide
- Factory Markings
- Fender Skirt
- Floor
- Flushing
- Foam
- For Sale
- Front AXLE
- Front brakes
- Front bumper filler
- Front Floor
- Front wheel bearing
- Fuel Filter
- Fuel Pump
- Fuel Sending Unit
- Fusible Link
- Garage
- Garage Cabinets
- Gasket
- GE
- Gear indicator
- General Time
- Glove box light
- Grand European
- H4
- Haus of Hot Rod
- Headlight Actuator
- Headlight doors
- Headlights
- Heater Core
- Heater Hose
- Heater Valve
- High Idle
- Holley
- Honest John
- Hood
- Hood Emblem
- Hood Ornament
- Hose Clamp
- Hot Choke
- Hot Water Valve
- HotRod
- How to
- Hödlmayr
- Ignition Diagram
- Illuminated Entry
- John D‘Agostino
- John Foust
- Klassikwelt Bodensee
- Kremsmünster
- LaSalle
- Leather seats
- Light Switch
- Limited
- Lincoln
- Lincoln Mark III Repair Tip
- Low Mileage
- Magazine
- Marilyn Monroe
- Mark III
- Master Cylinder
- Master Switch
- Master Vacuum Switch
- Media Blasting
- Meeting
- Meguiras
- MK II
- Mobile
- Model
- Moldings
- Mom
- Mopar Nationals
- Mostkost Kustom
- Movie
- Neon
- NOS
- Oberösterreicher des Tages
- oilchange
- ORF
- Overspray
- Pacer
- Paint
- Paint correction
- Paintjob
- Part Number
- Parts
- Patch Panel
- Perfect Circle
- Permabag
- Persian Lime
- Photo shooting
- Photoshooting
- Pictures
- PinUp
- POA Valve
- Power Antenna
- Power Servo
- Power Vent Windows
- Power Window
- Printed Circuit Board
- Programmer
- Pulley
- Quadrajet
- Quarter Panel
- Quartz Conversion
- R134
- Radiator
- Radio
- Rattle
- Rear brakes
- Rebuild
- Recalibrate
- RediRad
- Reed Switch
- Relais
- Relaunch
- Removing Overspray
- Repaint
- Repair
- Restoration
- RIP
- Roadhouse
- Roadmaster
- Rochester
- Rocker Arm Cover
- Rocker Panel Extension Clips
- Rostio
- Rotary Valve
- Rotterdam
- Rupes
- Rust removal
- Rust removal gel
- Sabre Wheels
- Sand Blasting
- Sandblasting
- Screed
- Season Greetings
- Seasons Greetings
- Seat Back Locks
- Seat Padding
- Seat Transmission
- See through ornament
- Self adjusters
- Sepp's Garage
- Seville
- Sheetmetal
- Shocks
- shop manual
- short
- Sign
- Solenoid
- Spark Plug Wire Routing
- Speakers
- Special Award
- Speed Bleeder Screws
- Splash Guard
- Starter Diagram
- Starter Motor
- Steering Column
- Storage
- suction throttling valve
- sunroof
- suspension
- Swirl Mark removal
- Switzerland
- T3
- Taillight Cover
- Texan´s Choice Award
- Thermostat
- Tilt and Telescope
- Time capsule
- Tomsclub
- Torque Specifications
- Tower Hose Clamp
- Towtruck
- Transducer
- Transmission
- transmission control selector
- transmission control selector indicator light
- transmission shift indicator
- Treadle Vac
- Treffen
- Tri-Band
- Troubleshooting
- Trunk Cardboard Kit
- Trunk lining
- Trunk to bumper cover
- Turn Signal Switch
- TV
- Typisierung
- Ultimate Garage
- Underbody
- Undercarriage
- Undercoating
- Undercoating Removal
- Vacuum Booster
- Vacuum diagram
- Vacuum hoses
- Vacuum Master Switch
- Vacuum Schematic
- Vacuum Valve
- Valve Cover
- Various
- Vent Window Switch
- Vibration
- Vibrator
- Vicodec roof
- Video
- Vinegar
- Vinyl Roof
- Visitor
- Washer Fluid Float
- Washer Fluid Low Level Indicator
- Water Pump
- Wax
- Weatherstripping
- Website News
- Westclox
- Wheel Bearings
- Wheel Housing
- Wiesbaden
- Windlace
- Winter
- Wiring
- Wiring Diagram
- Wonderbar
- Workbench
- Zurzach
 GERALD´S CADILLACS - NEWS