 GERALD´S CADILLACS - NEWS
POST CADILLAC BIG MEET CLEAN UP
PHOTOSHOOTING WITH MY 1974 CADILLAC
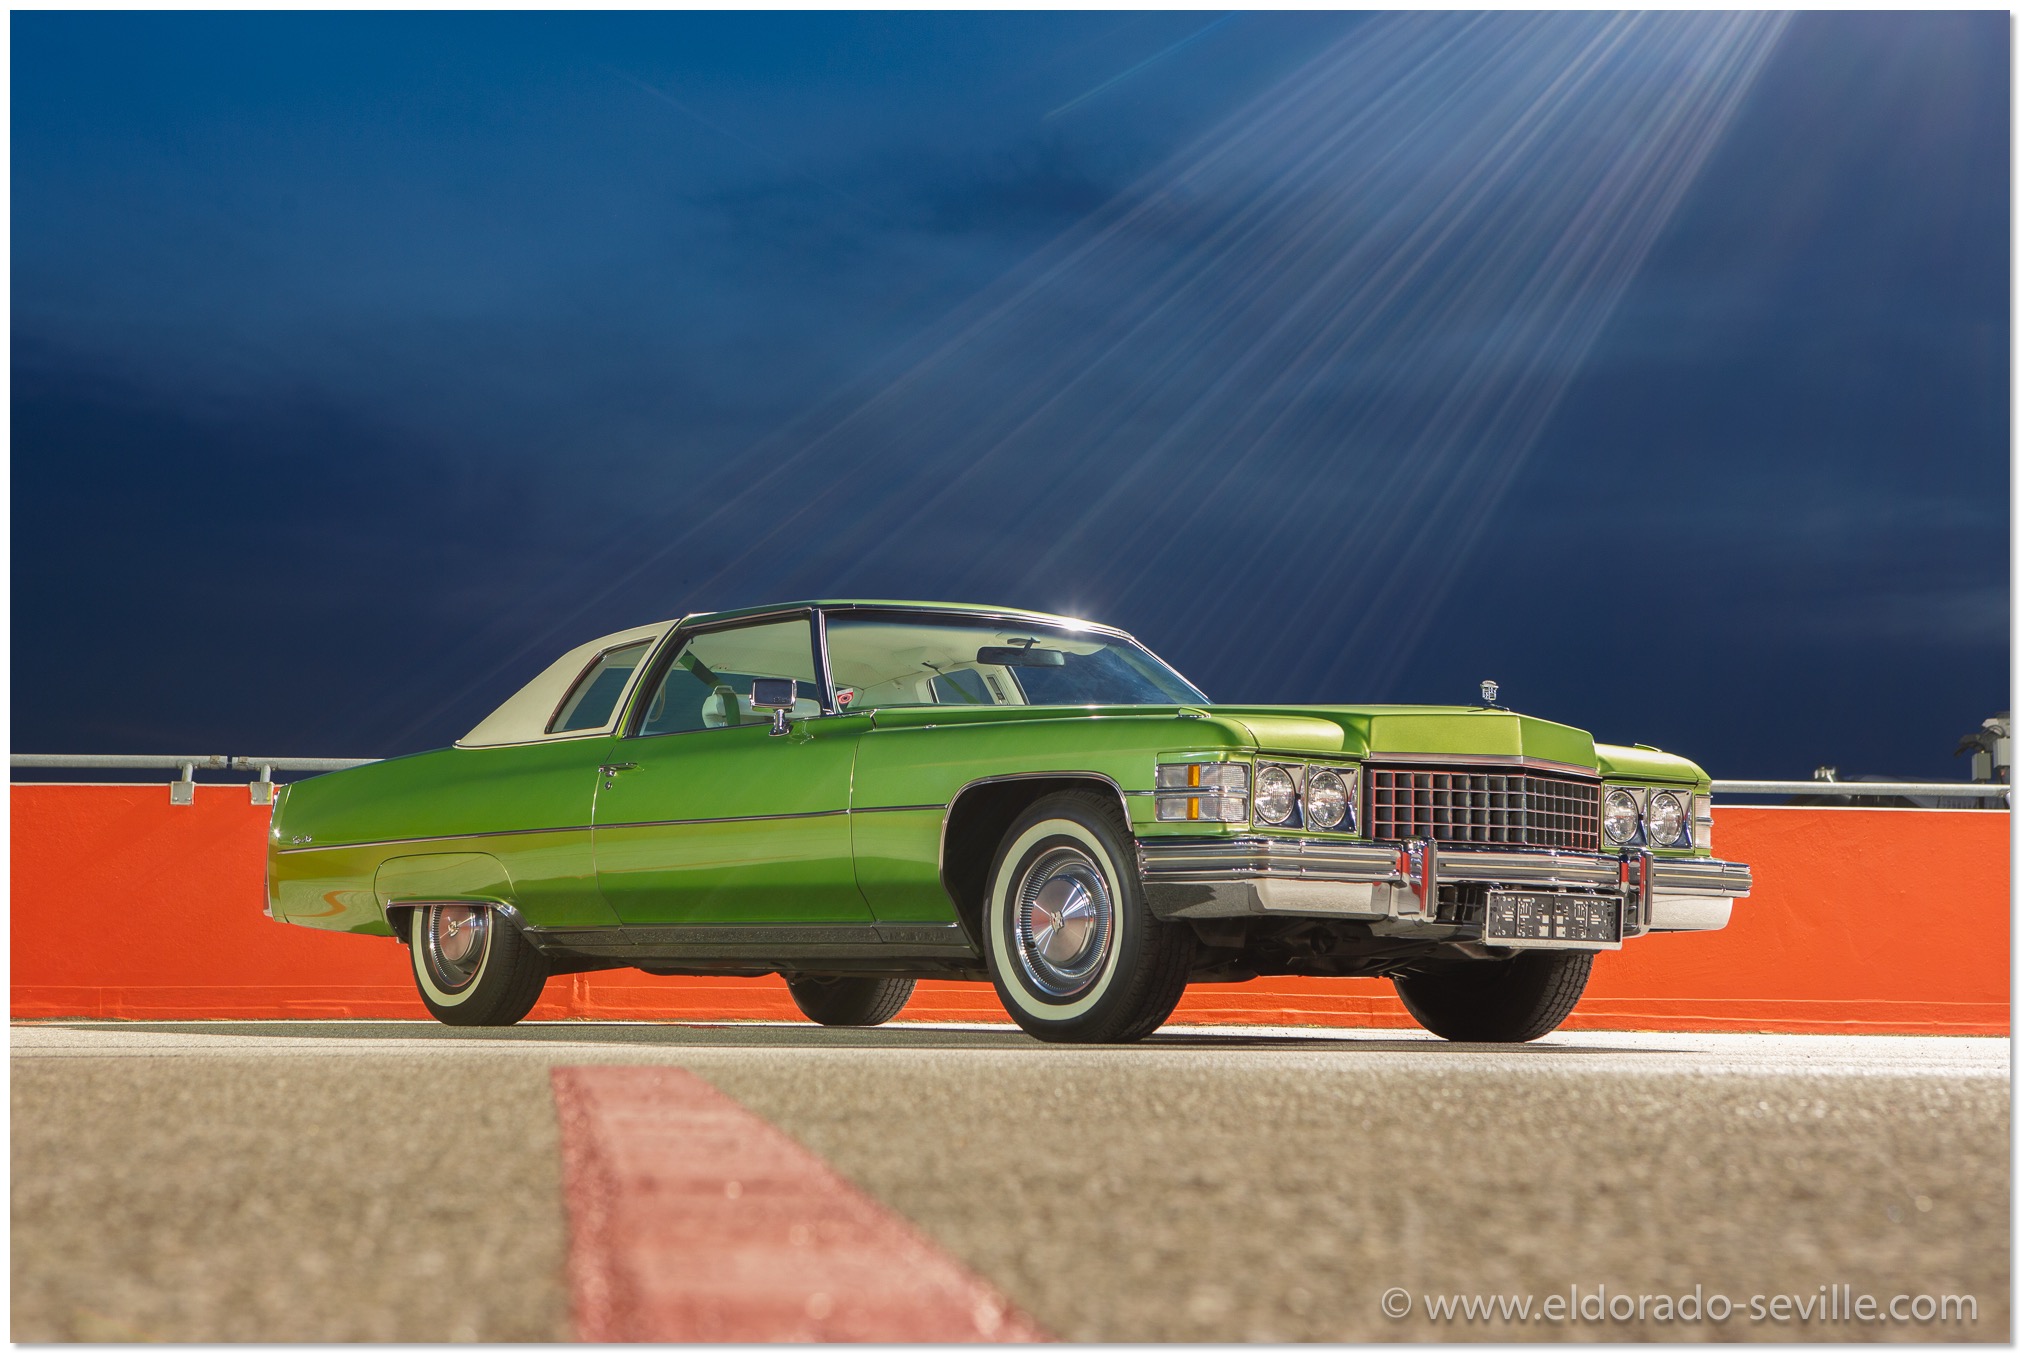
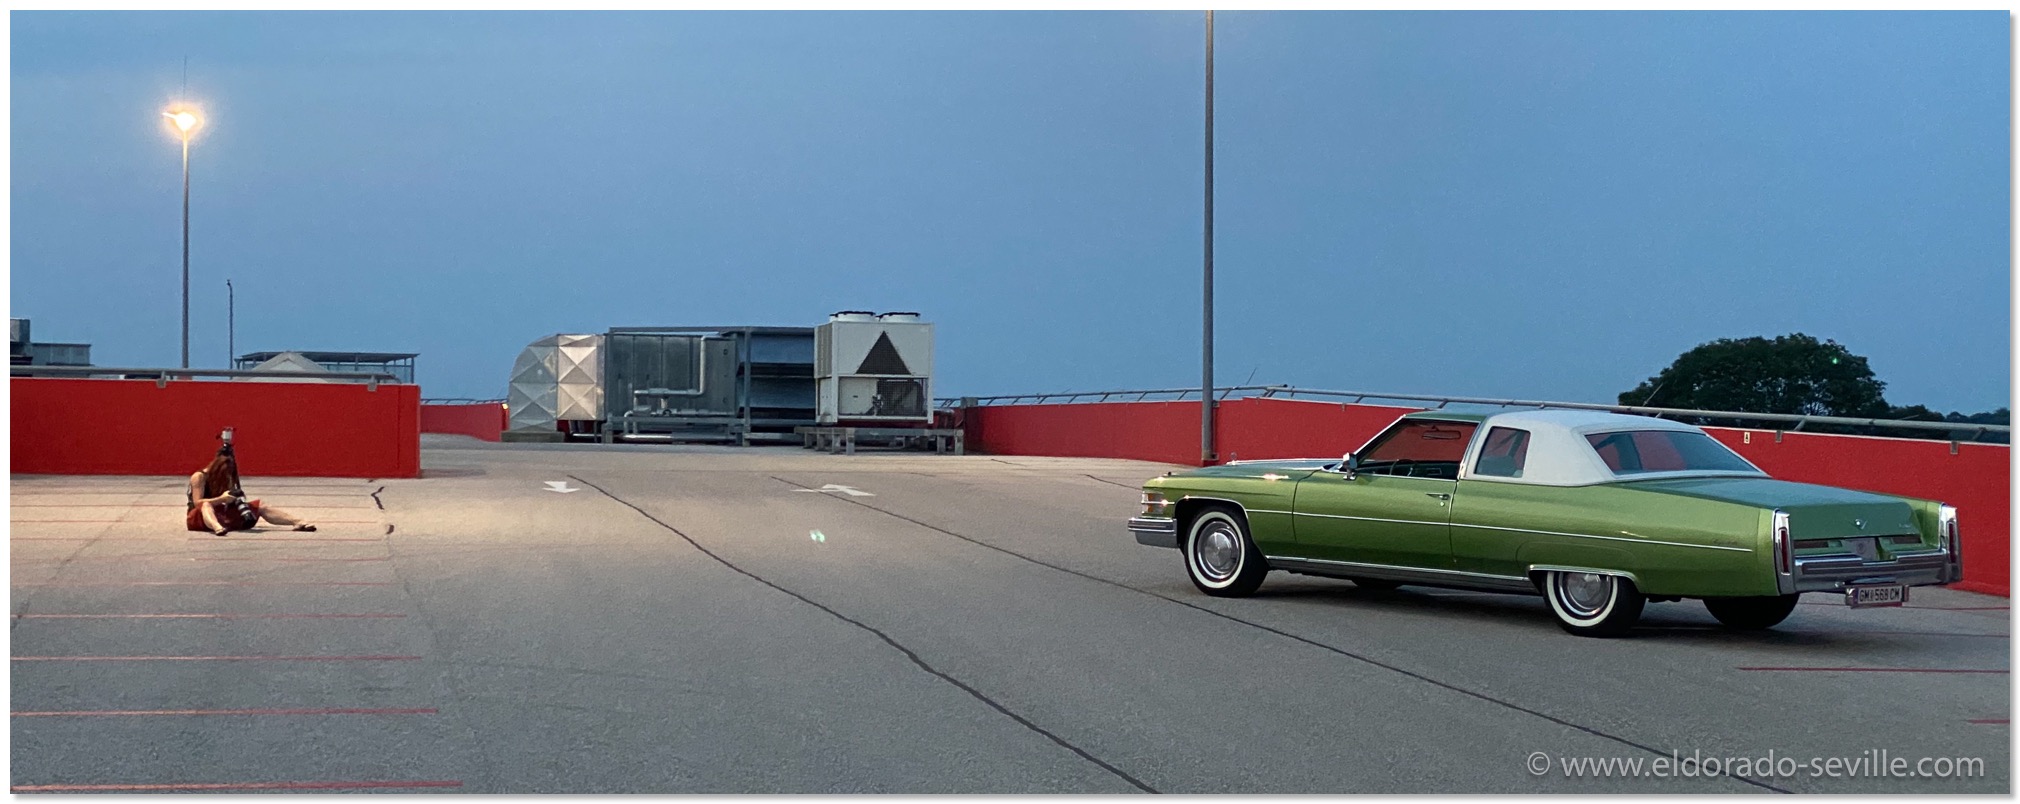
My wife at work :-)
More pictures can be found here.
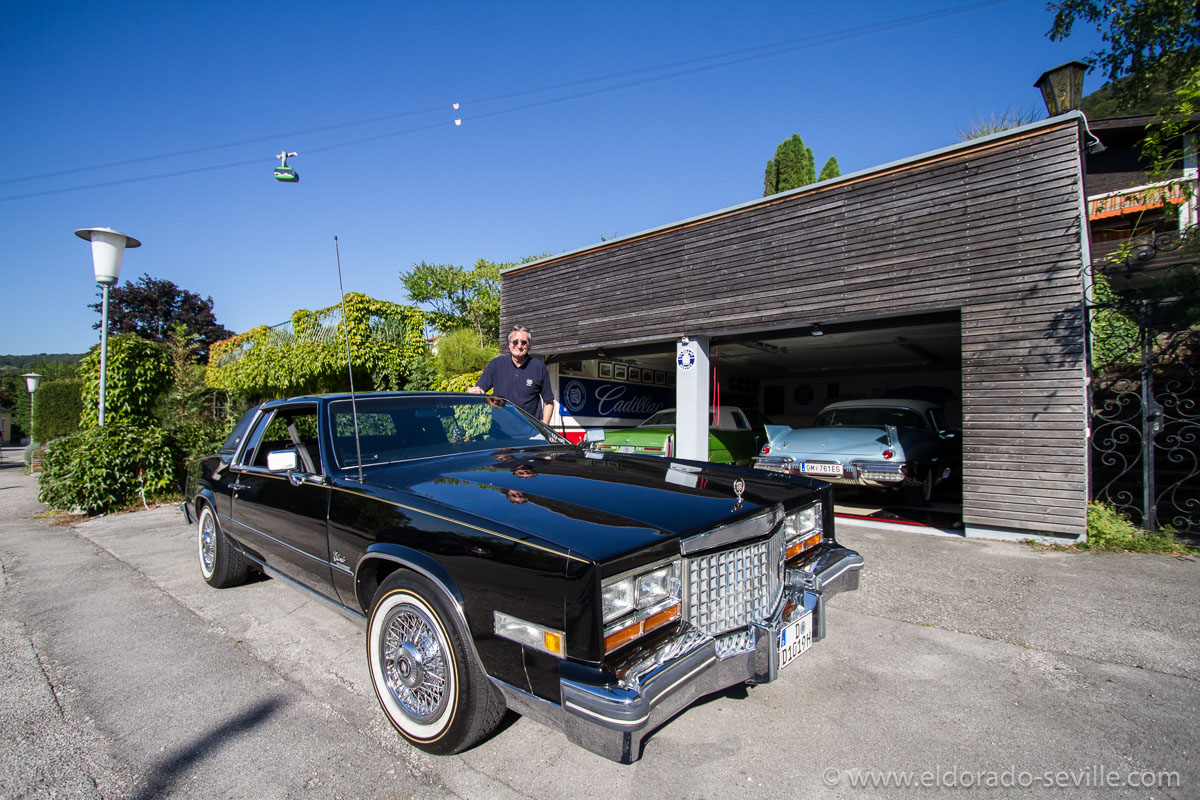
VIDEOSHOOTING WITH FRIENDS AND A VISIT TO AN AWESOME GARAGE
We are a group of Cadillac enthusiasts and friends and all of my friends brought one of their many Cadillacs to the first day of the filming.
We then had dinner together and another highlight was a tour of a friends new garage where we had a great evening.
The 1976 Eldorado in the picture is for sale by the way! It has only 1.000 miles on the clock and is in PERFECT condition.
Check out the preview video and some pictures!
Some scenes from the upcoming short film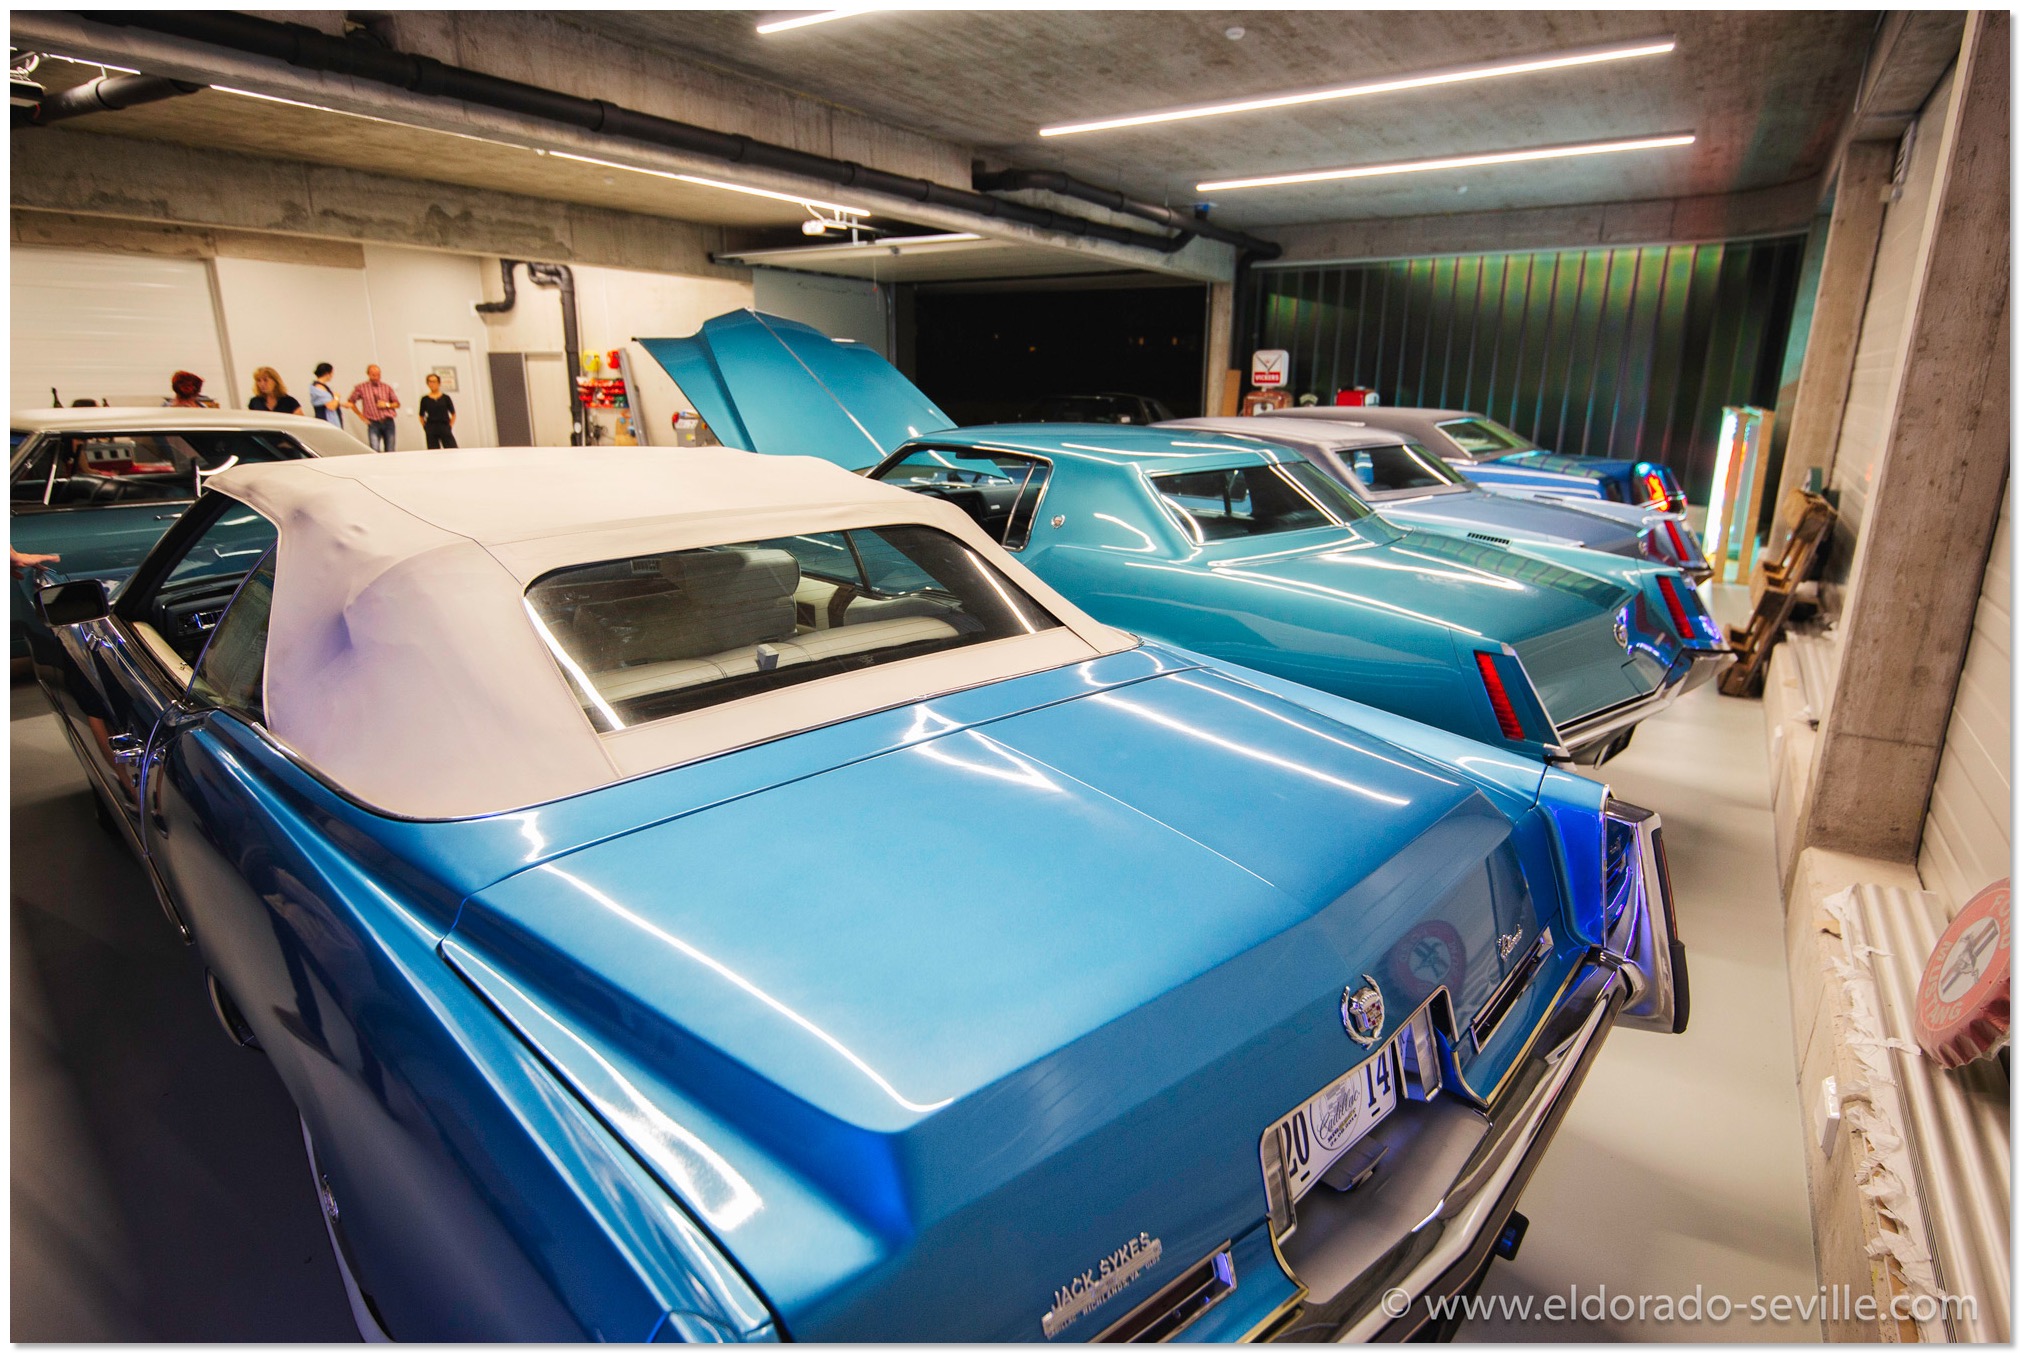 In my friends new garage.
CLASSIC CADILLAC CLUB OF GERMANY - ANNUAL MEETING 2019 IN WIESBADEN
Days before the meeting I hurt my back badly in an accident at work and it looked like if I could not participate. I had a lot of pain whenever I moved and could basically do nothing but sitting still. I could not even hold a camera and getting in and out of my car literally took minutes.
Luckily the seats in the car are even more comfortable than my sofa at home. So I packed a lot of pain killers into my luggage and…. CLICK BELOW TO READ MORE AND TO SEE THE IMAGE GALLERY
The video my wife shot at this meeting with our Gopro camera and our drone. Make sure to watch in HD or 4k
The official video of the German Cadillac Club - Check it out!
ALMOST IDENTICAL TWINS
We got these two rare cars together for …
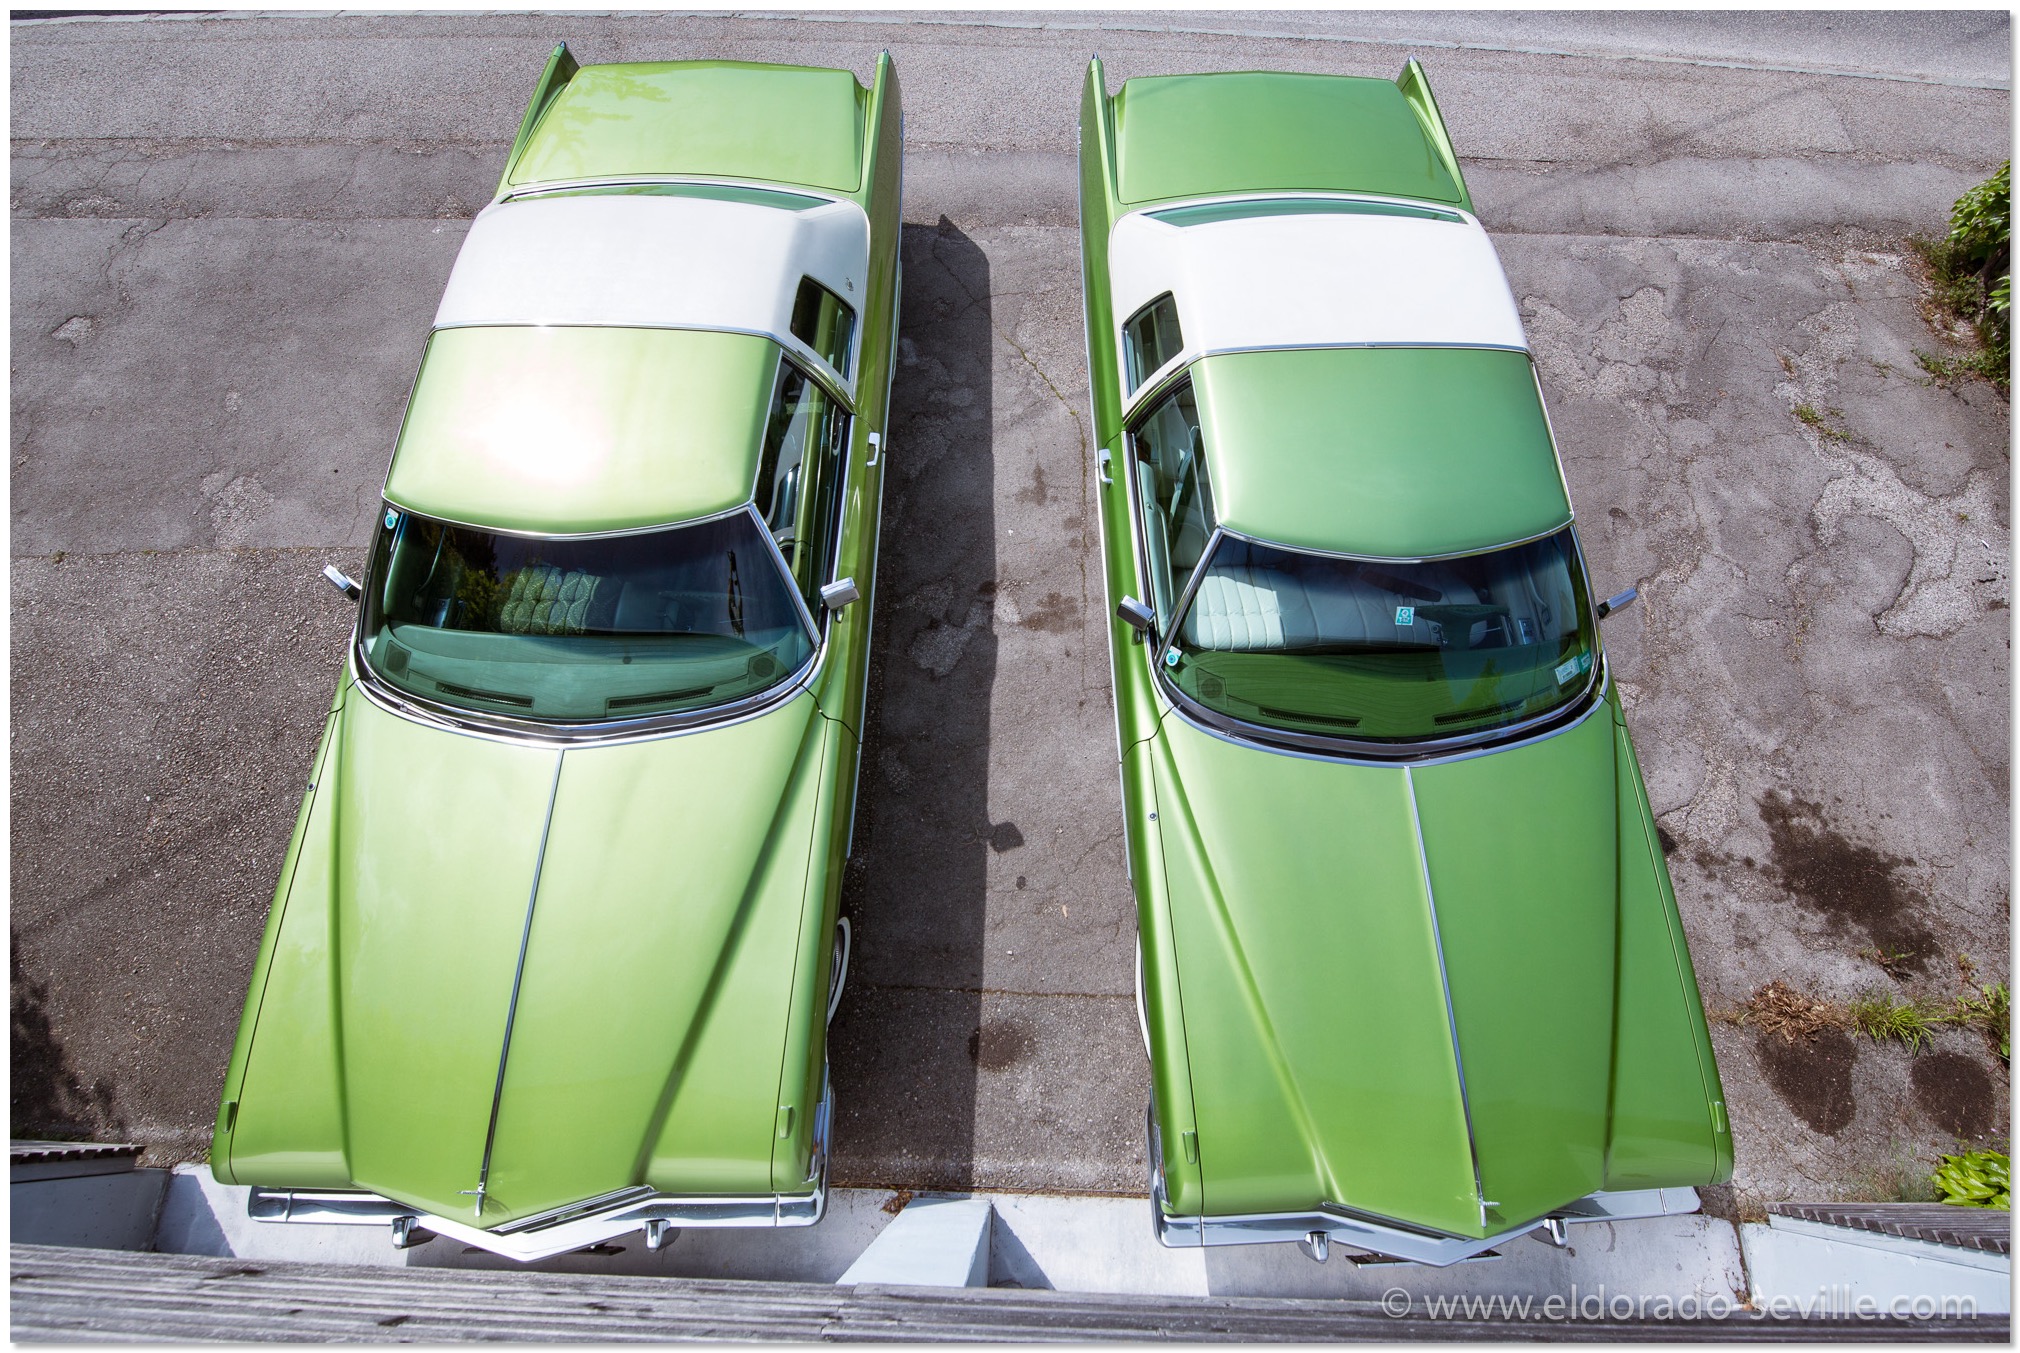 READ MORE...
FINISHED THE 1974 CADILLAC ENGINE BAY RESTORATION PROJECT
Everything that came out was cleaned up, and wherever I found some surface rust or flacking paint it was completely removed and the according part was repainted. I had to do all of this on a very tight budget, but luckily the total cost of this project was extremely low, as all I needed were 3 cans of paint, some wire brushes and some cleaning chemicals .
I took a break from Nov. 2016 to April 2017 where I did not do any car related work at all. During the last 2 weeks I finished everything, and the car is now ready and only needs a good cleaning prior to the upcoming season. When everything was back together the car started up immediately (see video below) but I could not let it run for a longer time yet as the engine enamel (I used Bill Hirsch engine enamel) needs at least 2 weeks to fully cure.
I did not restore parts which still had their original decals, because some are irreplaceable, as there are no correct reproduction decals for the 1974 Cadillac out there. Many decals for sale for the 1974 Cadillac are totally incorrect - beware! For example there is no correct "Caution Fan" decal or AC compressor decal available anywhere. So there is still some patina left on some areas, and at first glance the engine bay does not look restored at all, but more like an extremely well kept car with very low mileage. I did not want to go for this over restored look.
But let the pictures speak for themselves - here are 3 Before/After pictures (Click on them for a larger view) and the rest of the restoration pictures can be found here.
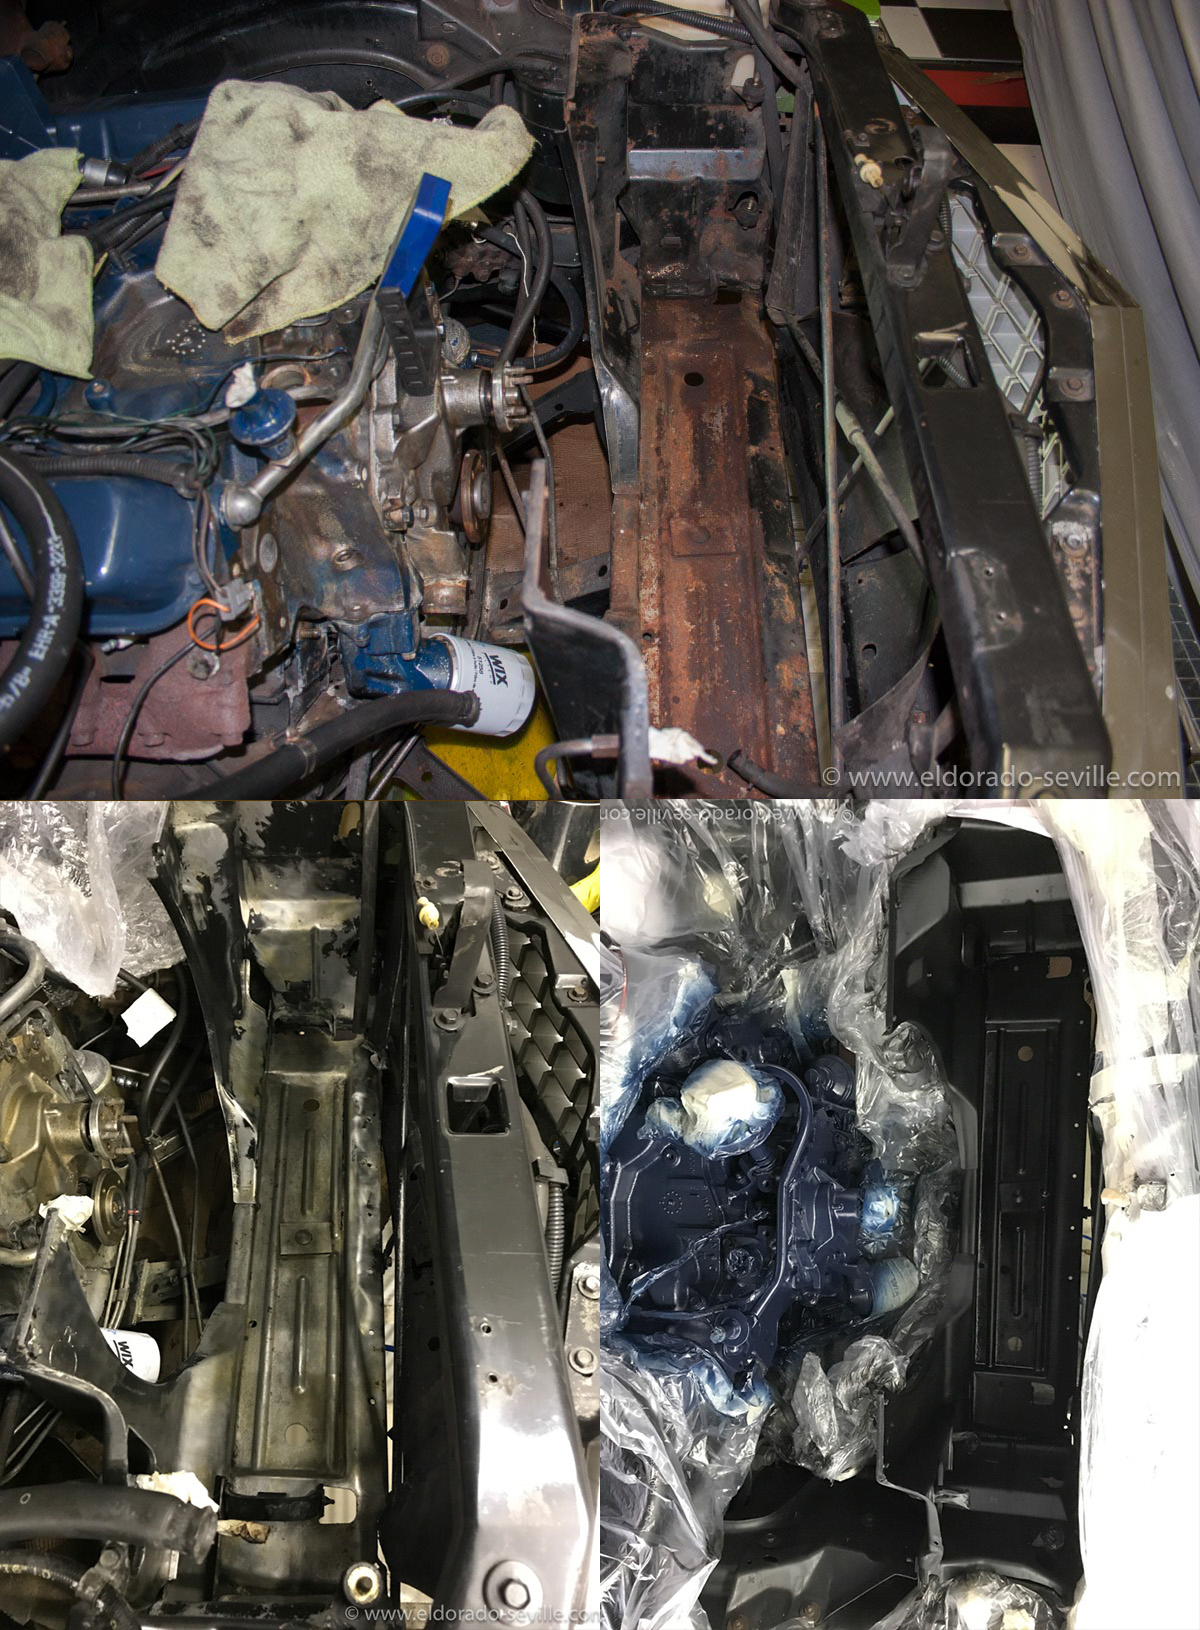
The radiator support frame before, after removing the rust and after painting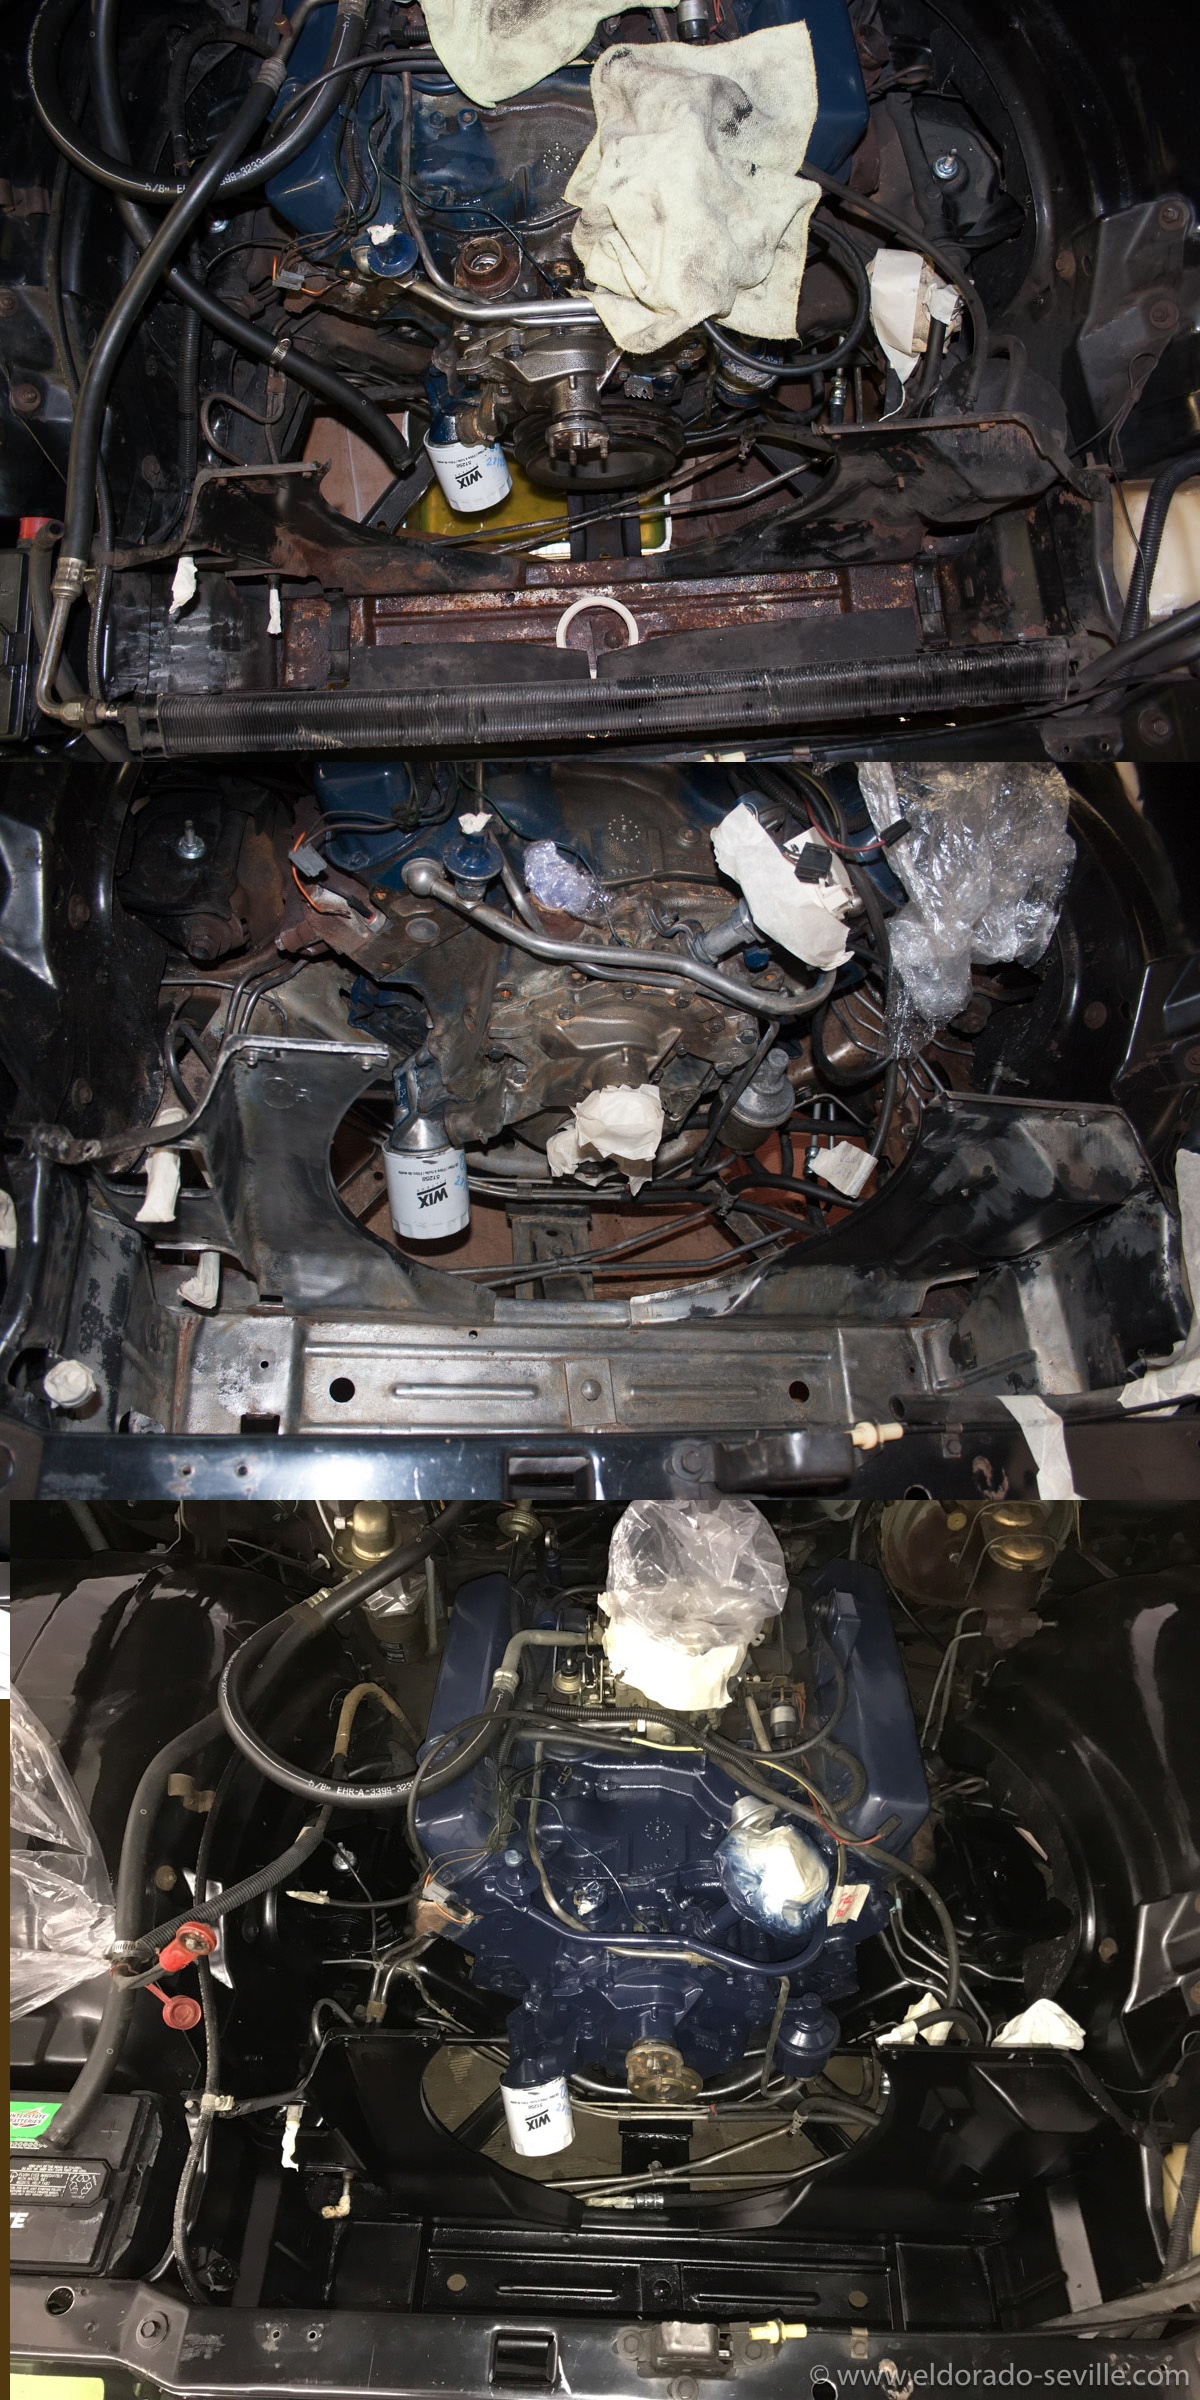
The radiator support frame before, after removing the rust and after painting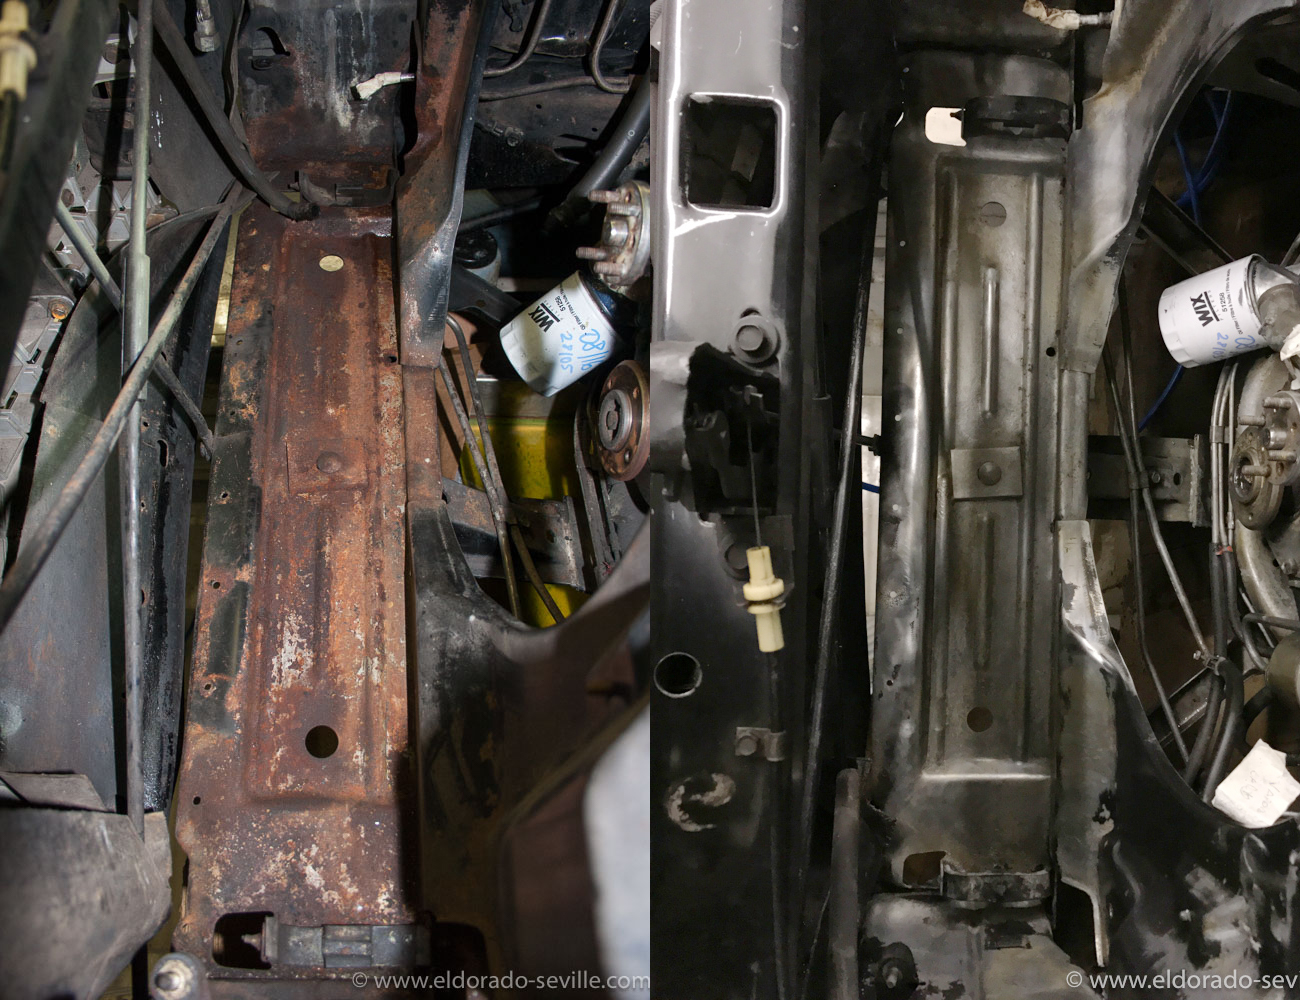
Before and after rust removal
Here is short video of the first start up after the restoration.
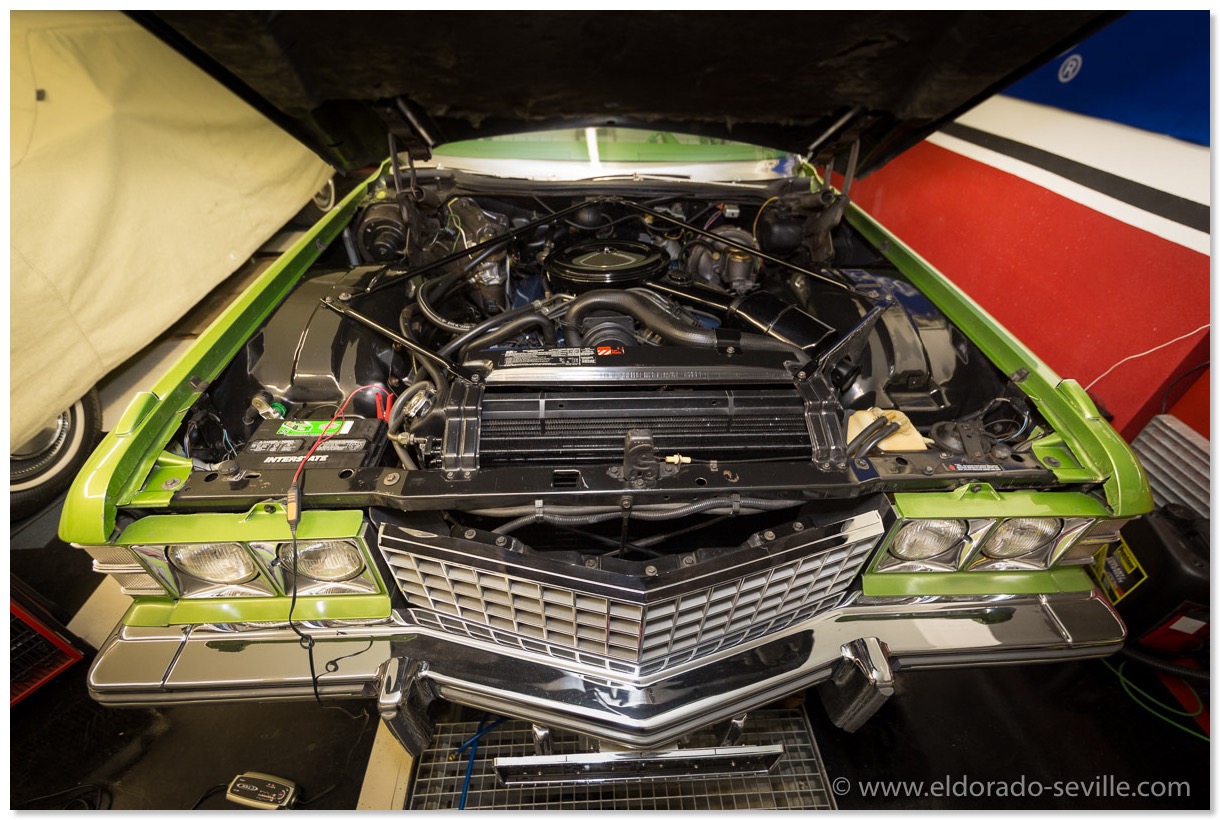
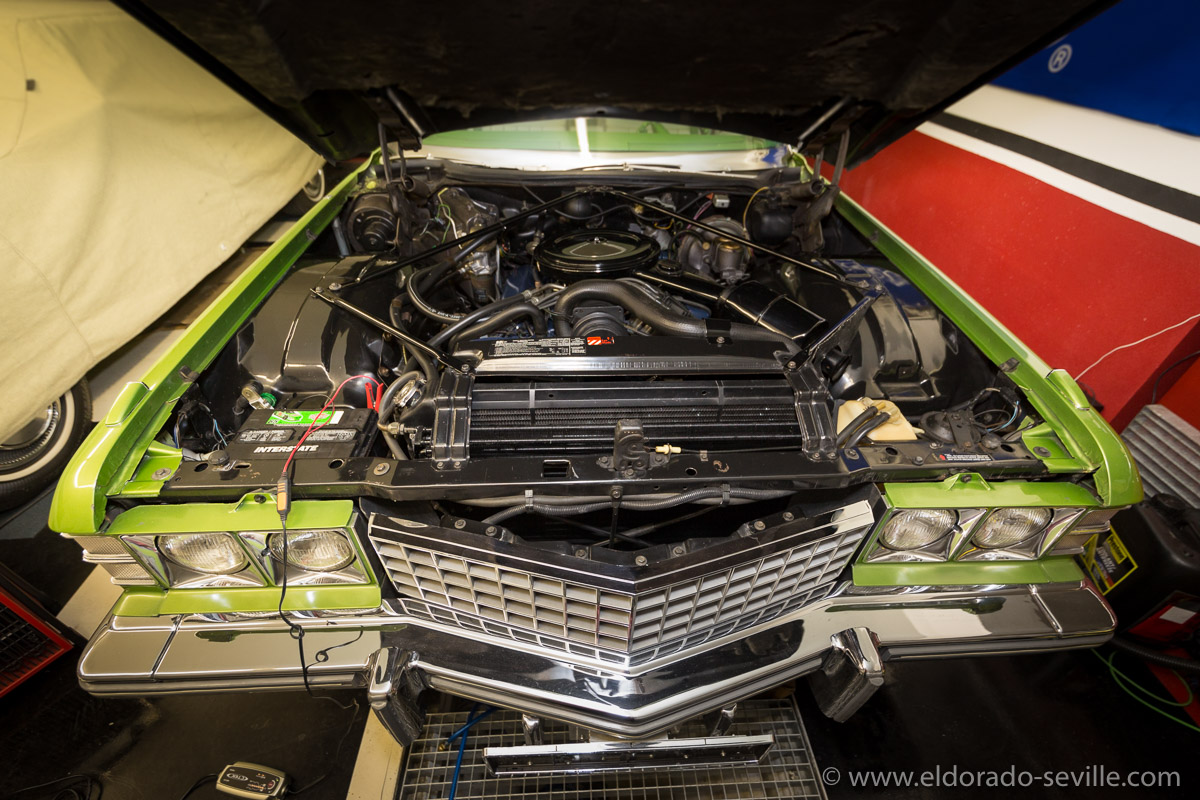
The finished engine bay looks pretty nice!
More pictures of the finished engine bay can be found here.
A6 AC COMPRESSOR REPAIR - BAD BEARING ON THE 1974
Due to all the other projects I never managed to get the AC back in fully working order until now.
Unfortunately the rebuilt AC compressor came with the clutch coil terminals in the wrong position. They are available with the terminals at the correct 10 o clock position or the 2 o clock position, which is correct for other years.
If the terminals are in the wrong position you cant connect the original wires to them as they are too short. With the high shipping costs it was no option to send the incorrect compressor back.
As it turned out the cars original compressor had a bad bearing and that was the reason why it was disconnected.
My friends Lucky and Steve were here to help me with the compressor project and so I took both of my compressors to Lucky´s workshop, as he has all the necessary tools and experience with these compressors from his own cars.
Originally I just wanted to turn the clutch coil on the rebuilt compressor into the correct position, but then we decided to rebuild the original compressor instead, because it still has the original decal, which is not available as a correct reproduction. All the available compressor reproduction decals are TOTALLY incorrect for the 1974 Cadillacs. The 1974 reproduction decals all show the wrong amount of refrigerant! They are also different in many other details. The closest match of reproductions for 1974 are the ones from 1972 Cadillacs…
We still disassembled the rebuilt compressor to "borrow" its pulley bearing to replace the bad one on the original compressor.
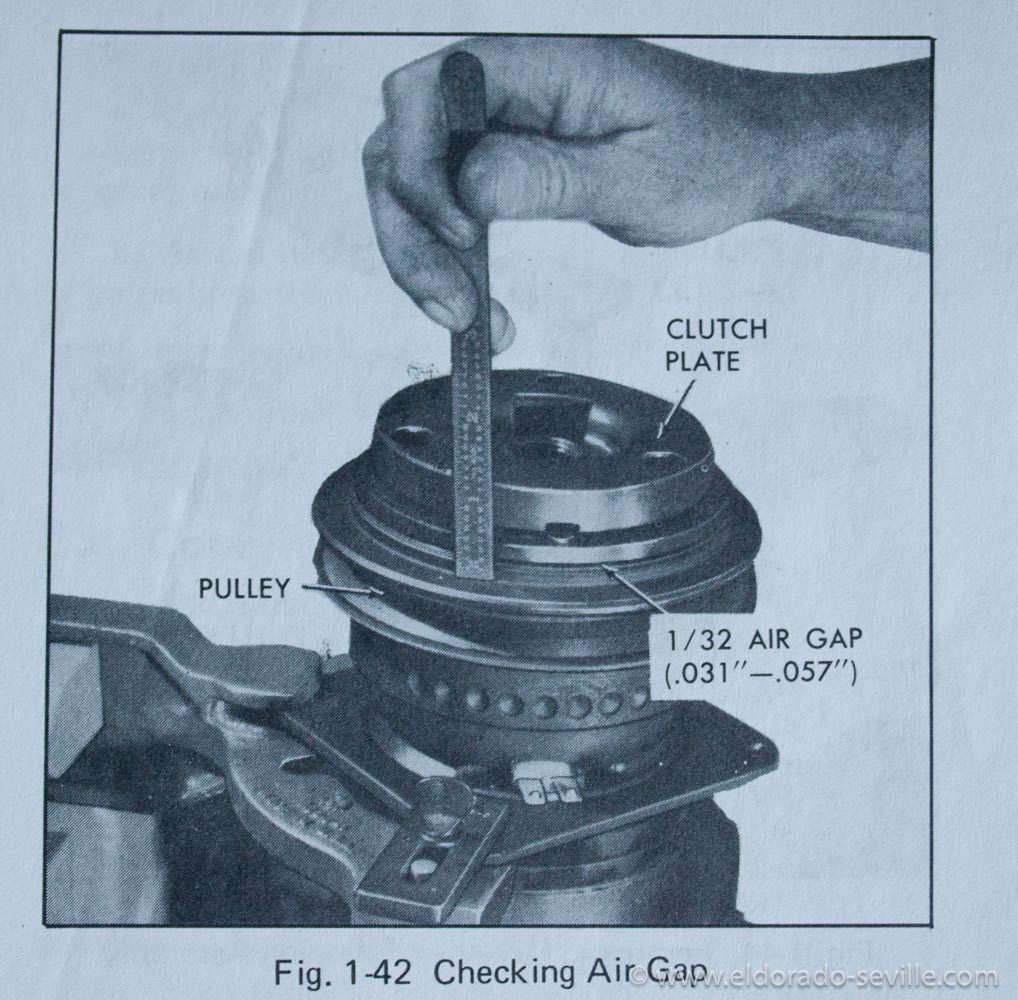
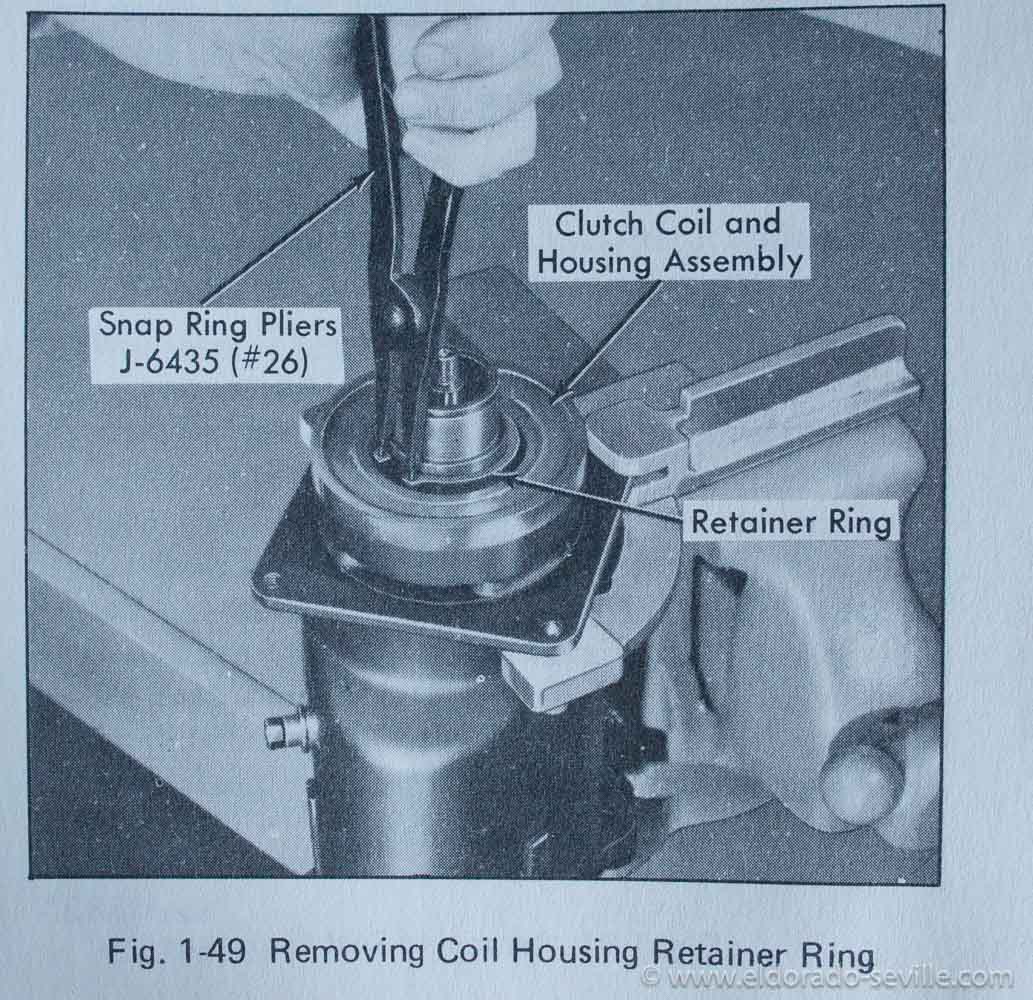
The procedure to be able to replace the bearing and to turn the clutch coil is not too difficult - but you need some special tools. Without those you cant do it. You´ll need a basic clutch puller / installer set for this job and some long nose snap ring pliers to get the retaining rings out.
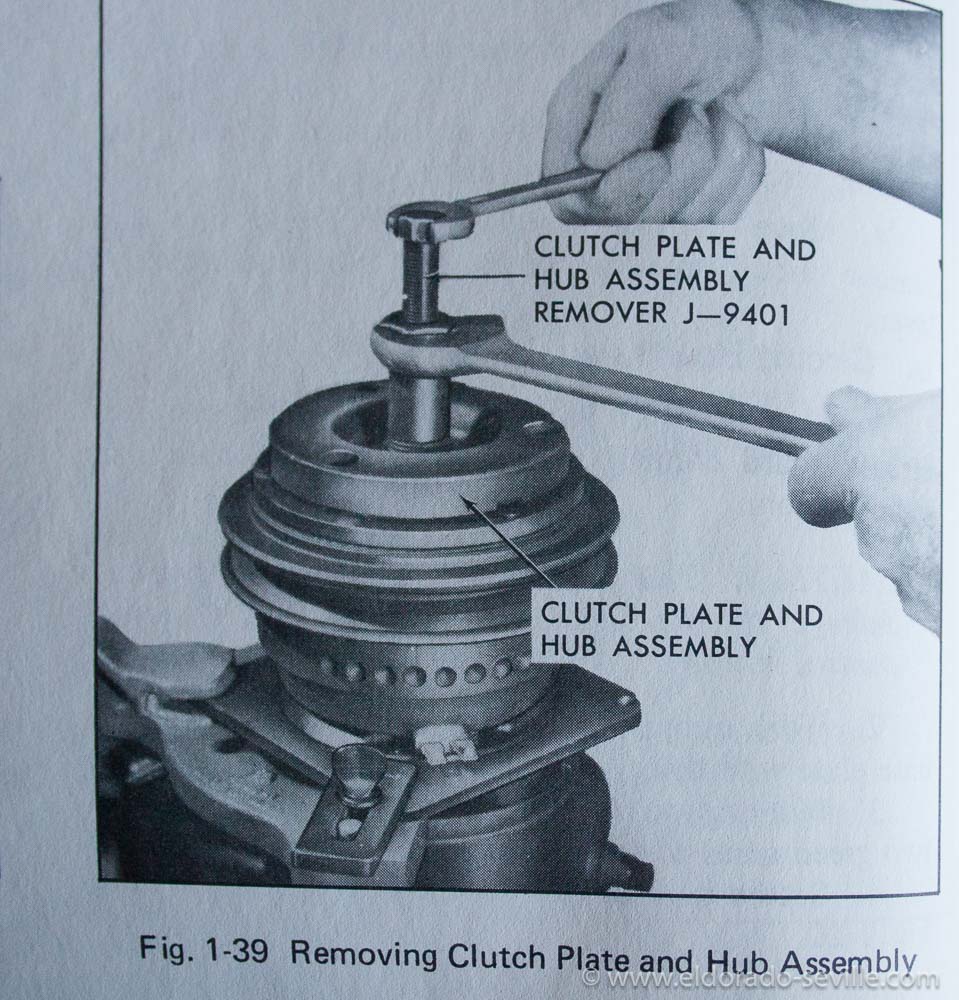
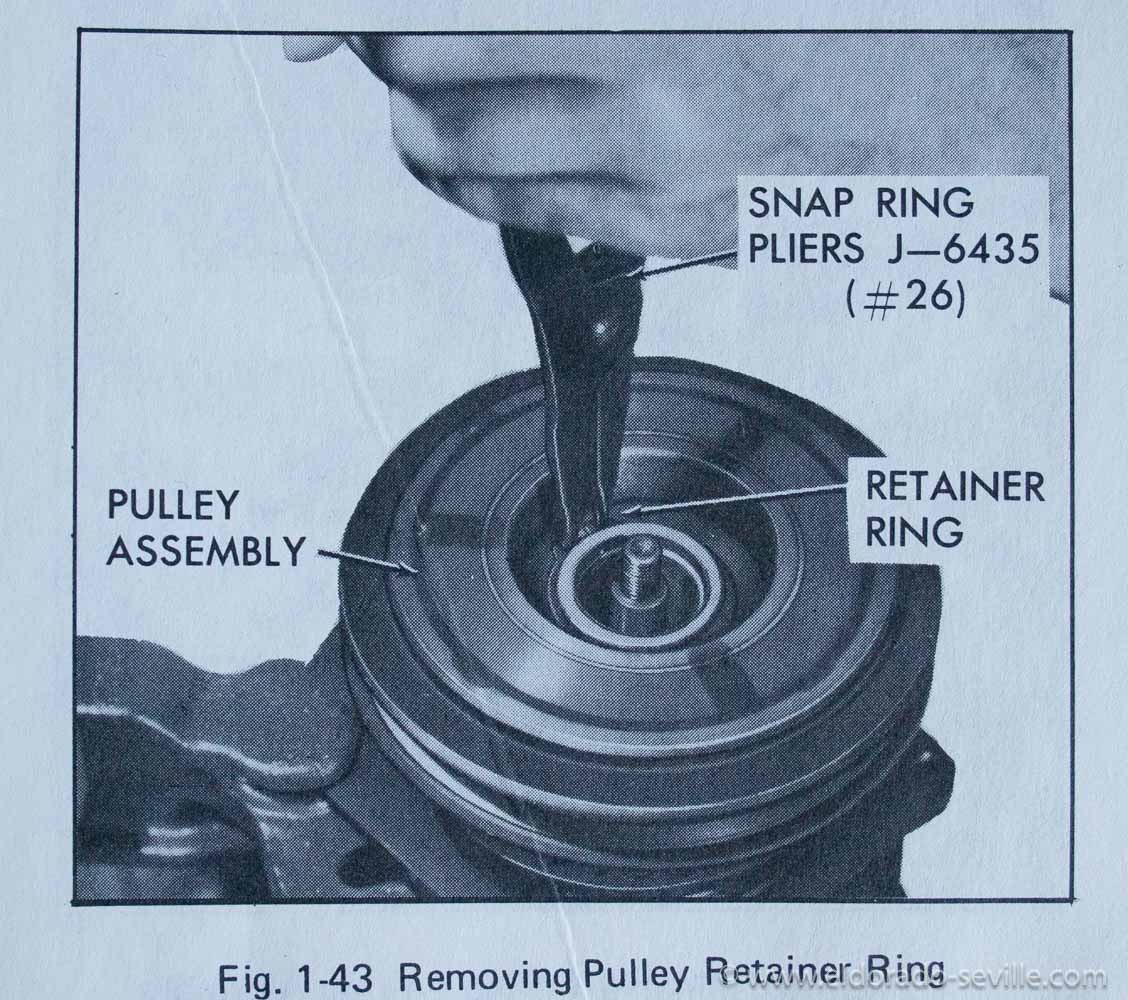
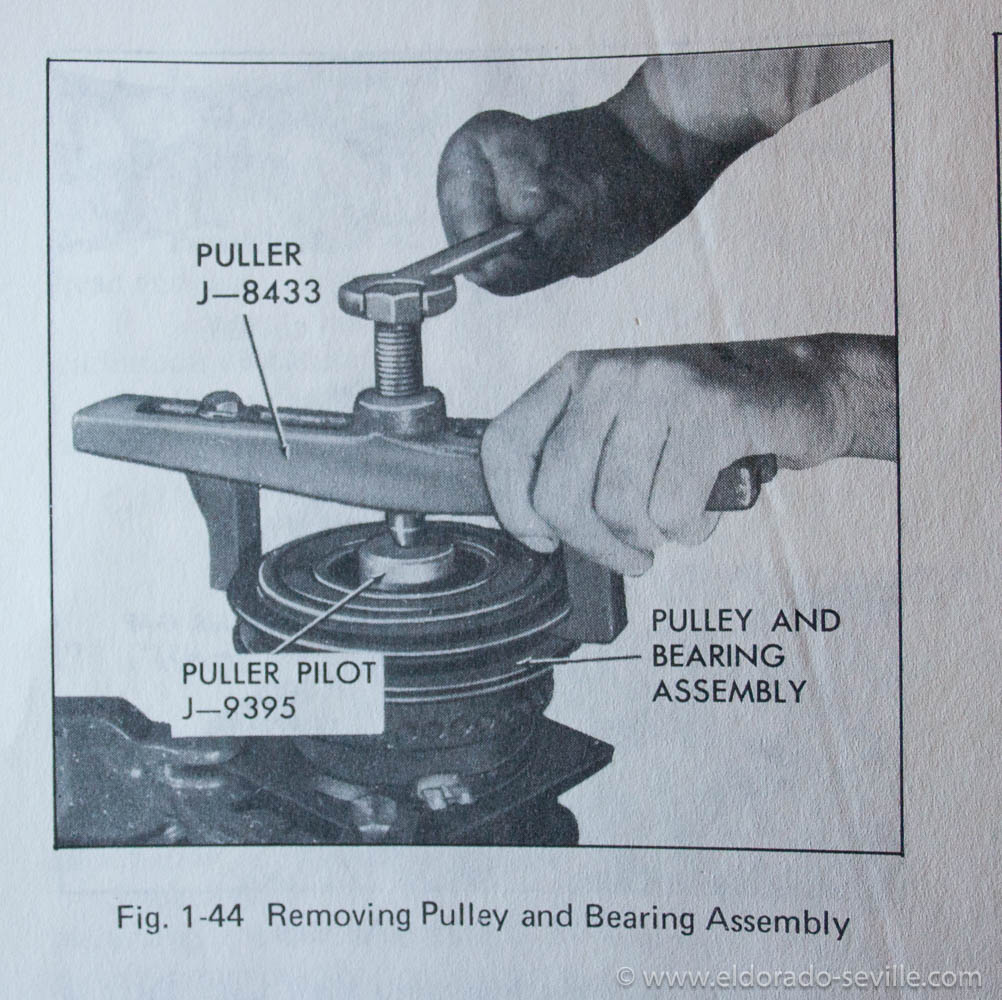
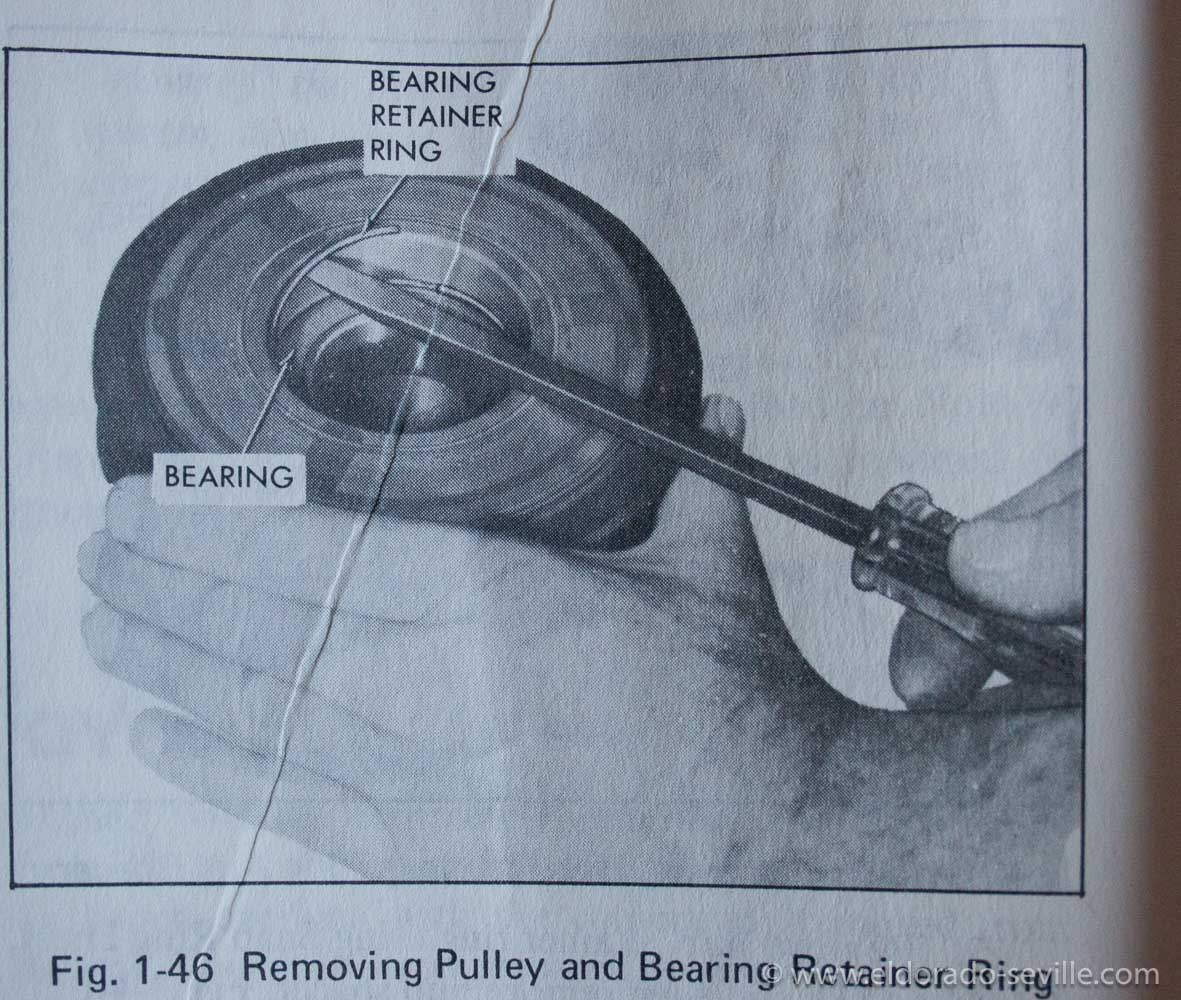
First remove the shaft nut and the snap ring ( the rebuilt compressors always seem to come without this snap ring) and then pull the clutch with the special puller. Pull off the pulley and take the bearing out and replace it with a new one.
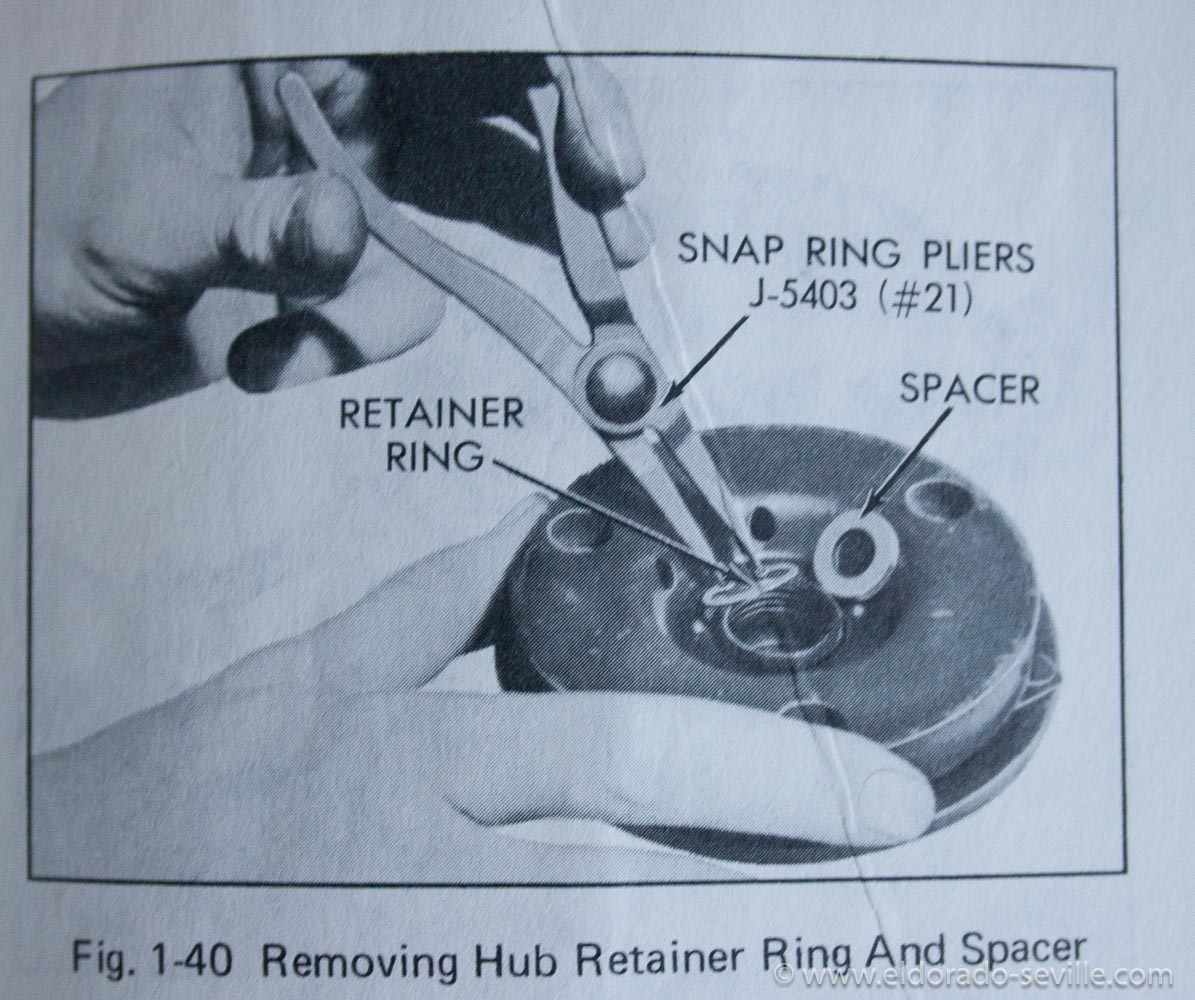
To be able to turn the clutch coil you´ll have to remove another snap ring. This snap ring was the biggest challenge for us. The shop manual lists a special tool for this which we of course did not have… It could be done with a very long nose plier as well, but we did not have these either. So it took us quite a long time to get it out with screwdrivers and self made hooks… You can then simply turn the coil into the correct position.
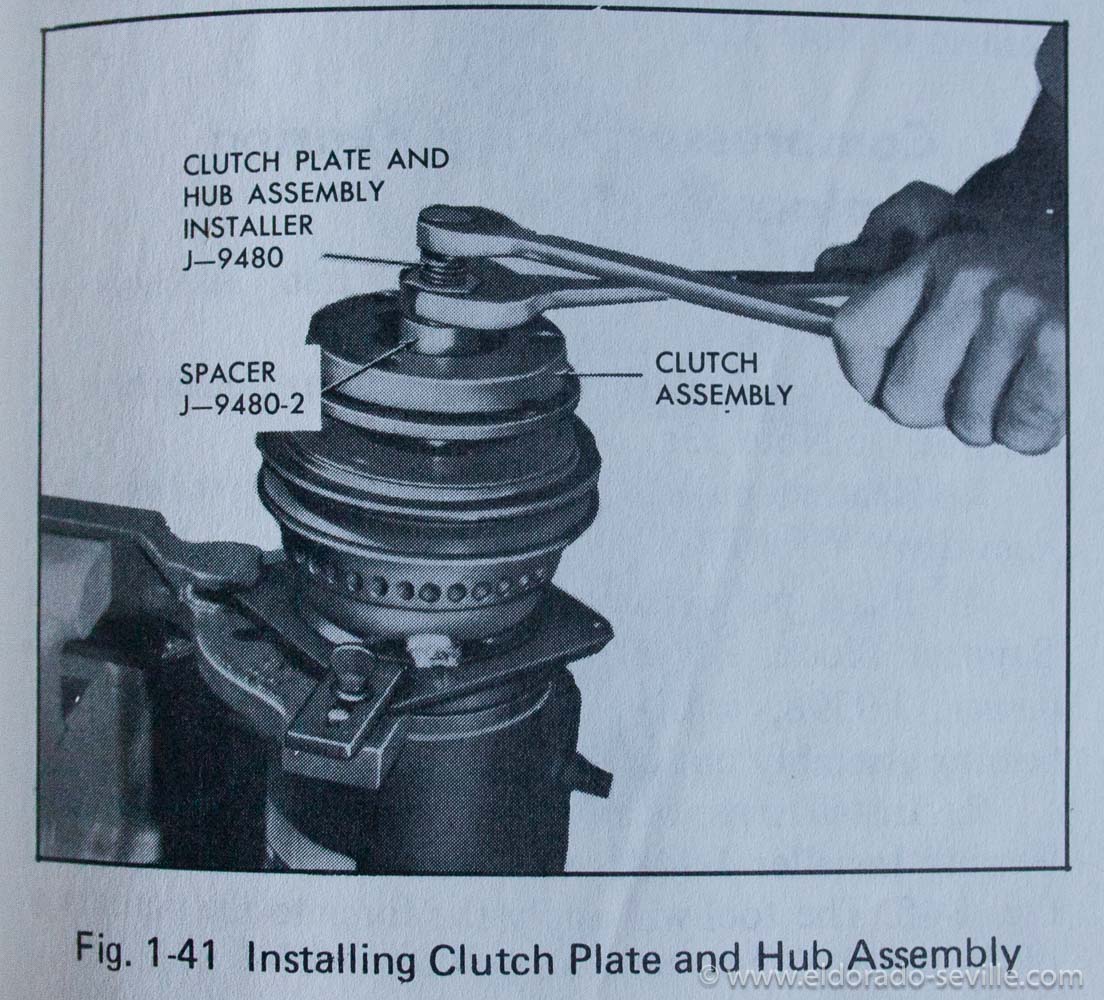
Putting it back together is pretty straightforward as well, but again you need a special installer tool to get the clutch back on and to adjust it properly.
I will now have to buy a new bearing so that I can put the rebuilt compressor back together and have it as a spare.
I have attached some pics from the shop manual which show how to remove the various parts of the compressor to remove the pulley and the clutch coil.
As always you can find ALL the pictures in my restoration gallery!
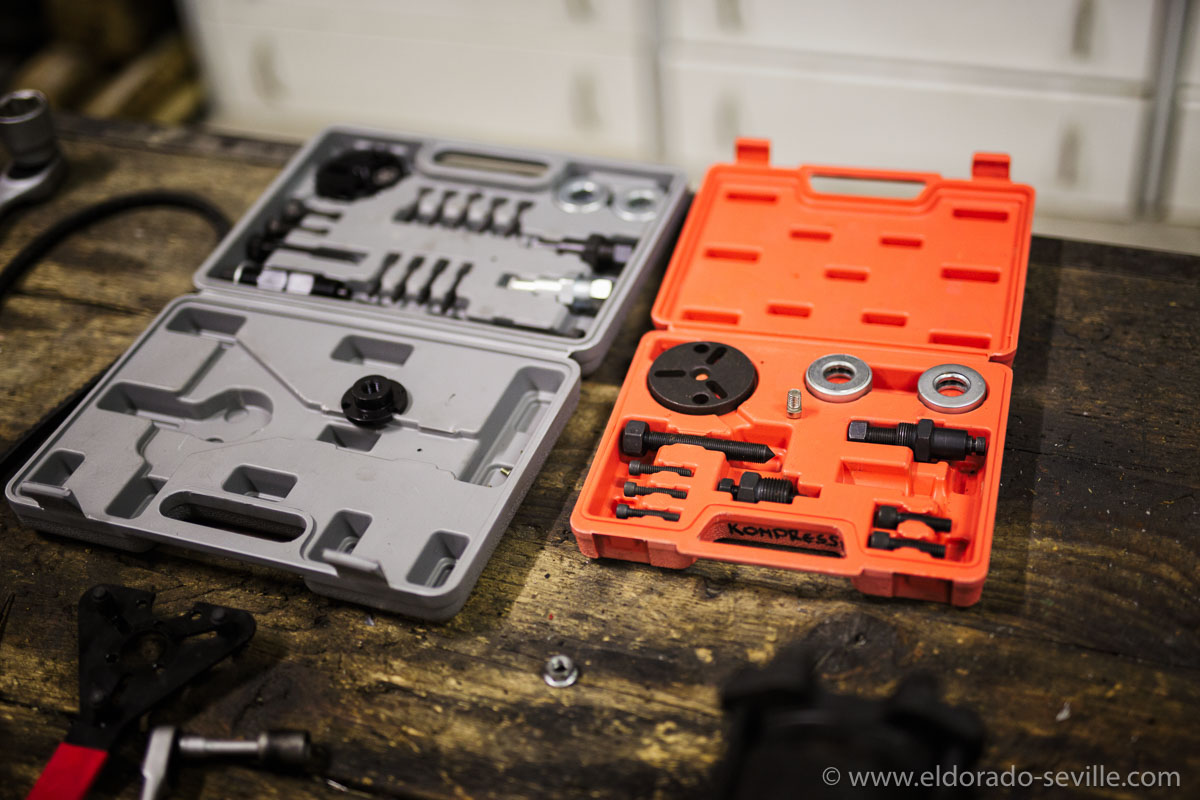
You need some special tools to disassemble the A6 AC compressor.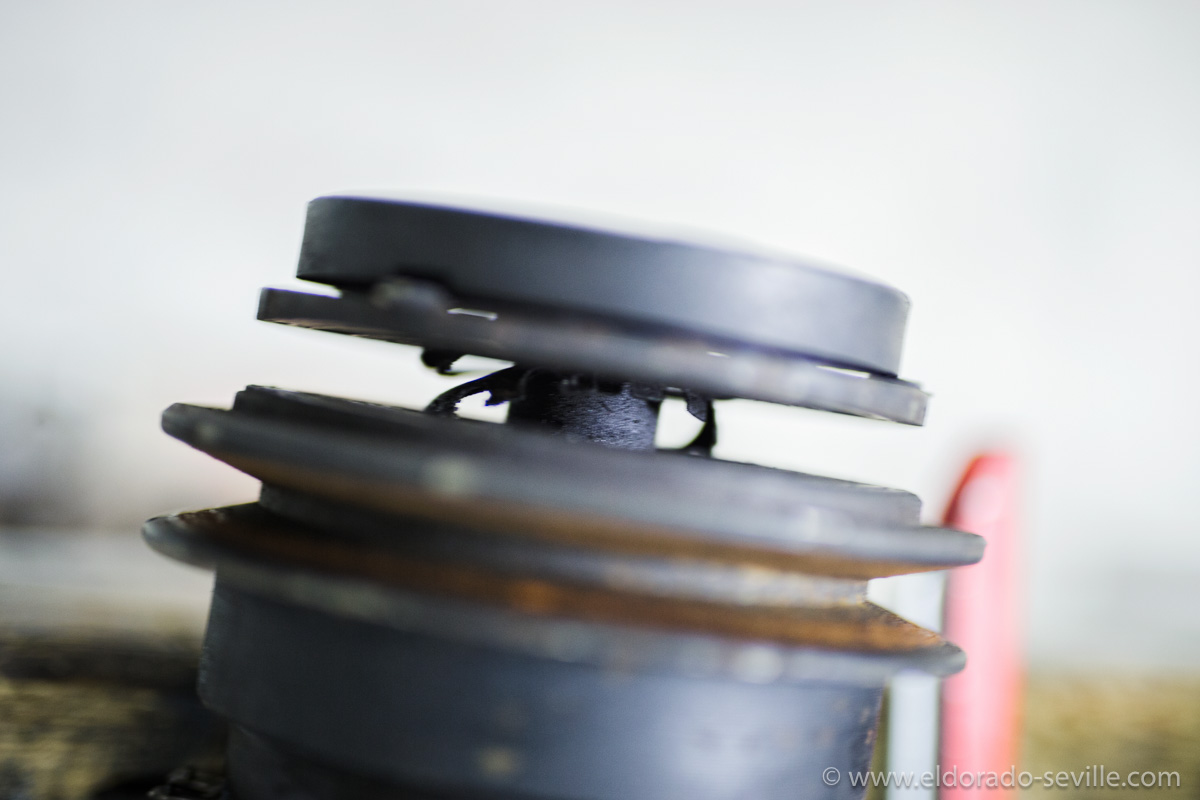
On the 74´s original AC compressor clutch the bearing was bad.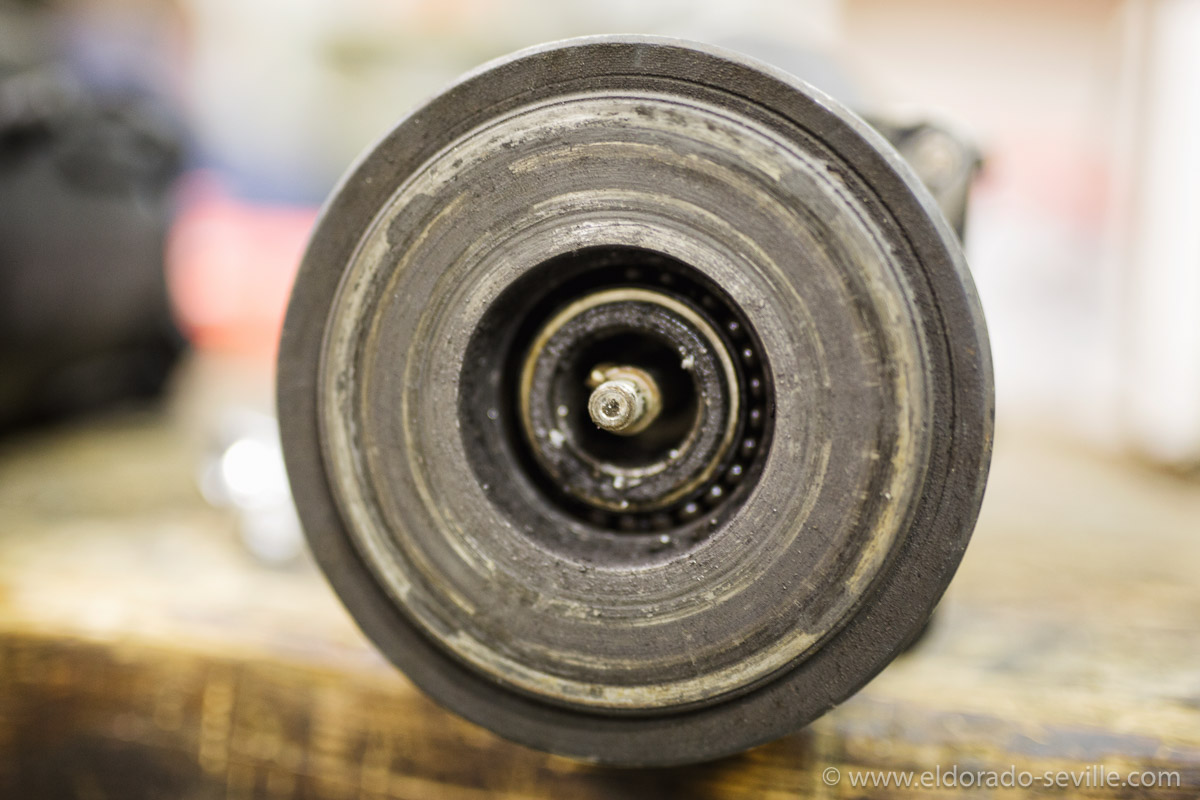
The compressor clutch removed. You can see the bad bearing inside which is normally sealed. Some balls were already missing.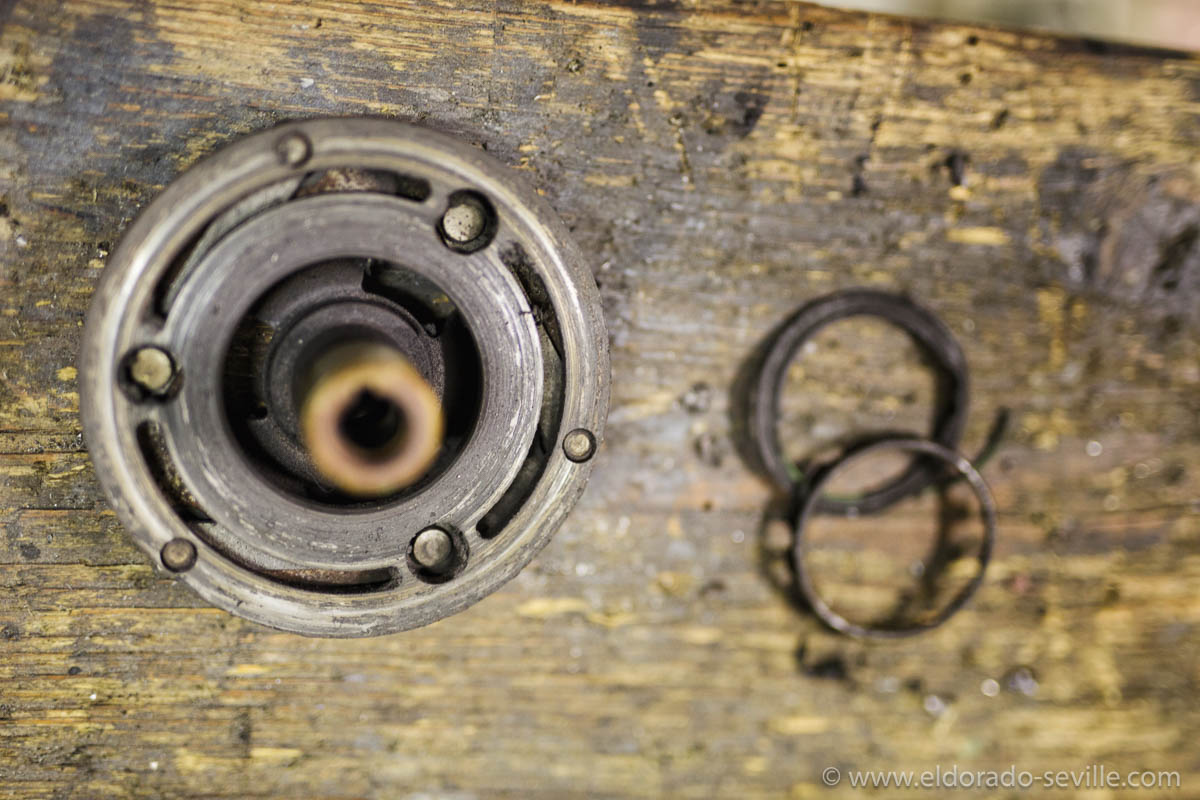
The clutch with some remains of the bearings.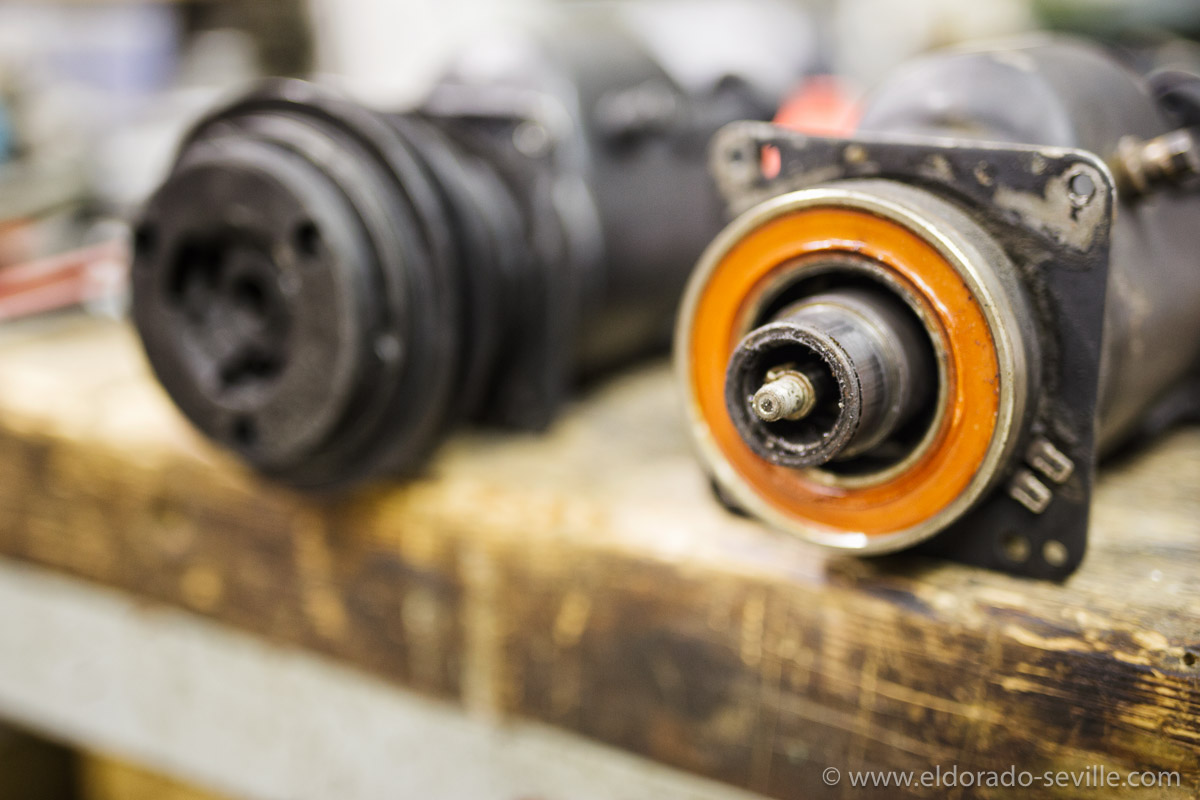
The clutch and pulley removed on the original compressor.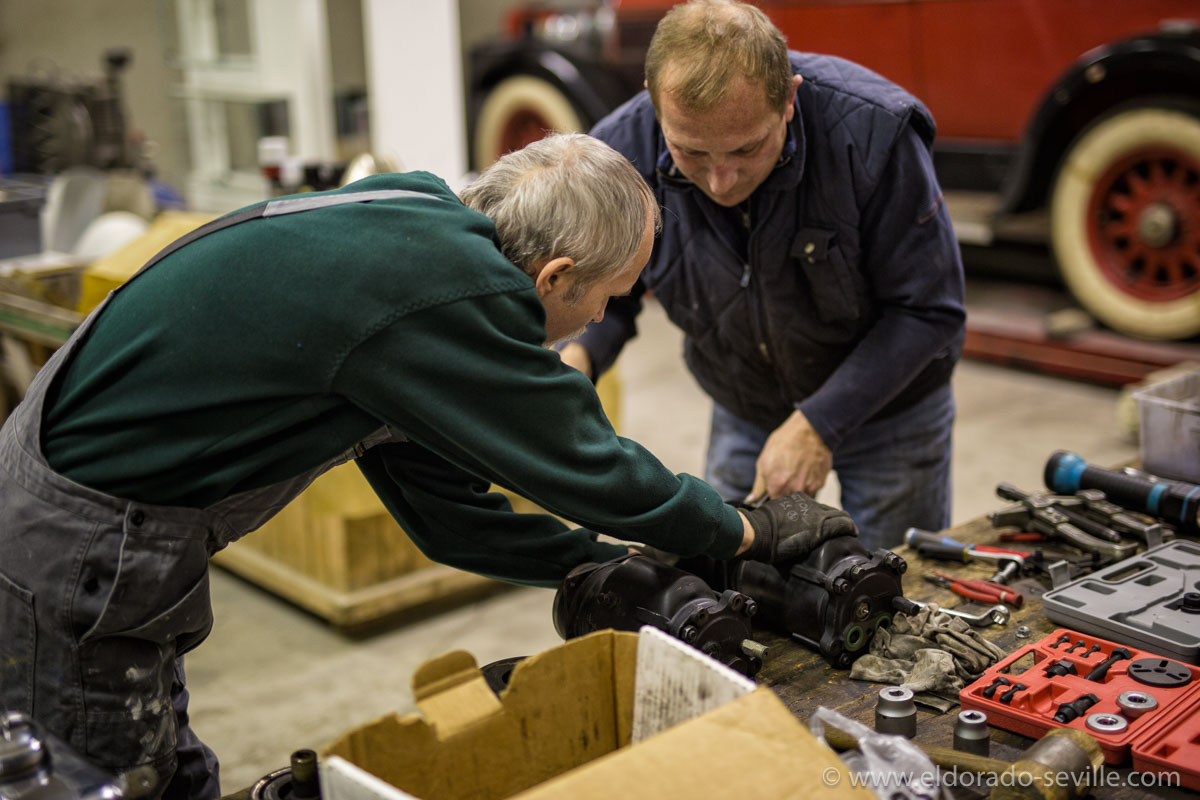
My friends Steve and Lucky at work. We also replaced all the O - rings.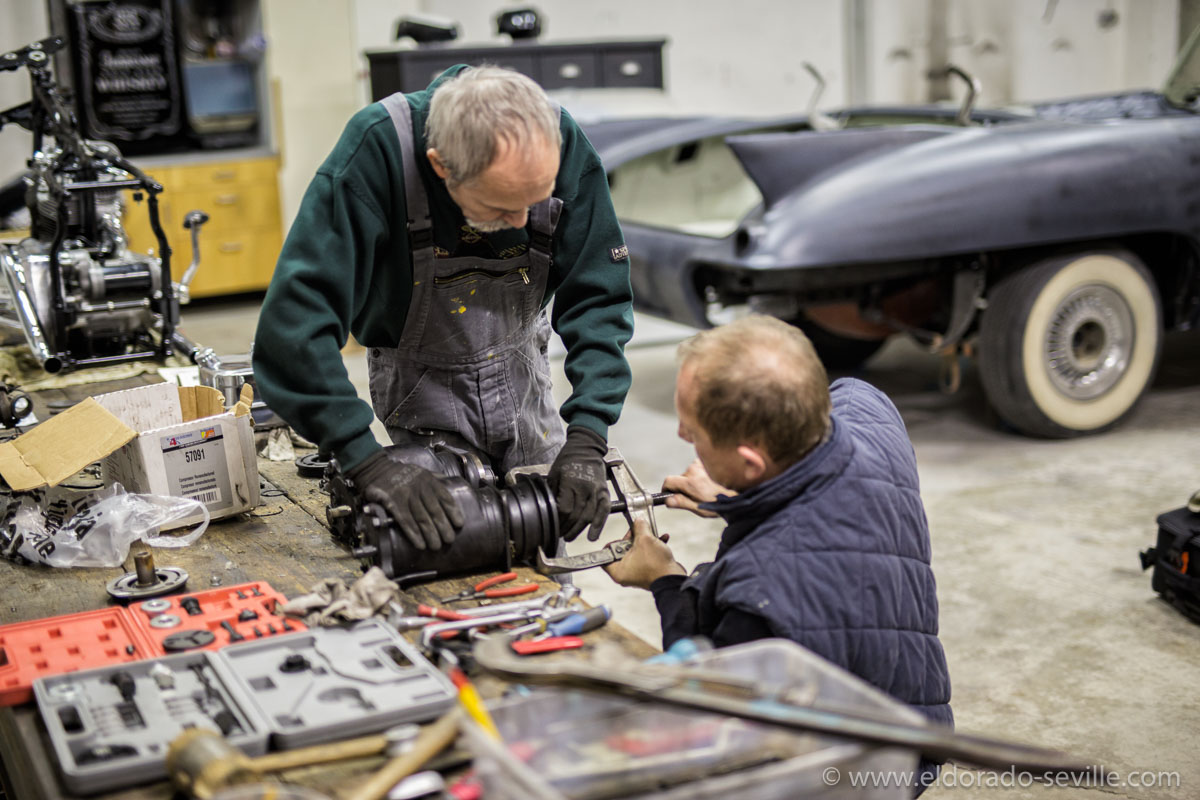
Removing the pulley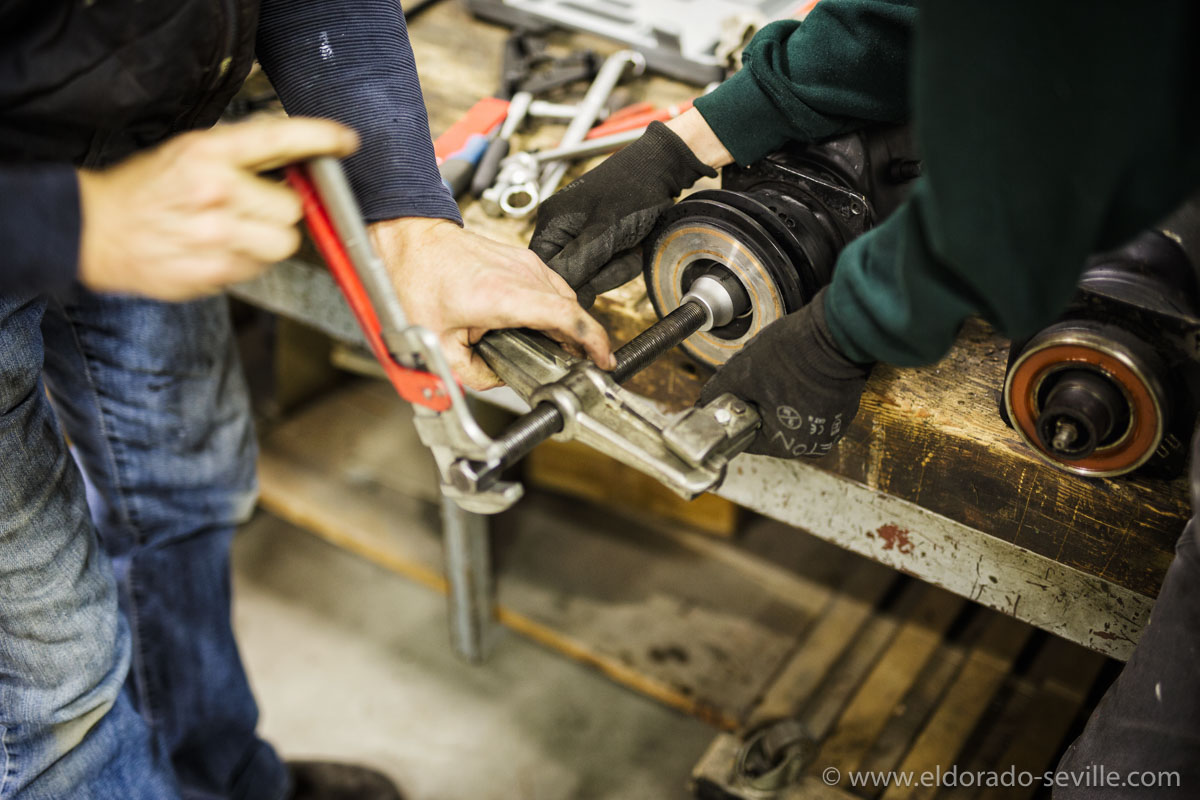
Removing the pulley from the rebuilt compressor.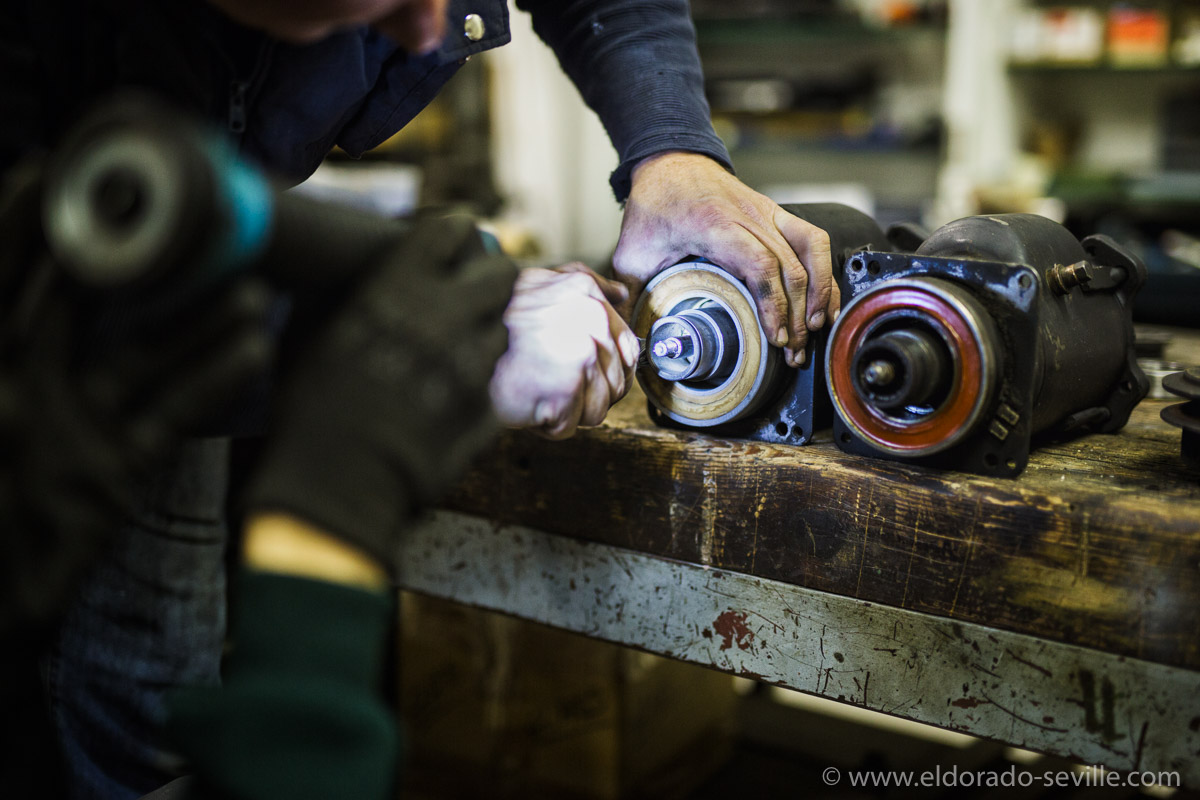
There is this one snap ring we just did not have the right tool for. The shop manual lists a special plier for this. After a lot of fiddling we got it out eventually…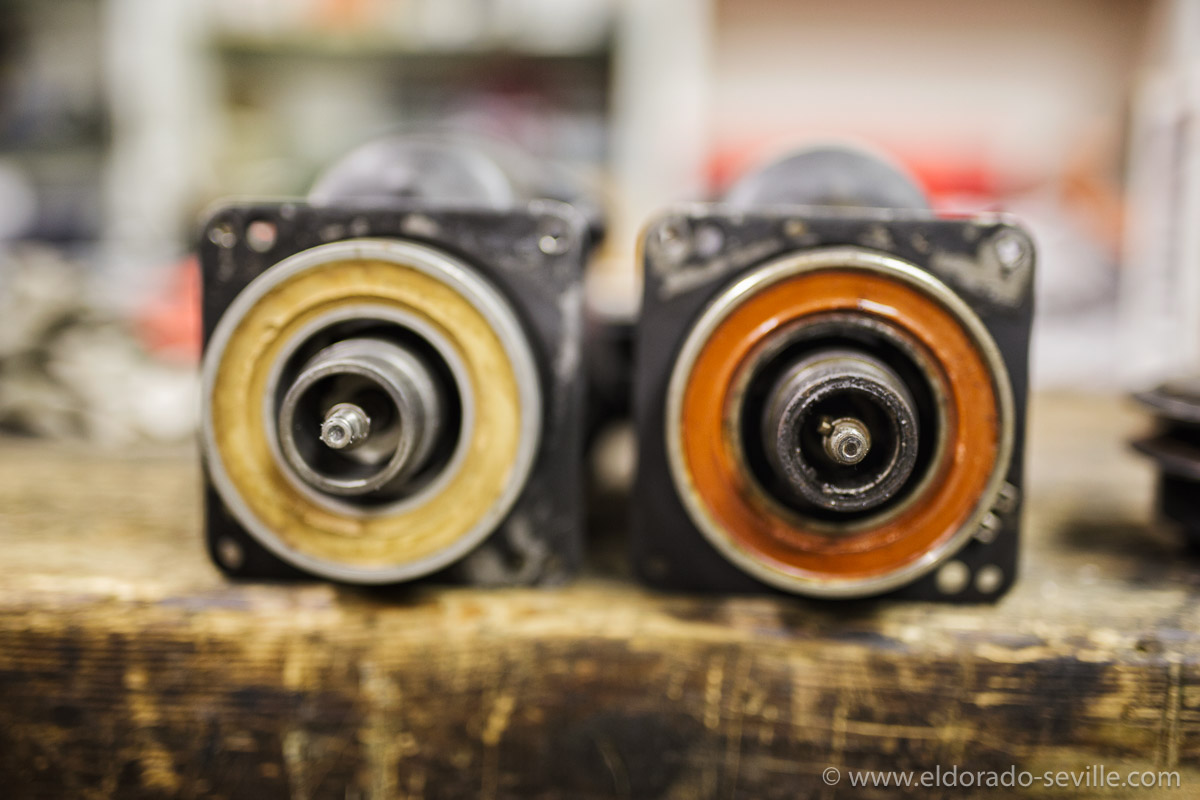
The magnetic coils on the rebuilt and the original compressor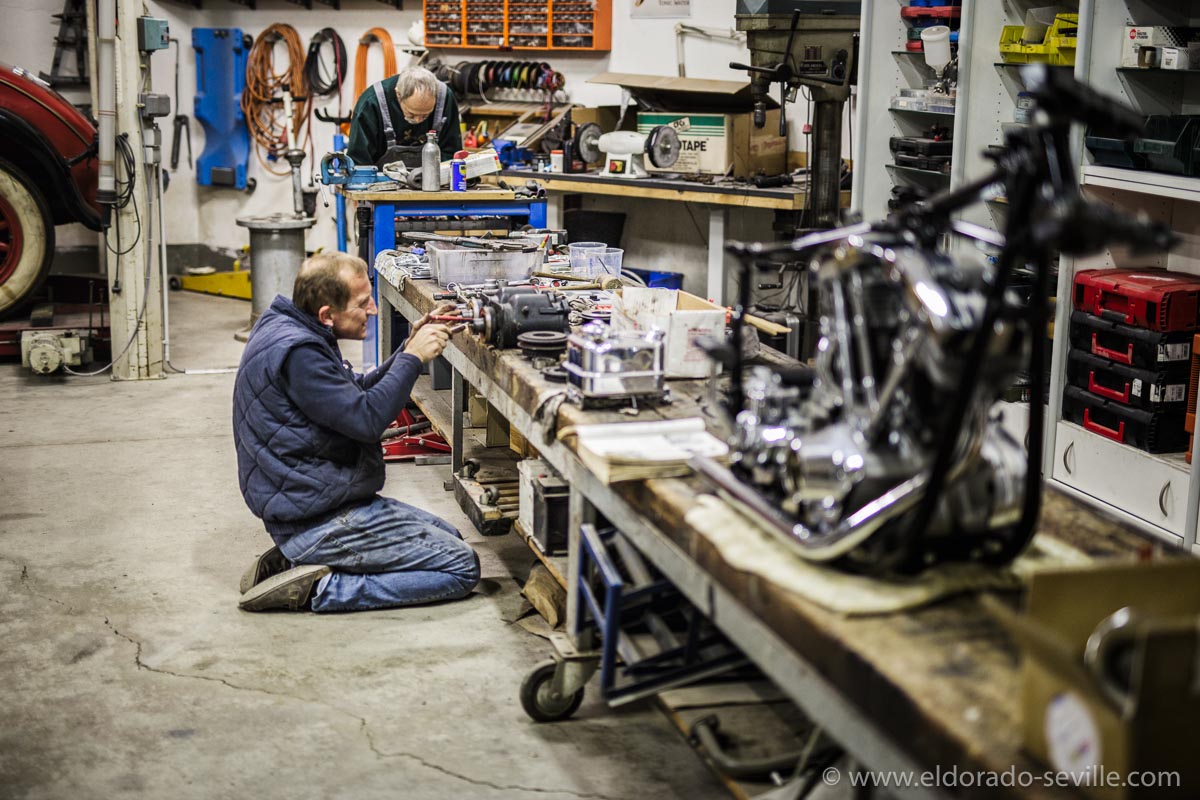
Lucky in action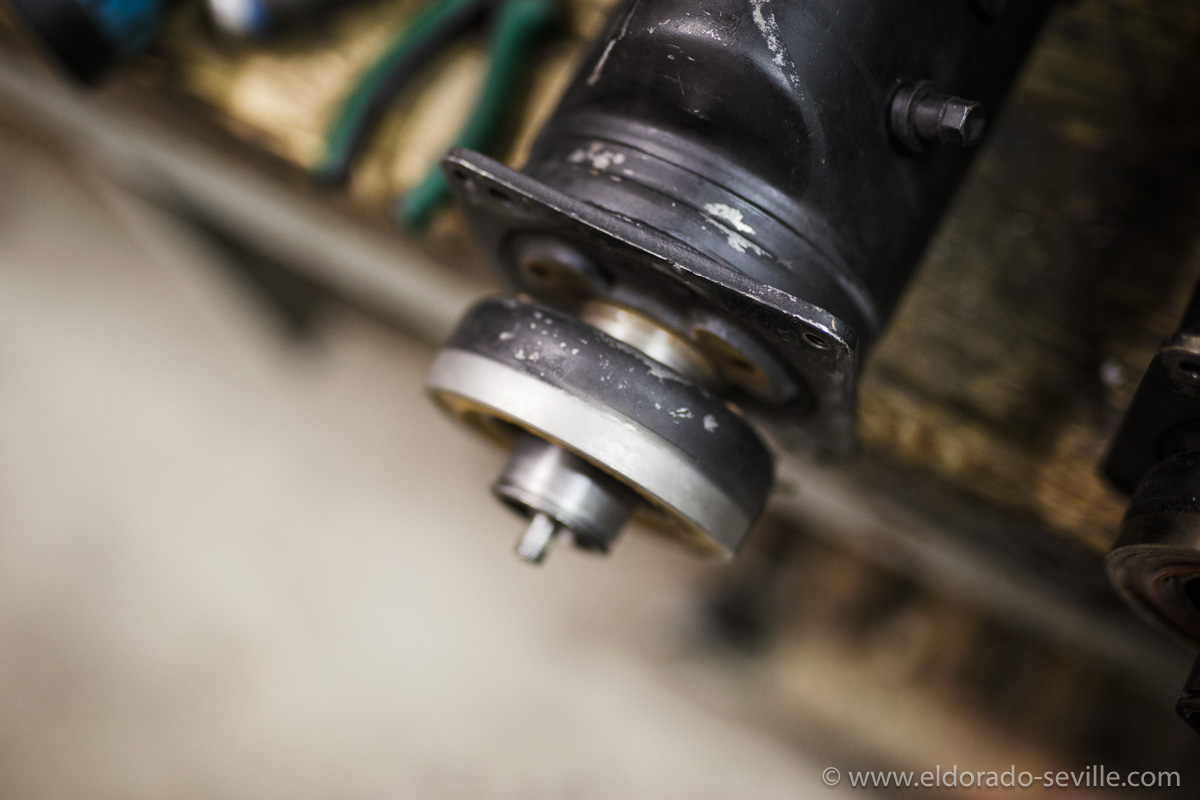
Once the snap ring is out you can turn the coils terminals to the 11o´clock position or the 1 o clock position. On the 74 it has to be at the 10 o clock position, otherwise the connecting wires are too short.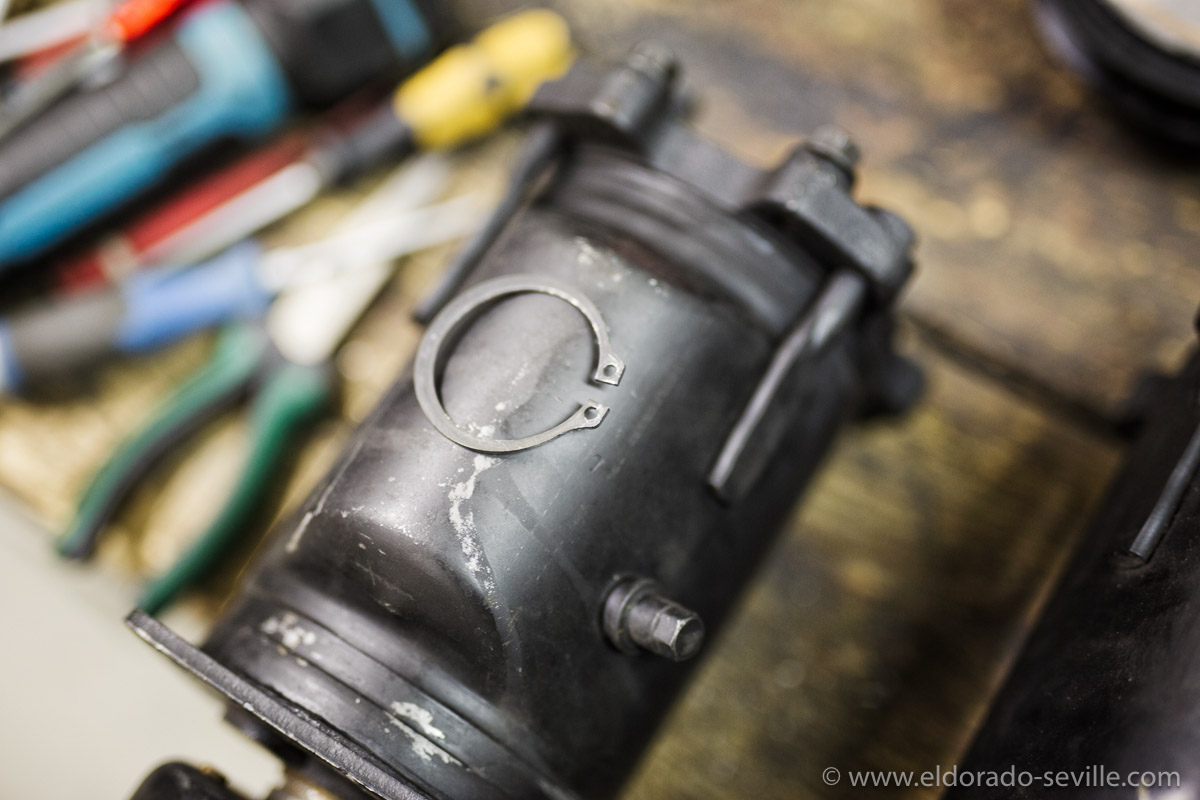
Getting this snap ring out was the hardest part on this job, due to not having the right tool for it.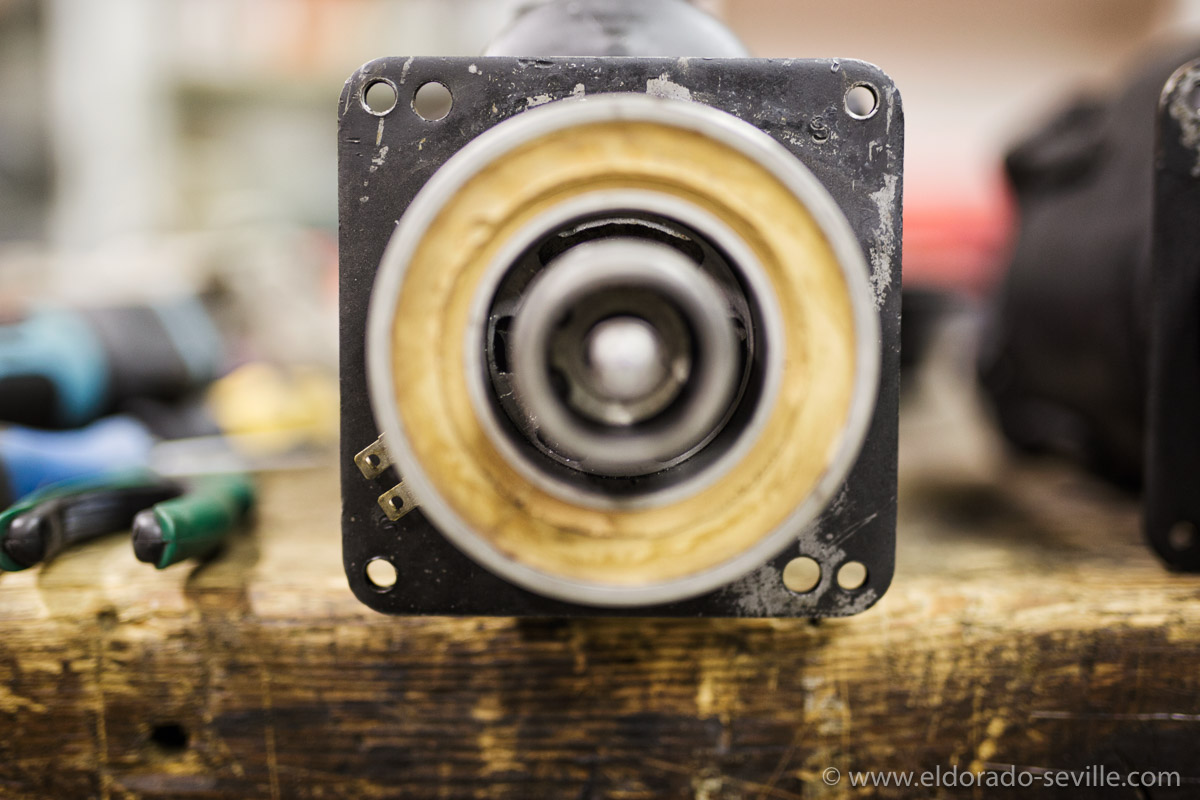
The terminal at the incorrect position at the rebuilt compressor.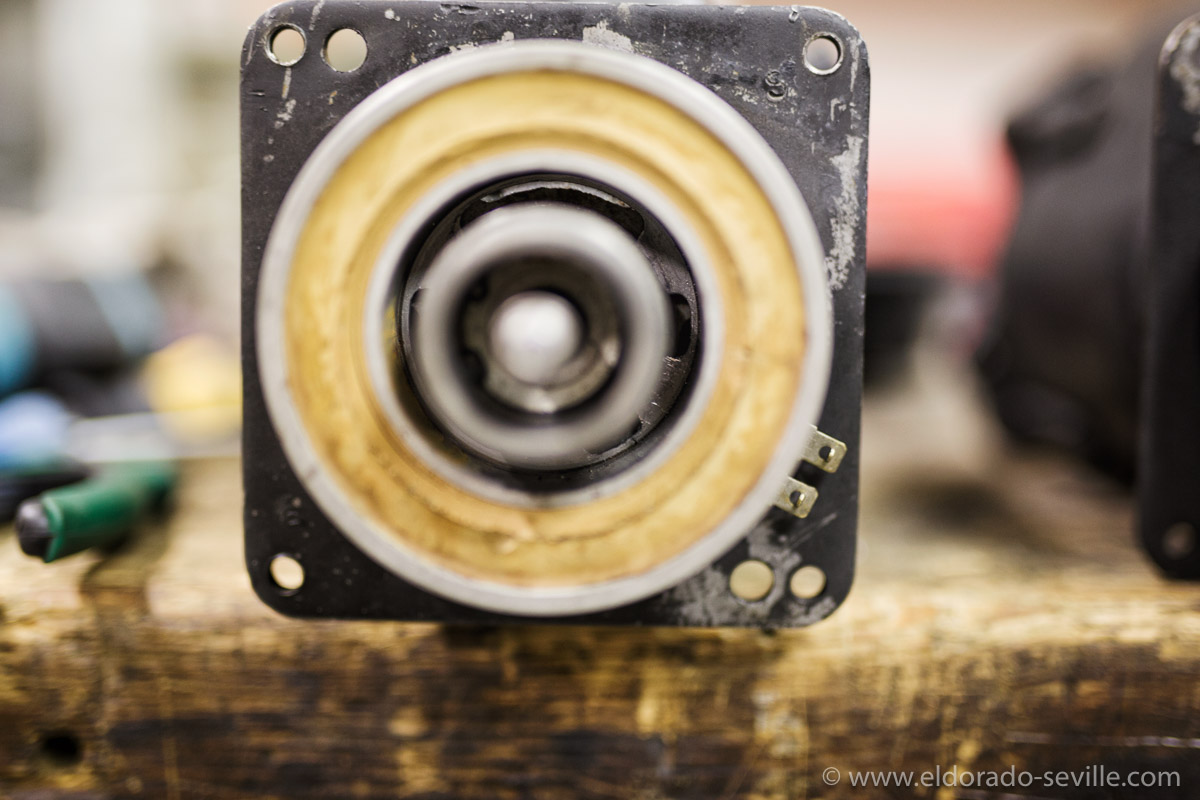
We turned the terminal to the correct position.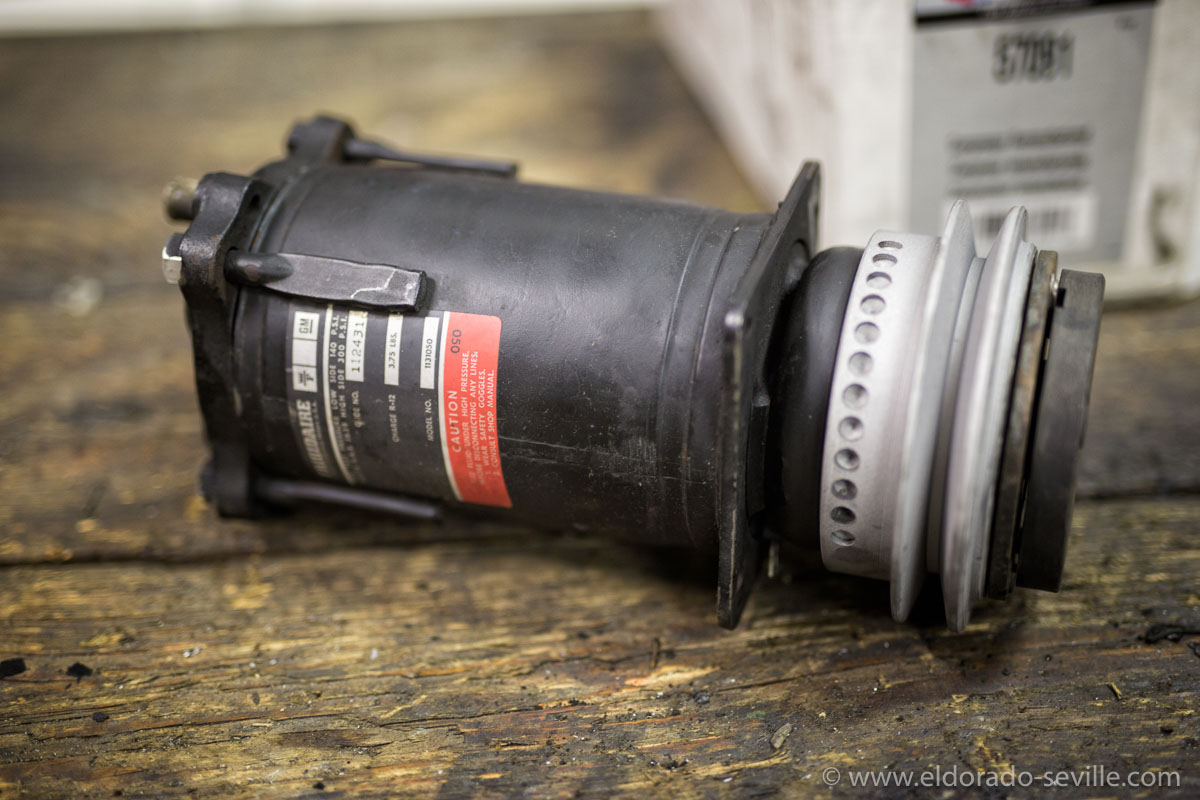
We sandblasted the pulley while it was out of the car so that I can repaint it now. Note the original decal! All the available reproduction decals are totally incorrect for the 1974 Cadillacs. The reproduction decals all show the wrong amount of refrigerant! They are also different in many other details. The closest match of reproduction decals for 1974 are the ones from 1972 Cadillacs…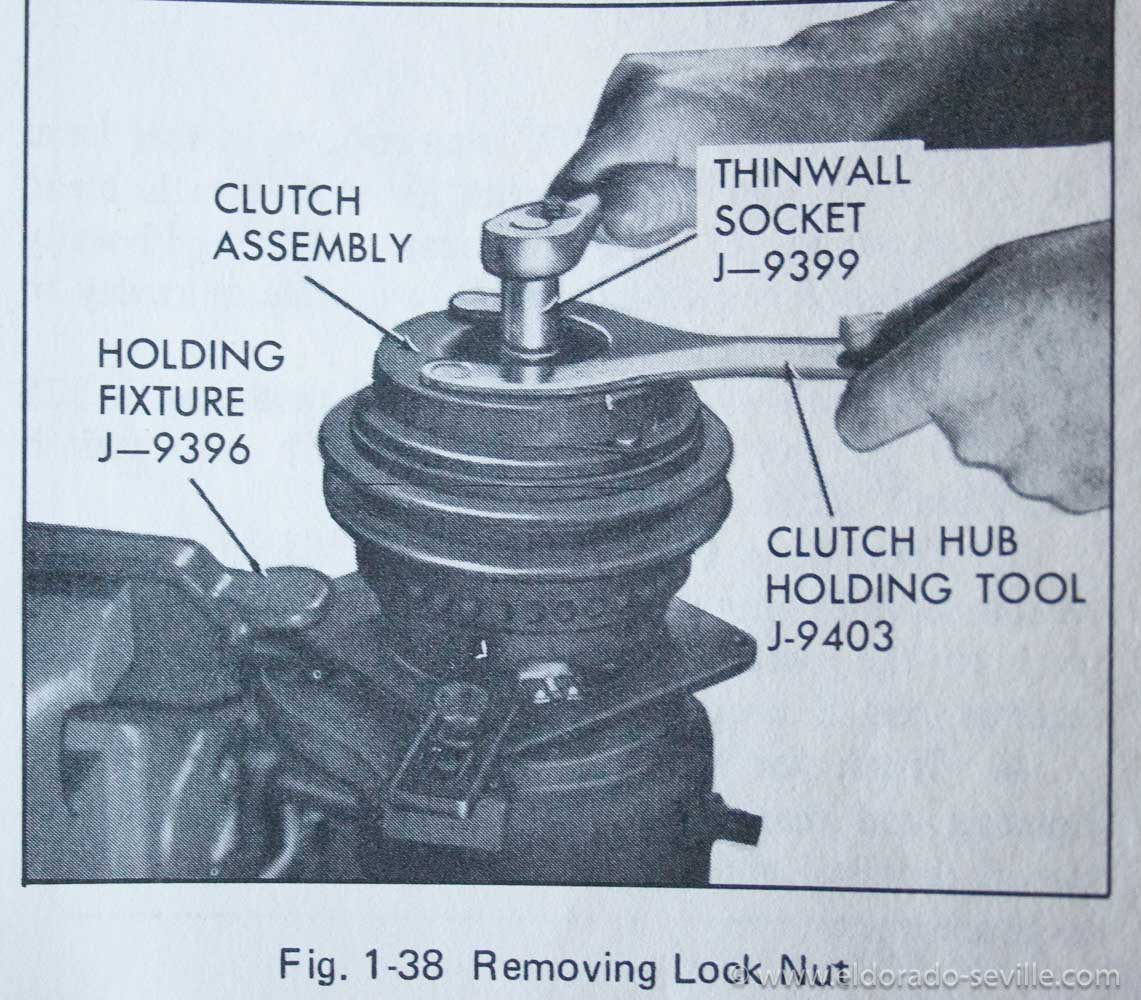
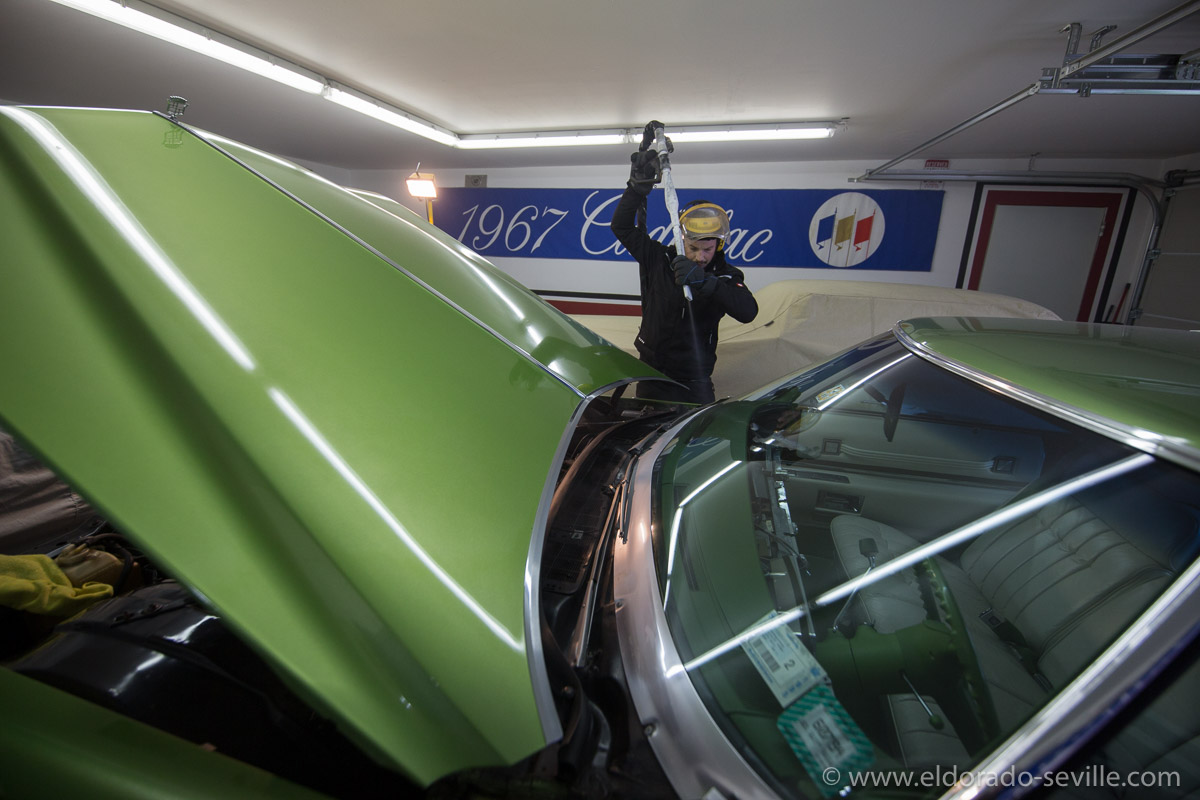
DRY ICE CLEANING THE ENGINE AND ENGINE BAY OF MY 1974 COUPE DEVILLE. (VIDEO).
A conventional engine cleaning with a strong degreaser, steam or a pressure washer was not successful when I tried, because the main issue I had was overspray, which you cant remove with traditional cleaning methods.
During the undercarriage project last winter - the paint shop did not cover the engine bay good enough, and a lot of overspray settled down on the entire engine bay. It looked terrible!
This overspray is extremely difficult to remove, and this is why I thought of dry ice cleaning for the remains which I could not remove with clay and polishing.
I had some very good results with dry ice blasting during my undercarriage project for removing the undercoating.
Dry ice-blasting is a form of carbon dioxide cleaning, where dry ice, the solid form of carbon dioxide, is accelerated in a pressurized air stream and directed at a surface in order to clean it. An alternative media for non-abrasive blasting is water-ice, known as ice blasting.
The method is similar to other forms of abrasive blasting such as sand blasting, plastic bead blasting, or soda blasting but substitutes dry ice as the blasting medium. Dry-ice blasting leaves no chemical residue as dry ice sublimates at room temperature.
Dry-ice blasting involves propelling pellets at extremely high speeds. The actual dry-ice pellets are quite soft, and much less dense than other media used in blast-cleaning (i.e., sand or plastic pellets). Upon impact, the pellet sublimates almost immediately, transferring minimal kinetic energy to the surface on impact and producing minimal abrasion. The sublimation process absorbs a large volume of heat from the surface, producing shear stresses due to thermal shock. This is assumed to improve cleaning as the top layer of dirt or contaminant is expected to transfer more heat than the underlying substrate and flake off more easily. The efficiency and effectiveness of this process depends on the thermal conductivity of the substrate and contaminant. The rapid change in state from solid to gas also causes microscopic shock waves, which are also thought to assist in removing the contaminant.
Unlike abrasive media blasting you cannot remove rust with dry ice blasting.
With this cleaning process I could remove 99,99% of the overspray and the engine is now extremely clean. I will have to remove all of the remaining surface rust with rust remover, and then re-paint the areas which will then be bare metal. Some of the original paint had flaked off over the last 45 years, but I´m trying to keep as much in original paint as possible and only repaint where it is absolutely necessary. Areas of the block will get some fresh Bill Hirsch engine enamel and I had to repaint some brackets, pulleys and the power steering pump.
Below I have put together a short video to show how dry ice cleaning was done in my engine bay. Enjoy and make sure to watch in HD to be able to view all the details!
Here is a short video I shot during dry ice cleaning - it shows the process and explains it a little. MAKE SURE TO SET THE QUALITY TO HD TO SEE ALL THE DETAILS!

You need a very strong compressor for dry ice cleaning - even a very good shop compressor is not strong enough and cant supply the necessary capacity of air.
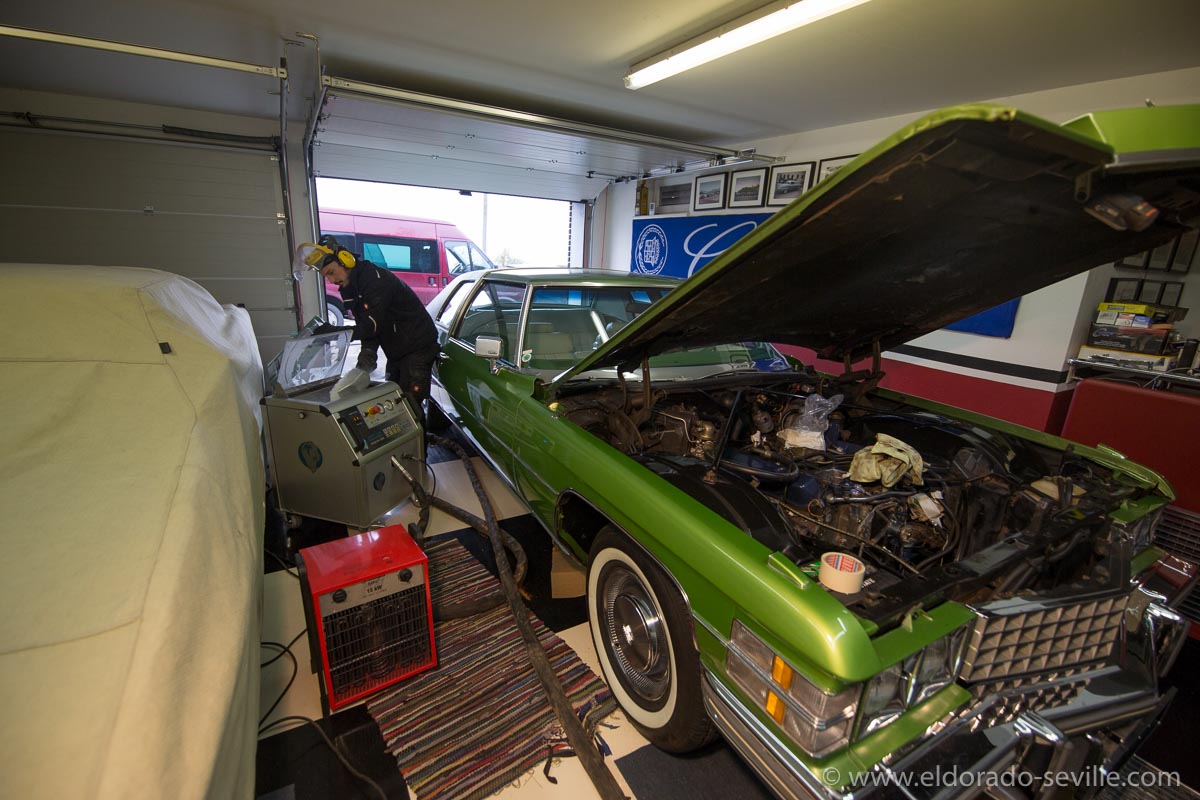
Christoph with his dry ice blasting machine.

Loose paint will come off easily
You can also clean weatherstripping and rubber hoses very well.
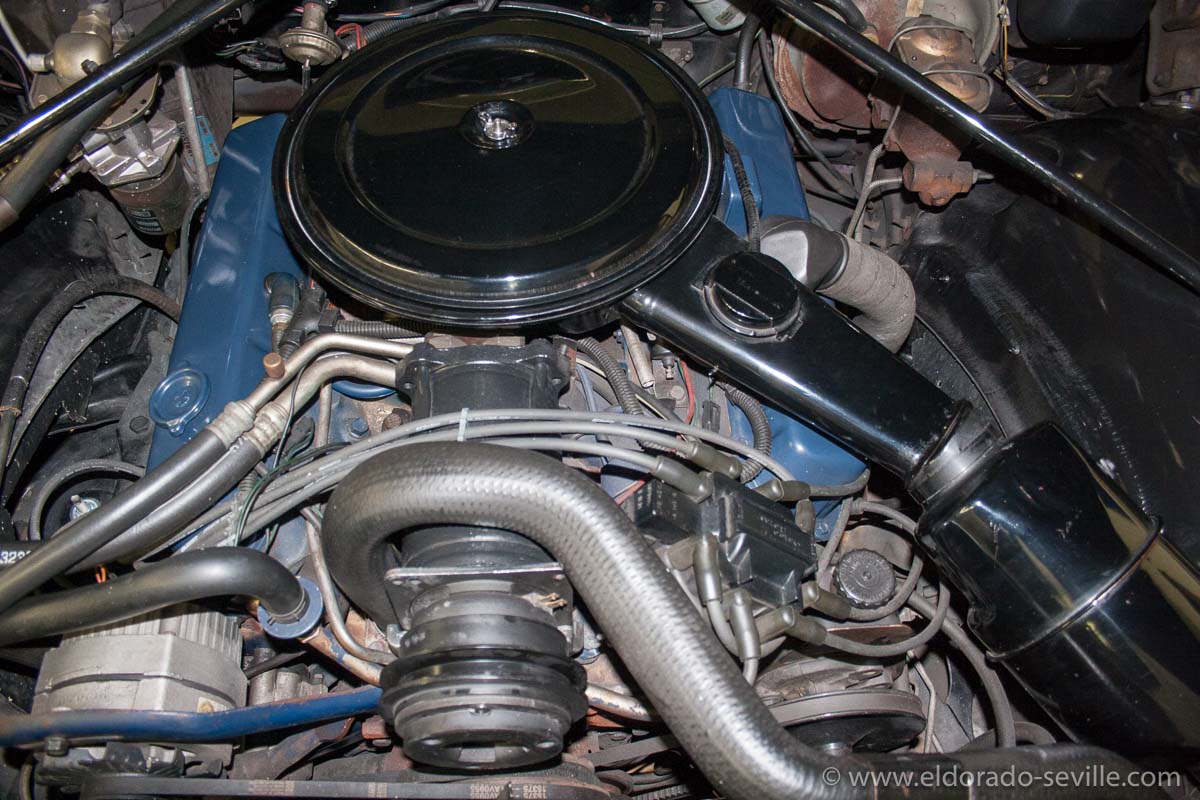
After cleaning - the overspray is gone :-)
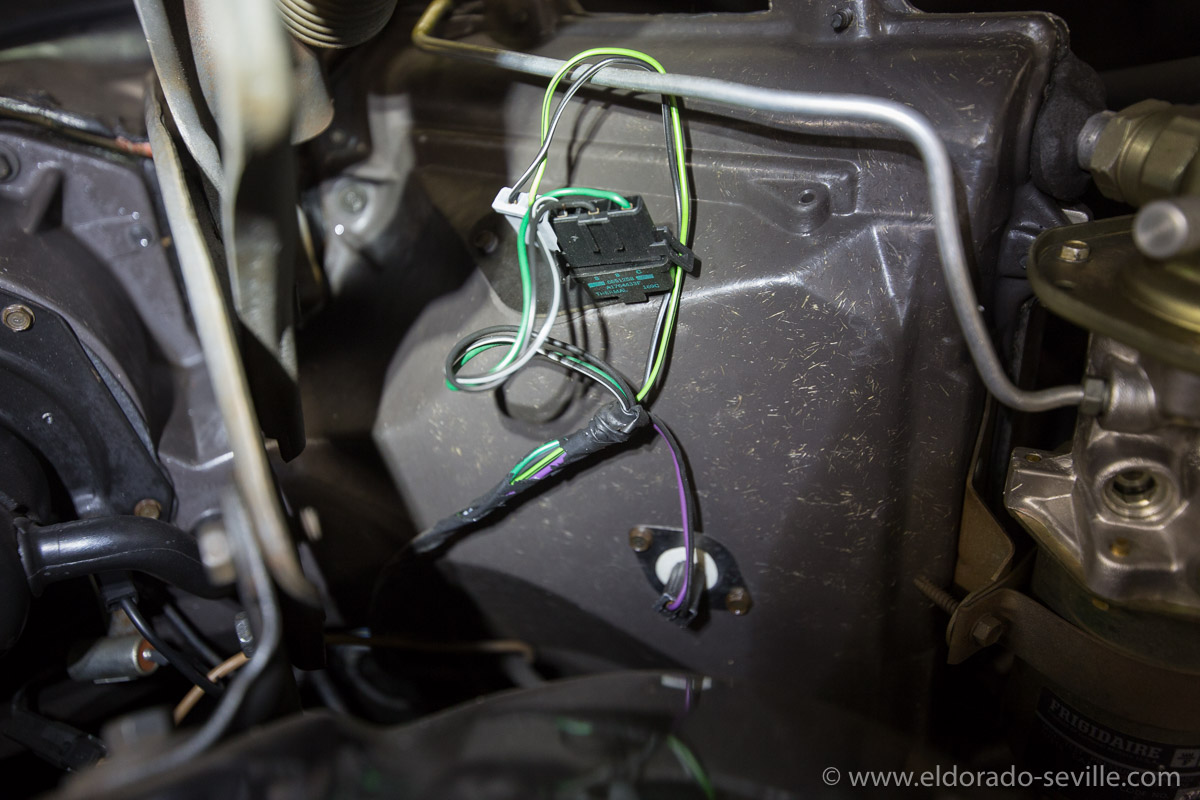
After cleaning - the overspray is gone :-) All the hoses and wires are clean again.
After cleaning - the overspray is gone :-) All the hoses and wires are clean again.
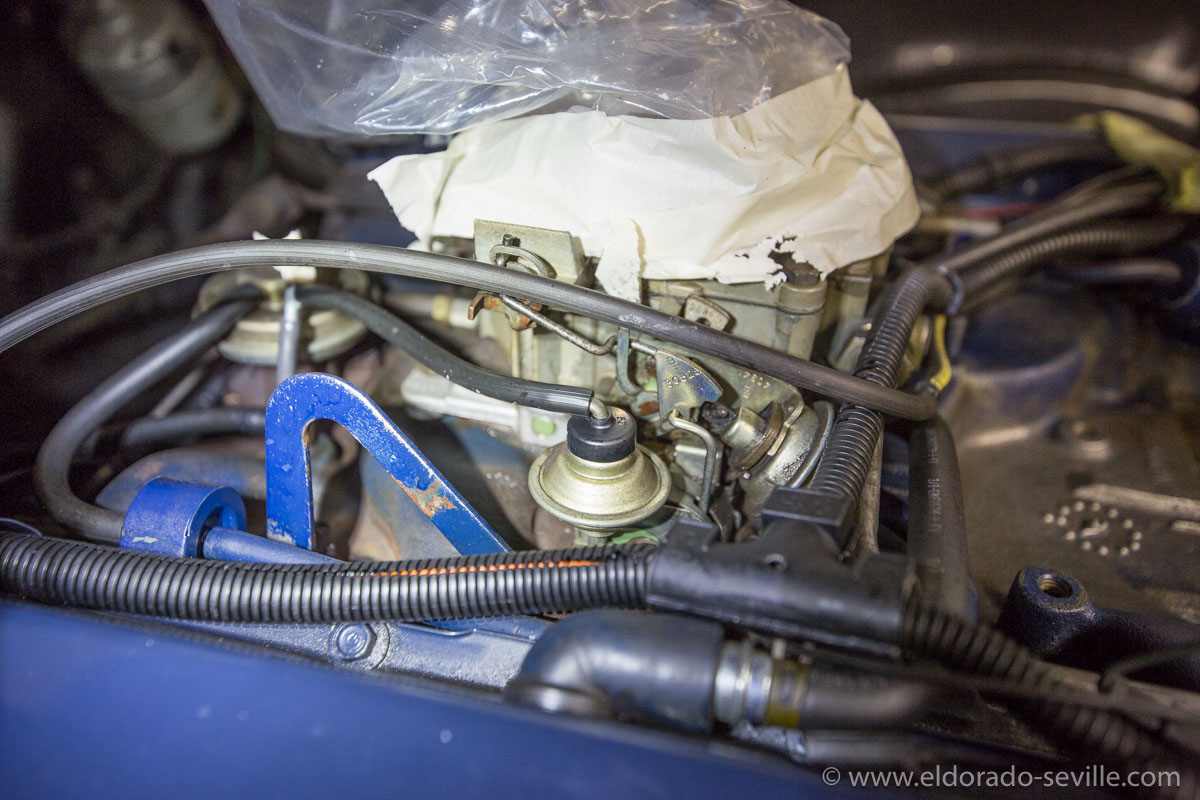
You can also clean the carburetor with dry ice.
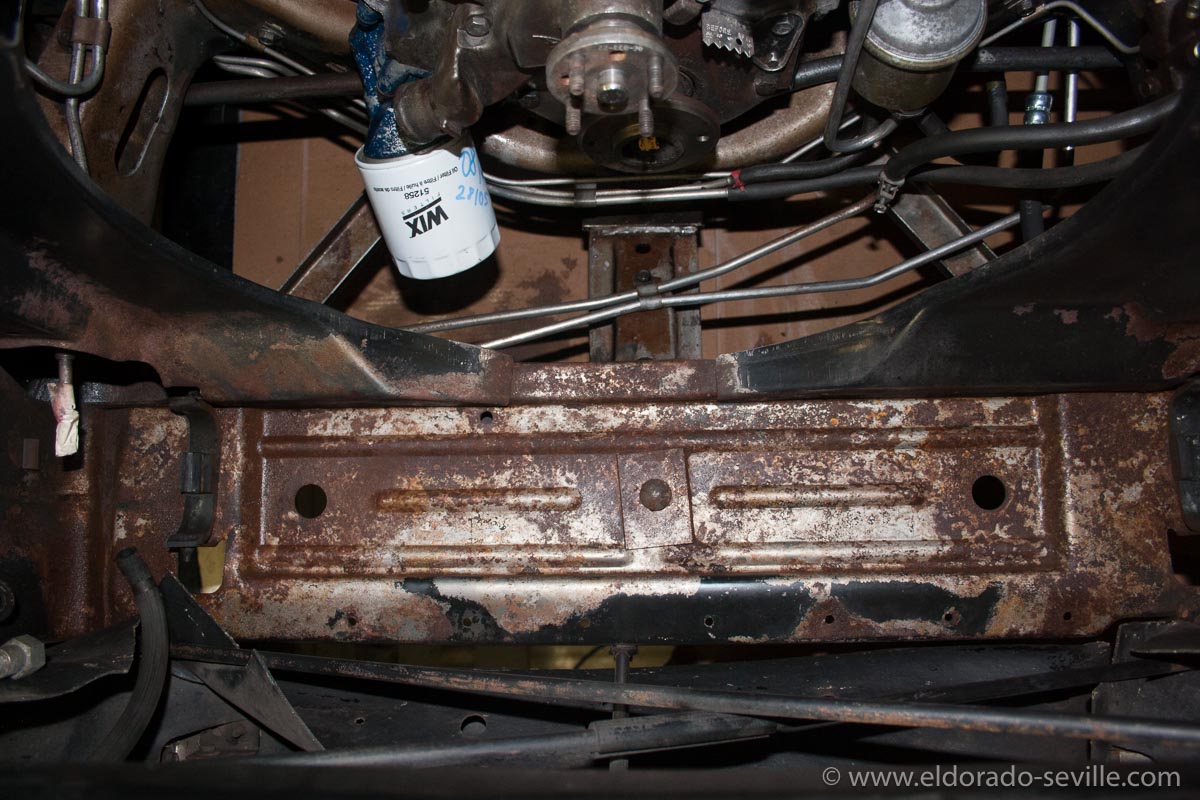
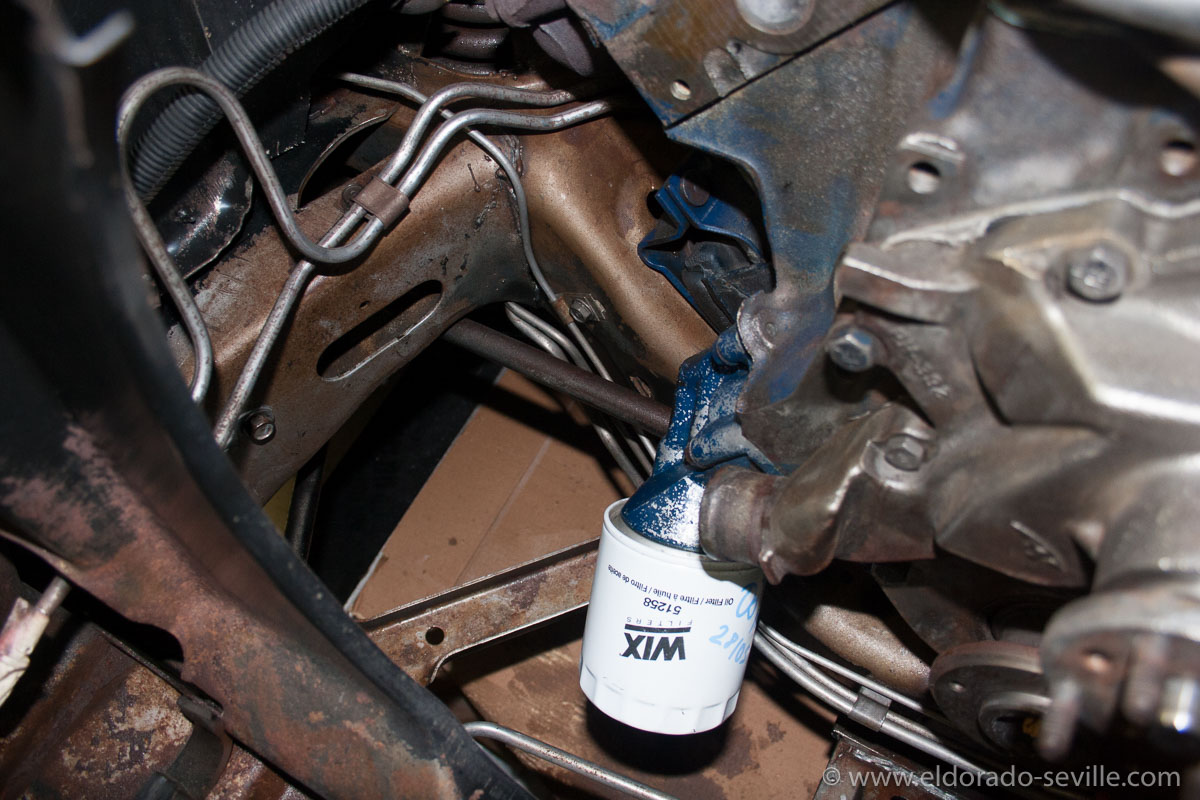
This is the area underneath the radiator. The surface rust will come off pretty easily with rust removing gel. Afterwards I will re- paint it.
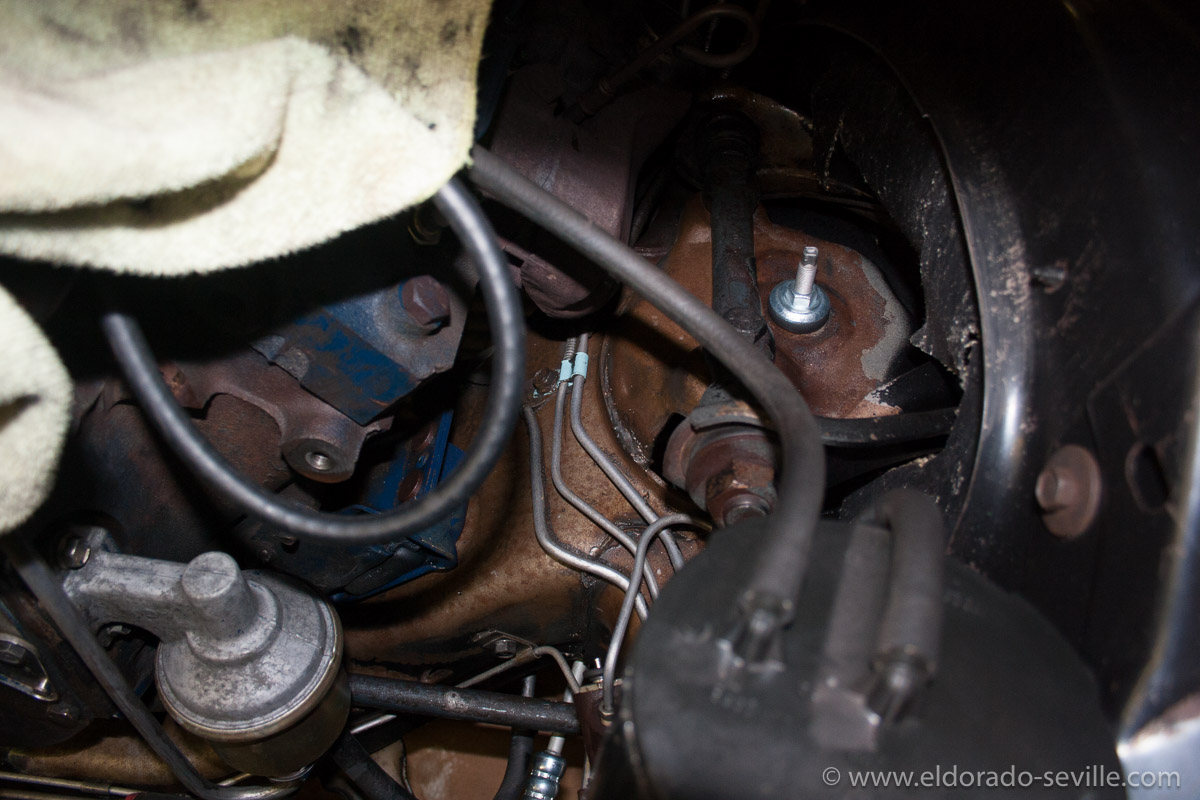
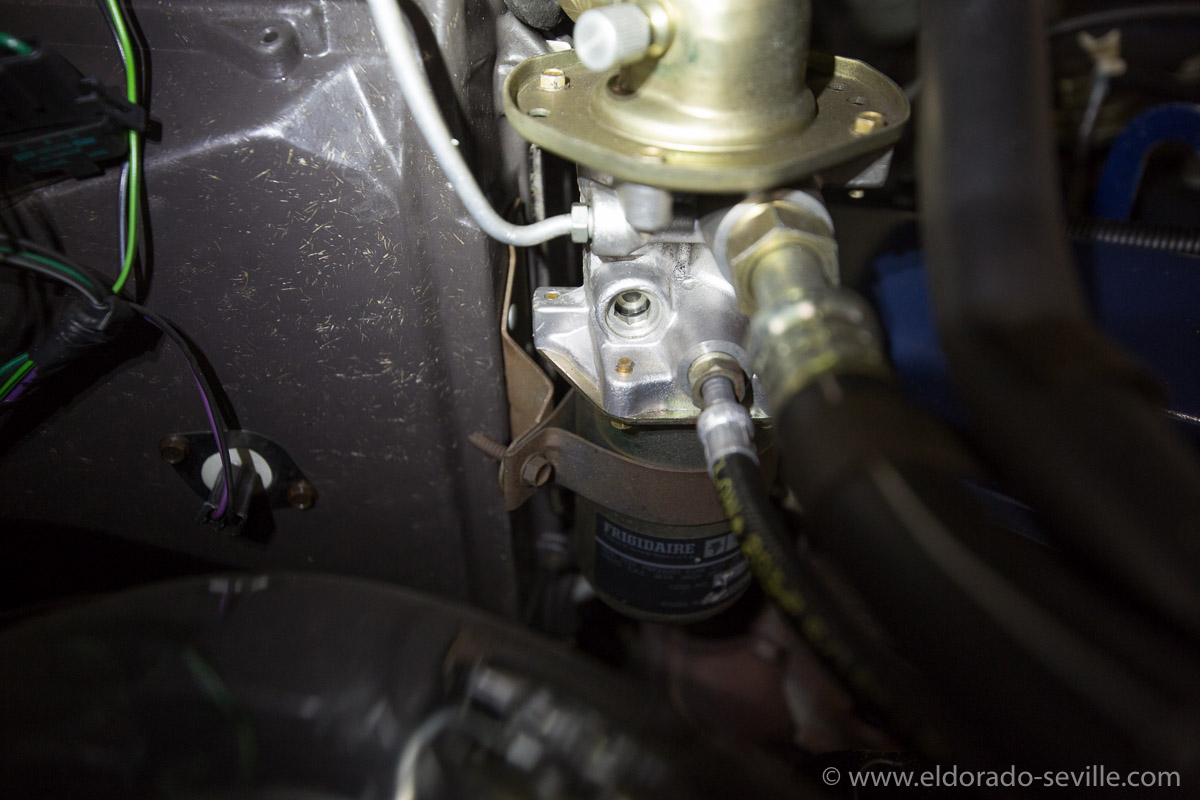
As you can see its clean, but there is some surface rust remaining which I will have to remove before applying some fresh paint.
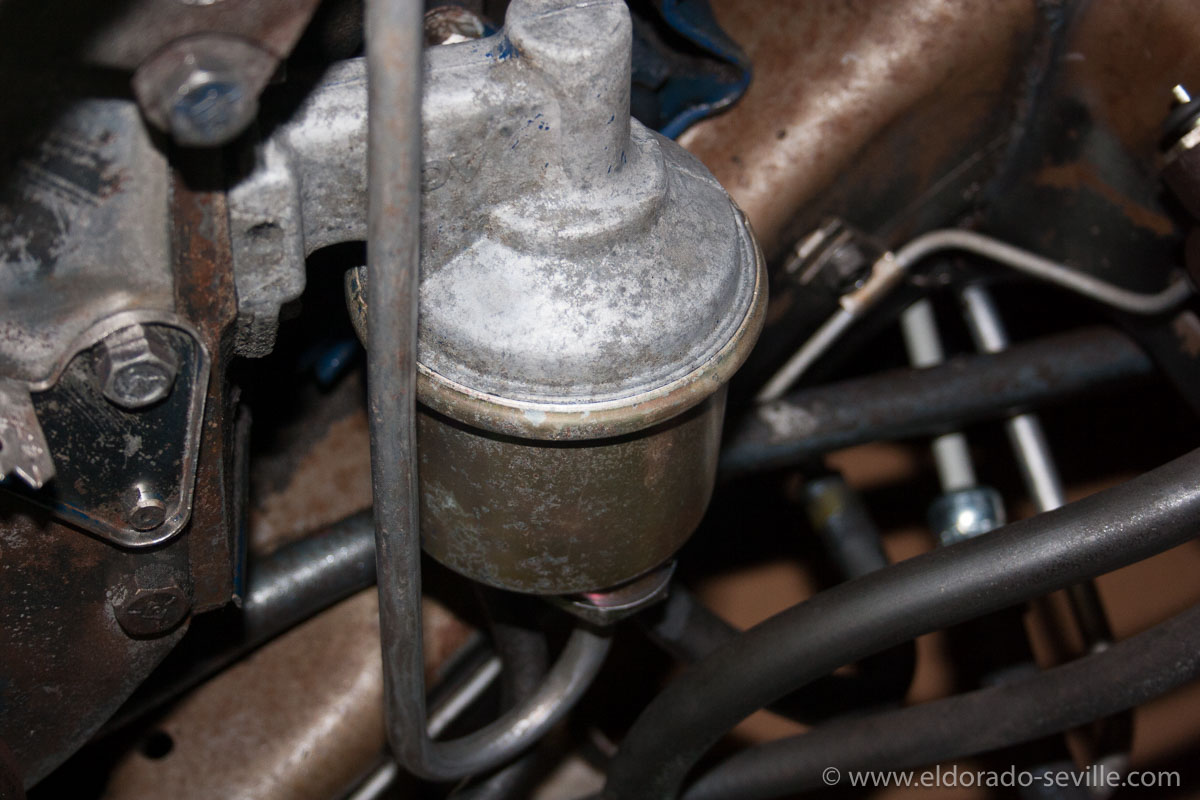
As you can see its clean, but there is some surface rust remaining which I will have to remove before applying some fresh paint. I will remove the fuel pump for painting.
As you can see its clean, but there is some surface rust remaining which I will have to remove before applying some fresh paint.
DETAILING THE ENGINE BAY AND REMOVING A BROKEN BOLT FROM THE AIR PUMP OF THE 1974 CADILLAC
During the restoration of the battery tray of my 74 Coupe deVille I noticed that the belt from the AIR Pump was a little loose. While I tried to find out how to properly tension it, I noticed that one of the bolts going through the pulley into the pump seemed to stick out a little bit at a strange angle. When I touched it, it immediately broke off… Great…
So I had to remove the pump to be able to get to the broken pulley bolt and replace it with a good new one. It was very common on GM cars from the 70s which used this air pump, that the bolts broke off. GM used 3 very cheap and weak bolts to hold the pulley in place.
Before I took any bolts out to remove the pump, I sprayed every nut and bolt with penetrating oil to make sure I could open them without damage.
I anyway had to take out the AC compressor as well for another winter project. After that I removed the generator and then the air pump including all the brackets.
You can see the at the diagram below where the bolts are hiding.
With these parts removed I now have access to many parts of the engine which I can freshen up to the original factory fresh look. I will remove the surface rust on the block, clean everything and re-paint in the original Cadillac Blue paint.
I can clean the air pump, the generator and will blast the brackets and re-paint them. While the AIR Pump is out you might also want to check the diverter valve atop the smog pump to be sure the vacuum canister holds and hasn't ruptured at the vacuum diaphragm. If the diverter valve does not respond to vacuum, it can lead to all of the positive pressure from the pump being injected into the exhaust stream which can cause a backfire through the exhaust.
Many people also plug the AIR Pump and remove everything inside, so they do no longer have to bother with it. Rebuilt pumps are still available, but you can´t get the diverter valve anywhere.
So it is now officially my winter project to freshen up the engine bay…
The air pump is very fragile btw. It's not allowed to put it into a vise. Luckily I could remove the broken bolt with a bolt extractor. I just had to drill into the remains of the stuck bolt a little bit and could then remove it using the left turning extractor tool.
I have now to find replacement bolts now. They seem to be SAE bolts with the following dimensions: 1/4"(diameter)-20(threads per inch) and 1/2" (without the head) long. The original bolts were of the lowest grade material, the new ones I am going to install will be grade 5 or grade 8.
While cleaning the block I decided to also remove the fan and water pump pulley to be able to clean them as well. The pulley was pretty rusty and I had to soak it in rust removing liquid for 48 hours before the rust was gone and I had to paint it immediately as this material develops flash rust immediately.
UPDATE - OCTOBER 28th 2016:
I now also removed the power steering pump to get better access to the front of the engine block. I will also remove the radiator to be able to remove the surface rust underneath. I will then have the entire engine bay dry ice blasted to properly clean everything.
UPDATE - NOVEMBER 5th 2016
I took out the radiator today to be able to clean the surface rust underneath.
I also finished painting all the brackets and the power steering pump which I took down to bare metal before.
You can find much more pictures of this project in my 74 restoration gallery.
As this project is still going on - I will update this posting here soon.
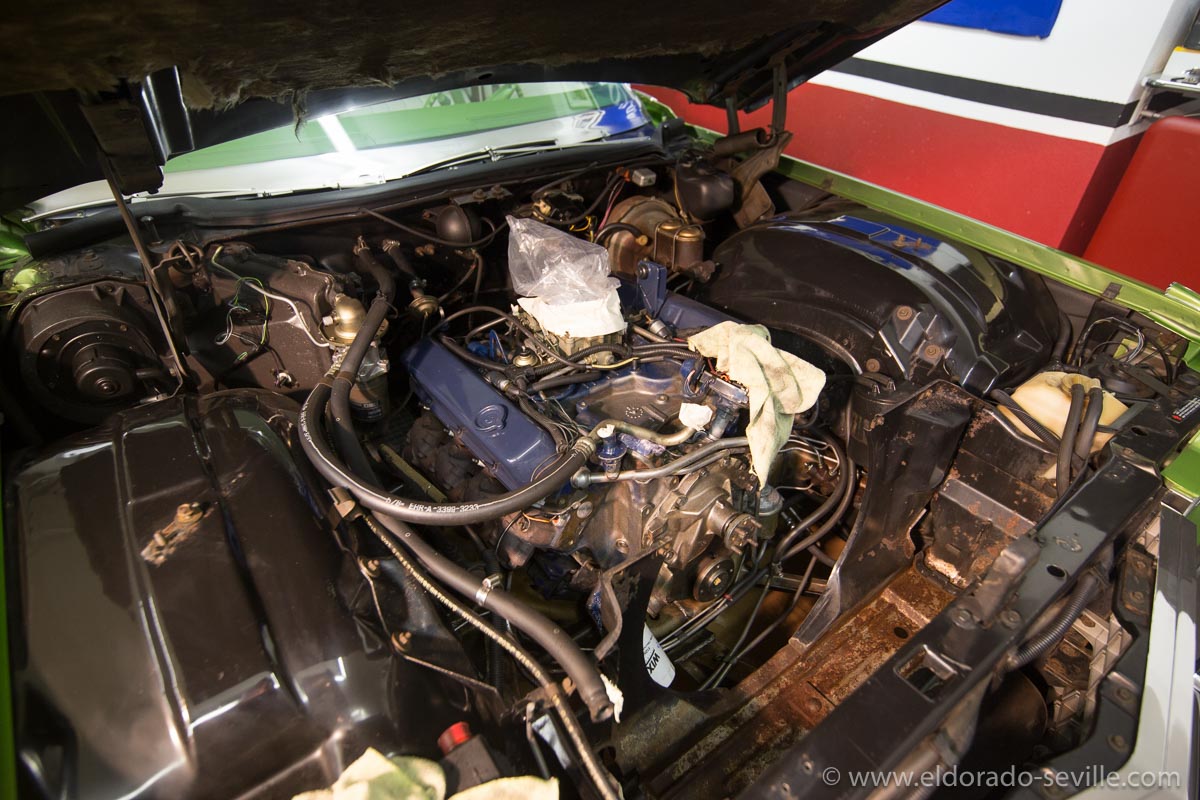
The engine bay before the start of the project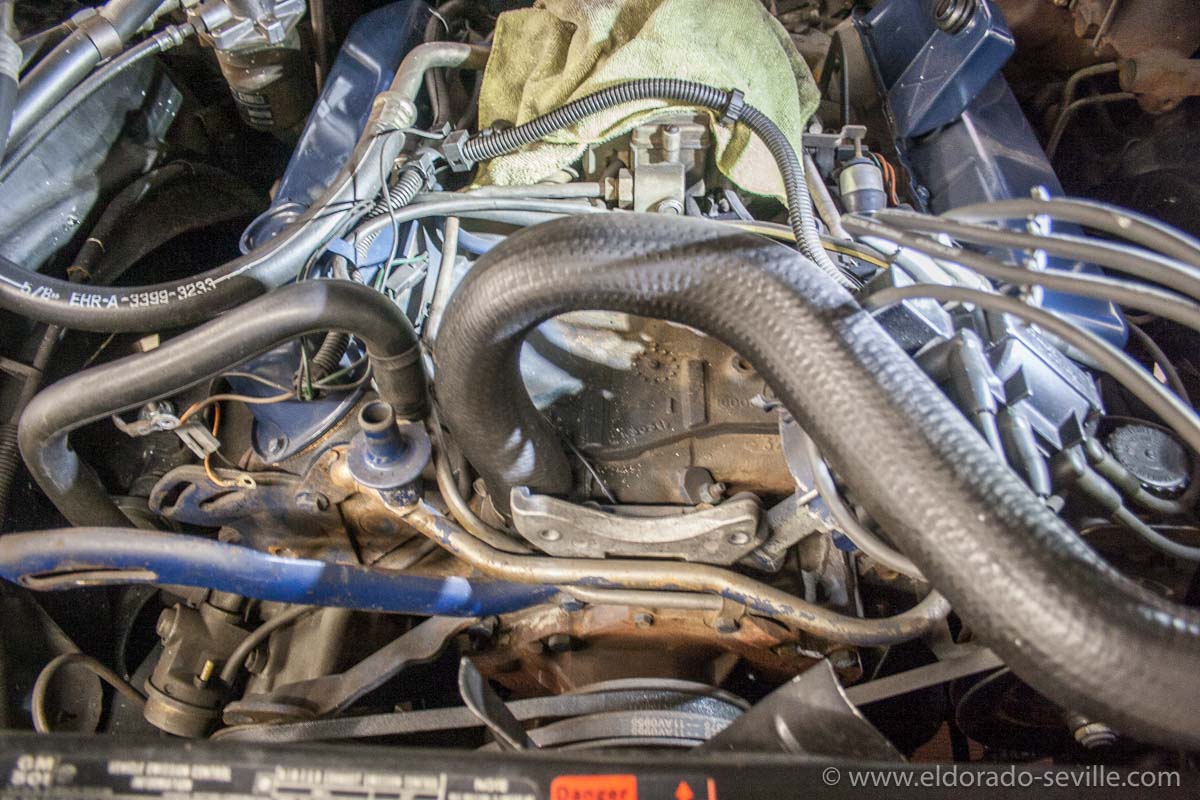
AC compressor and generator removed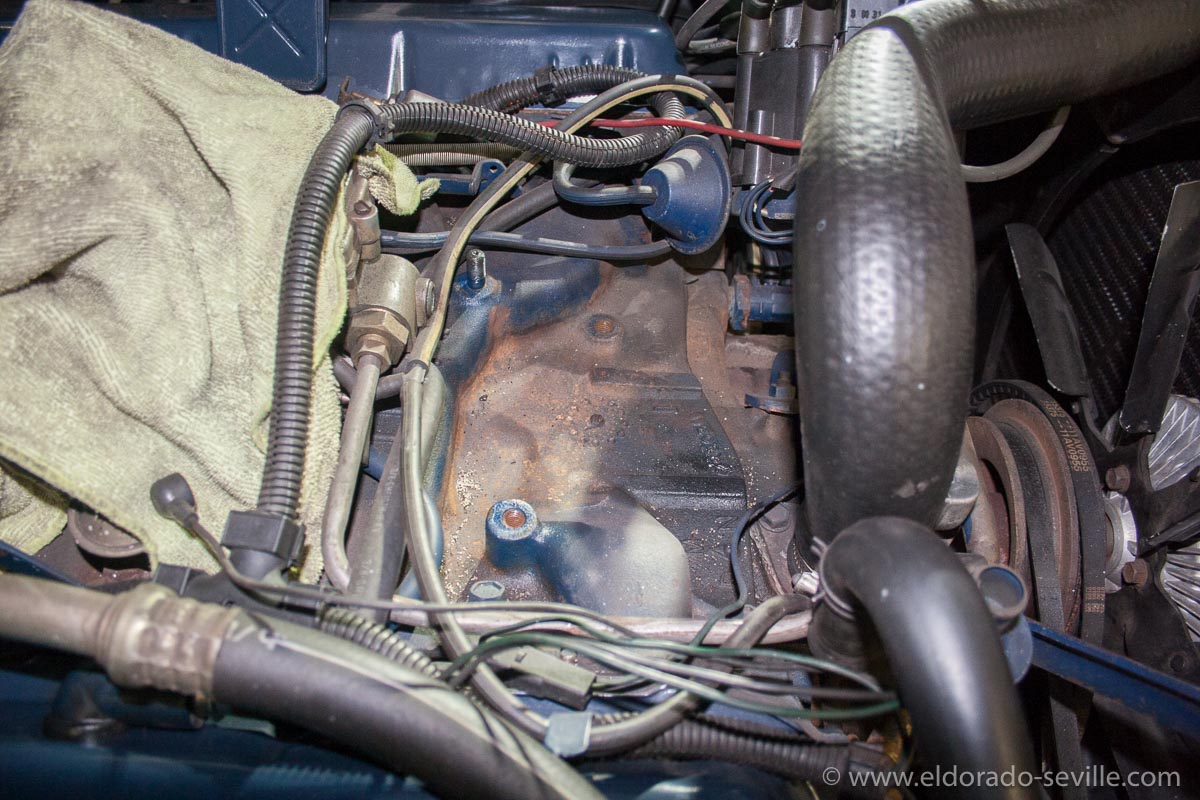
The area below the AC compressor will need some good de-rusting, cleaning and detailing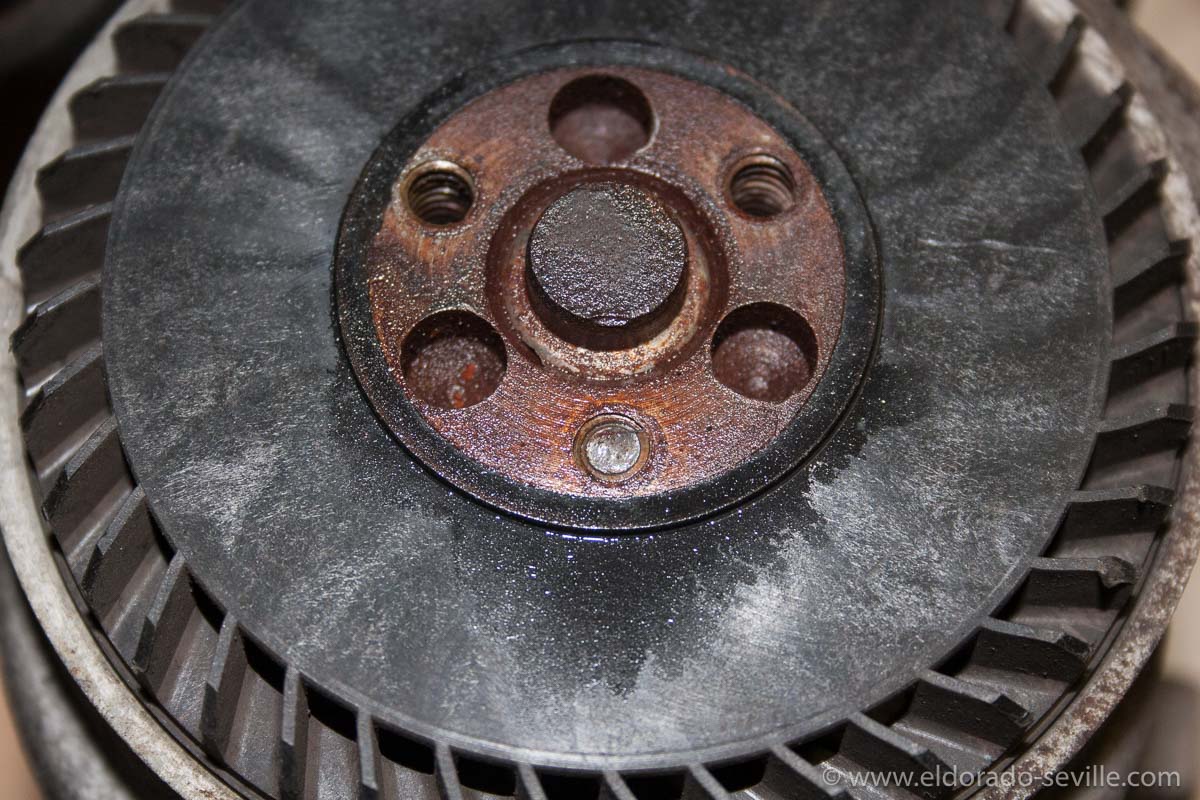
Here you can see the remains of the broken bolt in the AIR pump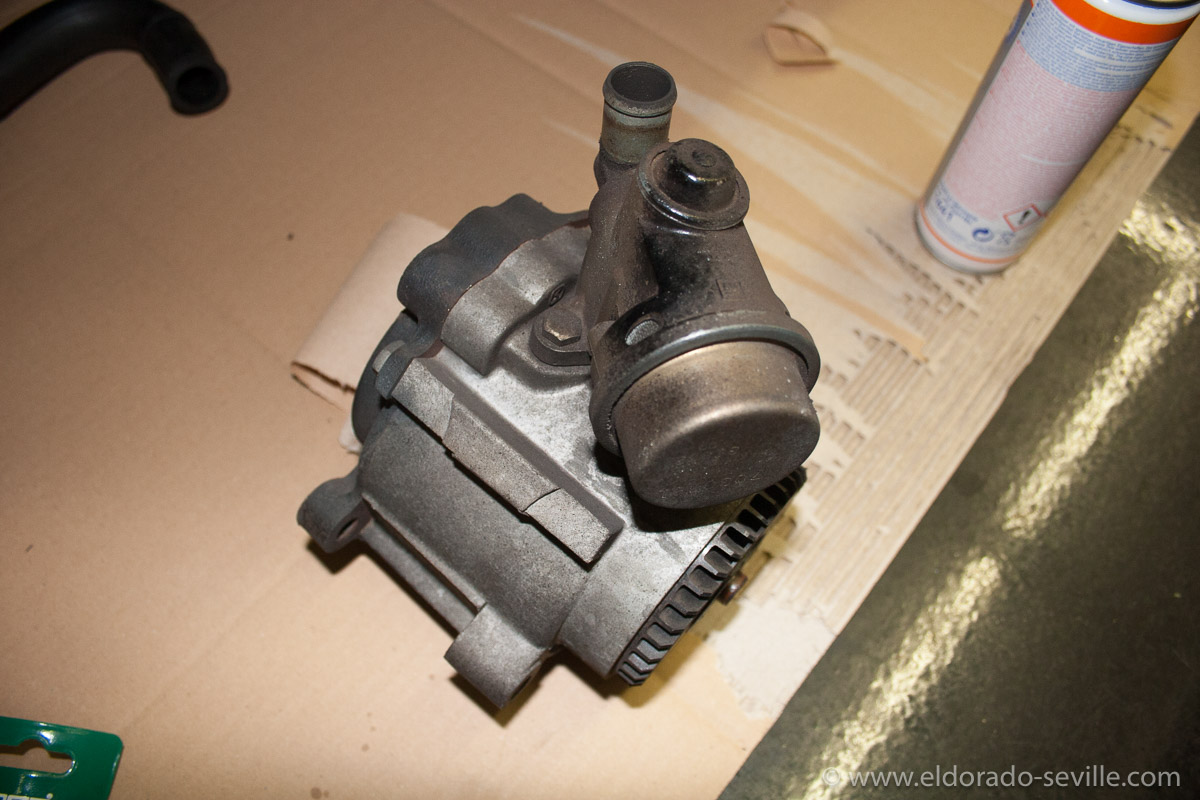
The AIR pump before cleaning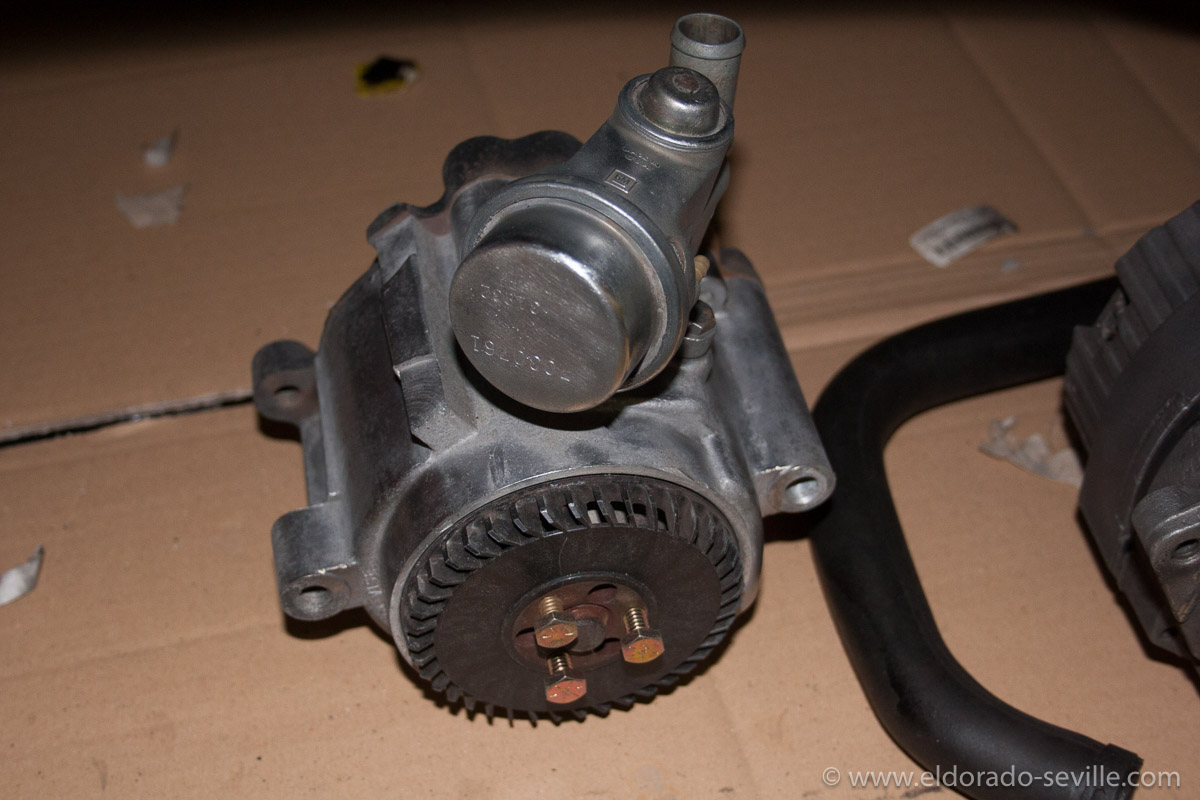
The AIR pump after cleaning - some details will still have to be done.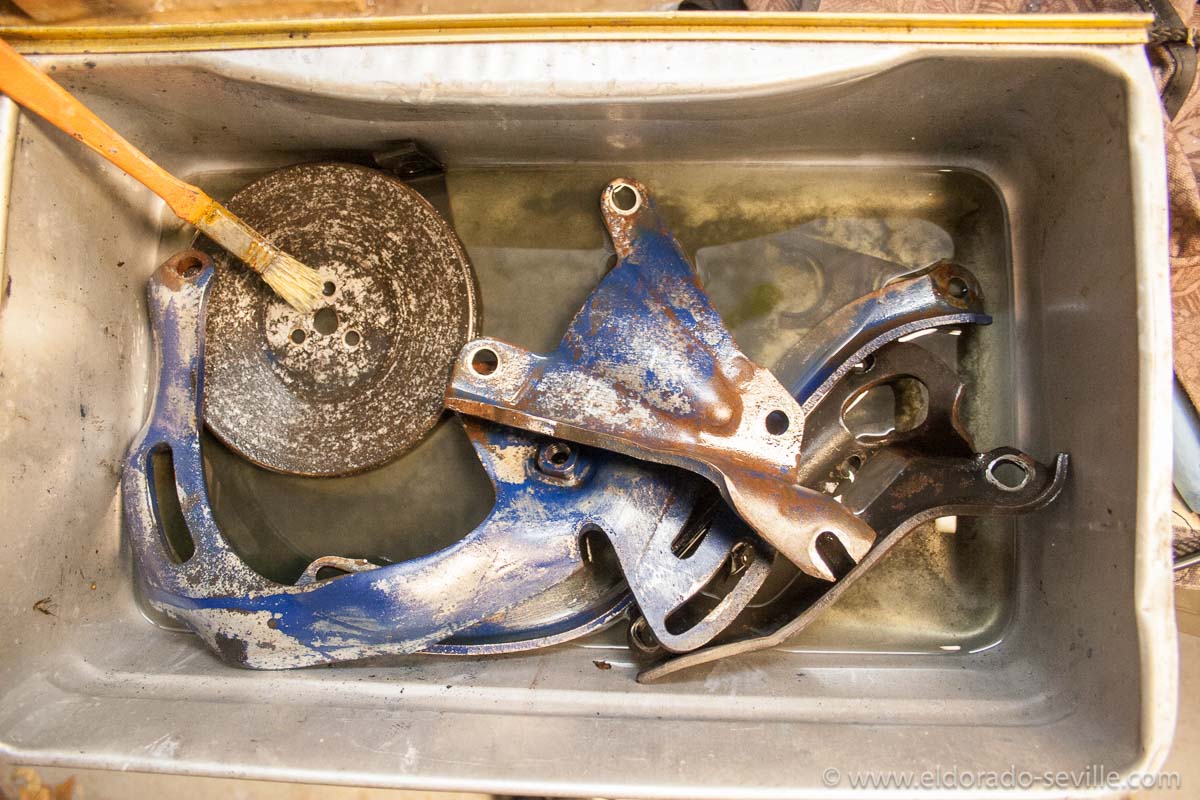
First I soaked the removed brakets in acetone to remove the dirt, grime and paint.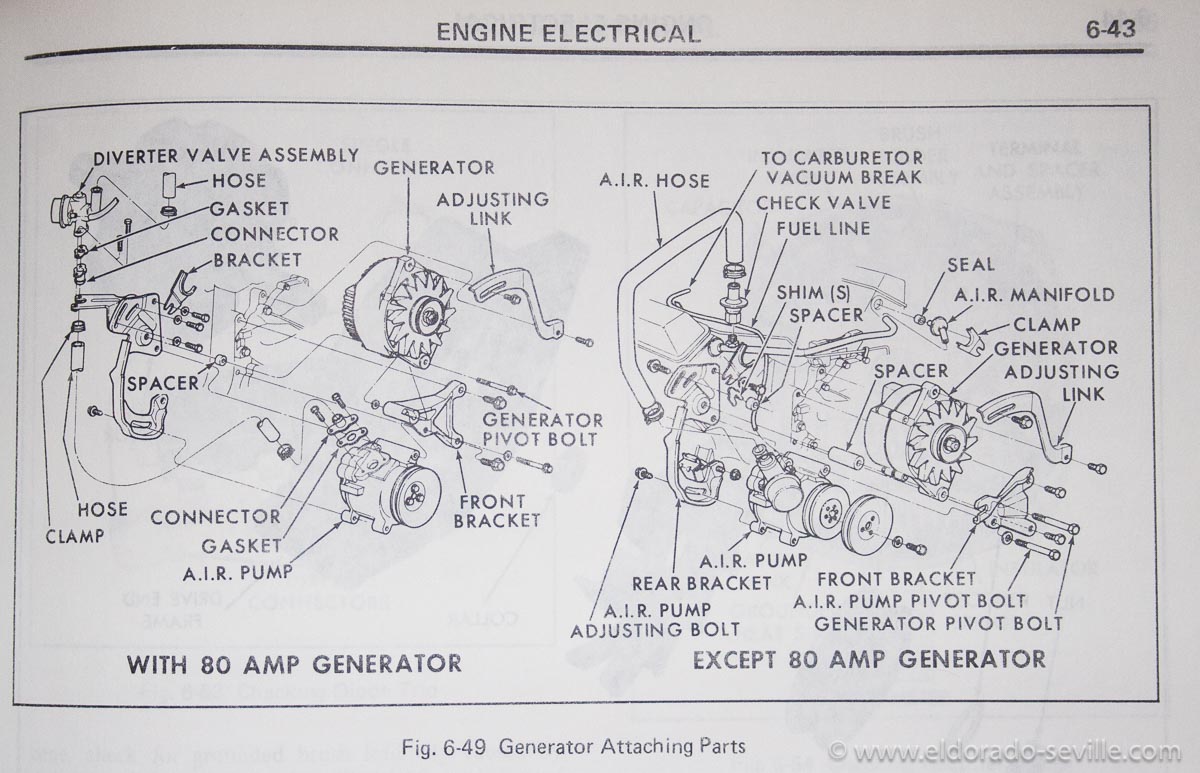
This shows the brackets in the shop manual.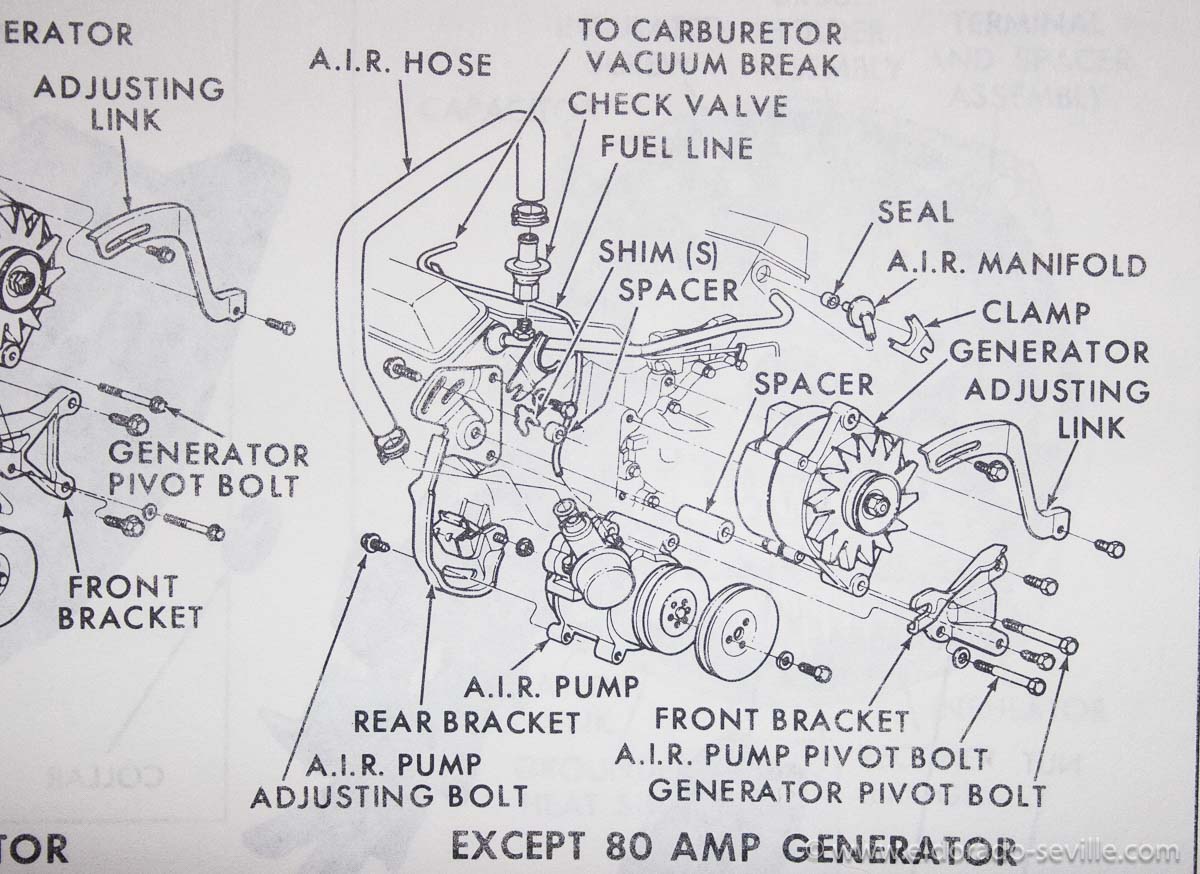
This shows the brackets in the shop manual.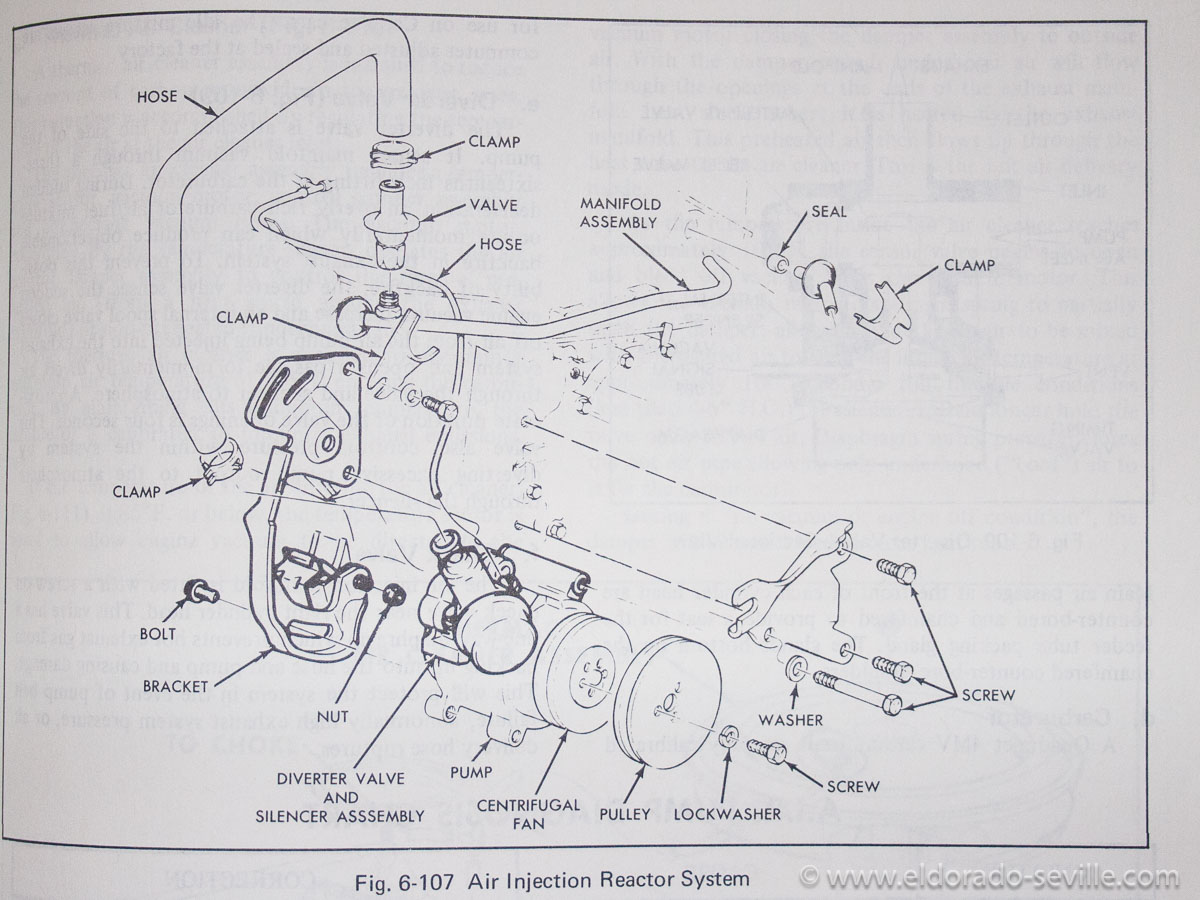
This shows the brackets in the shop manual.
The divert valve which is no longer available. Check the vacuum diaphragm inside while it is out.
The divert valve which is no longer available. Check the vacuum diaphragm inside while it is out.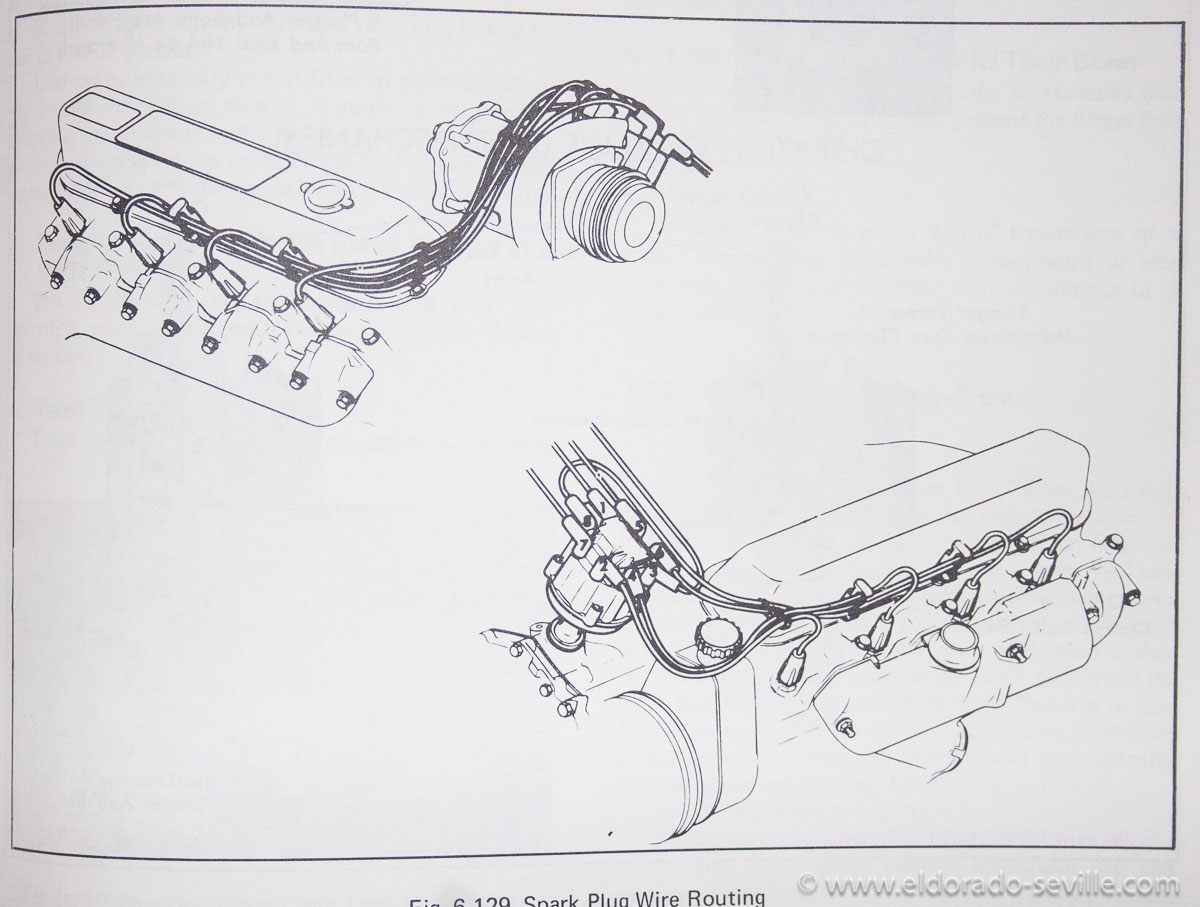
I had to remove the spark plug wires - this is how to put them back correctly.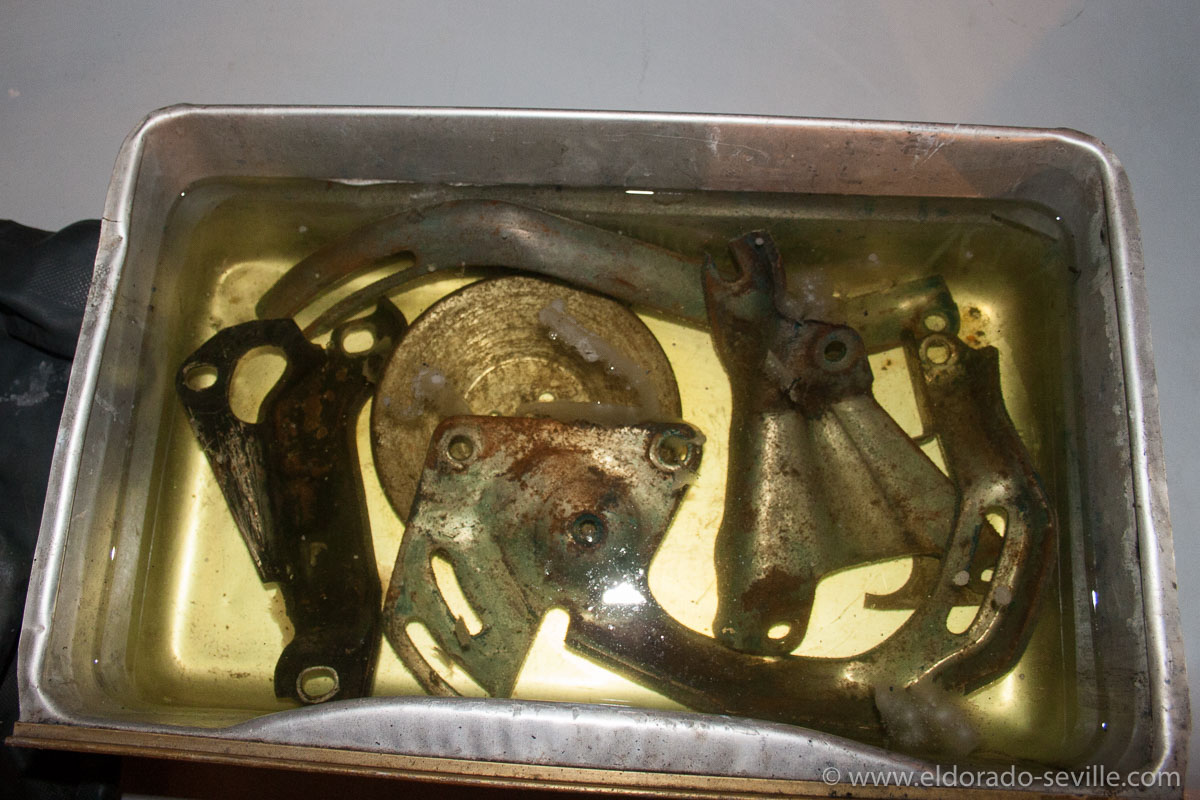
The brackets after I removed the paint - soaking in rust removing liquid until all the rust is gone.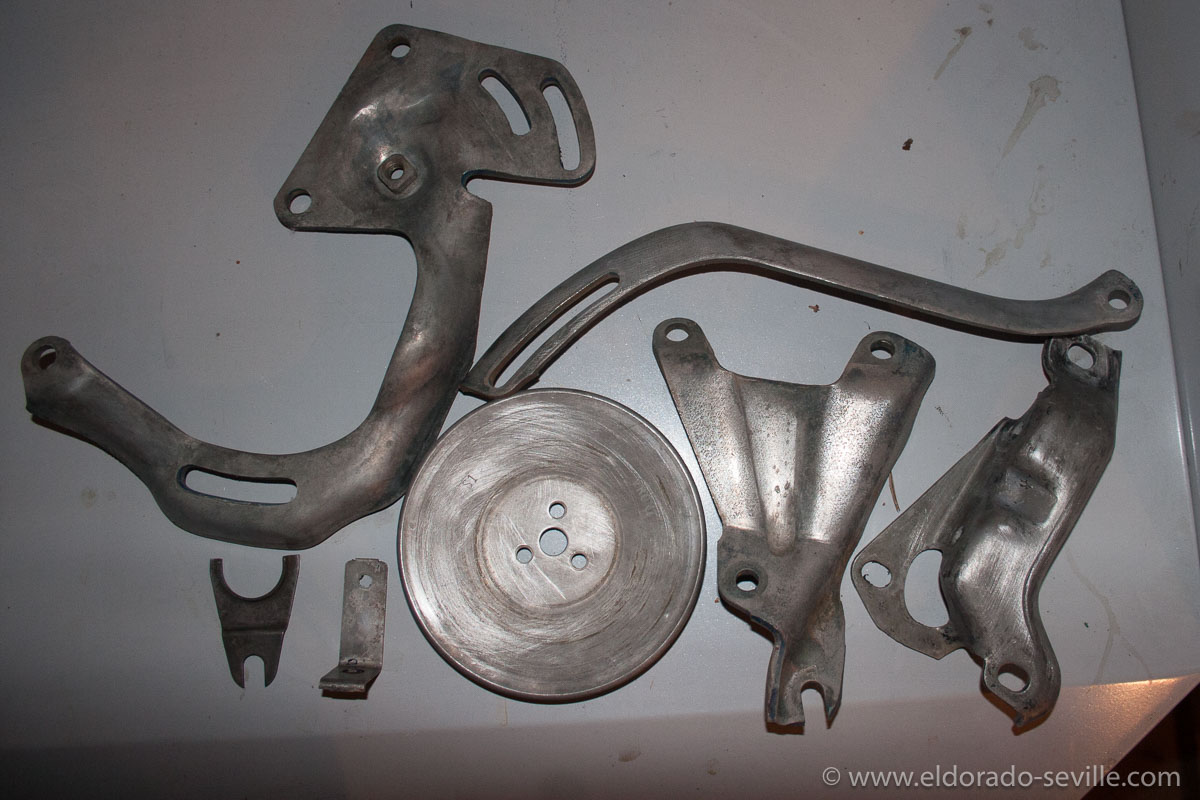
All the brackets and the pulley are now clean, rustfree and ready for paint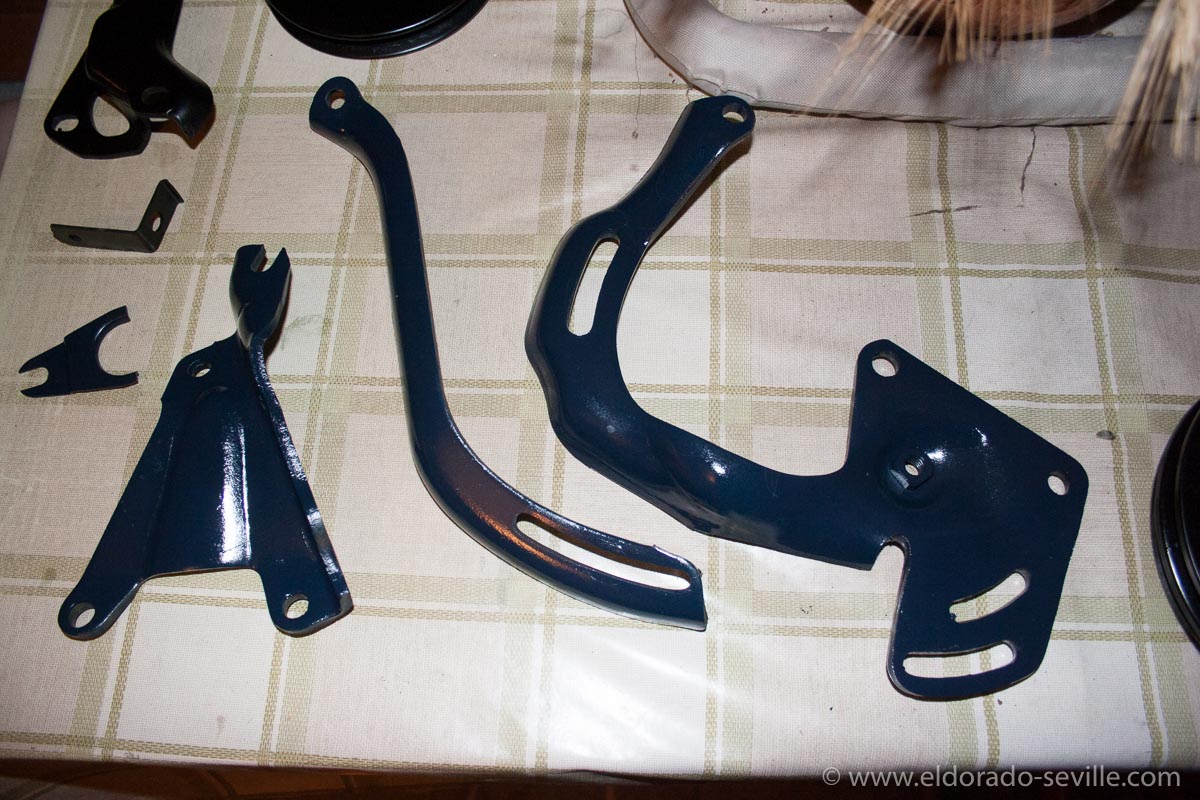
The brackets after painting.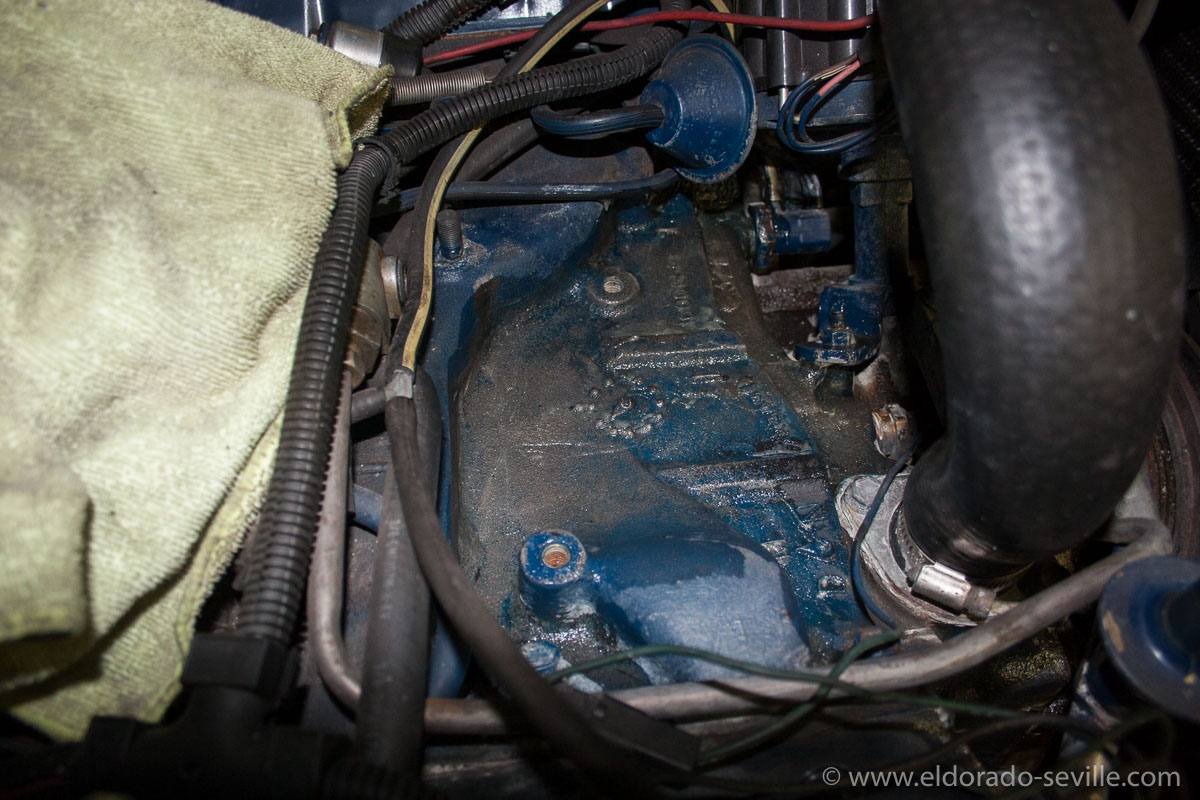
Rust removing gel in action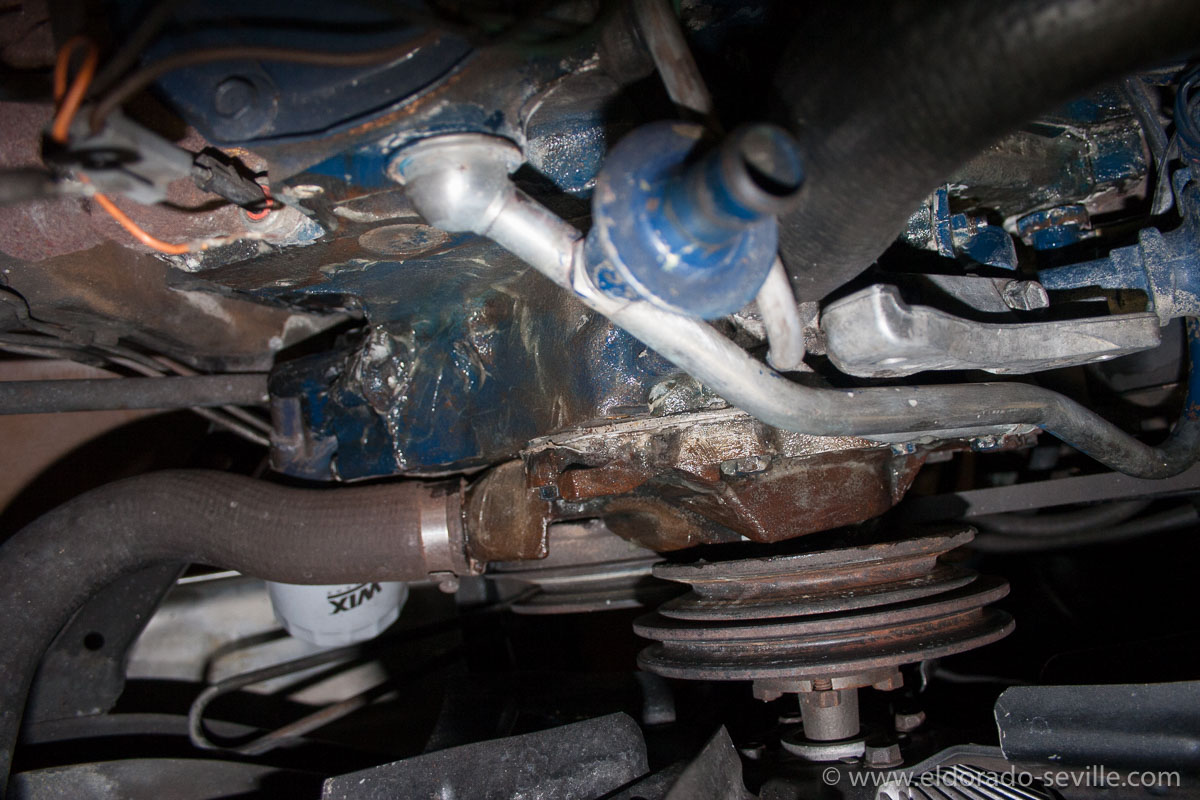
Rust removing gel in action - I decided to remove the waterpump pulley and the fan as well after I took this picture.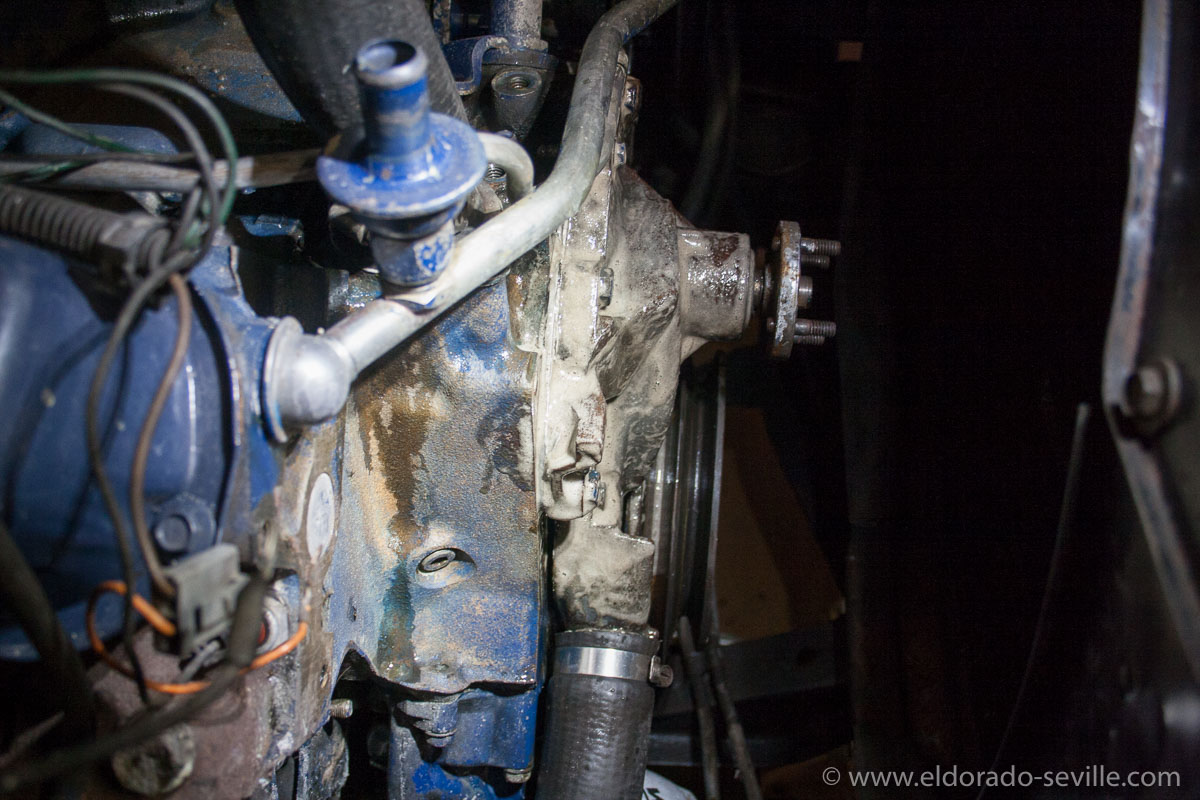
Rust removing gel in action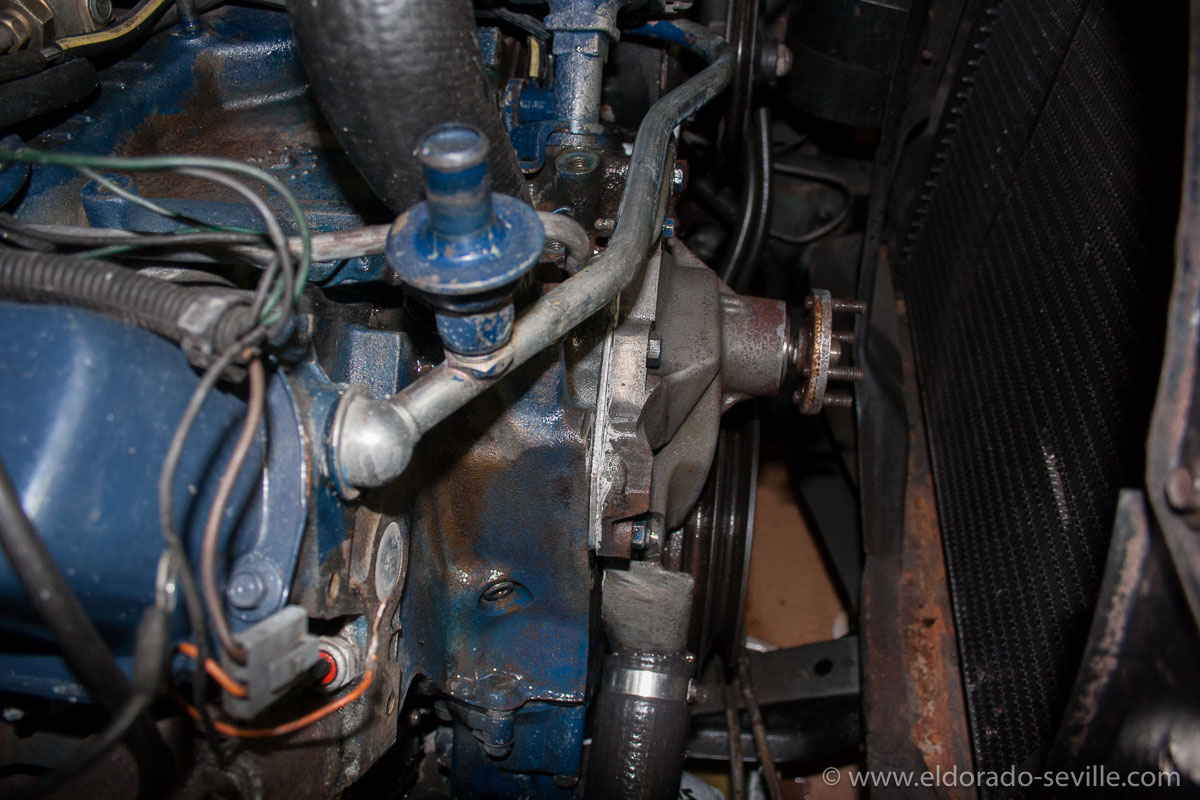
Almost clean - one more treatment will be necessary before it is ready for paint. The waterpump was not painted and therefore was pretty rusty.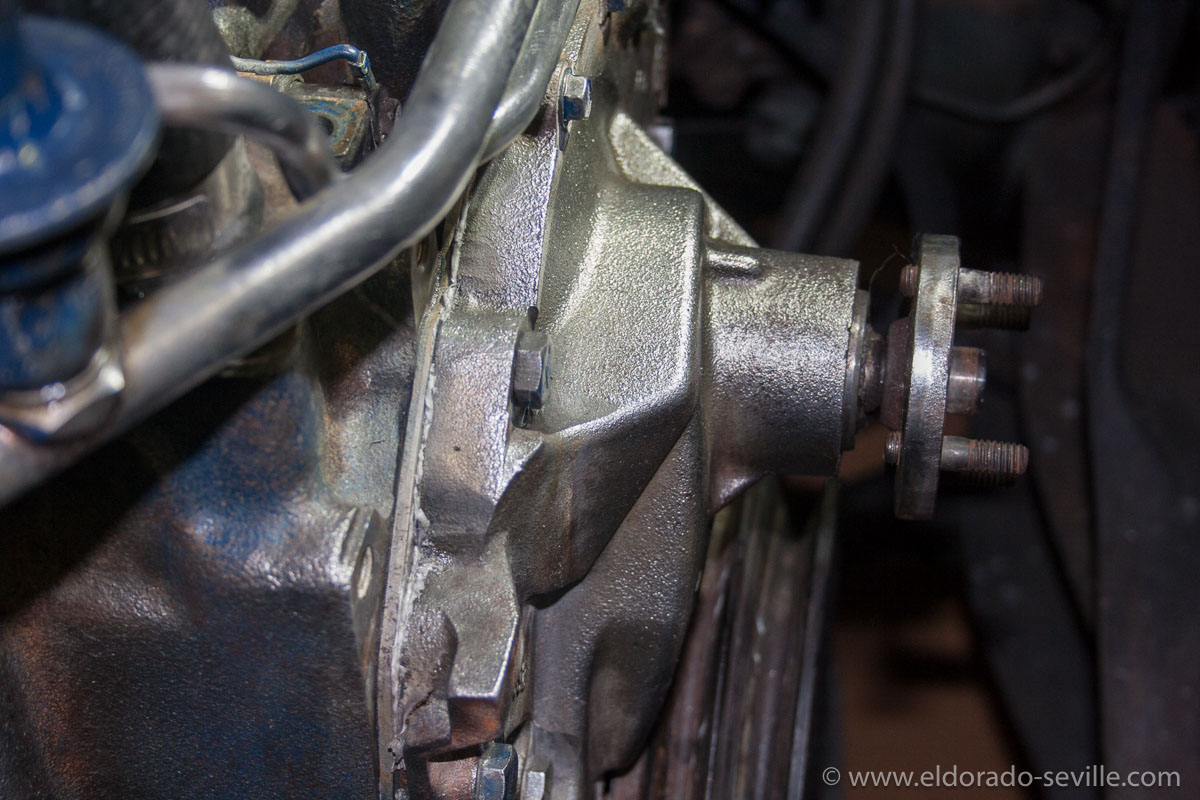
The water pump is now completely rust free and ready for paint.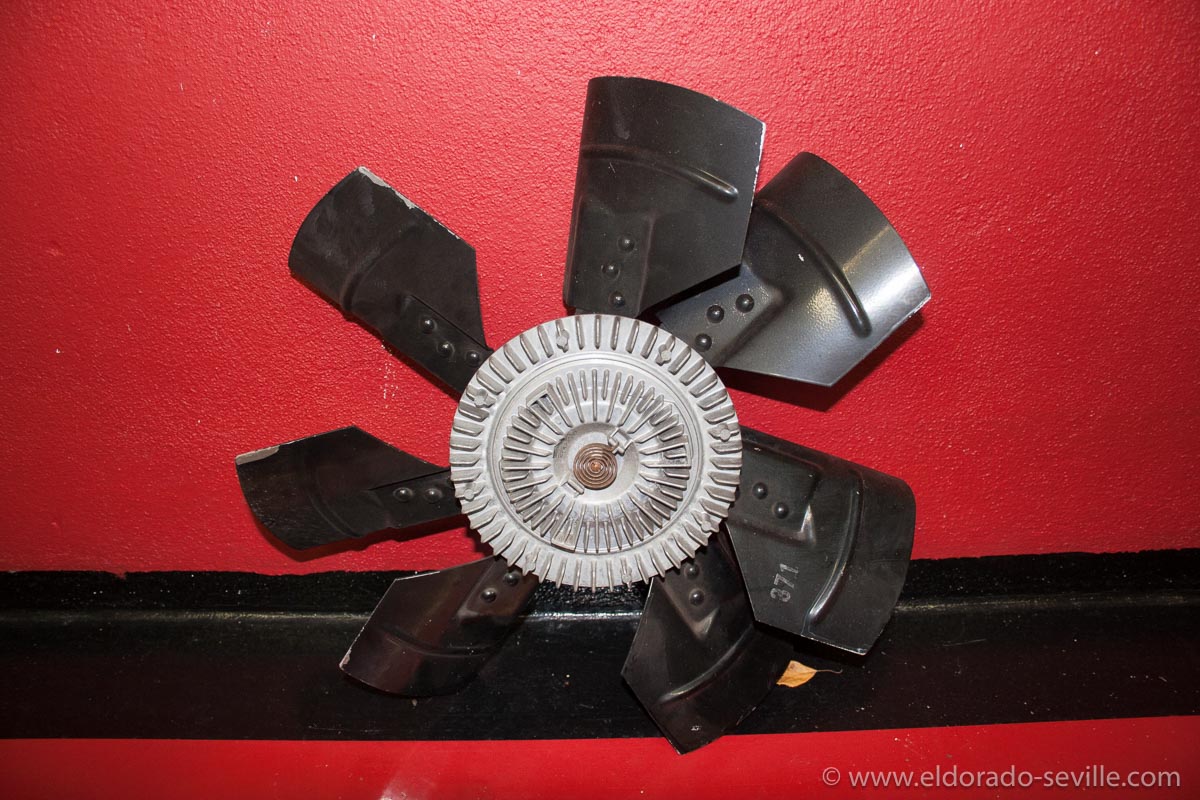
I can now fully clean and detail the fan as well. It even still carries the factory stencil.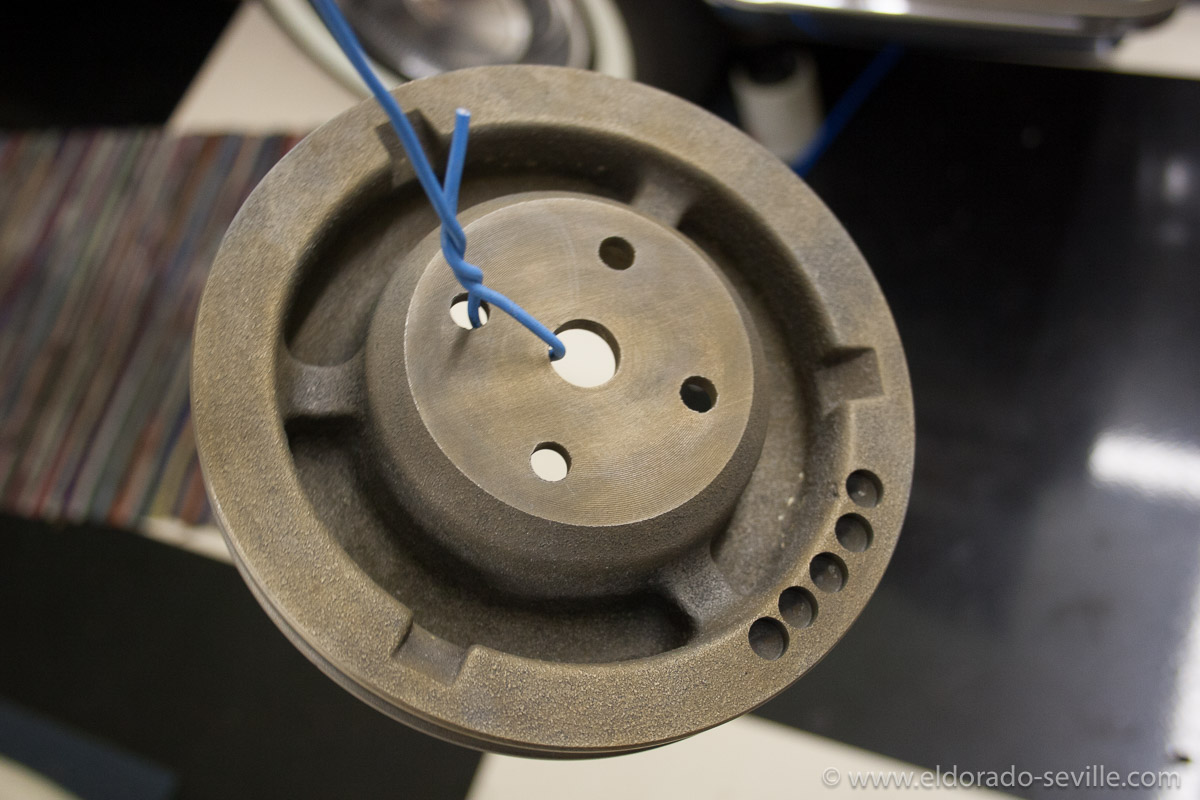
The water pump pulley after rust removal. I had to paint it very quickly because it developed flash rust immediately after removing it from the rust removing liquid.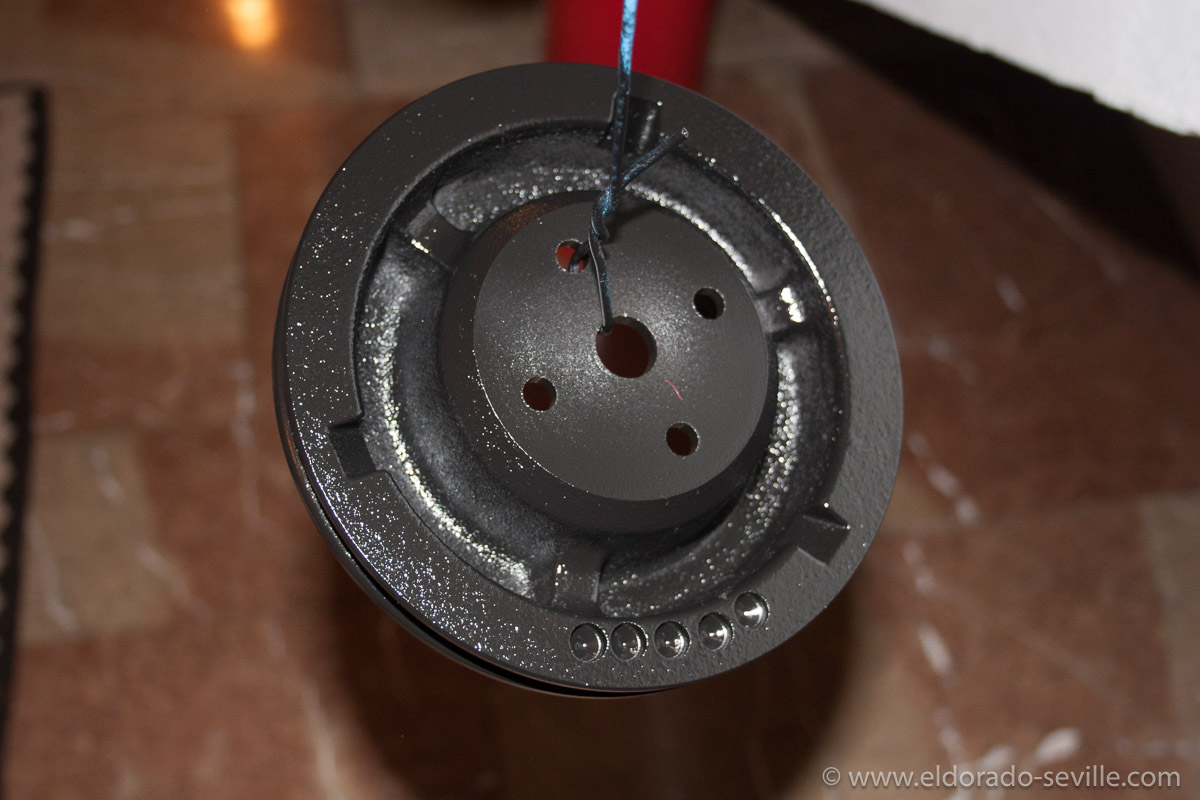
The water pump pulley after rust removal. I had to paint it very quickly because it developed flash rust immediately after removing it from the rust removing liquid. Here it is in black primer to stop it from rusting.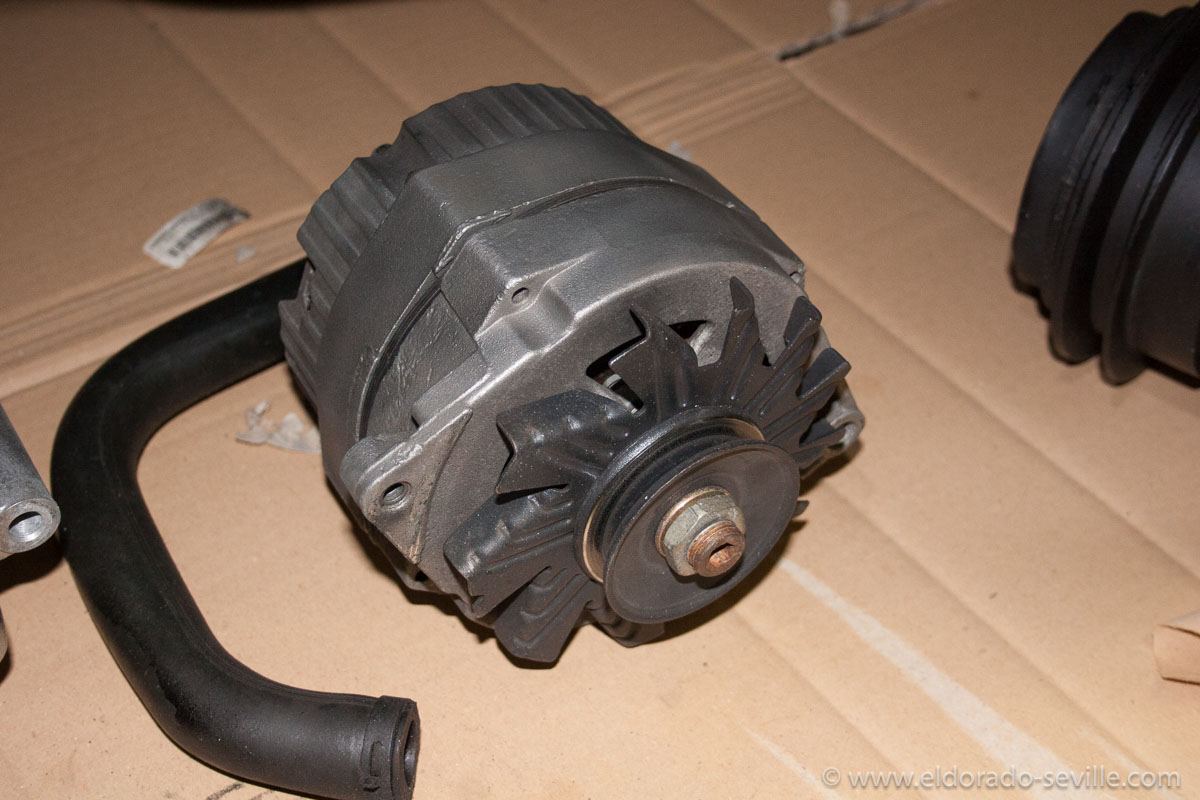
The alternator housing after cleaning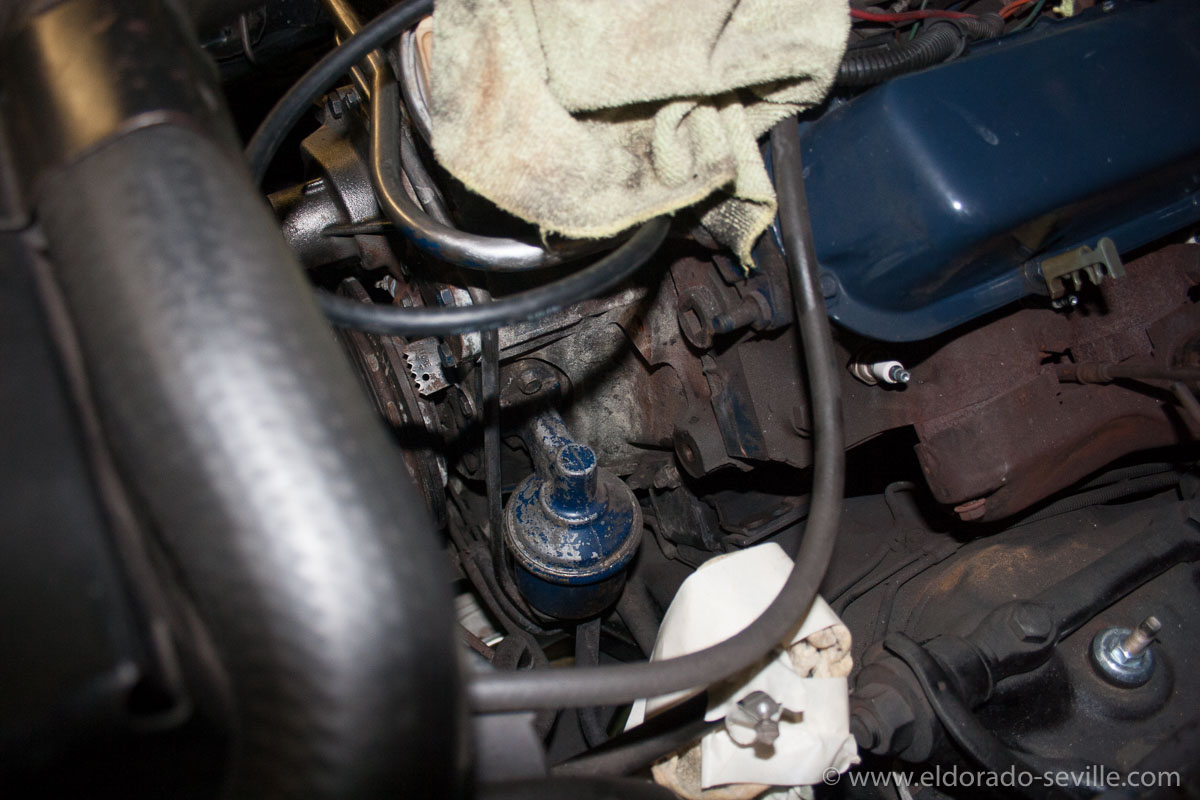
The power steering pump removed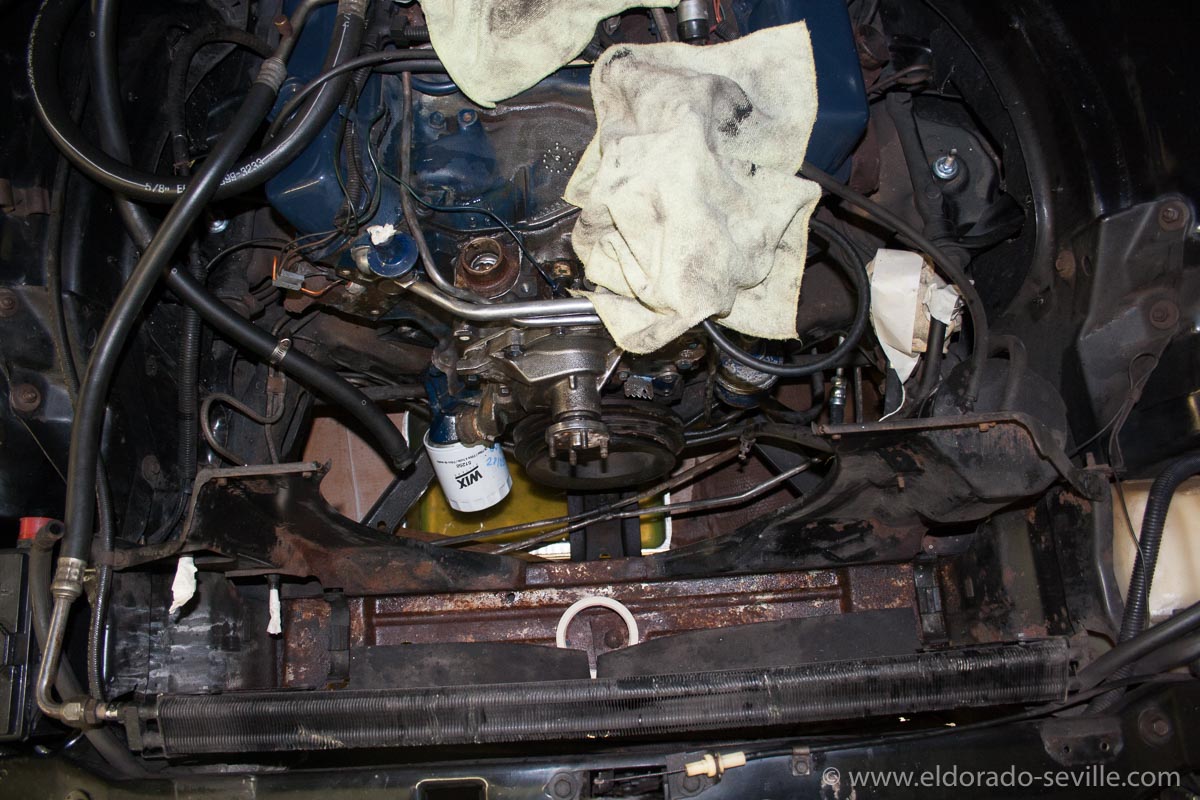
I took out the radiator to clean up the surface rust underneath…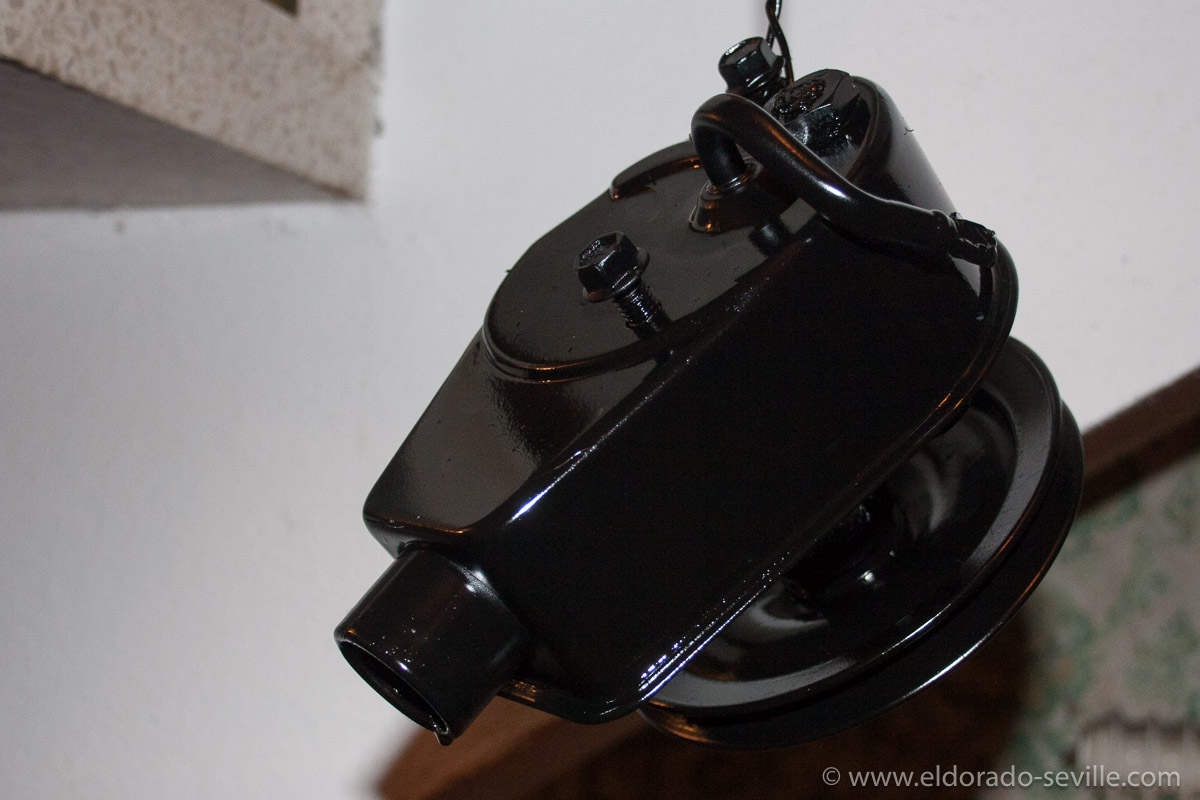
The power steering pump right after painting with wet paint... I took it down to bare metal before painting, but I forgot to take a picture...
REPAIRING THE TRANSMISSION SHIFT INDICATOR ON THE 74 CADILLAC
![]()
The stuck indicator at the L position![]()
You have disassemble almost the whole speedometer to be able to access the transmission selector dial mechanism. A small part was broken and therefore the spring behind the indicator could no longer work properly![]()
The rest of the speedometer could stay in the car
REMOVING RUST FROM THE UNDERCARRIAGE WITH RUST REMOVING LIQUID
I´m using a german product called "Rostio" - it's a concentrate used for de-rusting fuel tanks. You have to mix it with hot water. I have also heard great things about Evapo Rust.
I let my system run for days until all the surface rust was gone. The advantage is that the liquid can now get everywhere and should remove the last little piece of rust.
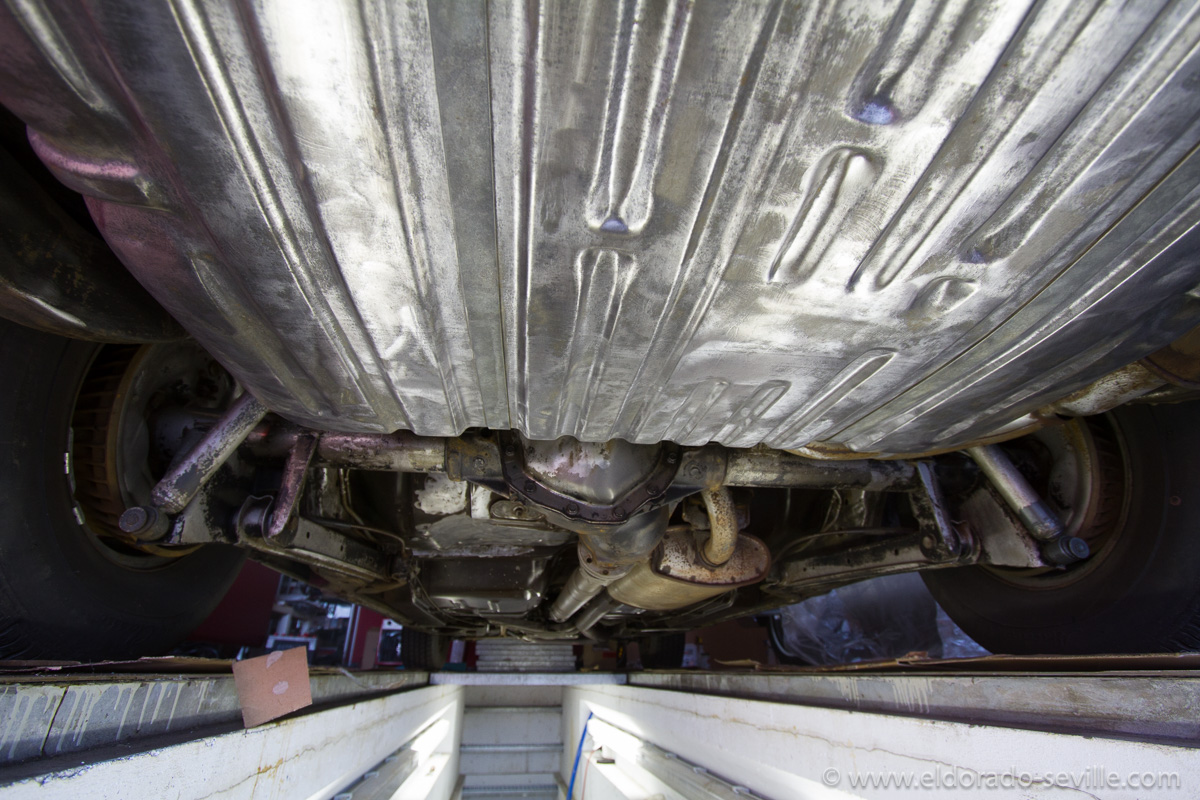
You will be surprised how well this works. This area now looks like a new car. There is not the slightest trace of rust to be found after 12 hours of spraying the car.
After spraying it with the rust remover you then have to flush it with water thoroughly and then dry it properly to avoid flash rust.
I also used various wire brushes and other abrasive materials to remove rust and strip bad paint.
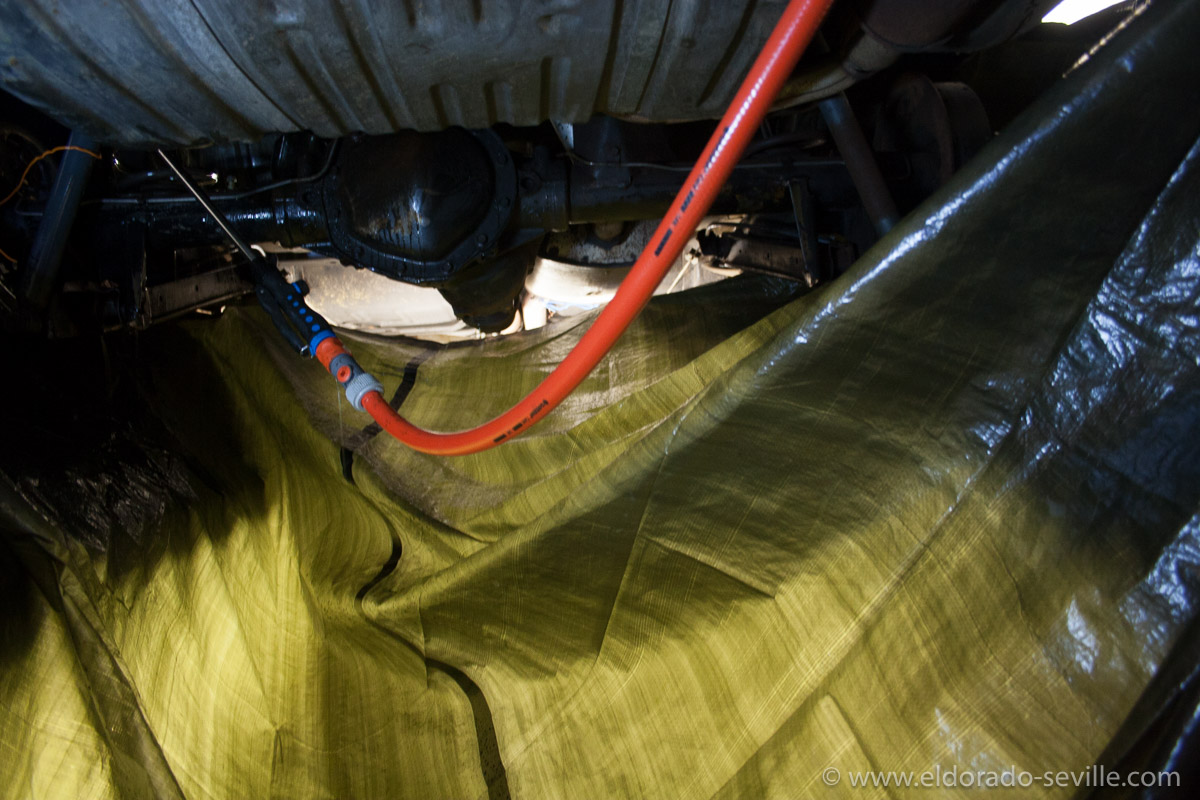
I simply used a garden hose and shower to spray the rust remover on.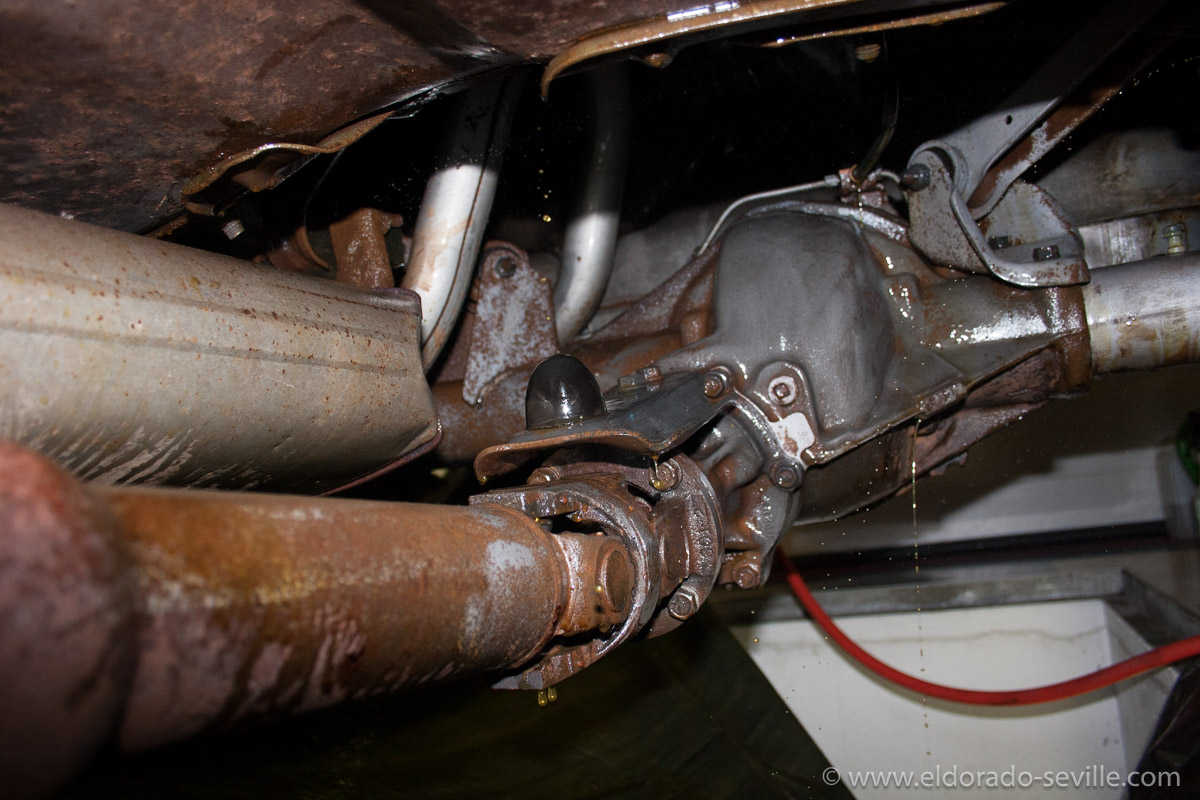
As you can see it only leaves rust free metal behind - I always let it run for 2 - 12 hours - depending on the amount of rust that had to be removed.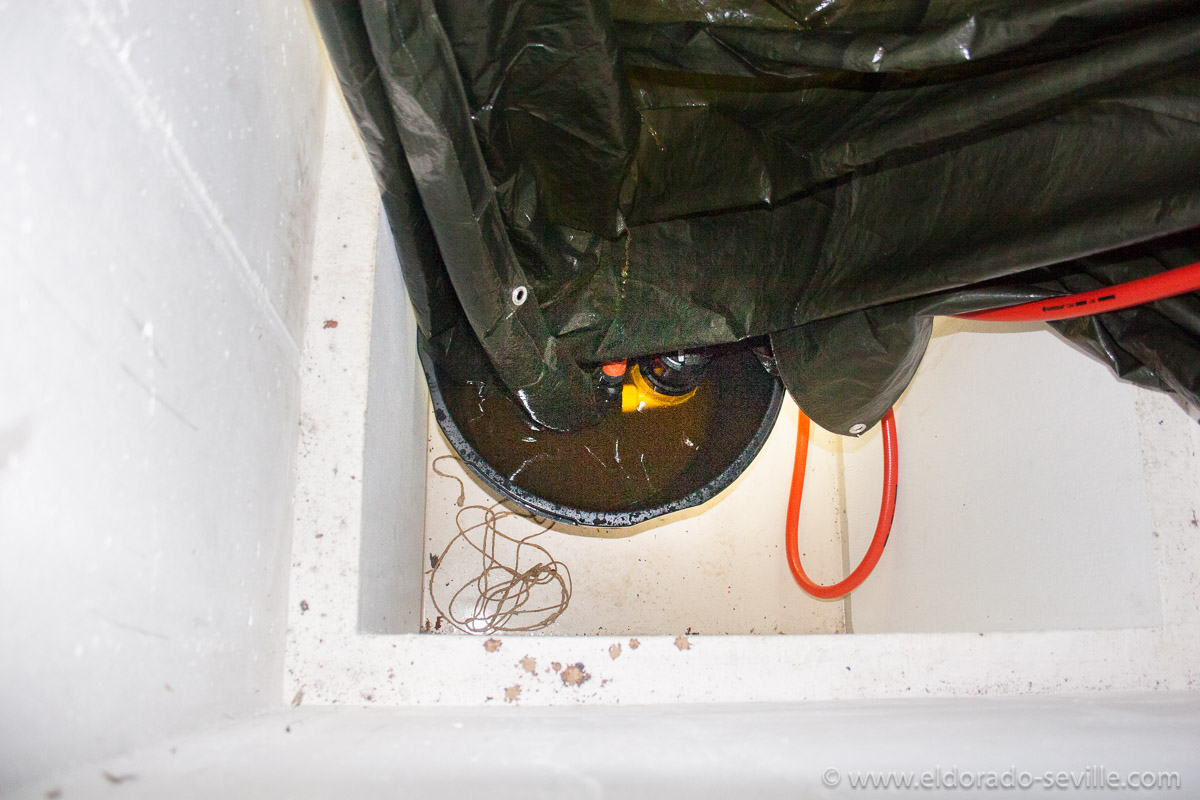
The liquid is collecting in the big bucket where I put the pump in to recirculate it.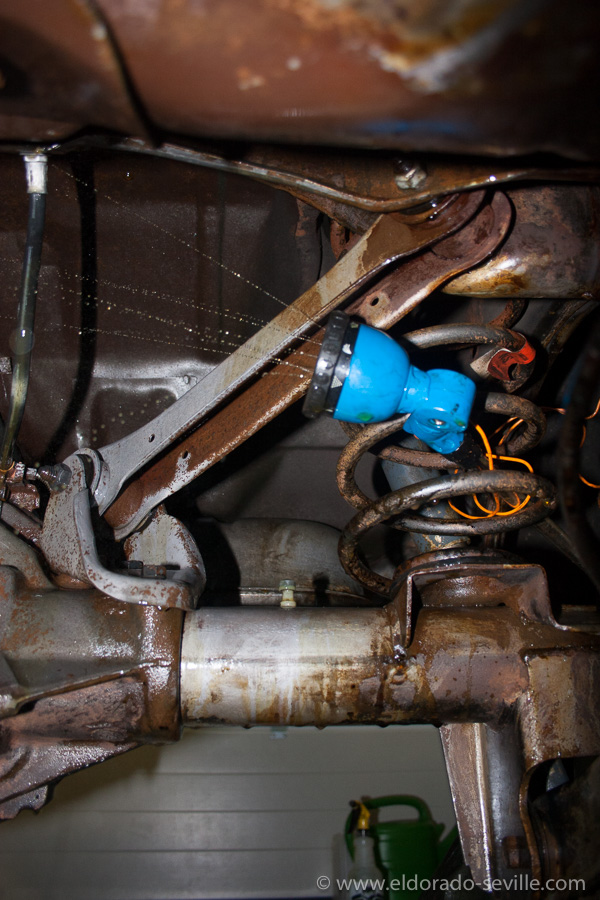
You can spray the liquid everywhere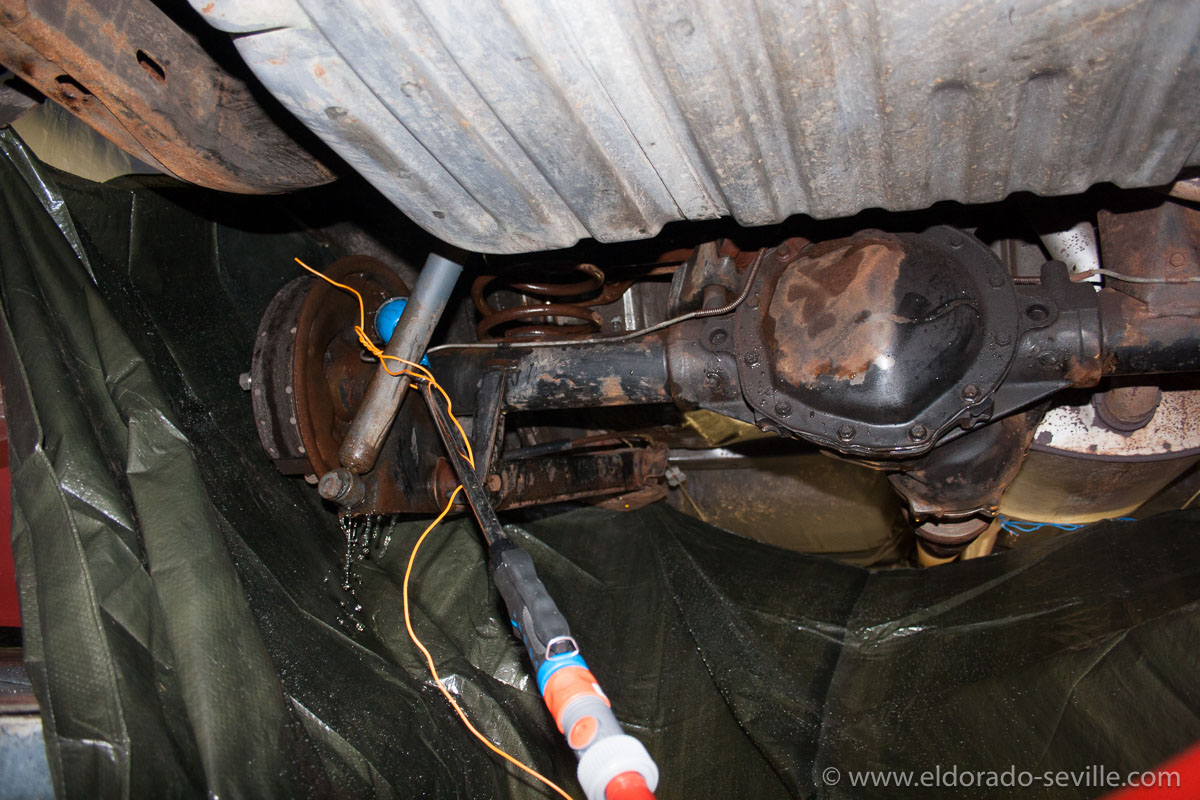
A "before" picture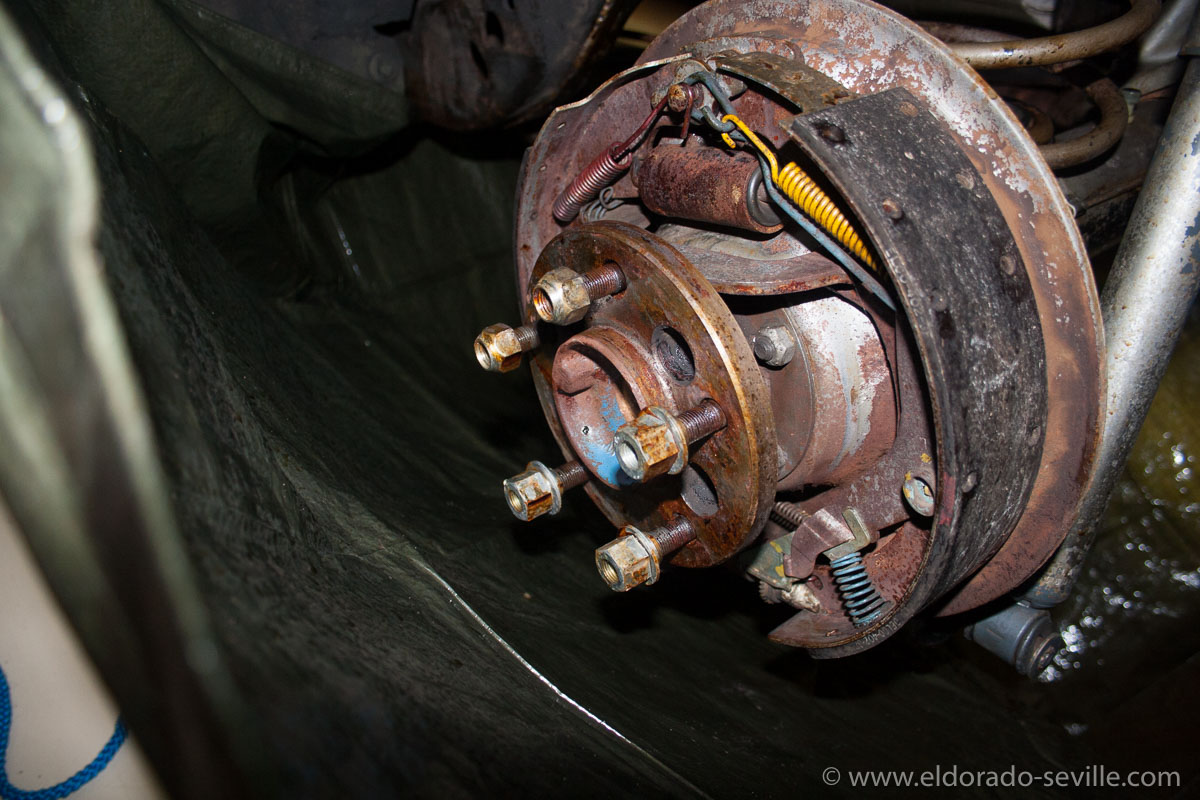
You can also remove the rust from the brakes without disassembling them. A before picture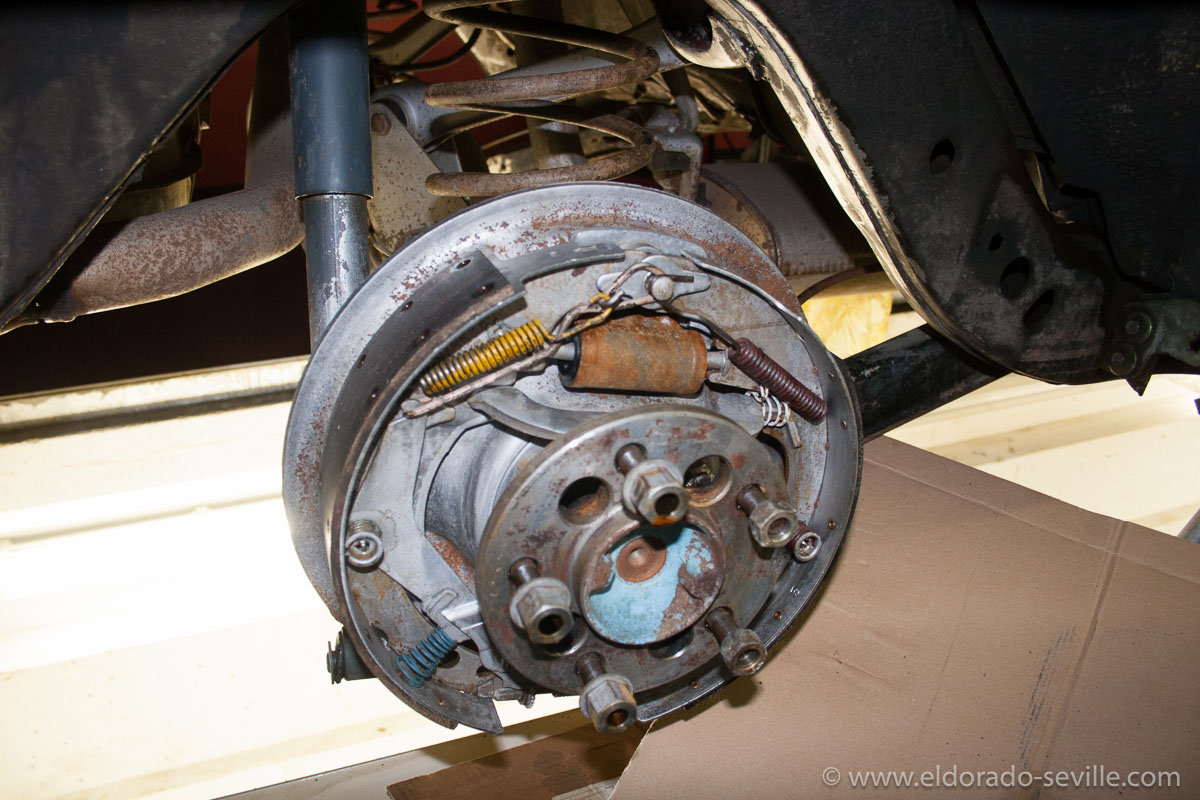
After cleaning - the brake cylinder developed flash rust immediately again.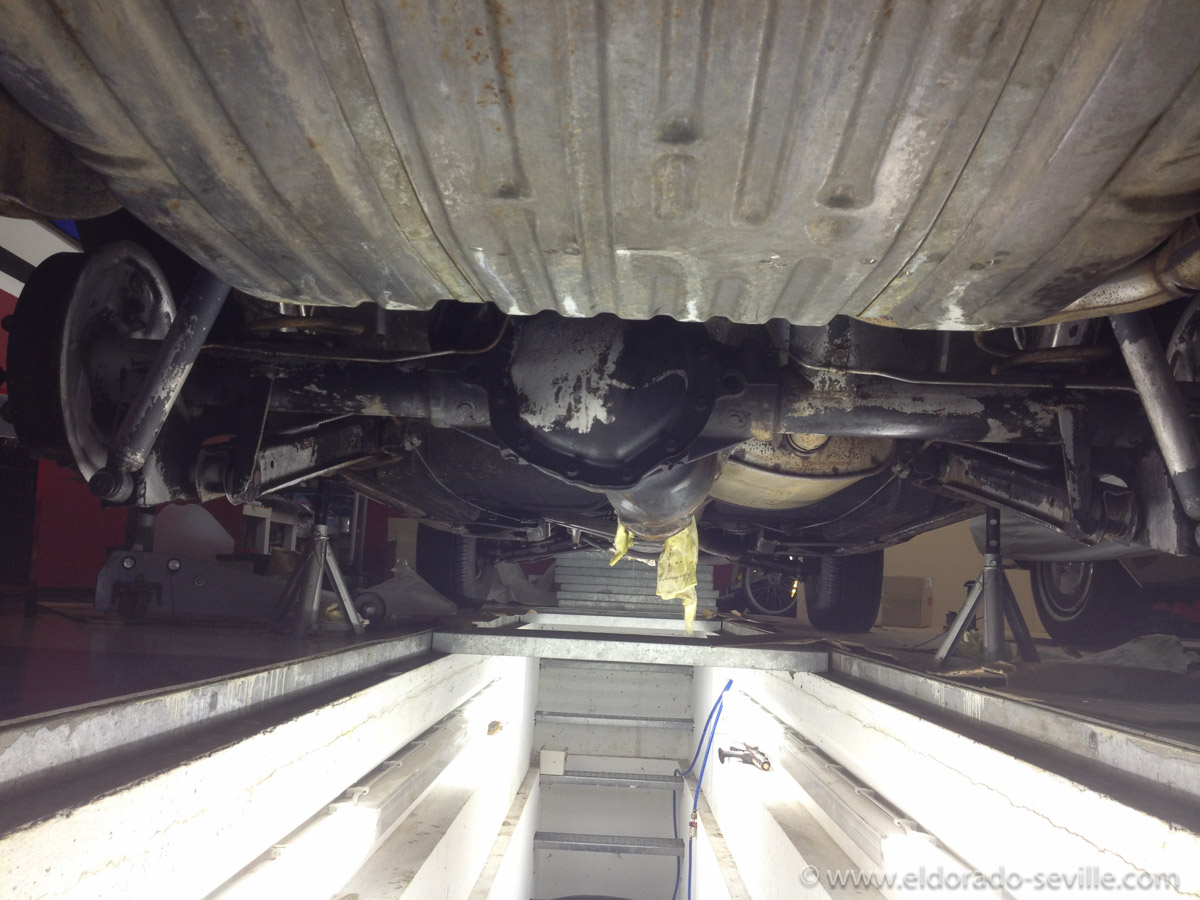
As you can see - the rust is gone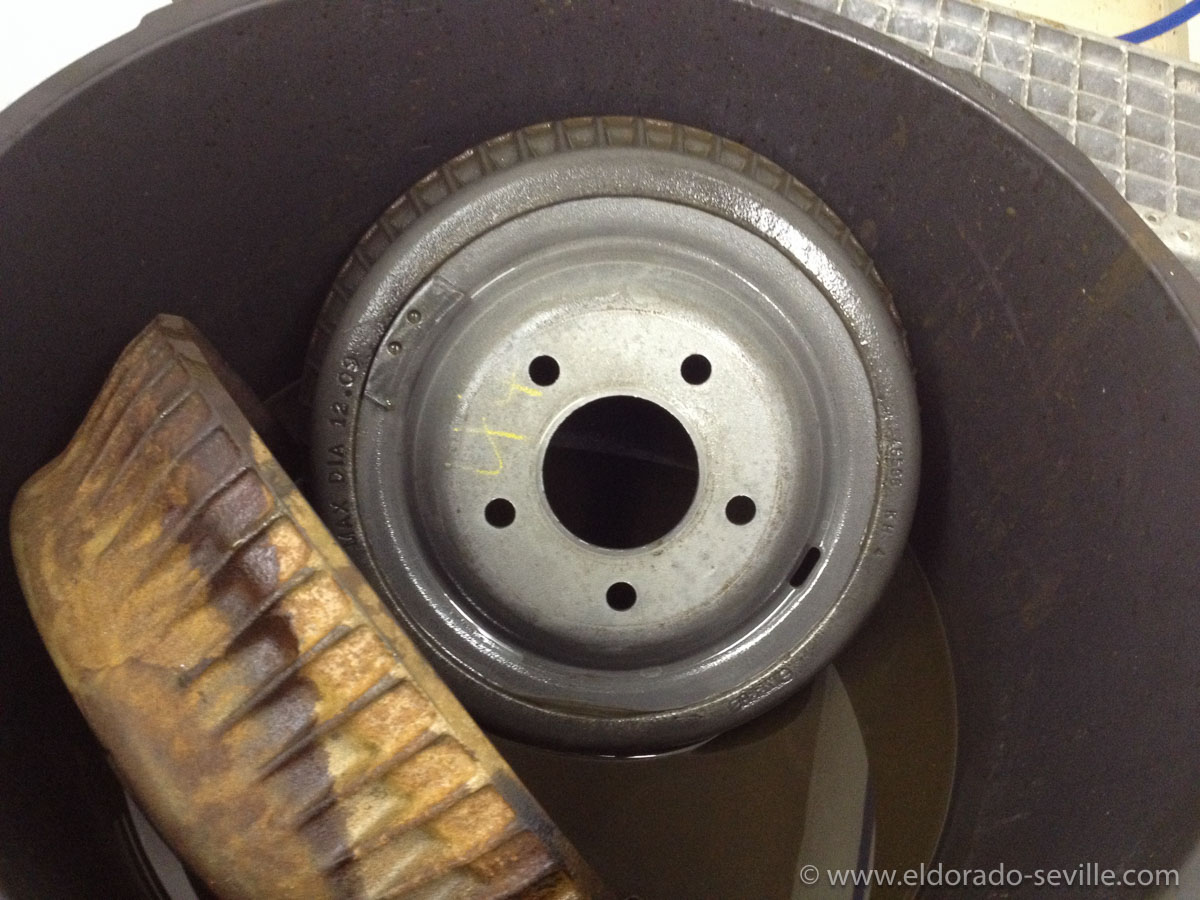
The liquid also works great on brake drums - the original factory markings were still there.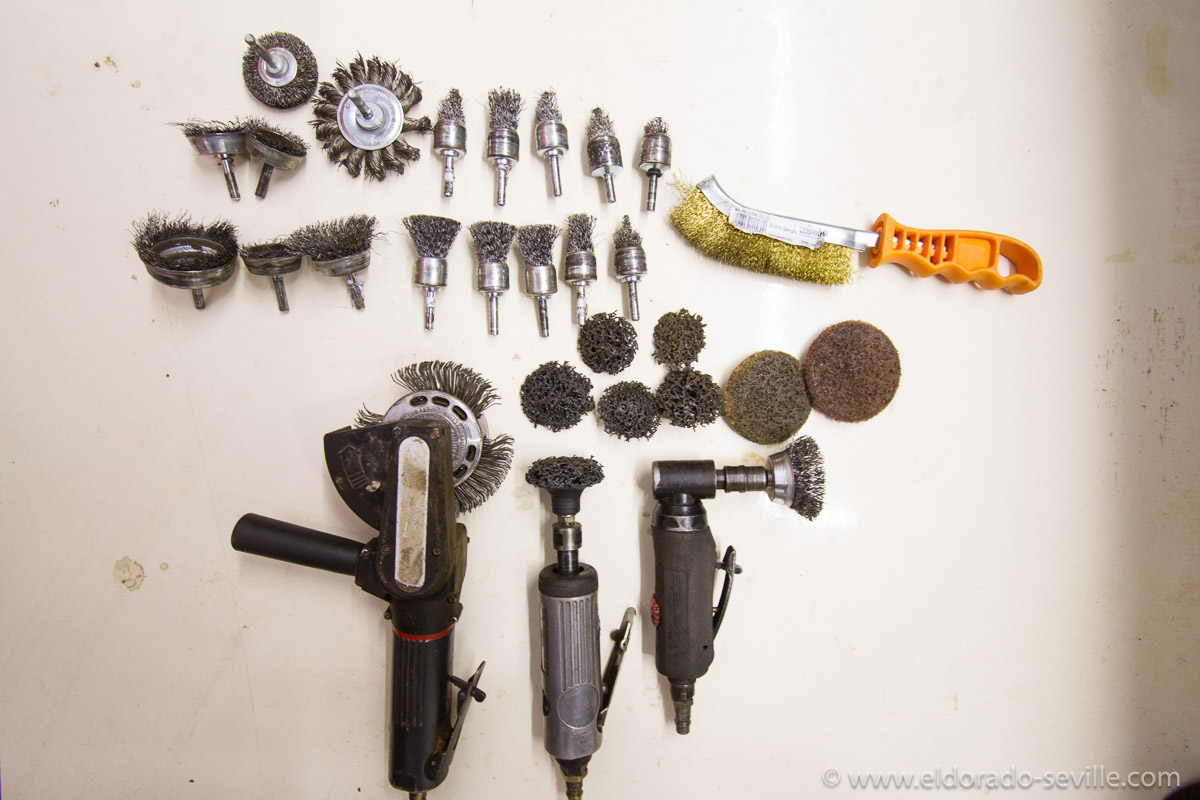
Cleaned the fuel tank with the wire brush and painted it afterwards with tank paint from Eastwood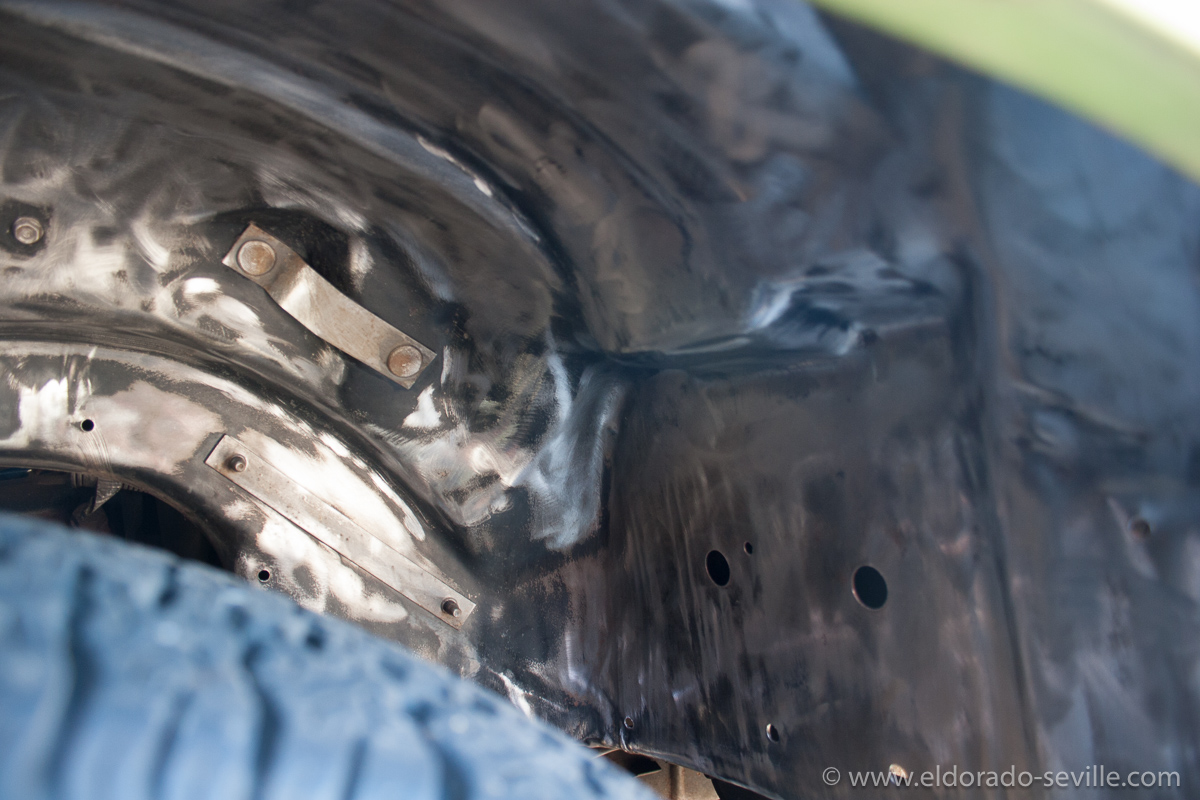
Cleaned the wheelhousings as well - stripped all the paint in there as well.
≈
Cleaned the fuel tank with the wire brush and painted it afterwards with tank paint from Eastwood
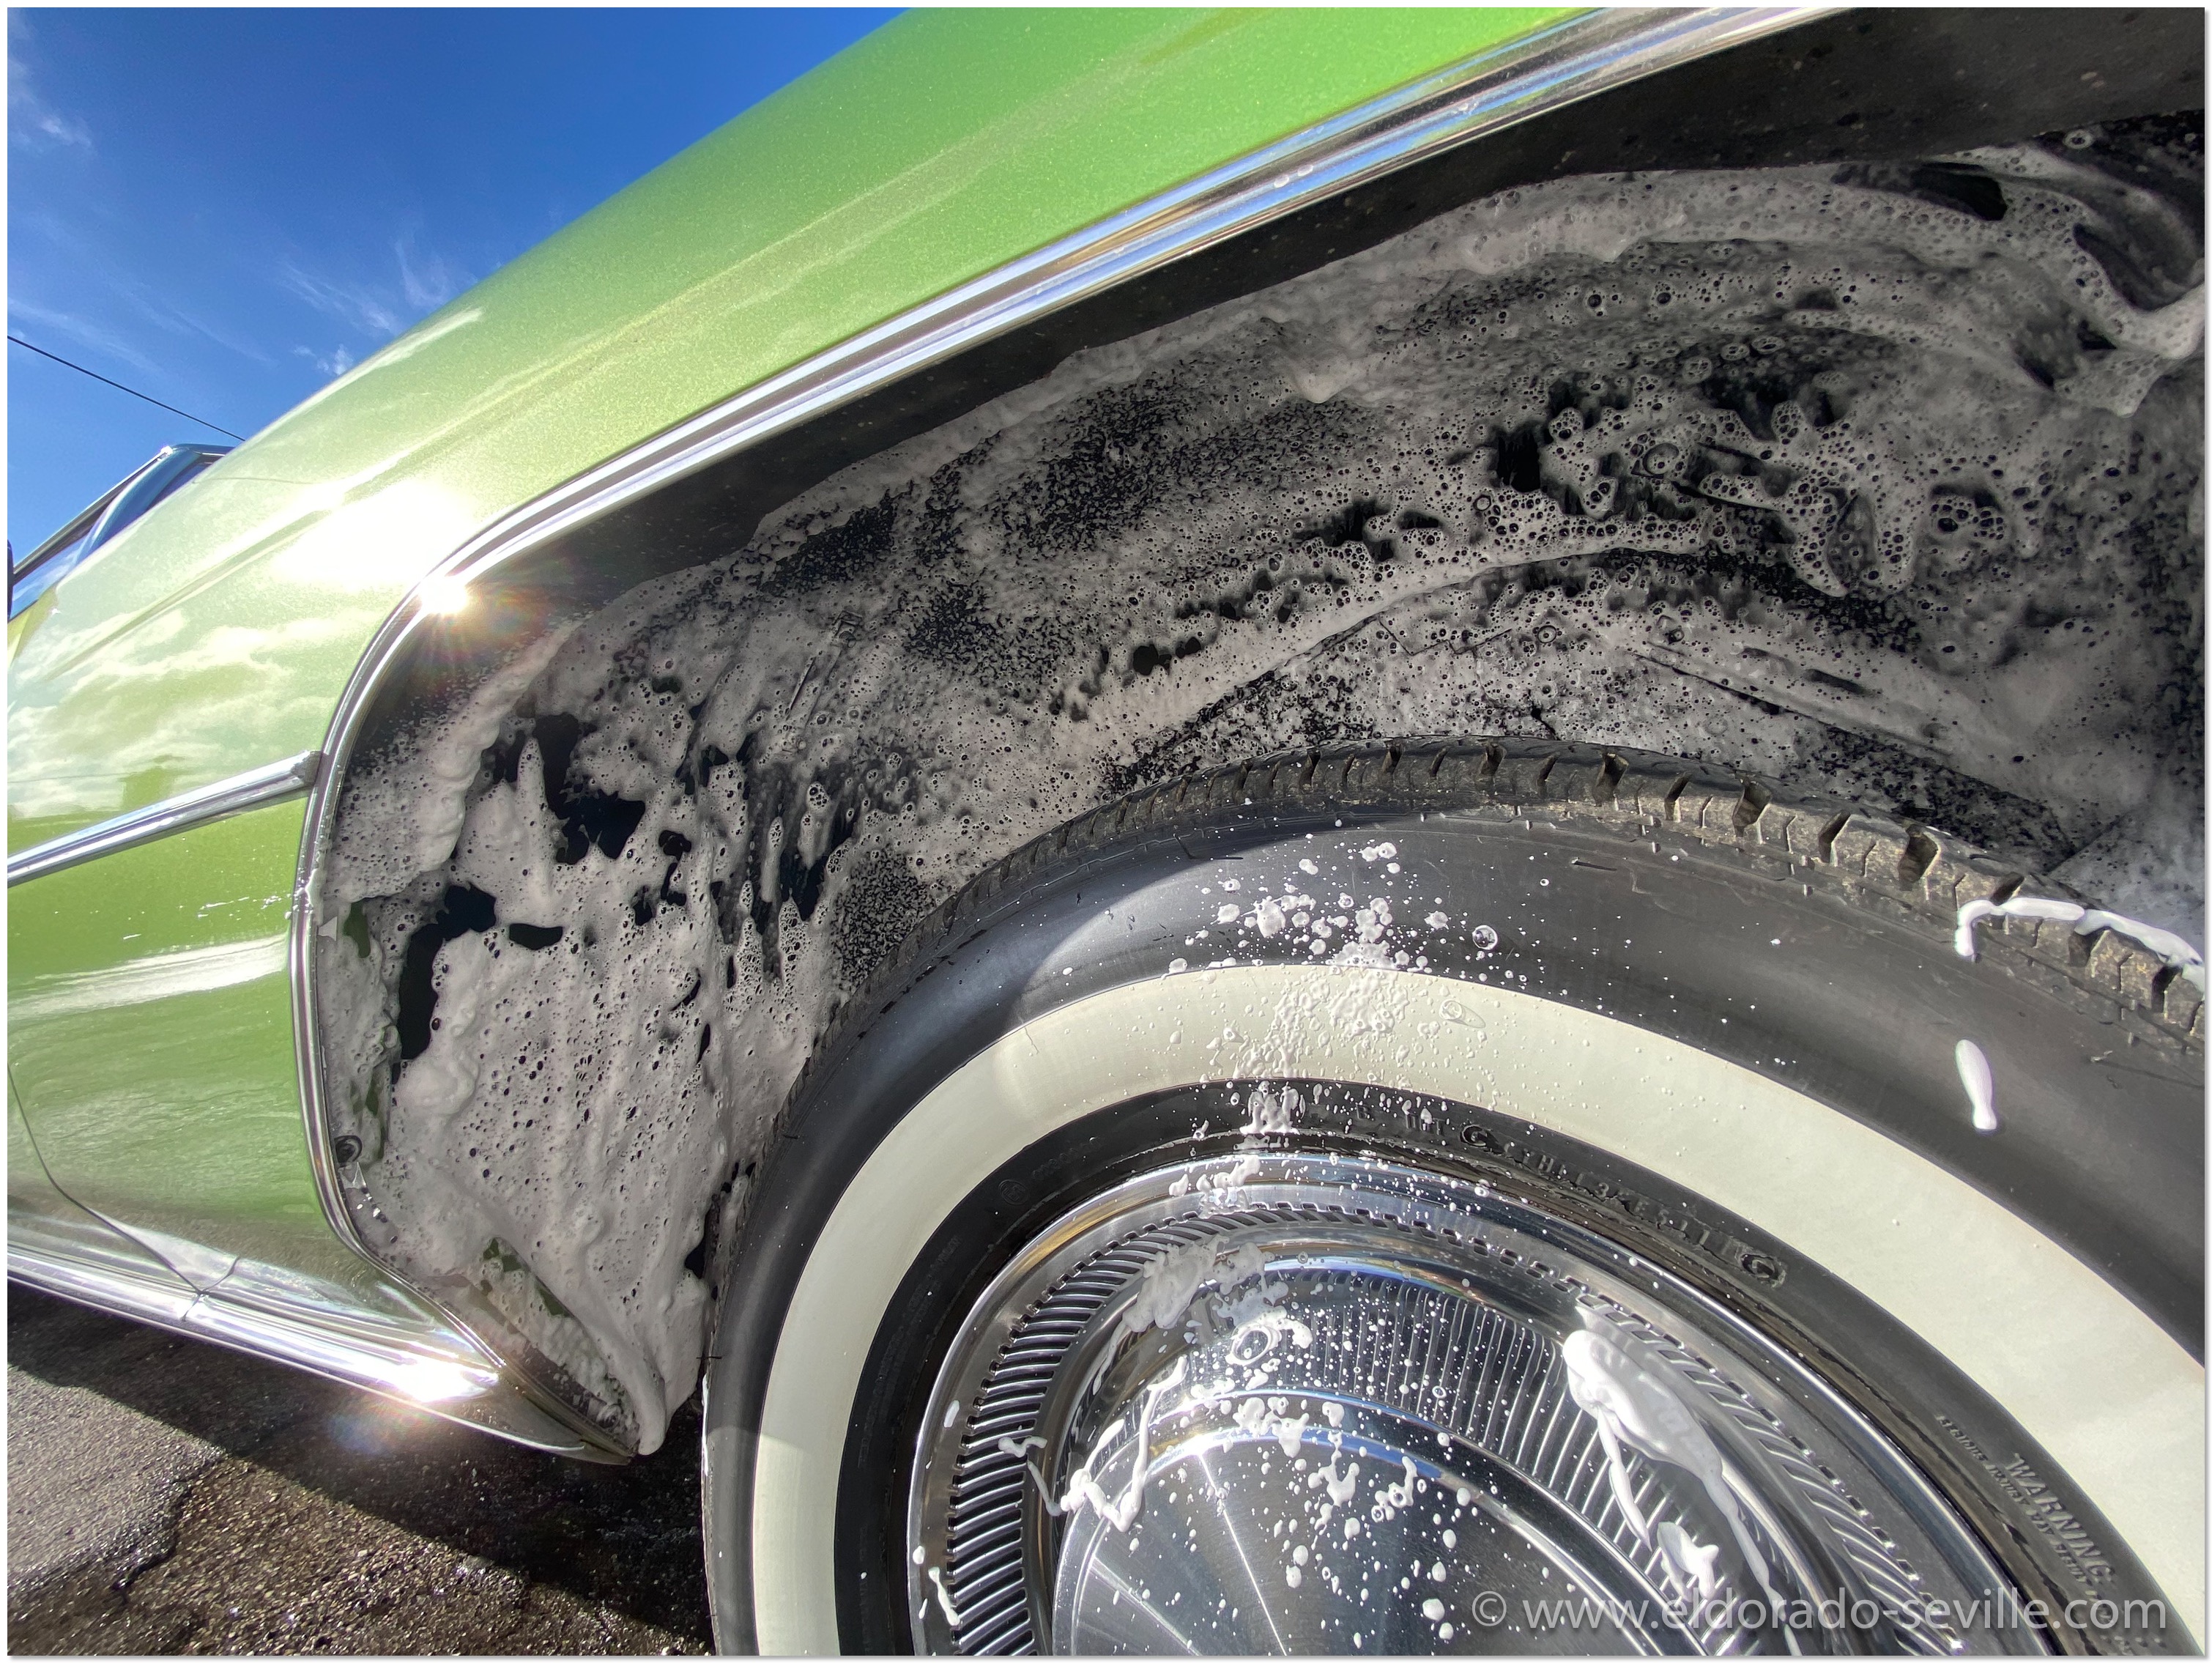
GETTING READY FOR THE CADILLAC BIG MEET
I had to clay the paint numerous times and also had to compound it 2 times and polish it 2 times before I finally could apply a coat of wax. Also all the exterior glass was extremely contaminated, and I had to use glass polish to get it smooth again.
I spent 12-16 hours a day, for 4 days in a row with almost no breaks, trying to get the car as clean as possible. I do really work fast, and I could not get it to the level of cleanliness I would have liked, but not many people will notice the areas I could not finish ;-) Looks like I will have to spend next winter to get it as clean as I want it to be.
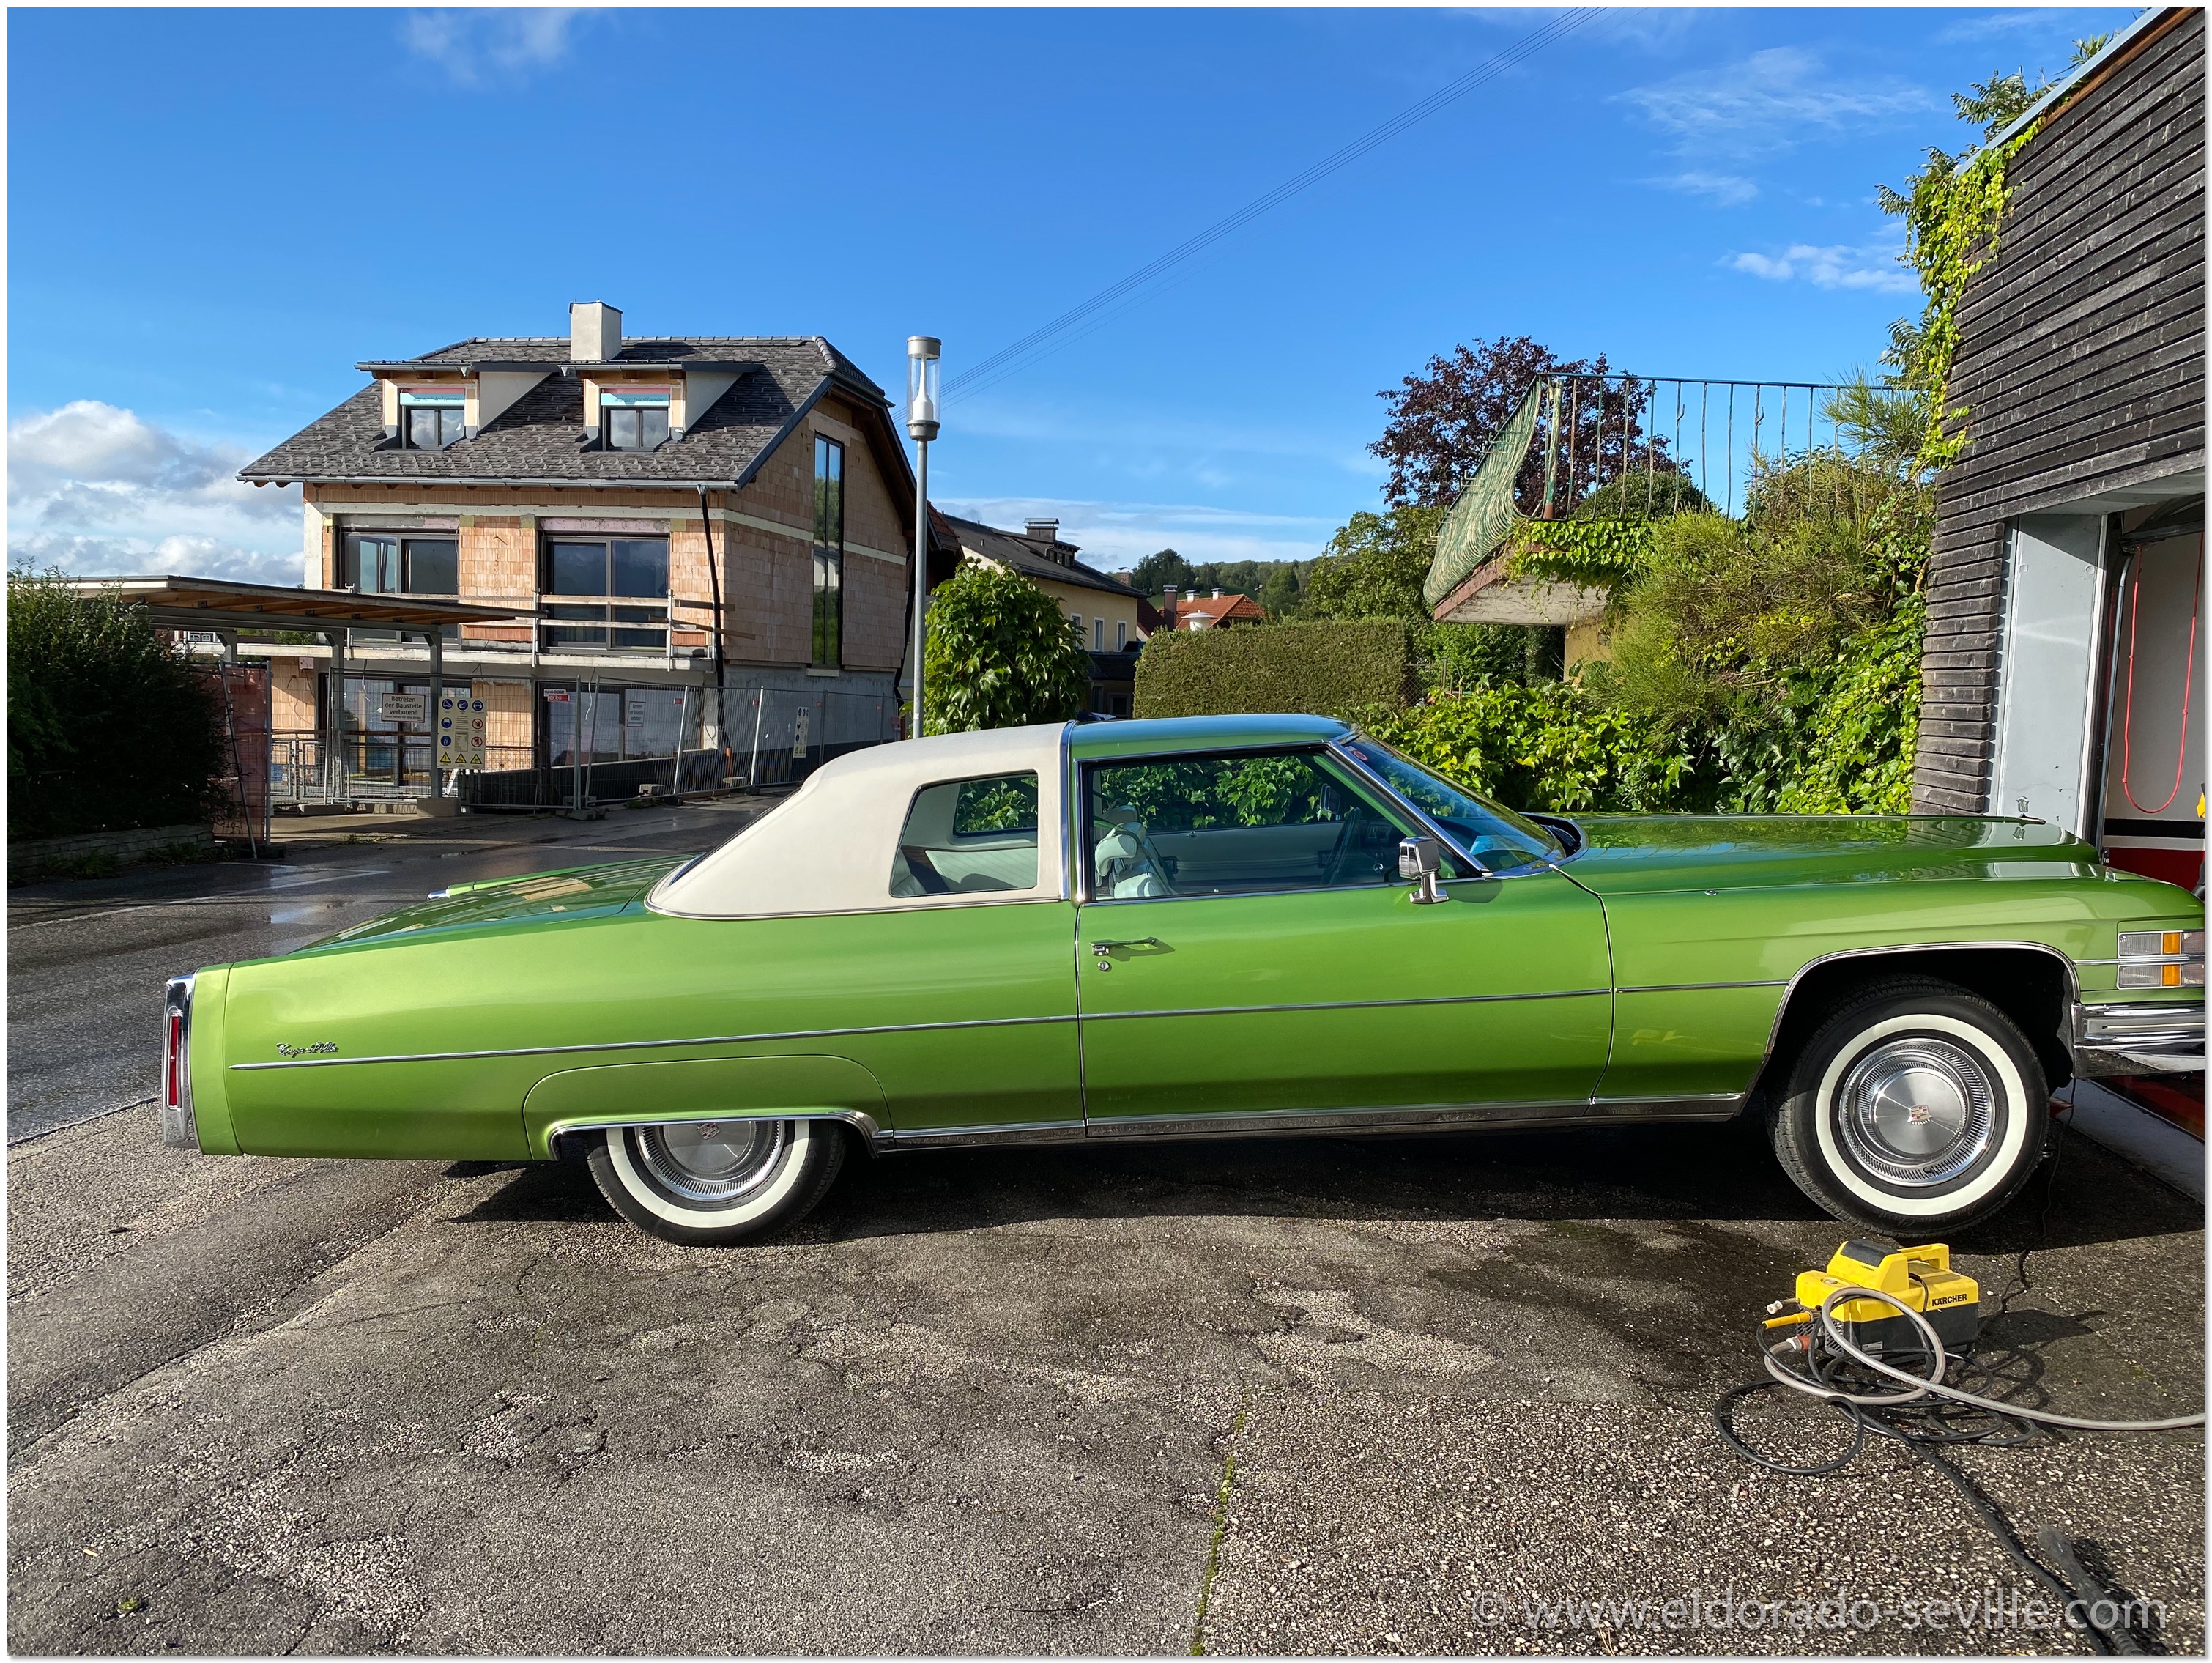
I am looking forward to the Cadillac BIG Meet now! I will drive the 58 Seville and my wife will take the 74 together with my son to the show, as the 58 has no seat belts.
Manuel was one of the first to drive his Eldorado to the Cadillac BIG Meet this year all the way from Düsseldorf. On his way he stopped by my garage and I gave him tour and showed him my humble collection.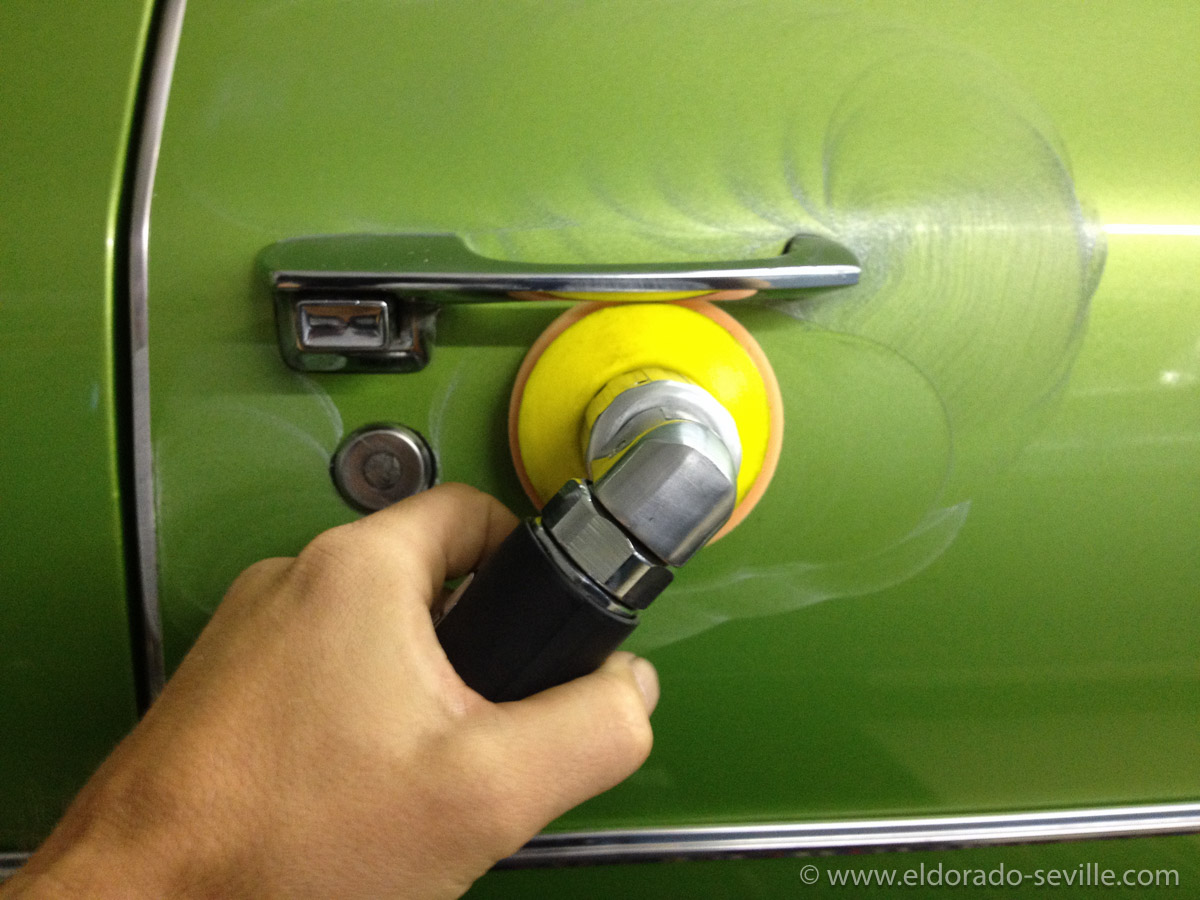
Getting the paint clean took forever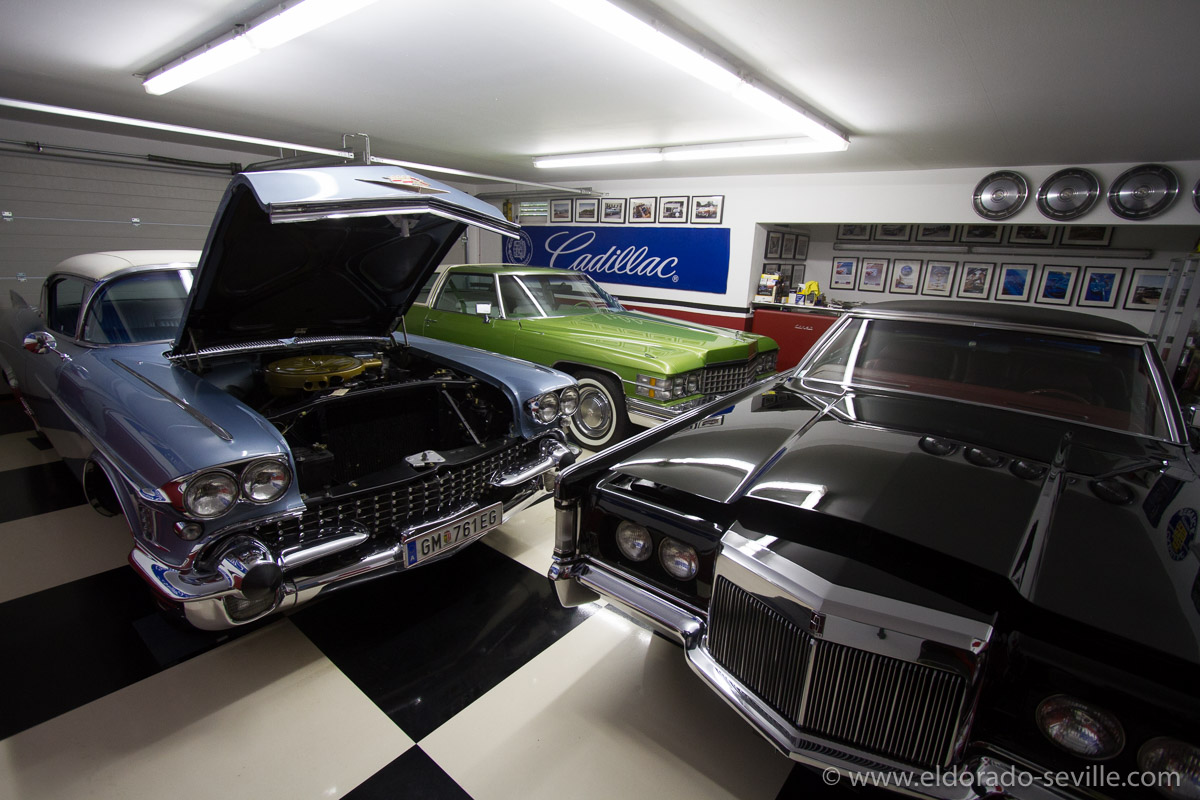
I already fully cleaned the 58 Seville for the Cadillac BIG Meet weeks ago - so I just had to dust it off :-)
ELECTRIC SEAT BACK LOCK IN THE 74 WAS BROKEN AGAIN
I already made 2 previous repair attempts after the solenoid for the unlatching mechanism failed, and for a while it seemed to work perfectly after the repairs were made …
The last mechanism I installed got so weak that it did no longer unlatch by itself when I opened the door…
So I had to order another used unit from my favorite source - Arizona Vintage Parts.
They sent me a perfectly working unit once again - it only had some surface rust, which I removed with rust removing gel once again (see pictures below). After this treatment it looked like new.
Like the last time, I had to disassemble parts of the back seat to replace the defective actuator with a new working one.
The new actuator I installed did work right away, but upon further investigation, I noticed that the latch did not come off as easily as it should, after it had engaged with the striker. On the passenger side the latch does not even touch the striker while it unlatches.
So the solenoid needed a lot of power to unlatch, and when the door was open for a longer period of time the solenoid got pretty hot and would eventually burn at least one of the coils inside. You can only make some minor adjustments to the mechanism itself, and there was no way to get it right on my seat so that it could clear the striker without hanging up.
This definitely already was not done correctly at the factory, and the misalignment of the striker was the reason why the drivers door side solenoid always broke. I´m sure it worked for a while when the car left the factory, but eventually it caused problems.
The only way to make it right was to slightly modify the catch latch. I just had to remove a tiny bit of metal with a file and the mechanism could then move freely, and now the solenoid only needs very little power to unlatch the seat back, once the door is opened.
I hope this is a permanent fix now…
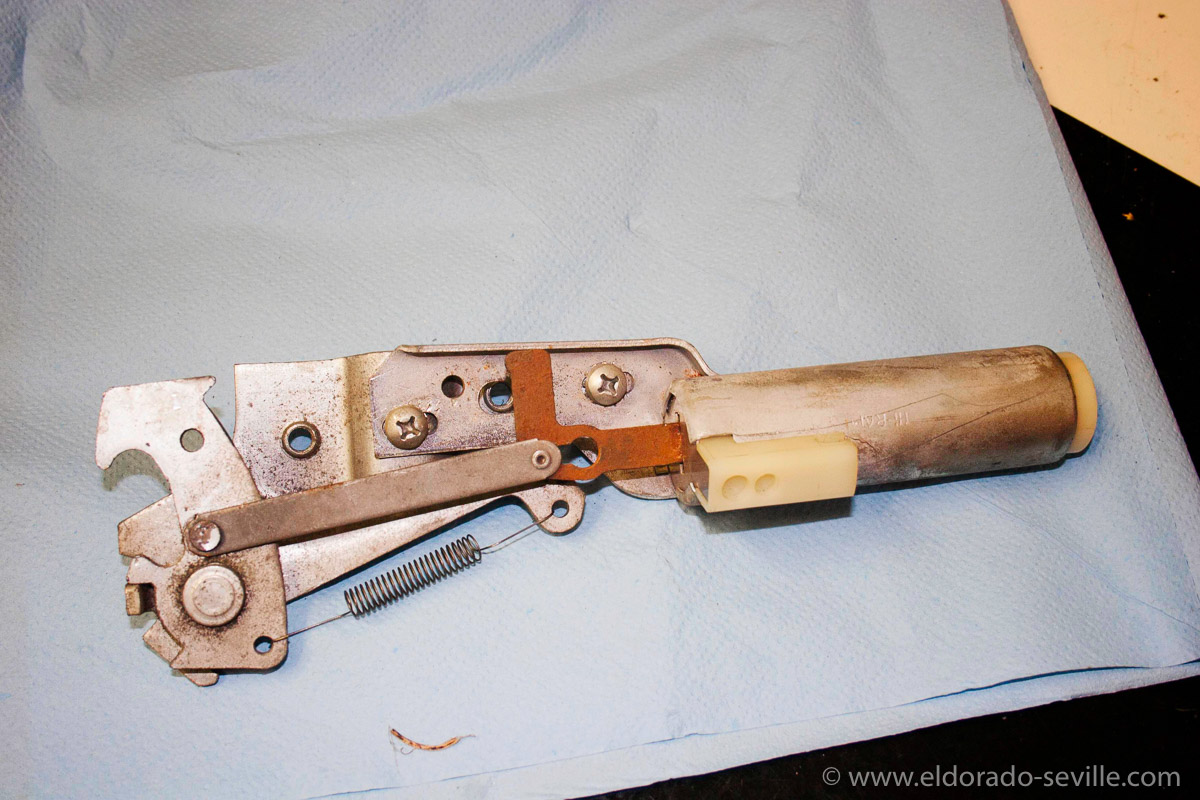
The new part I got - before cleaning it up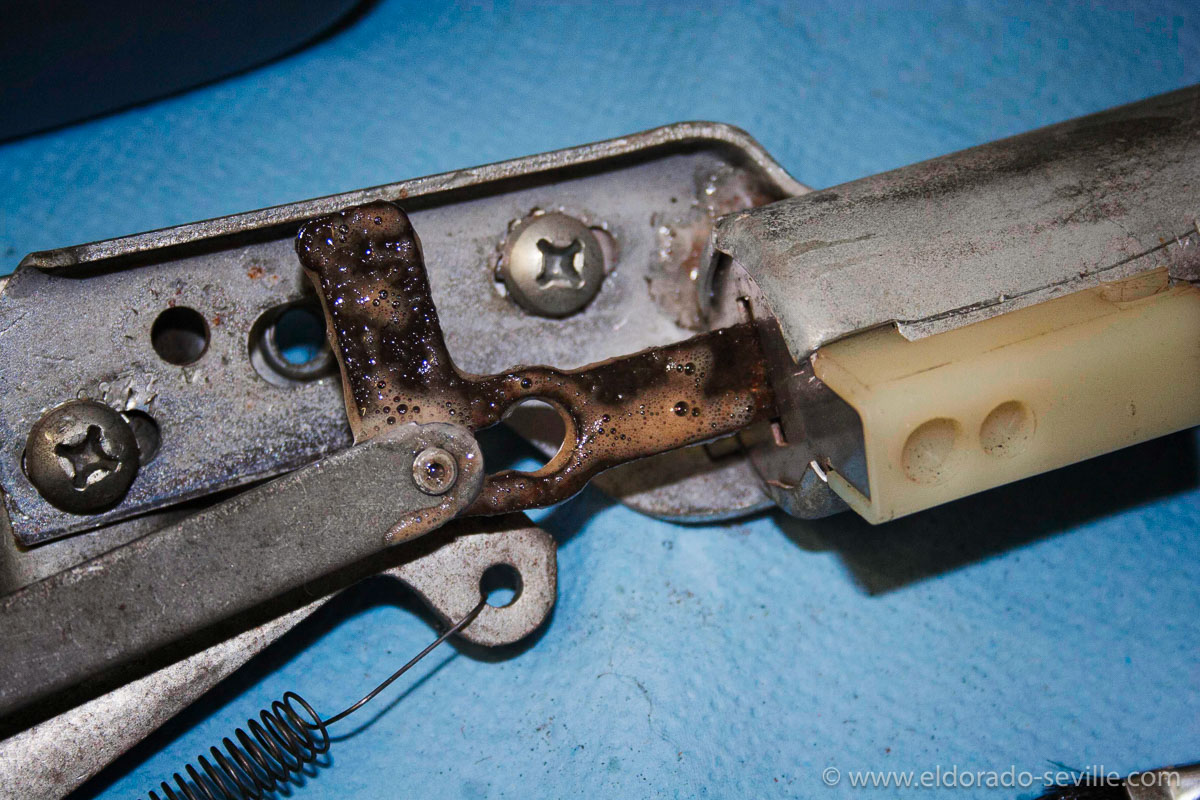
Removing the rust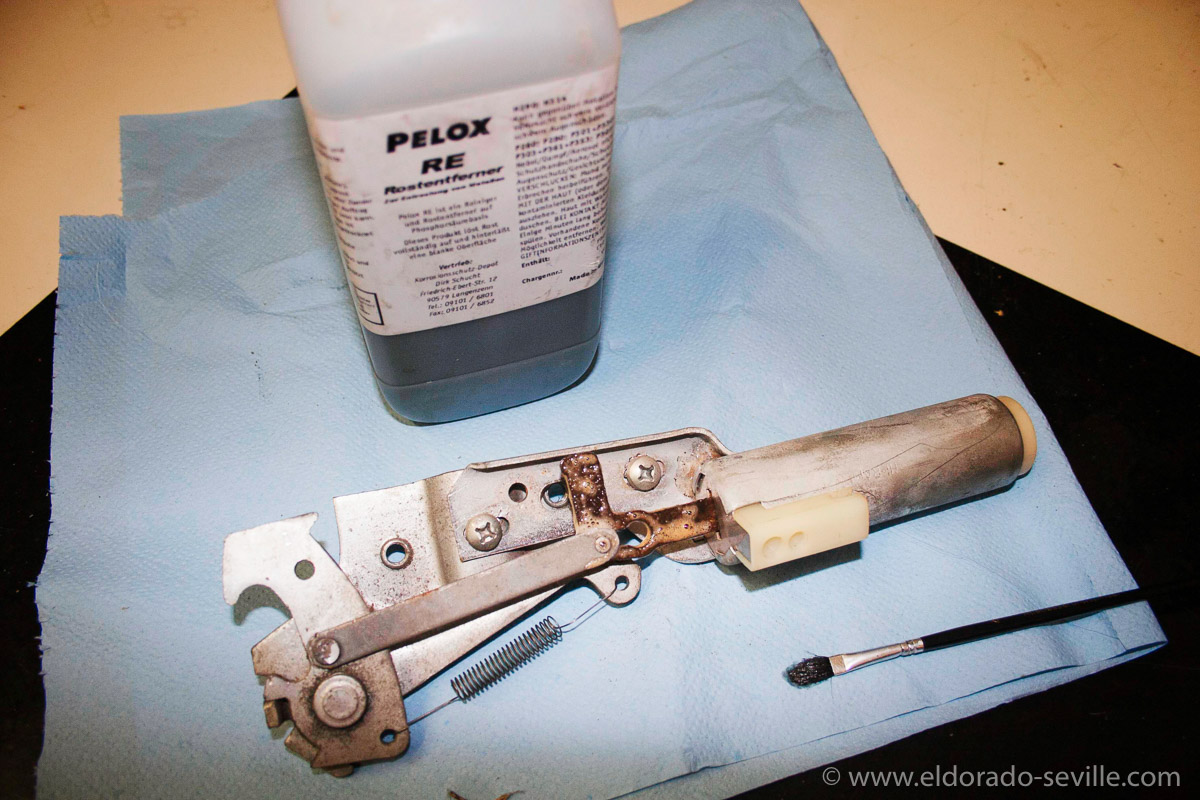
Removing the rust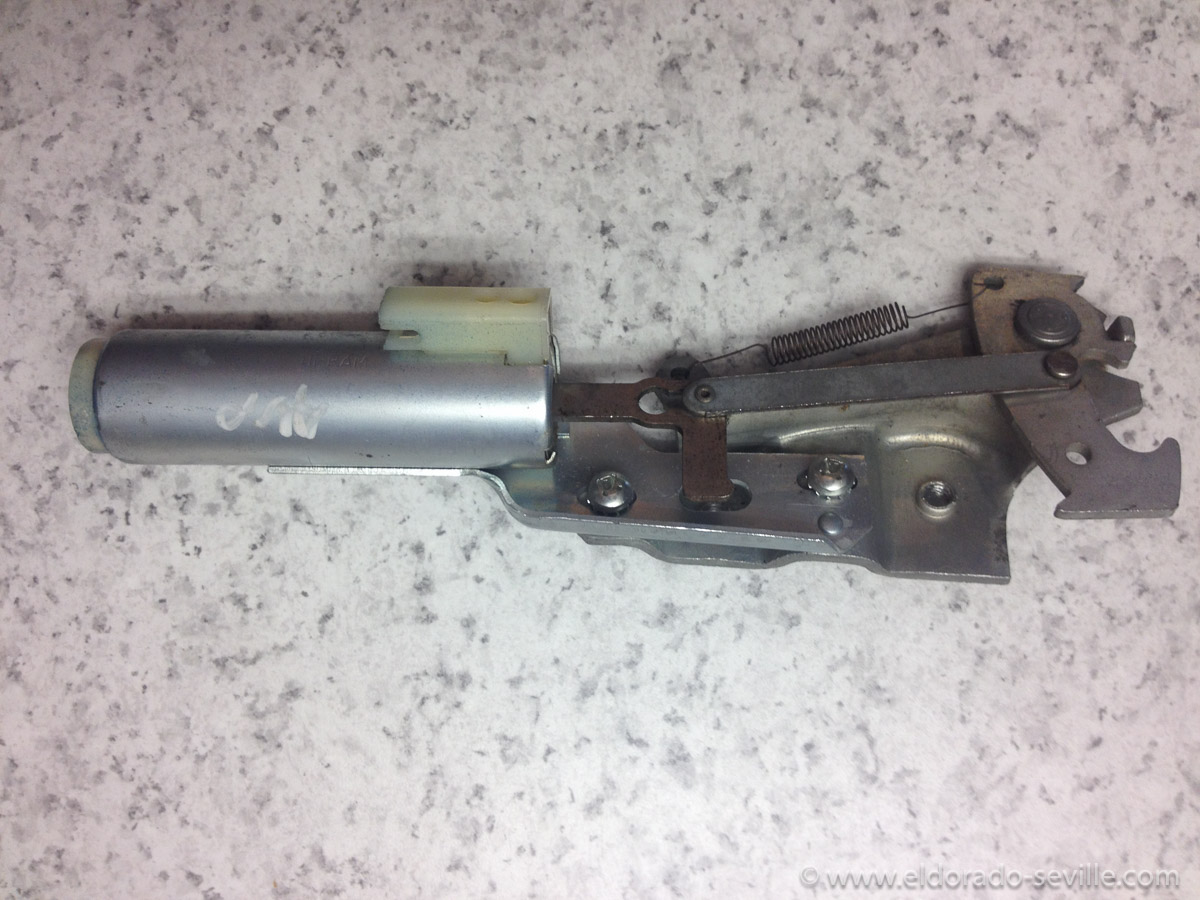
The clean mechanism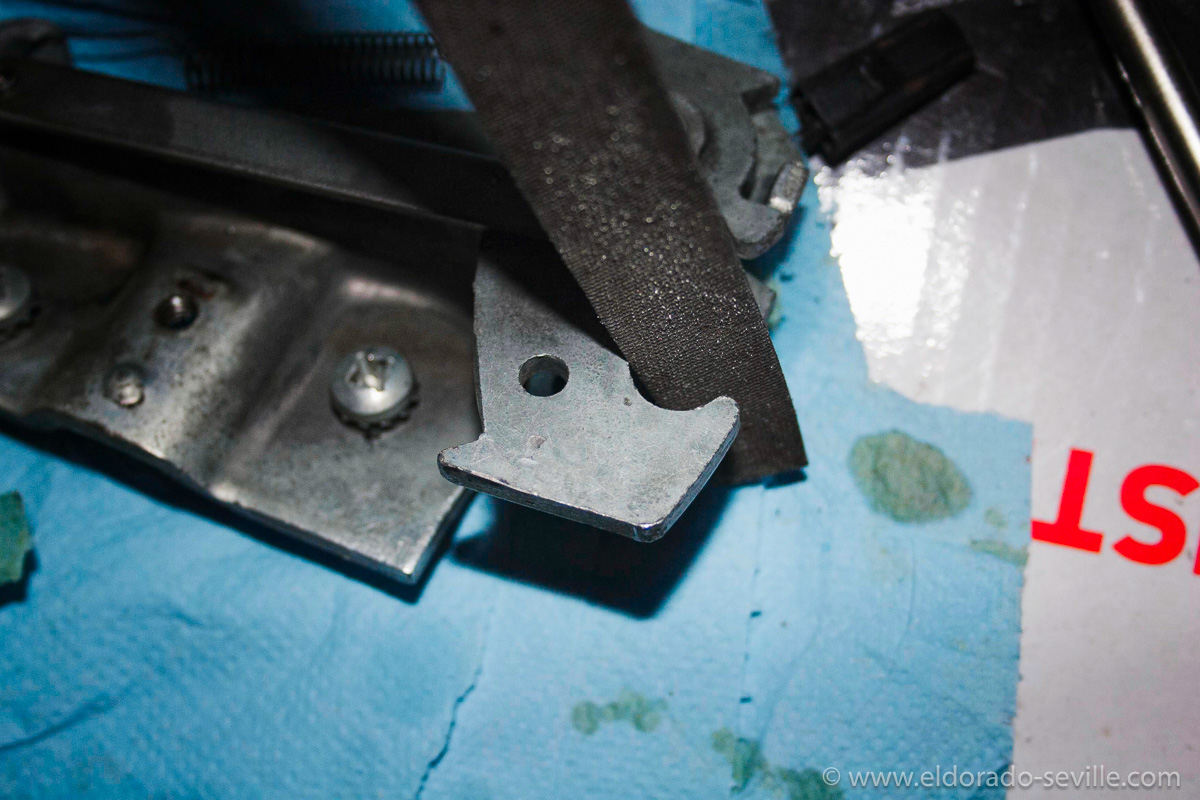
I had to file a little bit of material from the edge of the latch, so that it could move freely. They messed up the striker alignment on the seat in the factory.
THE 1974 UNDERCARRIAGE PROJECT IS FINISHED
I had some really bad luck with non sticking paint, undercoating reacting with the paint and shops not doing their job right…
The goal of this project was to remove all the surface rust, clean everything up and paint it in the correct colors again. For the ultimate, invisible protection I applied transparent undercoating from "Timemax" and transparent stone guard to the wheel housings. It was very important for me that the car looks as original and as perfect from the underside as the rest of it.
You can read reports about what I had to do by clicking here. You can also see all the restoration pictures in this gallery.
The undercarriage restoration project involved the following things:
- Removed some of the surface rust with rust remover gel.
- Had the undercarriage dry ice blasted and cleaned
- Removed all the surface rust with rust remover gel and liquid
- Cleaned the undercarriage with wire brush to strip bad paint down to bare metal
- Fully detailed the drive shaft
- Repainted the brake drums and fully detailed them with original factory markings.
- Had the rust free undercarriage painted in a paint shop in original black and brown with epoxy paints.
- Had the edges of the lower body parts painted as well in Persian Lime
- Found out that the new paint on undercarriage did not stick…
- Removed all the paint again with sandblasting and dry ice cleaning
- Repainted the undercarriage in the correct colors once again in the paint shop
- Applied transparent undercoating
- Applied transparent stone guard to wheel-housings
- The stone guard coating reacted with paint underneath
- Had another shop remove the paint from the wheel-housings again, as I did not want to do it myself for another time.
- This shop repainted the wheel housings and coated them with transparent undercoating and stone guard once again.
- I was not satisfied with their work so they had to re-do it.
- They sandblasted the wheel housings once again to get everything off to bare metal to be able to start all over once again.
- The restoration shop repainted the wheel housings and coated them with transparent undercoating and stone guard for the third time.
- I finally was satisfied with their work and took over again to detail all the splash guards and put everything back together.
- De-rusted the inner sides of the fender skirts and repainted them.
Other things I did on the 74 during this project:
- Repaired seat back release (3 times)
- Repaired the transmission shift dial indicator which was stuck in “L“ position.
- Replaced some of the plastic headlight adjusting parts which were broken.
- Fabricated license plate holders for Austrian plates.
- Repaired front ashtray mechanism which was stuck.
- Fixed loose left outer rear view mirror.
- Fixed a hole in the exhaust. (Temporary fix before I will replace the still original system which was installed in 1974)
- Replaced numerous burnt bulbs inside and outside of the car.
- Replaced AC compressor as bearing and clutch was shot.
- Repaired clock .
- Repaired radio.
- Replaced all speakers.
- Replaced heater core.
- Replaced front center bumper ends.
- Adjusted grill which was misaligned by the factory.
- Restored battery tray.
- Adjusted doors as they did not close well.
- Repaired door striker on passenger side.
- Replaced door bumper rubber.
- Installed new reproduction - correct heater hoses.
- Flushed cooling system.
- Changed oil.
- Changed shocks front and back.
- Changed stabilizer link and rubber.
- Replaced incorrect lug nuts.
- Changed lighting system to Austrian standards to get it road legal for the inspection.
- Replaced hood ornament.
- Replaced panel in dash.
- Sandblasted and repainted valve covers.
- Repaired washer fluid sensor.
- Replaced antenna.
- Fully detailed the paint and interior.
- Polished the windshield with glass polish.
- Painted oil pans.
- Painted fuel tank.
- Touched up some small stone chips
- Perfectly removed dents on the roof which happened during shipping of the car from the USA to Europe
- Tuned carburetor to factory specs
I´m sure that I have already forgotten some details - unfortunately I often forgot to take pictures, so I cant document everything with pictures…

The various stages of this project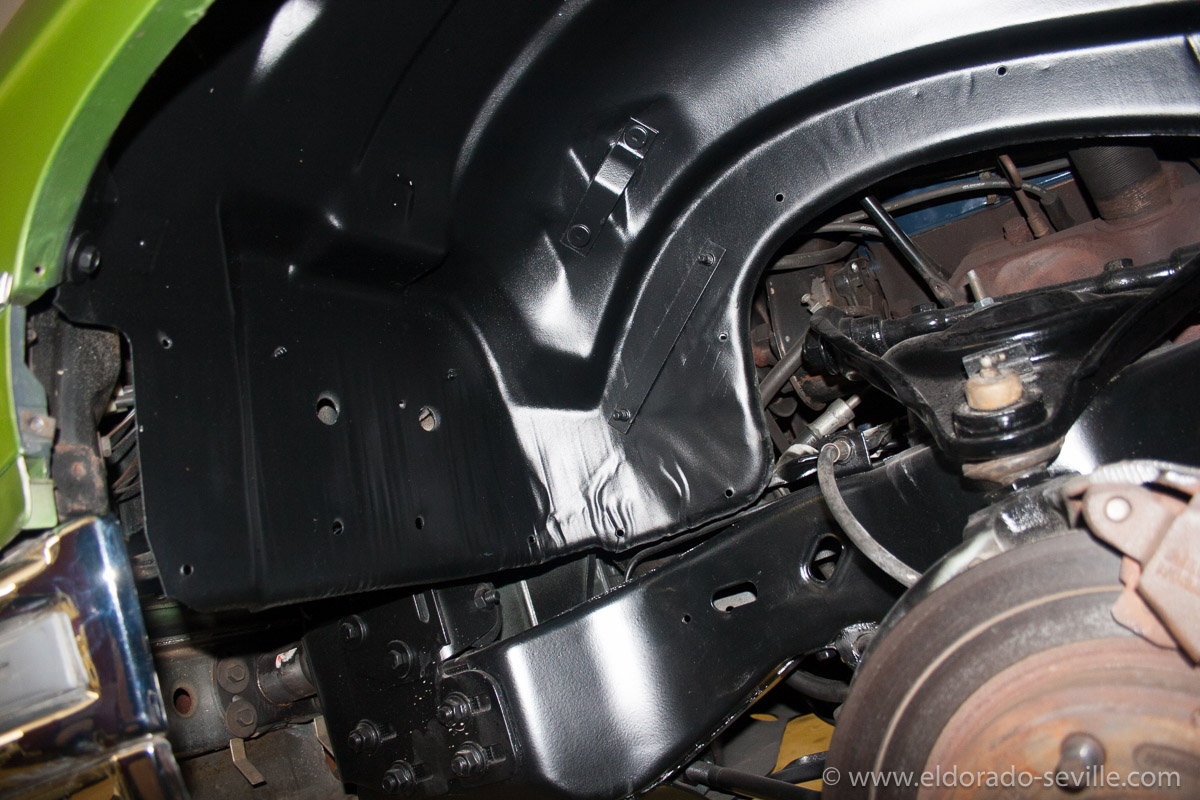
The re-painted wheelhousings. There are a few coats of "Timemax transparent undercoating" and "Timemax Body transparent" - a stone guard applied to protect the paint underneath.This stuff is great and also almost invisible.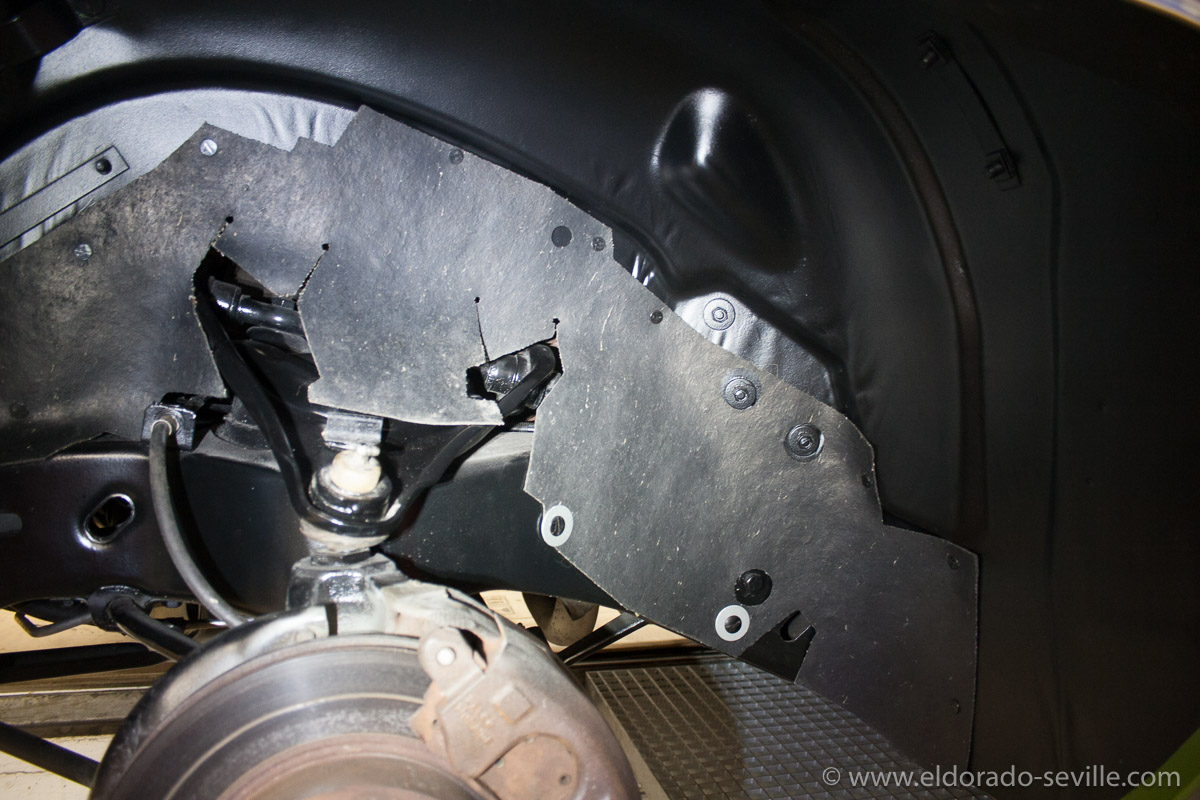
The re-painted wheelhousings. There are a few coats of "Timemax transparent undercoating" and "Timemax Body transparent" - a stone guard applied to protect the paint underneath.This stuff is great and also almost invisible. You can also see the detailed splash guards back in place.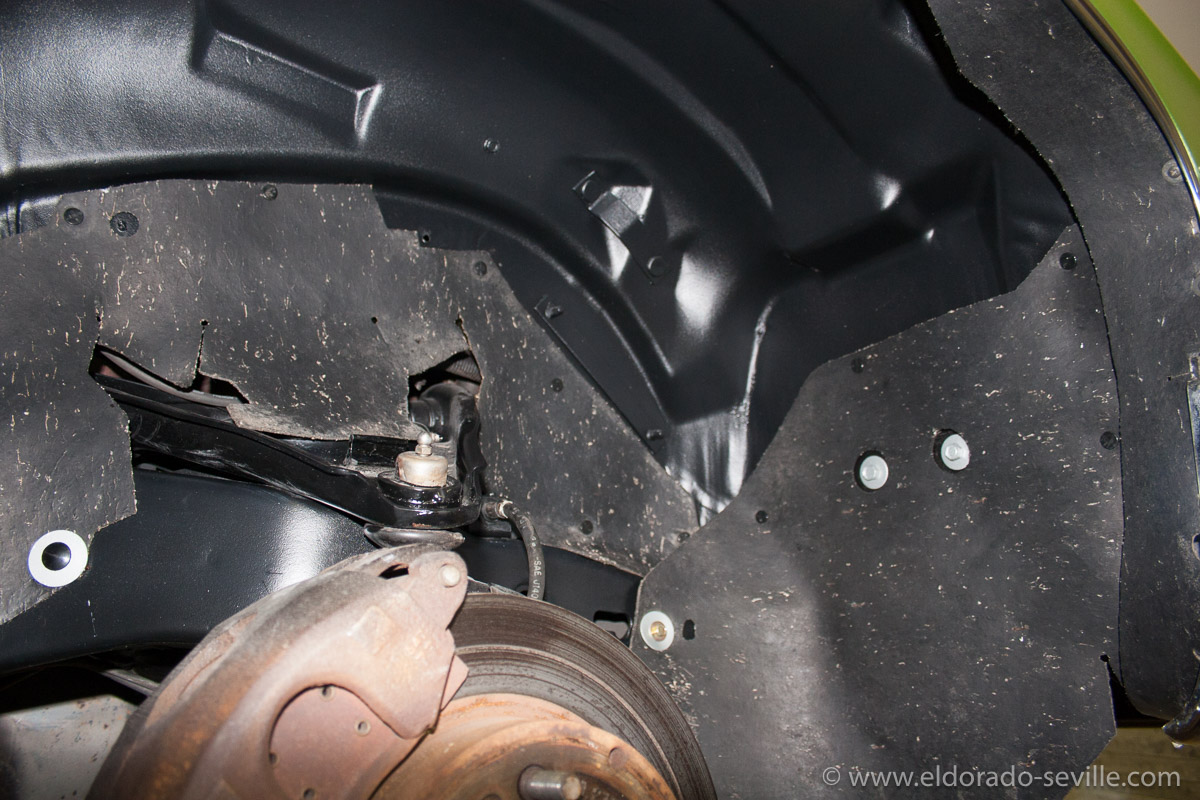
The re-painted wheelhousings. There are a few coats of "Timemax transparent undercoating" and "Timemax Body transparent" - a stone guard applied to protect the paint underneath.This stuff is great and also almost invisible. You can also see the detailed splash guards back in place.
I removed all the rust inside the fender skirts as well and painted them afterwards to protect them. I also undercoated them with transparent undercoating as well.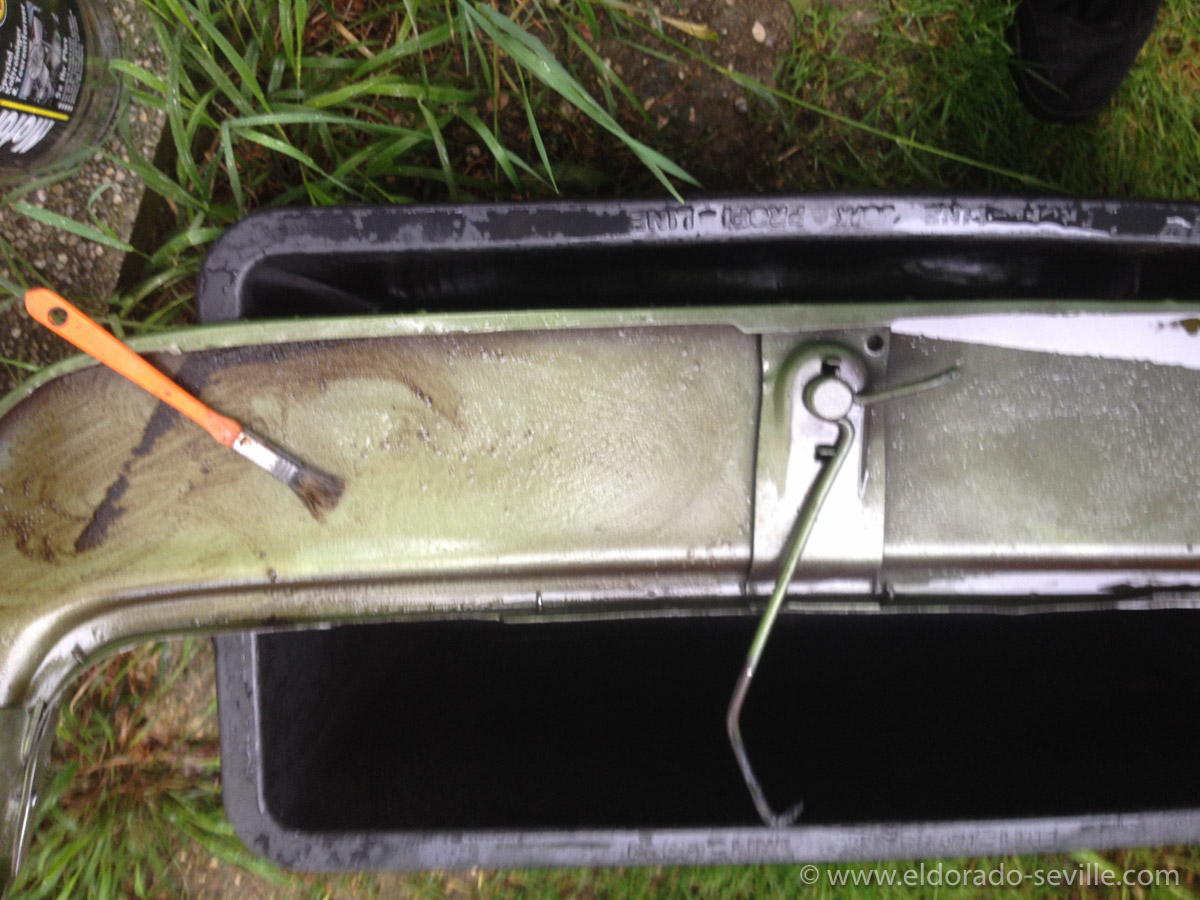
I used tar remover to clean the inside of the fender skirts which still had some factory applied undercoating on them.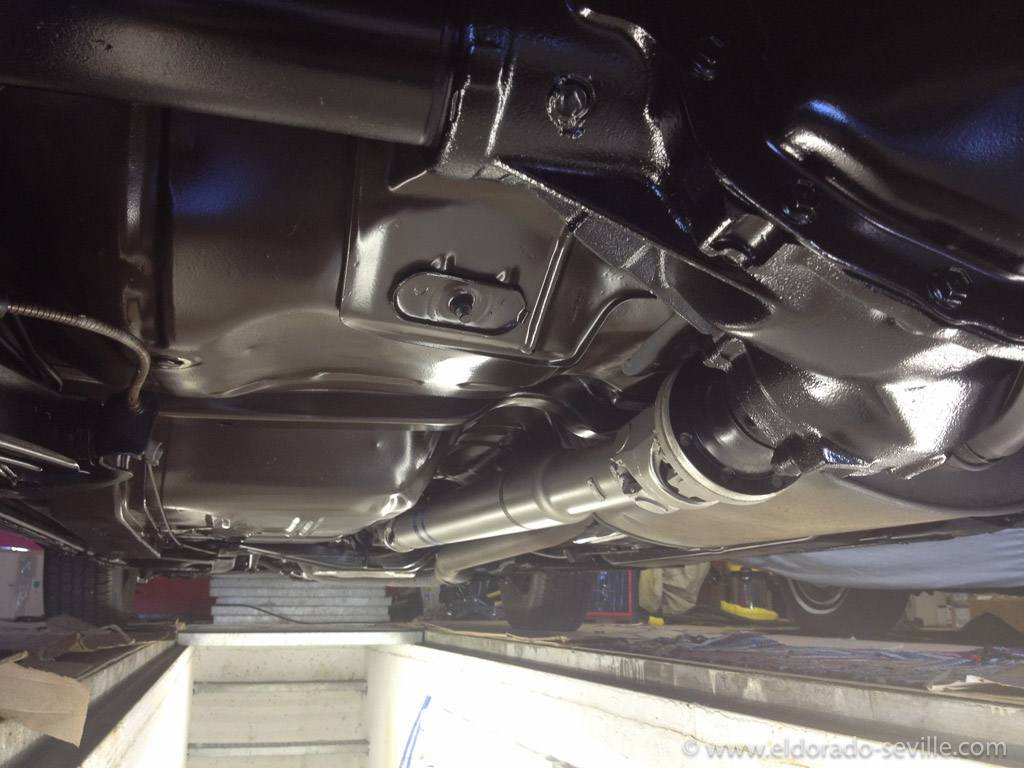
This is how the rest of the underside of my 74 is looking now. I painted everything in the correct colors and protected it with transparent undercoating afterwards.
RESTORING THE BATTERY TRAY IN THE 74 CADILLAC
I striped all the rust and paint and removed the headlights to get better access. I also de-rusted all the bolts, nuts and washers with rust removing liquid and removed the old paint with a wire brush.
After everything was completely rust free and down to clean bare metal, I primed the tray and afterwards painted it with 2 coats of Eastwood Chassis Black Extreme, which has an OEM sheen.
Now it is looking very nice again - almost OEM - and the new paint should protect it for a long time.
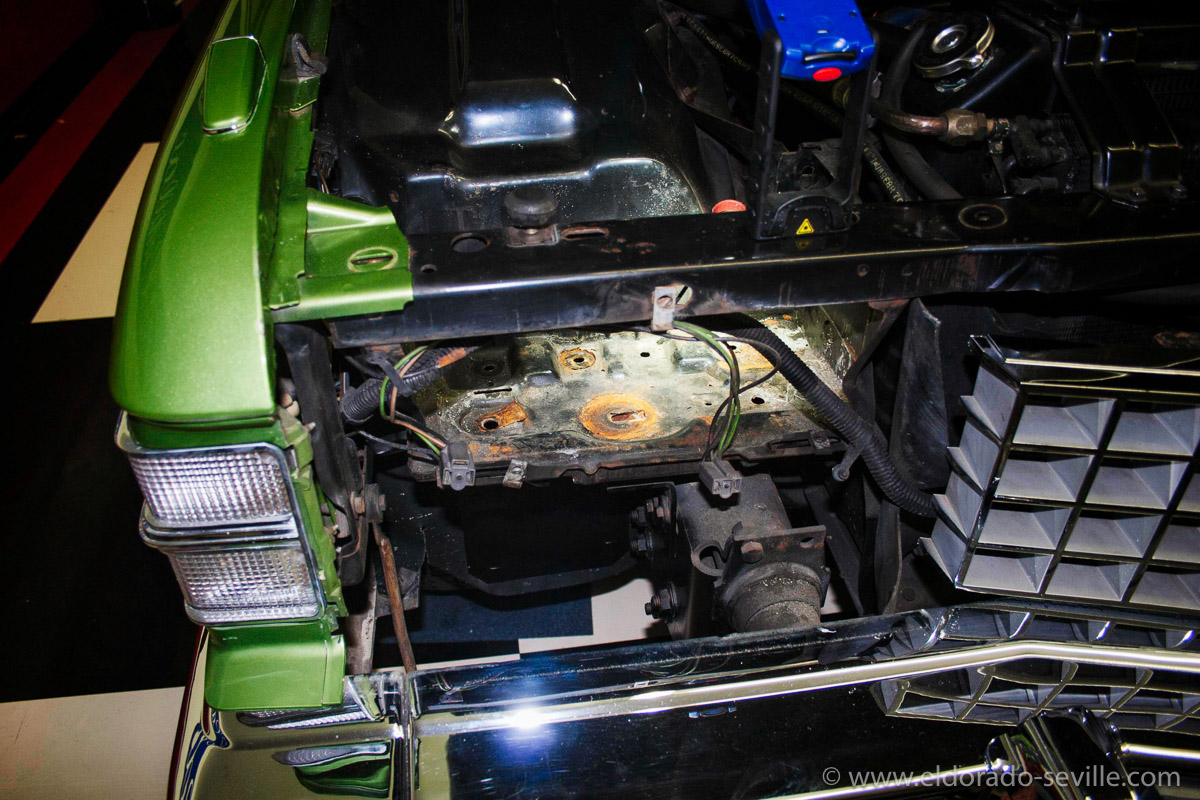
With the battery and headlights removed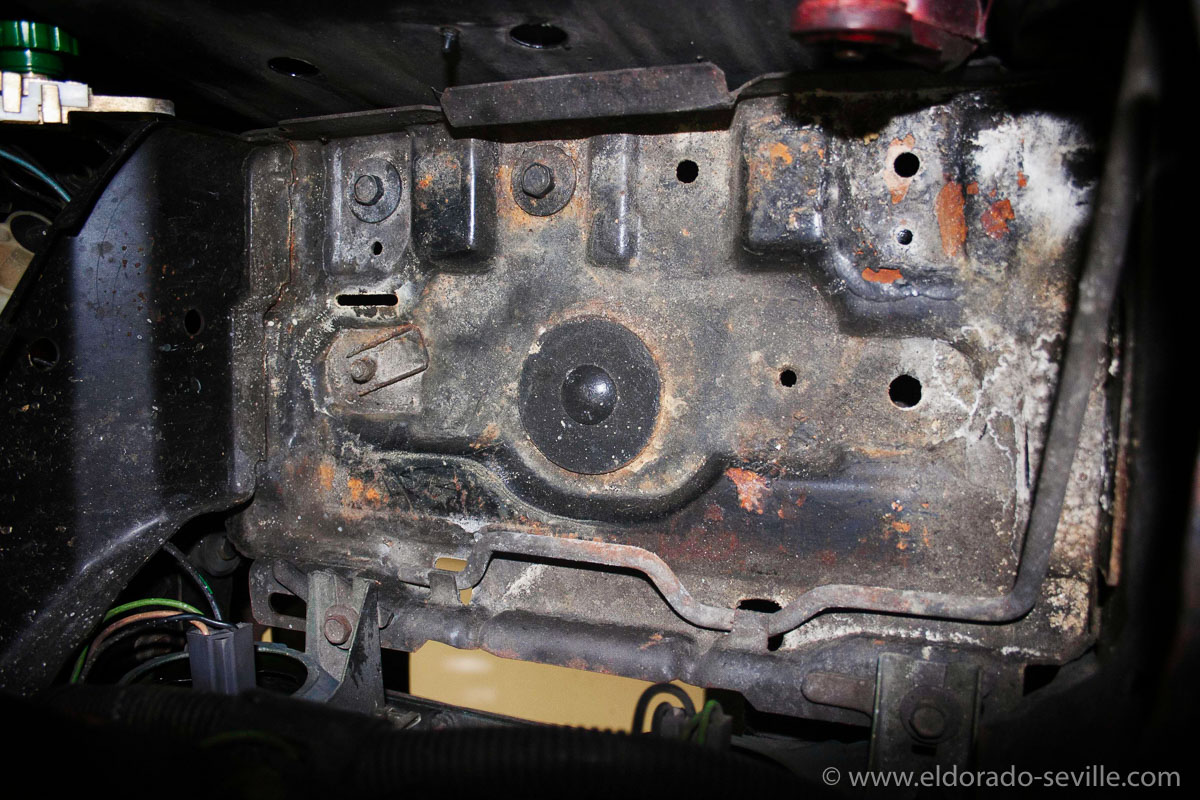
Luckily the rust was not too bad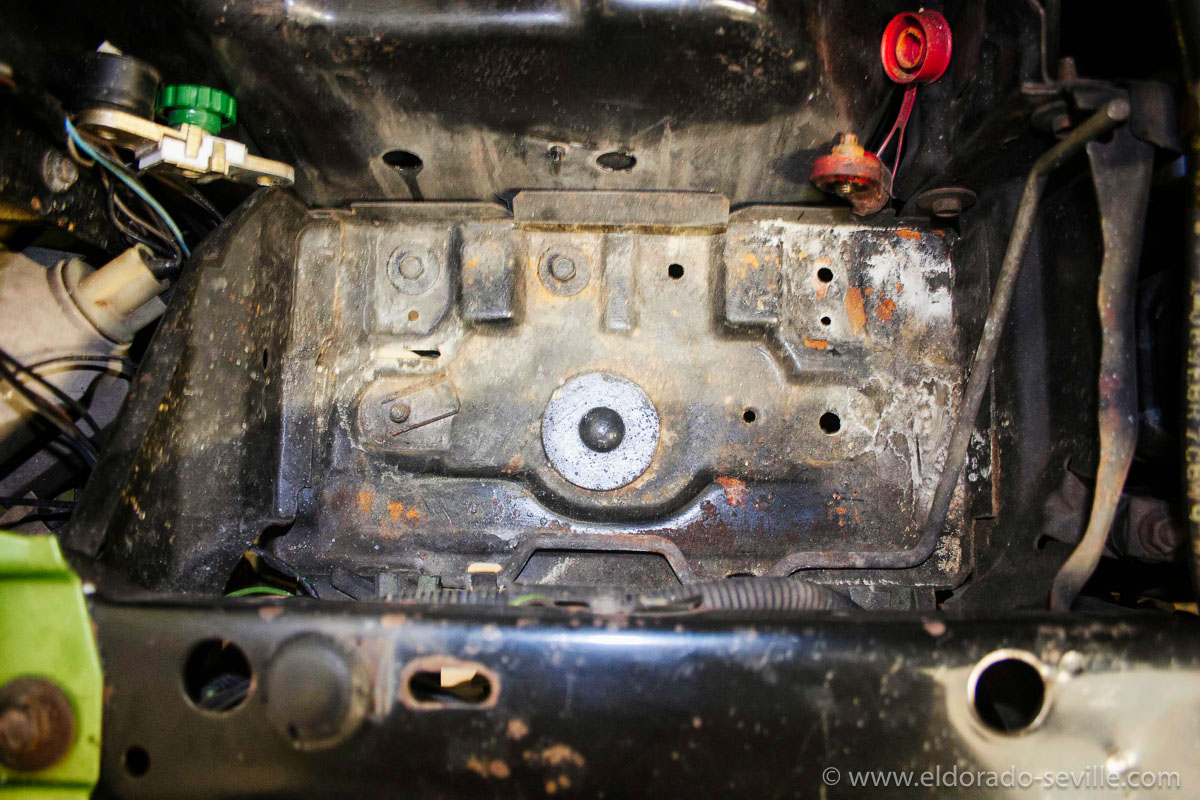
Luckily the rust was not too bad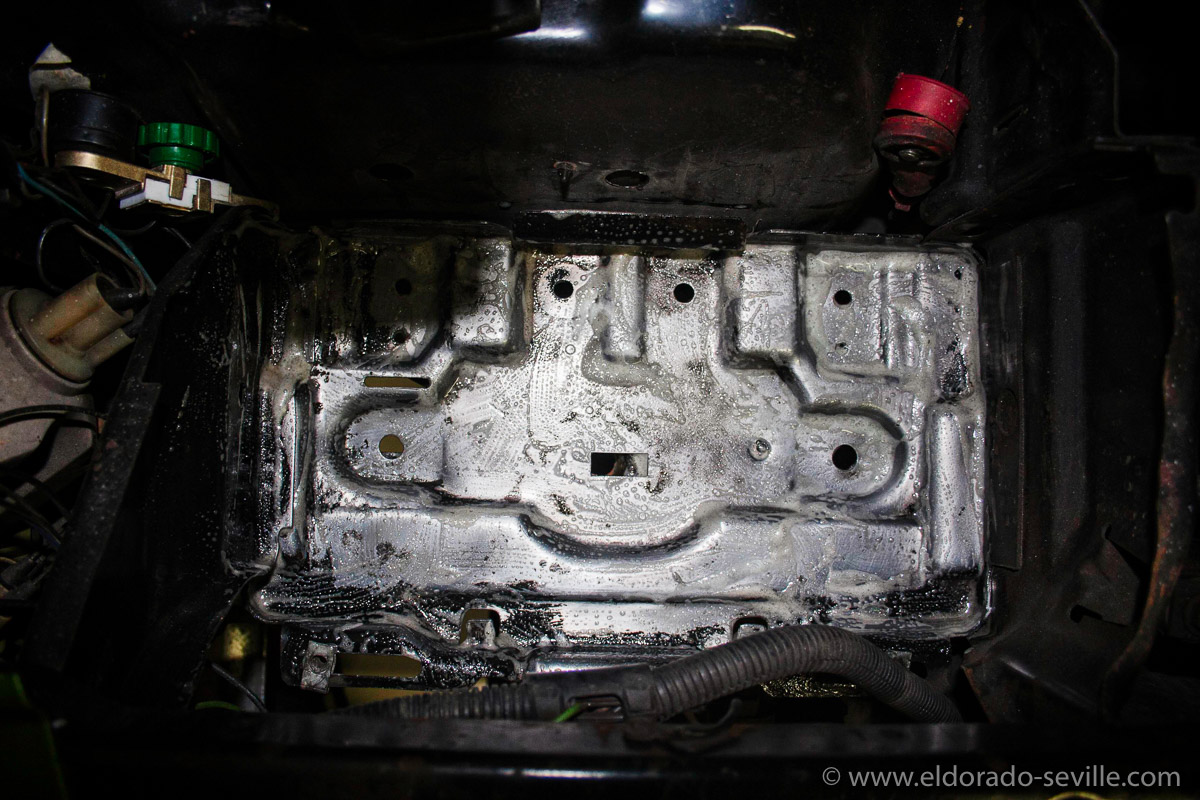
Rust remover liquid in action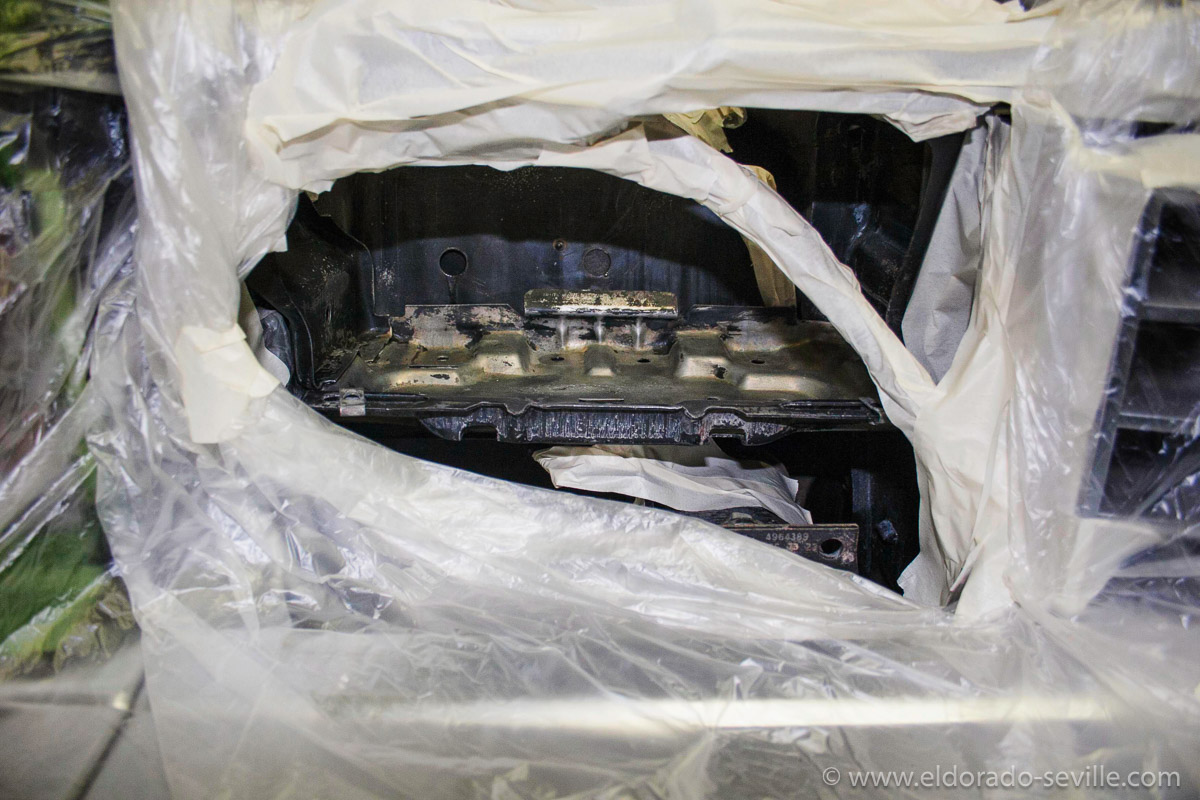
After removing the rust
I also cleaned the battery hold down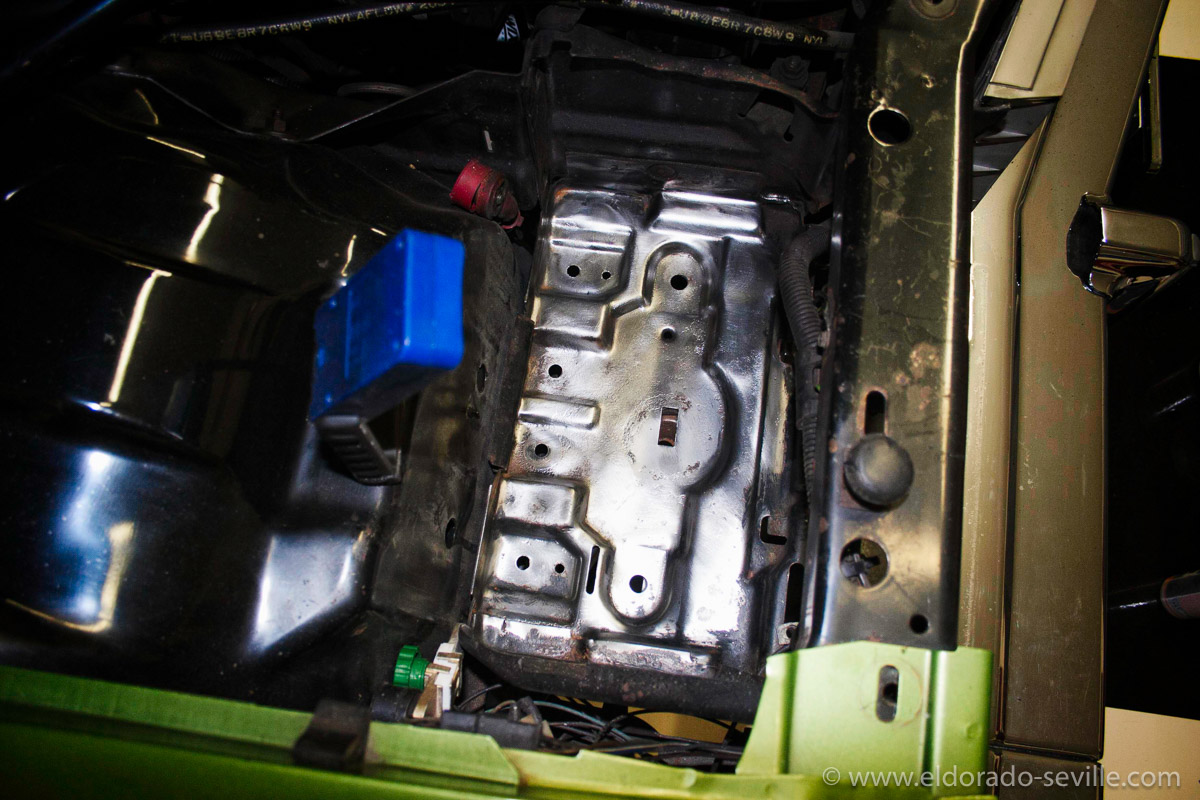
Almost rust free tray after the first treatment with rust remover. I got it much cleaner after this picture was taken.
Ready for paint - no more rust. Everything was also wire brushed and and sanded.
Ready for paint
The restored tray. 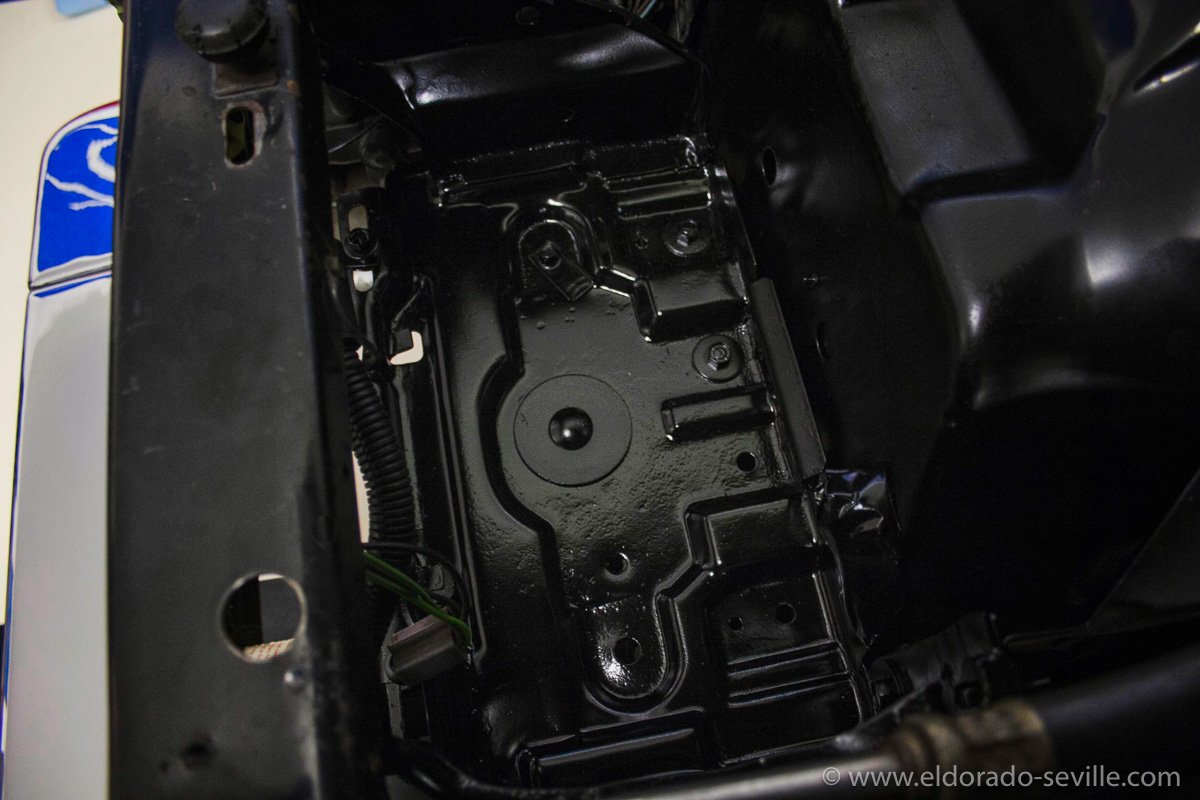
The restored tray - you can see where the rust was, as it left some marks in the metal. But it is now well protected and rust should be stopped.
THE 1974 IS NOW STREET LEGAL IN AUSTRIA
This state inspection is very thorough, and they do test everything. Everything like the brakes, lights, horn, wipers and everything else has to work. They also check and test the complete suspension.
It's not allowed to have rust, and the car has to run as clean as possible to pass the smog test.
One of the major modifications that need to be done involves converting the lighting system of the car. Red directional lights are not allowed - amber blinkers are obligatory. The parking light has to be inside the headlight. T3 - sealed beams are not allowed - we have to have H4. We have to make room to be able to install license plate holders for our huge number plates, and the rear one has to be lit. So a lot of modifications have to be made - some of them are pretty major and involve the cars wiring of the tail lights.
For an originality freak like me, it hurts a lot to do these modifications, and I´m always doing them in a way that they could theoretically be undone and reverted back to original condition after the inspection… (only if it would be legal of course) So the most important goal is to do everything without destroying anything and not cutting any wires.
Together with my friends Lucky and Steve I spent a whole evening in the shop where my undercarriage project was still going on, to do all these necessary modifications to pass the inspection.
Steve is the electrical genius among my great Cadillac friends, and he found the perfect solution to pass the inspection without wire cutting involved. He also fabricated the illuminated license plate holders. My friend Lucky also helped a lot!
Thank you guys - it's an honor for me to have you as my friends.
On August 11 th the 74 passed the state inspection with flying colors. The inspector was extremely impressed by the condition of the car. He said that it looked better than a new car. He also could not find any technical flaws. Thank you to Mike Meier from Mikes Garage for helping me as well!
The car now has a registration as an "historic car", and I can finally legally drive it!
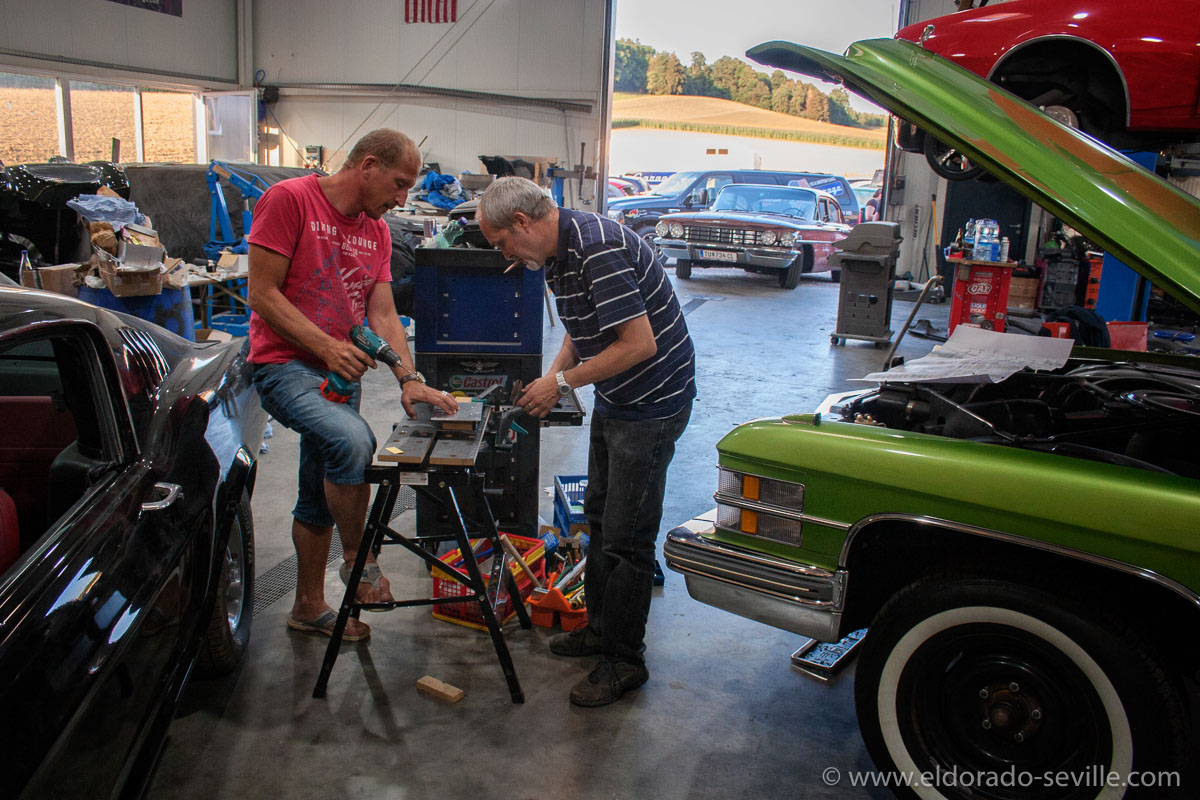
My friends Lucky and Steve at work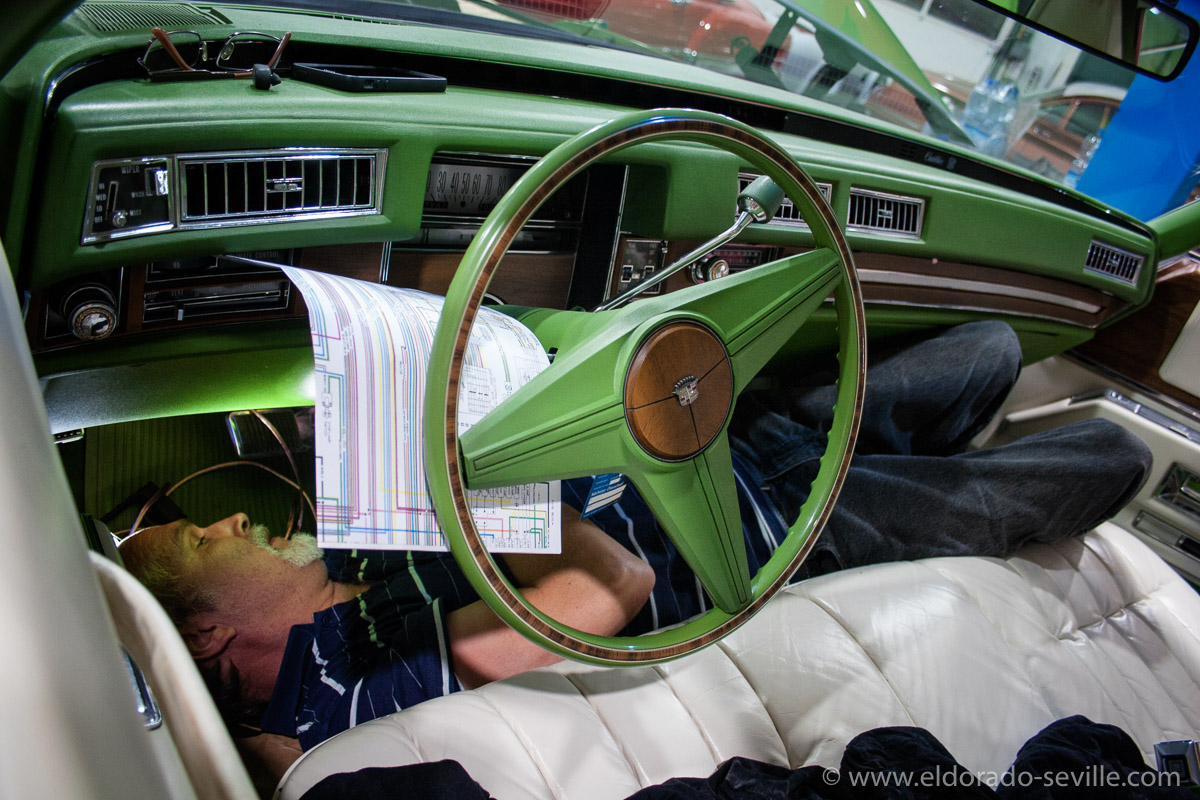
My friend Steve at work - working on the wiring for the rear blinkers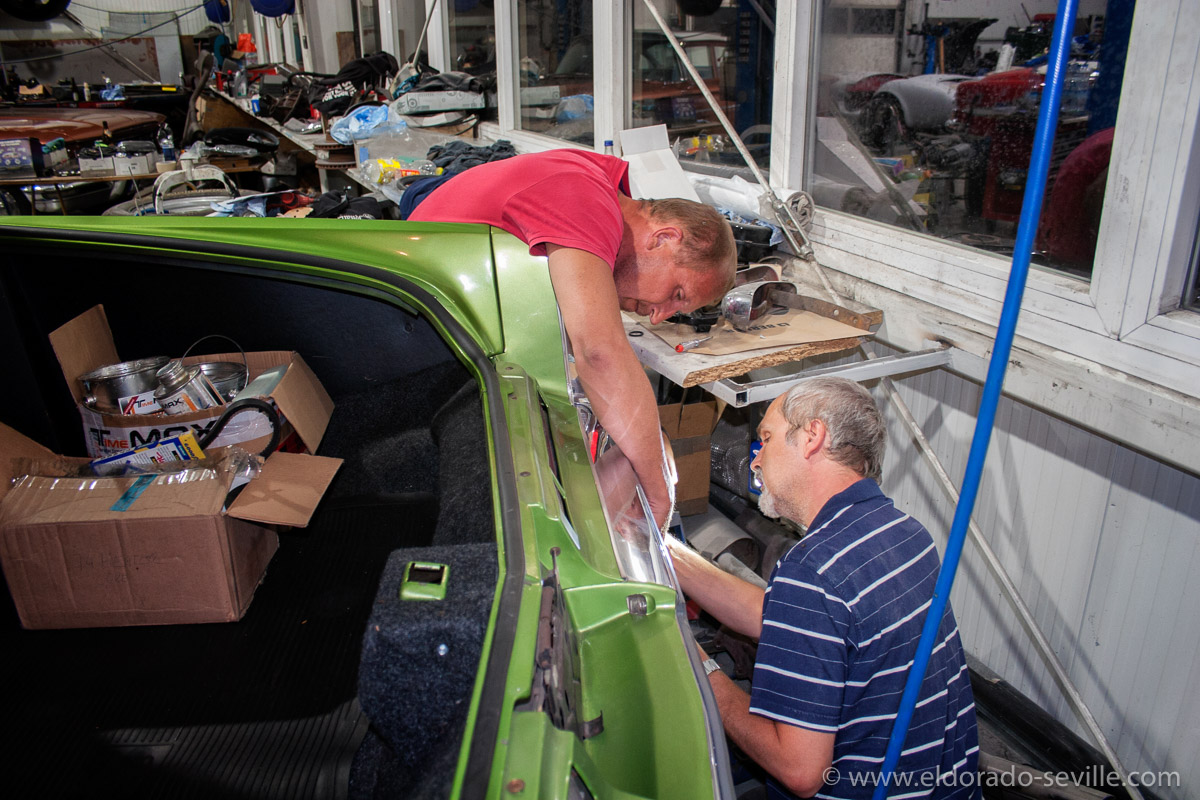
My friends Lucky and Steve at work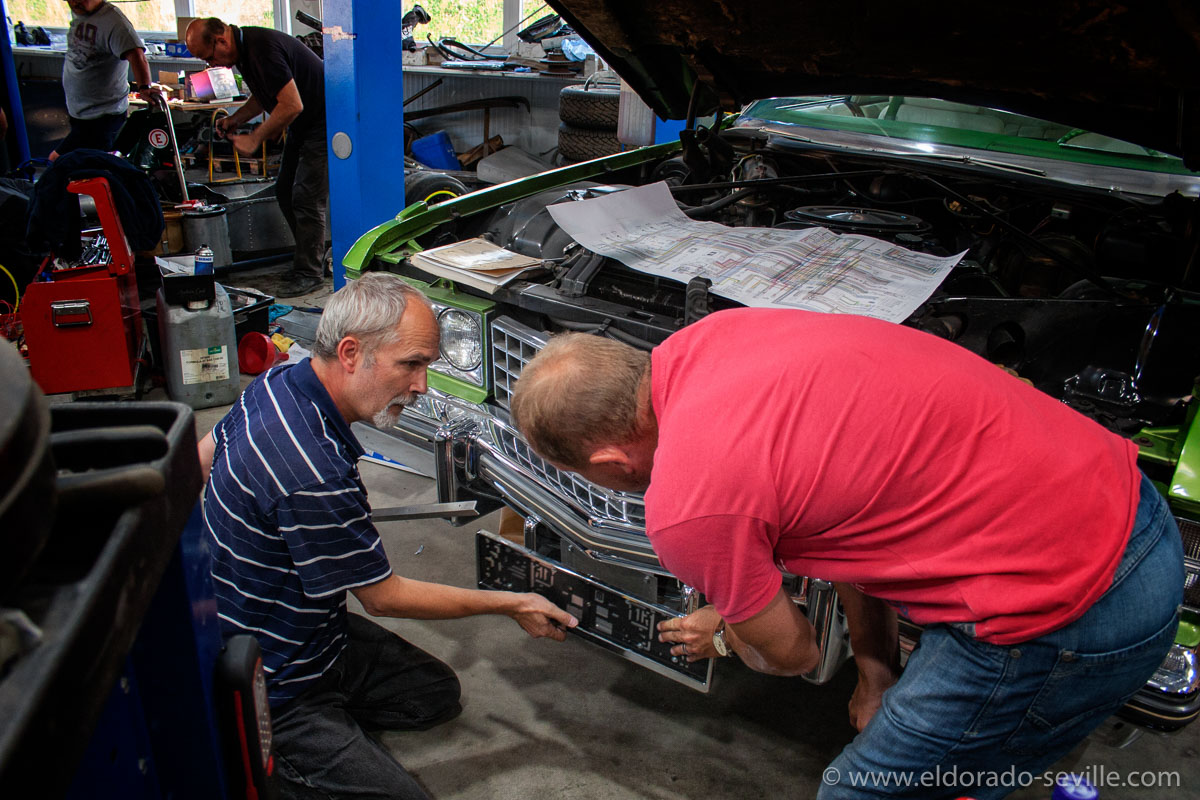
My friends Lucky and Steve at work. The car did not come with a front license plate holder - so Steve fabricated one for our huge Austrian plates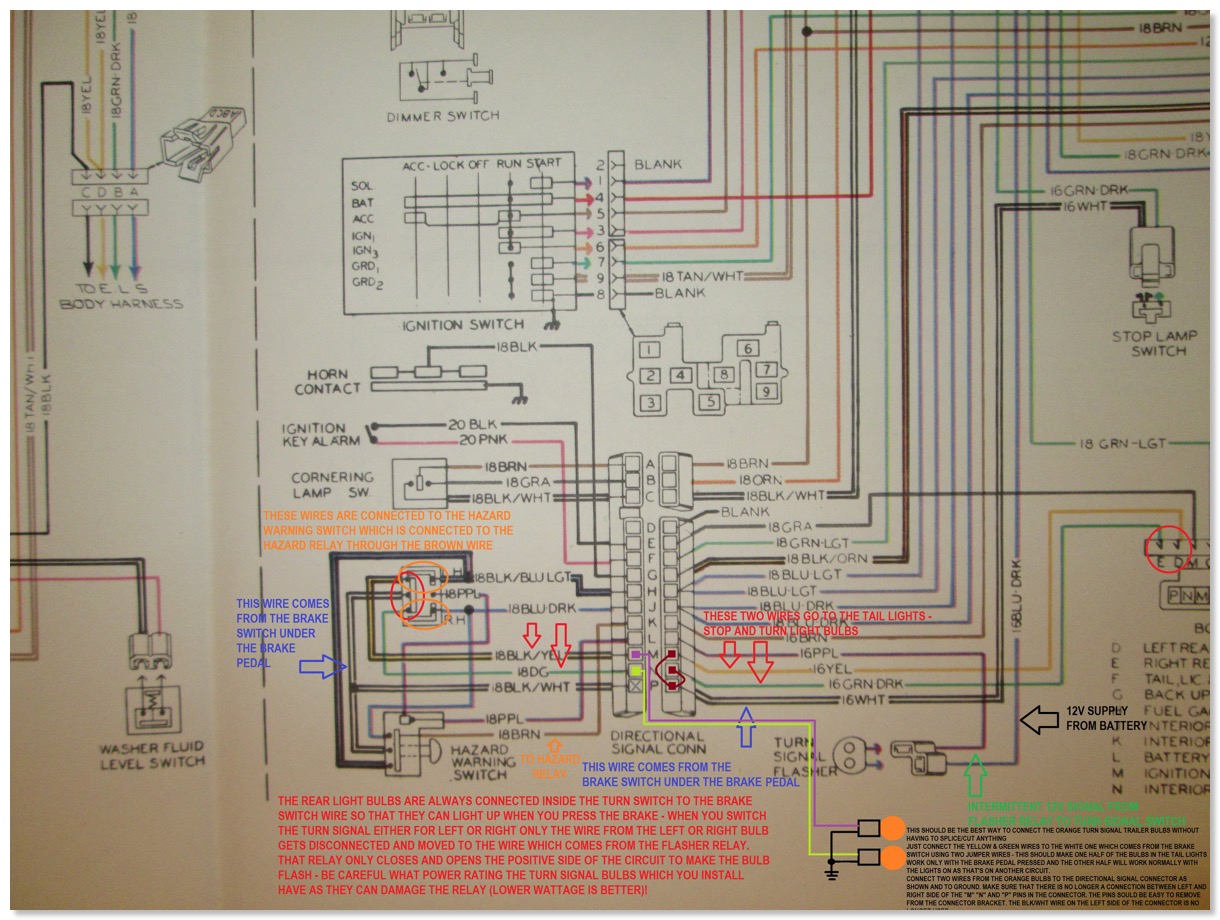
This is how we did the rear turn signal conversion on my 78 Eldorado - on the 74 its almost identical.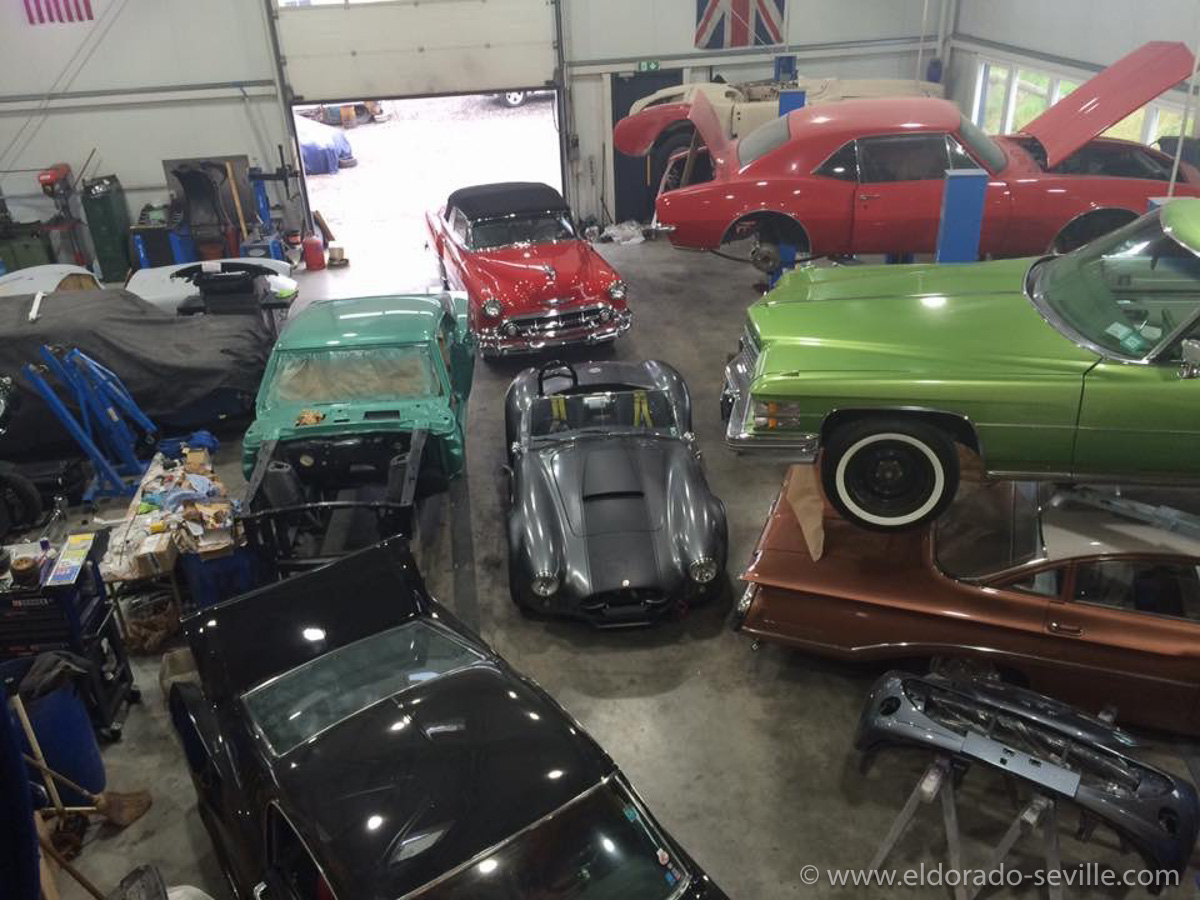
In Mikes Garage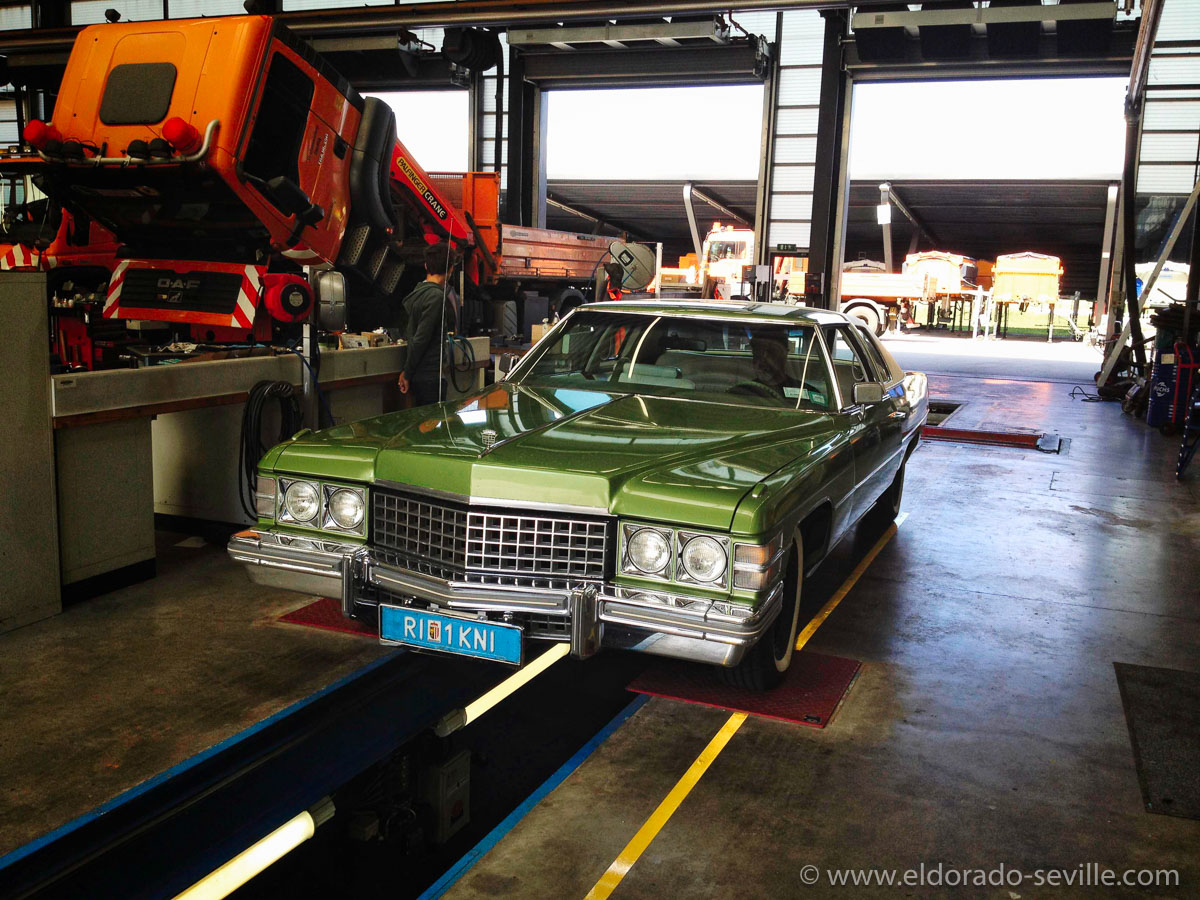
During the state inspection - here they are testing the front suspension on a moving plate.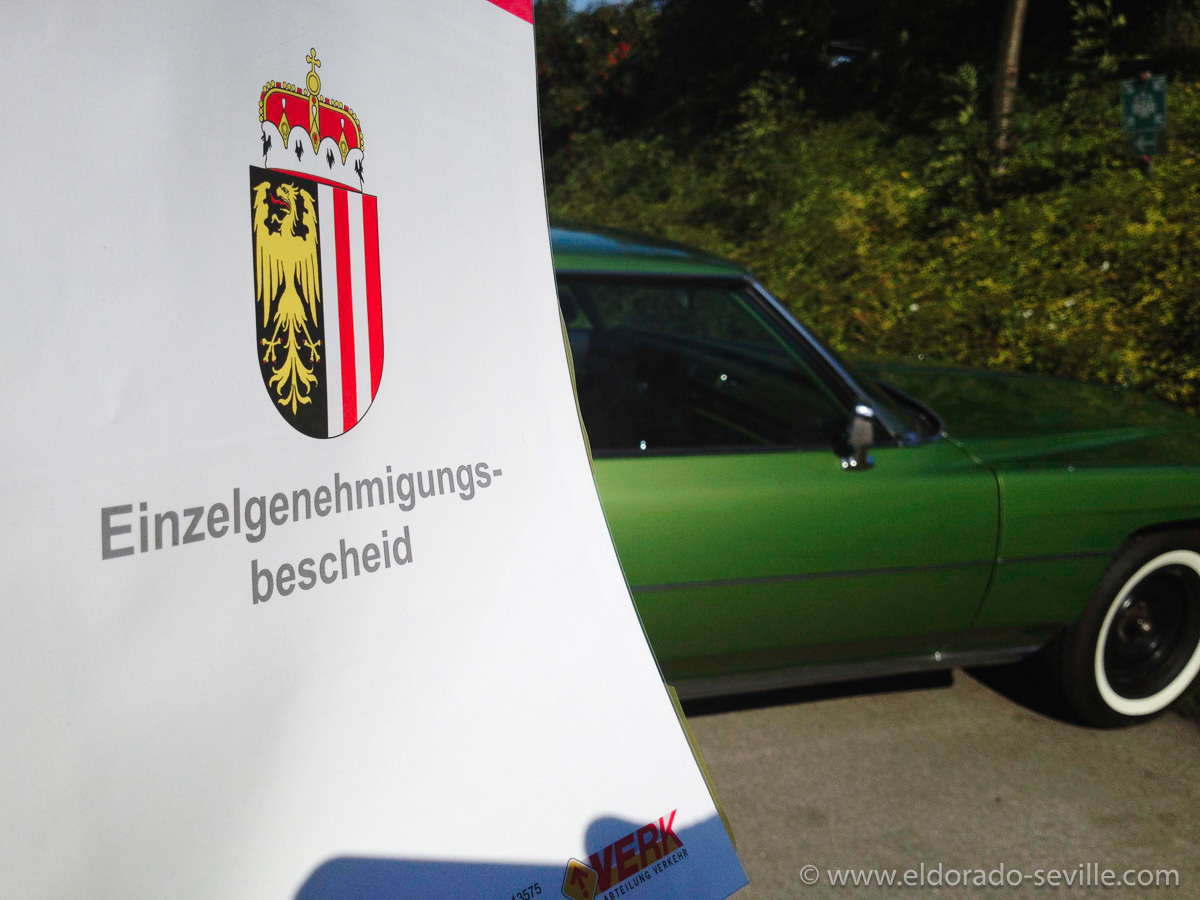
I now have all the necessary documents to drive the car.
1974 HOOD ORNAMENT, DASH TRIM REPLACEMENT AND SPLASH GUARD DETAILING
![]()
Some 1974 models like the "Cabriolet" Coupe DeVille version were equipped with see through hood ornaments. The one on my car was quite pitted so I got a new used one which looks much better.![]()
This is how Cadillac typically mounted its hood standup ornaments.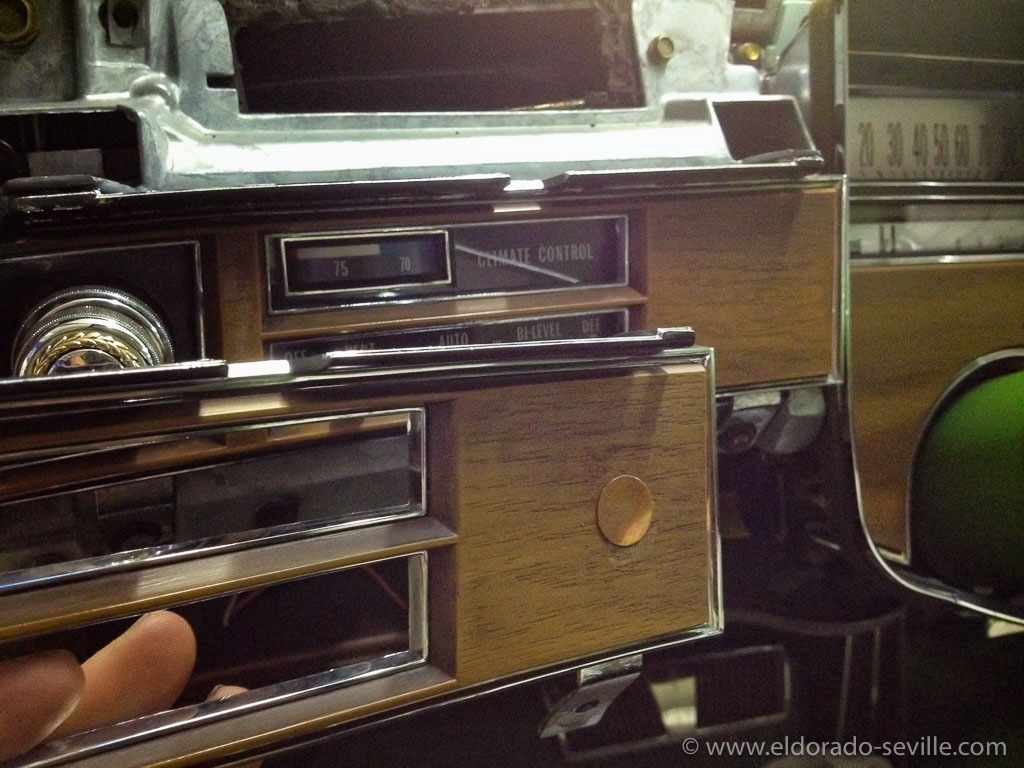
The previous owner glued some emblem to the dash which came off and left some residue on the plastic wood. I got a good used part and replaced it. Here you can see the old part in the front and the "new" part already installed. As I had the dash cover still removed from my heater core replacement and radio/speaker repair it was only a matter of removing two screws.![]()
I removed all the rust from the splash guards in the inner fenders with rust remover gel and repainted them afterwards. Here you can see the applied gel.![]()
The original rubber splash guards got a very good cleaning and are still in very good condition. The rubber has white/grey fabric woven into the rubber - therefor it's not completely black and the white dots you see are not dirt.
RESTORING THE 1974 CADILLAC´S WHEEL HOUSINGS ONCE AGAIN
I have already been so close to the finish line...
😭
I have no idea how to finish this project now, I will most probably have the 4 wheel housings done again by a professional restoration shop eventually. The rest of the undercarriage is finished and looks fantastic. I used the correct colors and replicated the factory new look.
The finished undercarriage - I applied some transparent undercoating over the freshly painted underbody which is completely invisible. This is some great stuff!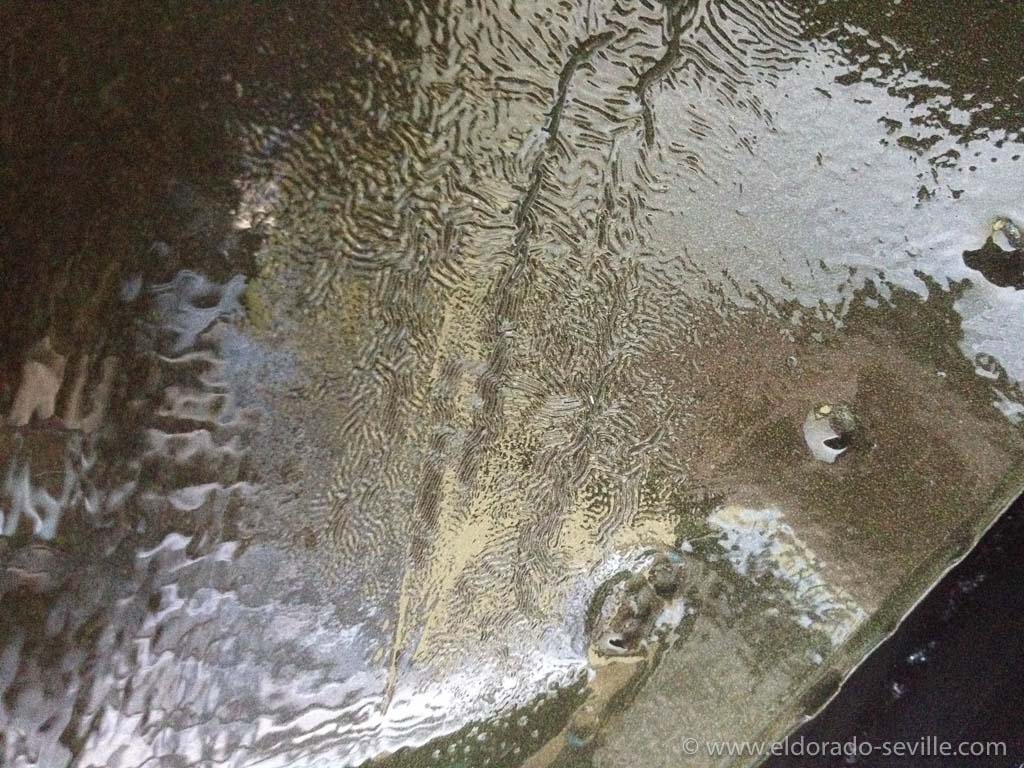
The transparent stone guard reacted with the paint... Now it's peeling off...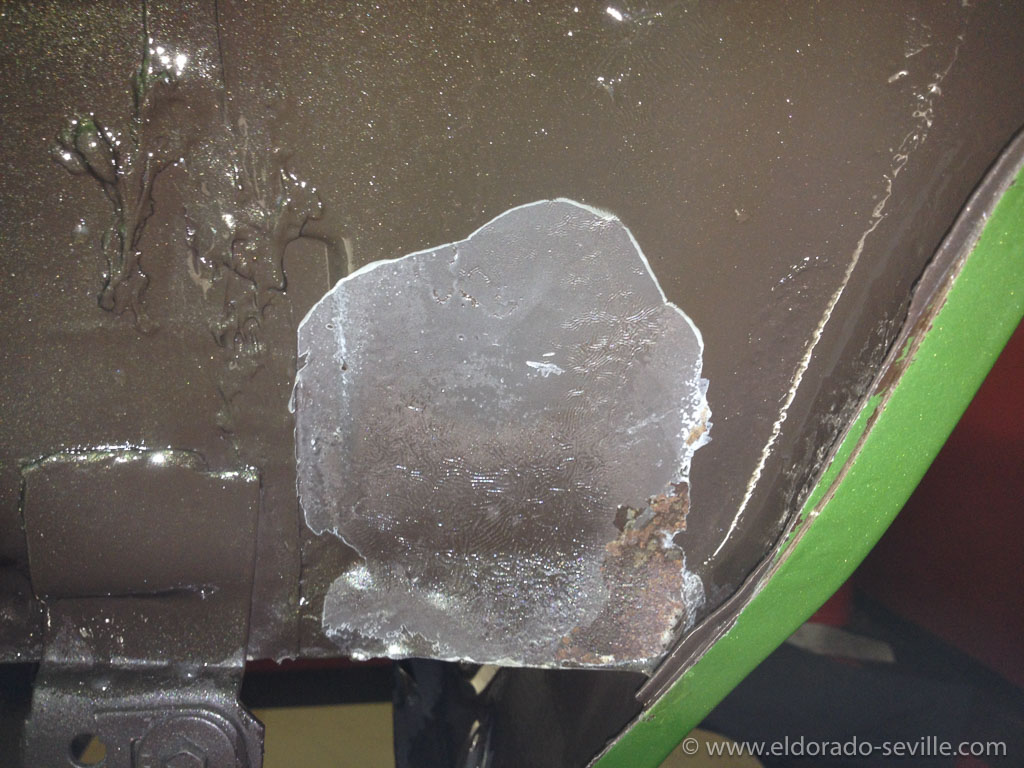
The transparent stone guard reacted with the paint... Now its peeling off...
SANDBLASTING AND DRY ICE BLASTING/CLEANING THE UNDERCARRIAGE OF THE 74 CADILLAC
The paint shop wanted to have the undercarriage media blasted this time, to make sure that everything is 100% clean, and that the paint can stick to the metal much better due to a rough surface.
Personally I´m not a big fan of media blasting a non disassembled car, as so many things could go wrong and I do not recommend to do it to anybody else.
The paint shop really wanted to go this route though, and they said that they have a very experienced media blaster to perform the work.
They did tape the car for hours to make sure that the blasting media would not go close to any mechanical or fragile parts.
The blaster worked with very low pressure (1bar - 14psi) to get the old paint off and it really came off within minutes. He did not want to risk anything and so there were some areas with the old paint left after he was finished.
We then spent a whole day trying to get rid of the rest of the remaining paint, by hand. With 240 grit paper we worked on all the areas we could reach. After a whole day under the car it was clear that we could not reach all the areas and that the job would not be good enough.
I then contacted a dry ice blaster who took over to remove the rest of the remaining paint. Normally you cannot remove paint with dry ice blasting, but as the paint on my car´s undercarriage does not stick, it works. It took him a couple of hours to get everything off.
The undercarriage is now completely clean and back to bare metal once again. He even was able to remove some of the old undercoating in the rear wheel wells which the other dry ice blaster could not get off.
We will now degrease everything multiple times and then scuff all the metal. Then its time to mask all the necessary parts and repaint everything once again with 2k paint. I will keep you updated here on my website about the progress.
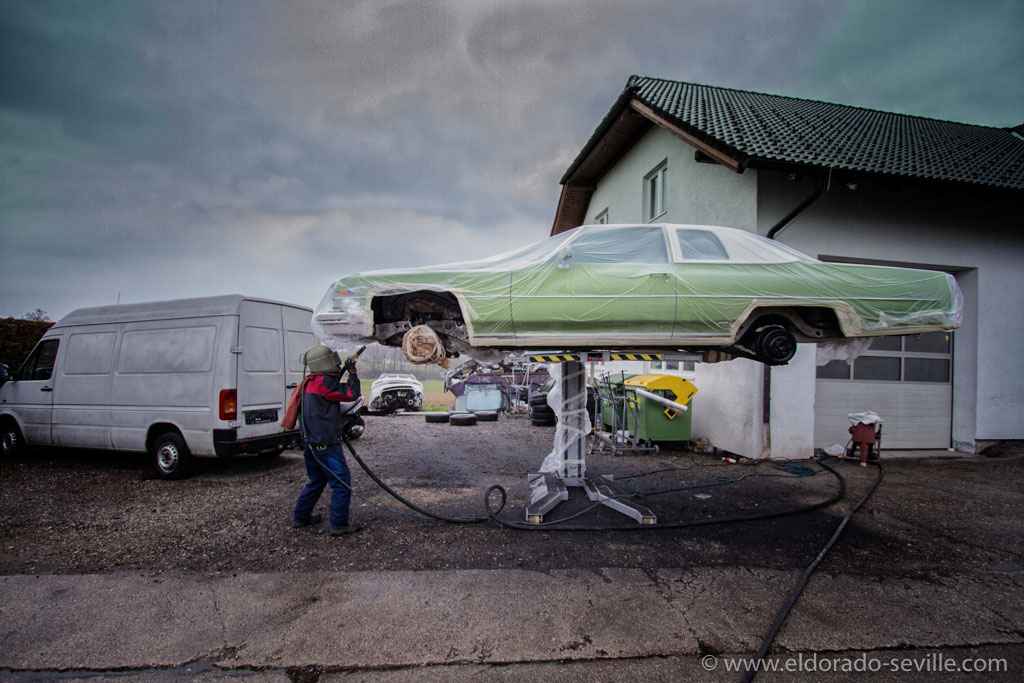
The media blaster at work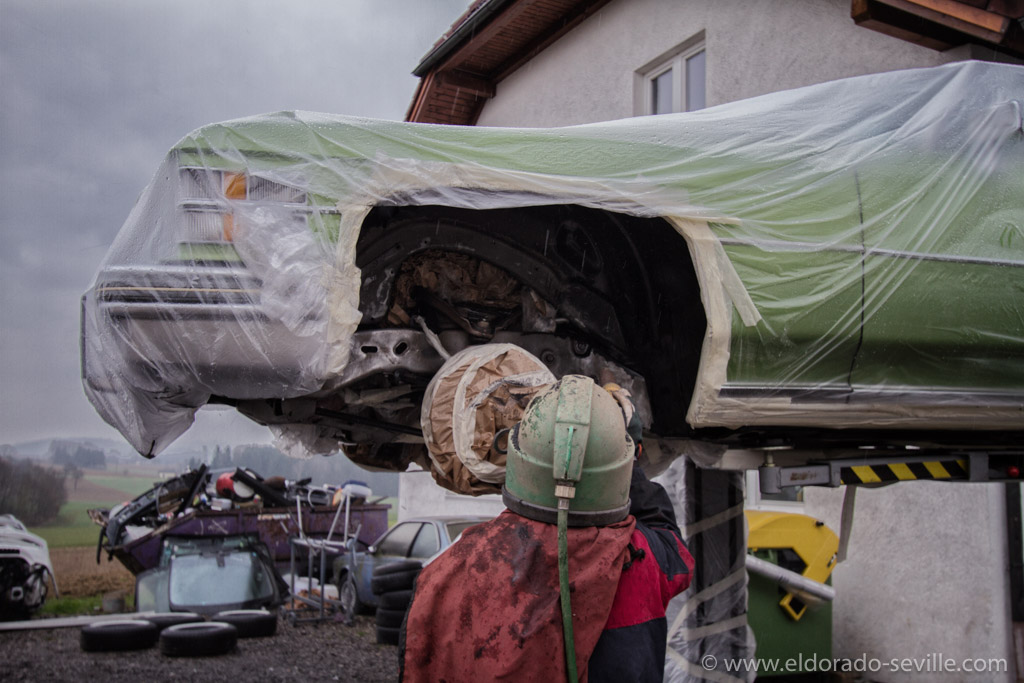
Media blasting the undercarriage.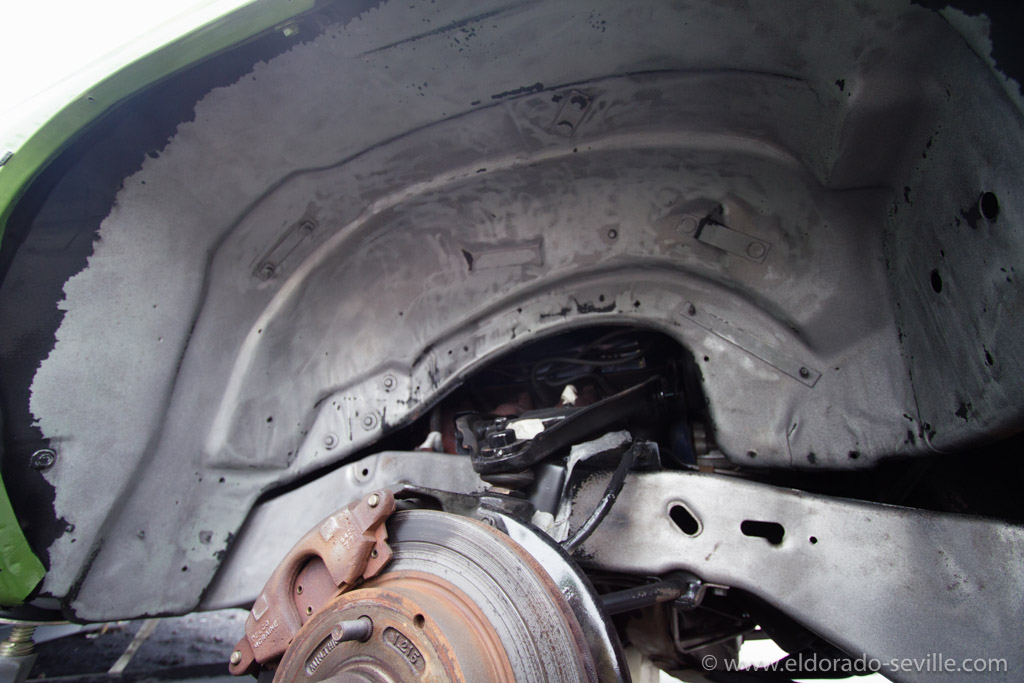
The bare metal wheel housing after blasting. The rest of the paint was removed later by hand and by dry ice cleaning.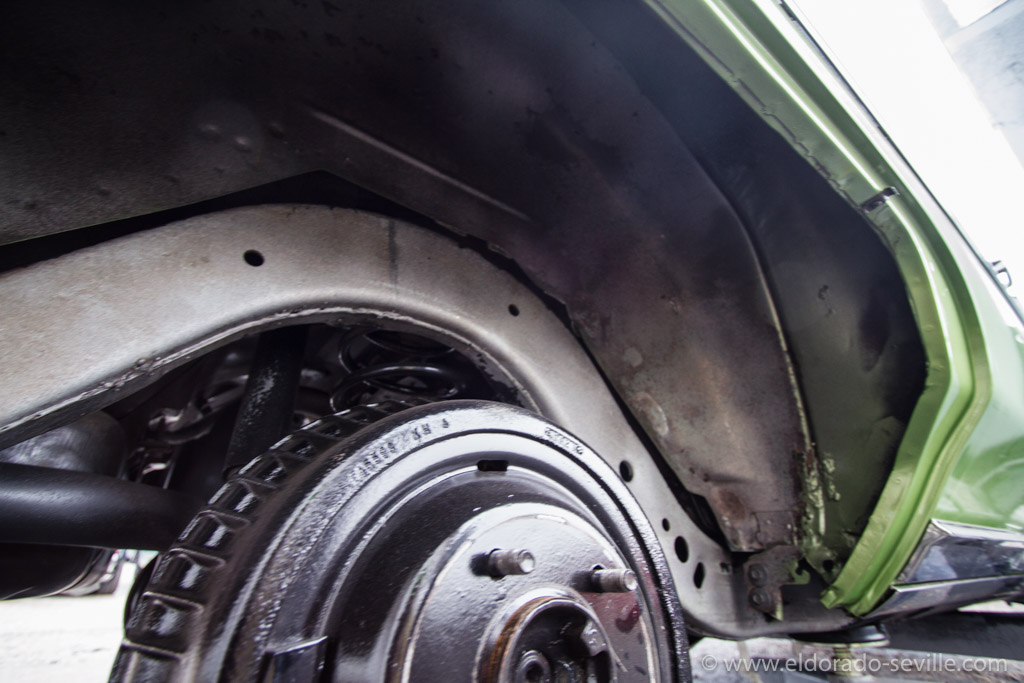
After blasting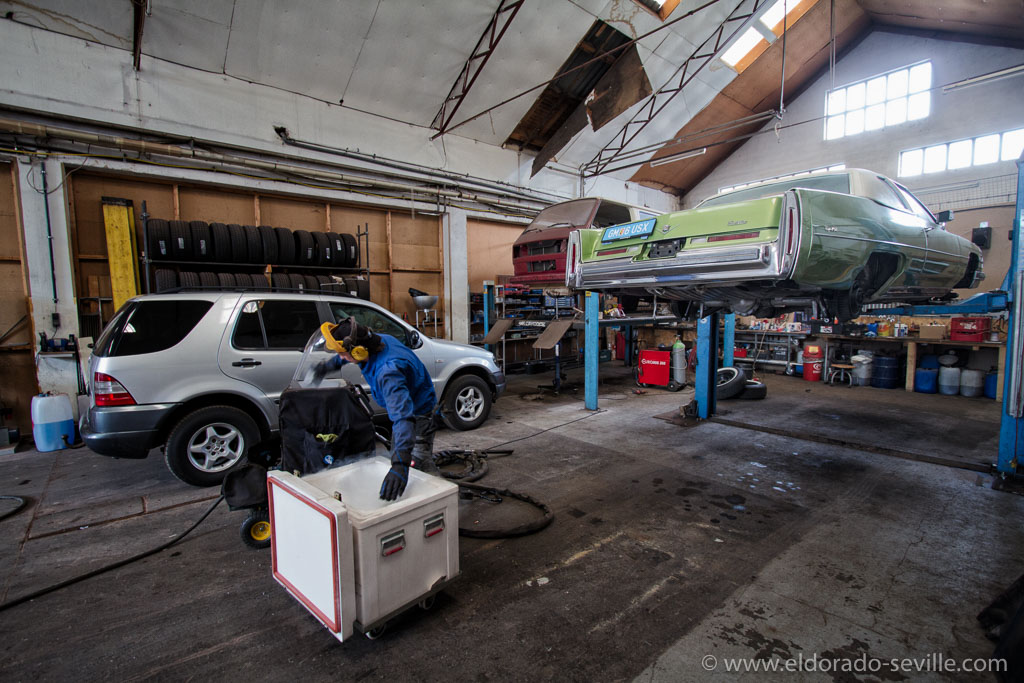
Ready for dry ice cleaning.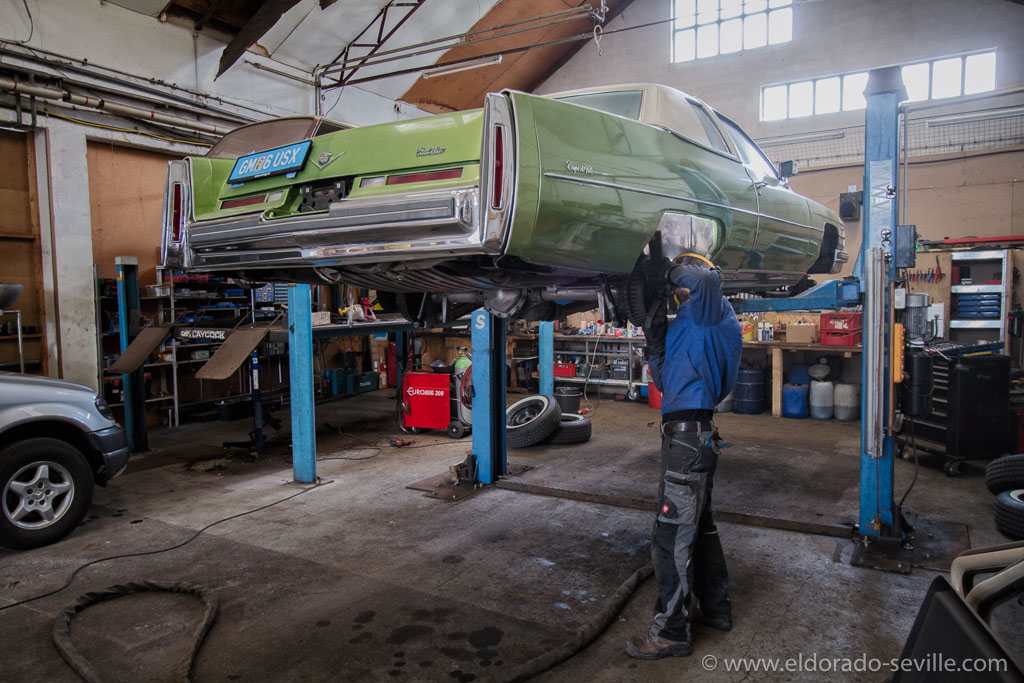
The dry ice cleaner managed to get the last undercoating out of the rear wheel housings.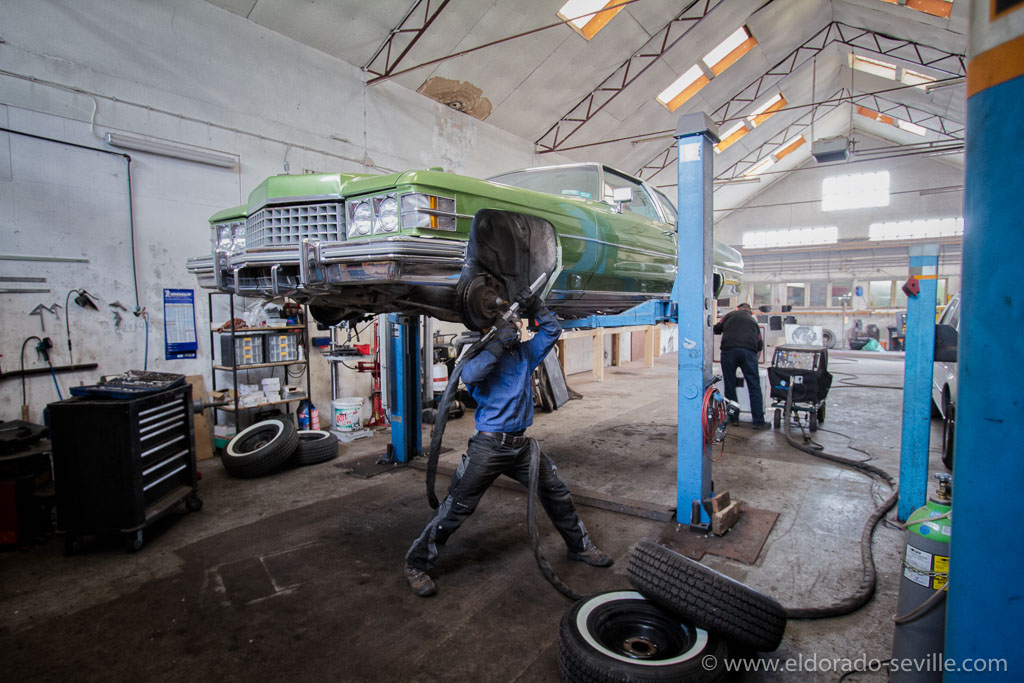
Dry ice cleaning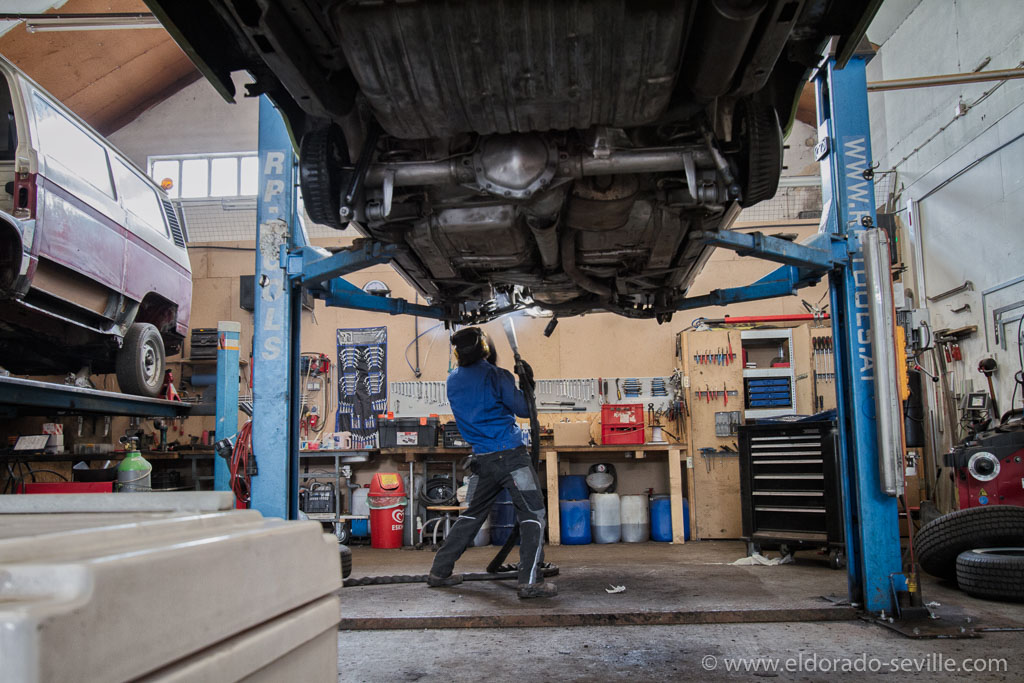
Everything is perfectly clean now.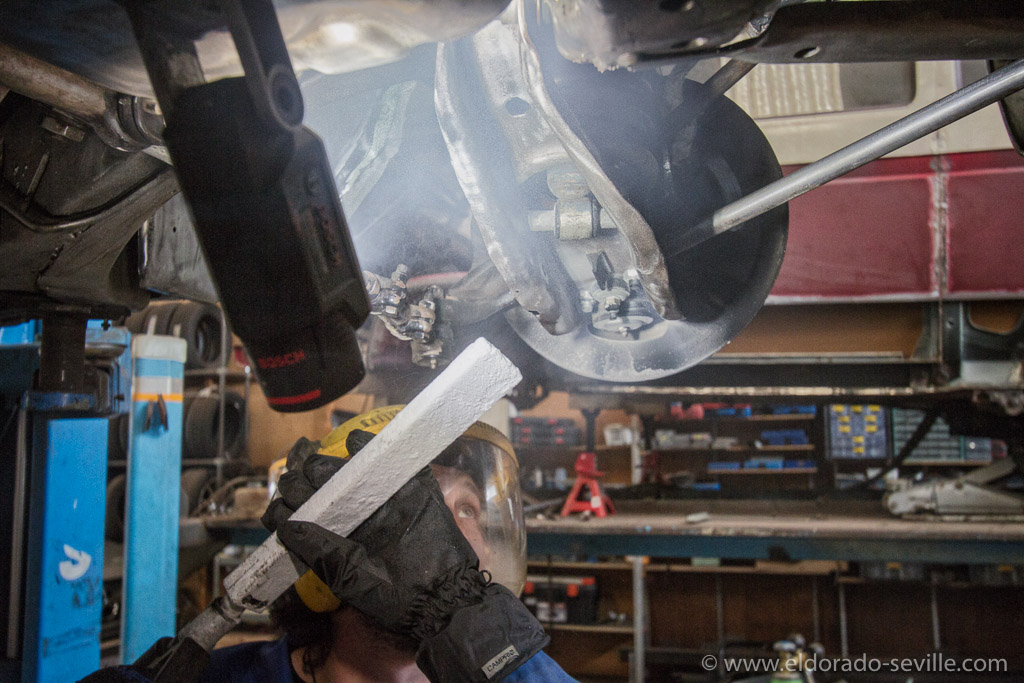
All the suspension parts were perfectly cleaned as well.
FLUSHING THE COOLANT OF THE 74
I first flushed everything with a cooling system flush chemical followed by fresh water and then I put in all new coolant (I used Prestone) and connected the heater core to the system again. Everything came out very clean, so I think that a good flush was already done a short time before I got the car.
It took a while until I got the air out of the system and the new heater core did not work at first. But after about 30 minutes of letting the car idle at about 2.000 rpm, the air was out and the AC finally blew out warm air.
Its great to have heat in the car again.
When I reconnected the heater valve to the heater core I needed a short piece of heater hose. I found perfect reproductions at Fusick - they look exactly like the original GM heater hoses with 5 ribs and are available by the foot. They are not exactly cheap, but perfect replacements if original appearance is important for you. They are also available in the correct size - 5/8 and 3/4. The smaller diameter goes from the heater core to the hot water valve.
By the way - Fusick has exceptional customer service , which impressed me very much. I will definitely buy from them in the future again.

Fusick offers a perfect reproduction of the original ribbed GM heater hoses. The original heater hoses had 5 ribs just like these super nice reproductions.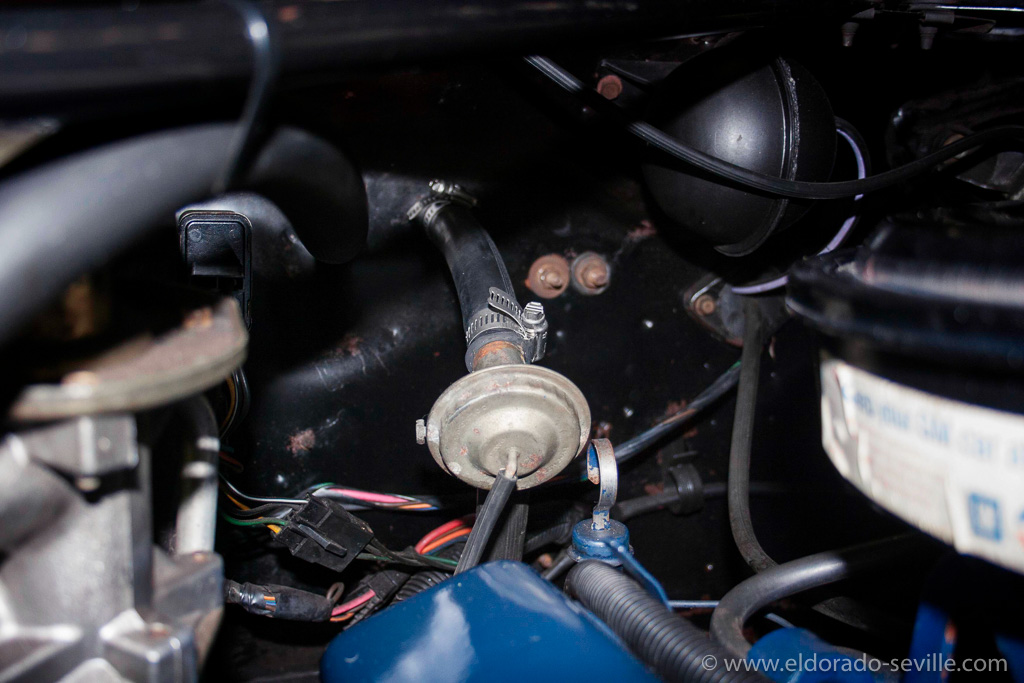
I re-connected the new heater core to the cooling system and used correct reproduction heater hoses to connect the original heater valve which is still working perfectly. The hose clamps are not the correct ones yet. I think there should be tower style hose clamps which I do not have at the moment. There is still an original one on the bottom of the valve and also one on the other heater hose, thats why I´m very sure that the other two clamps should be tower style as well. I have not found a perfect reproduction clamp yet, but I´m still looking…
PAINTING VALVE COVERS
The valve covers still wore their original factory applied Cadillac Blue paint which had suffered quite a bit over the last decades. Thats why I decided that I wanted to freshen them up.
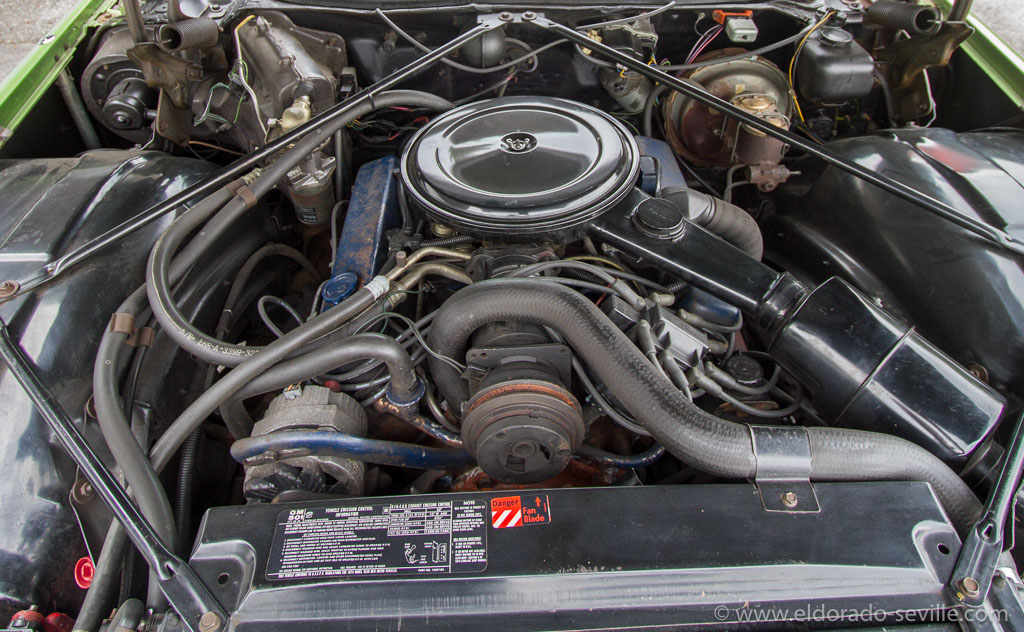
Thats how the engine bay looked like when I got the car.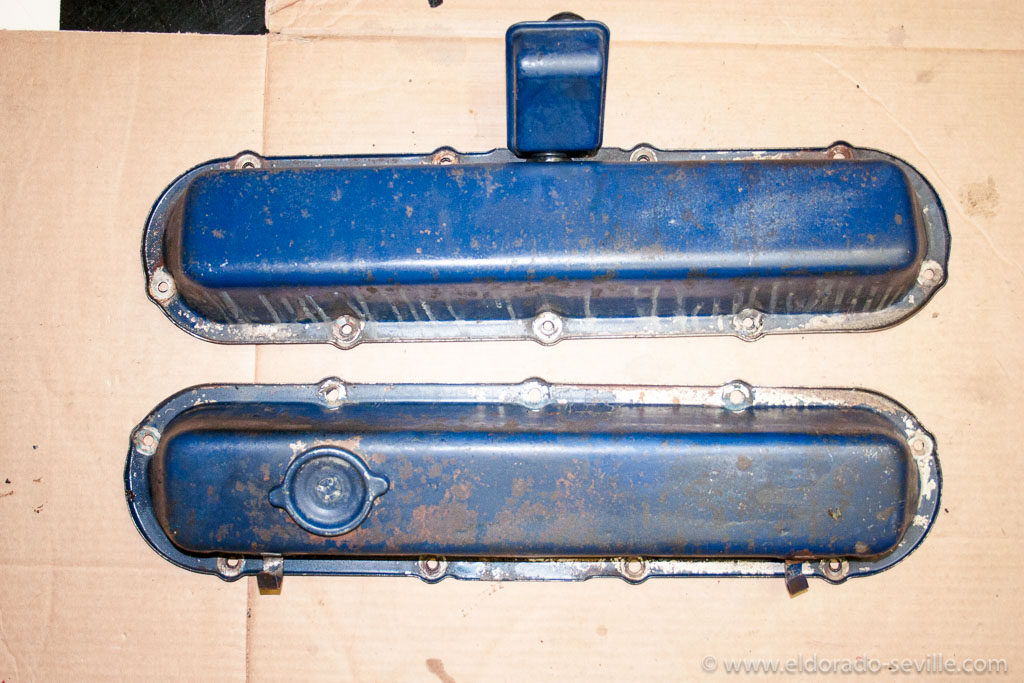
As you can see - the valve covers did not look too nice after all those years…
I bought "Bill Hirsch Engine Enamel" which is the perfect color match among all available engine enamels. Some others are good matches as well, but its said that Bill Hirsch is perfect. Also it seems to be the most durable engine enamel on the market.
The color match is really absolutely spot on. The only "issue" I had, was that the enamel is not exactly easy to work with. I have to admit that I´m not very good in spray painting, so I had to do the covers 4 times until I was happy with them.
I always had some paint runnings or dirt on the covers after spraying on the paint what is of course my fault.
Normally you can wet-sand imperfections out of the paint, but thats not possible with this enamel. You also cant spray over the paint to correct problems as the new paint will eat up the old one and damage it permanently. Its also drying extremely slowly and is extremely soft, so you can get scratches even with a microfiber cloth if you are trying to clean them.
It can take up to 4 months until the enamel is fully cured and hard.
These are things you have to be aware of if you are using this high temperature engine enamel.
I still highly recommend Bill Hirsch Enamel and I would not use anything else on my cars.
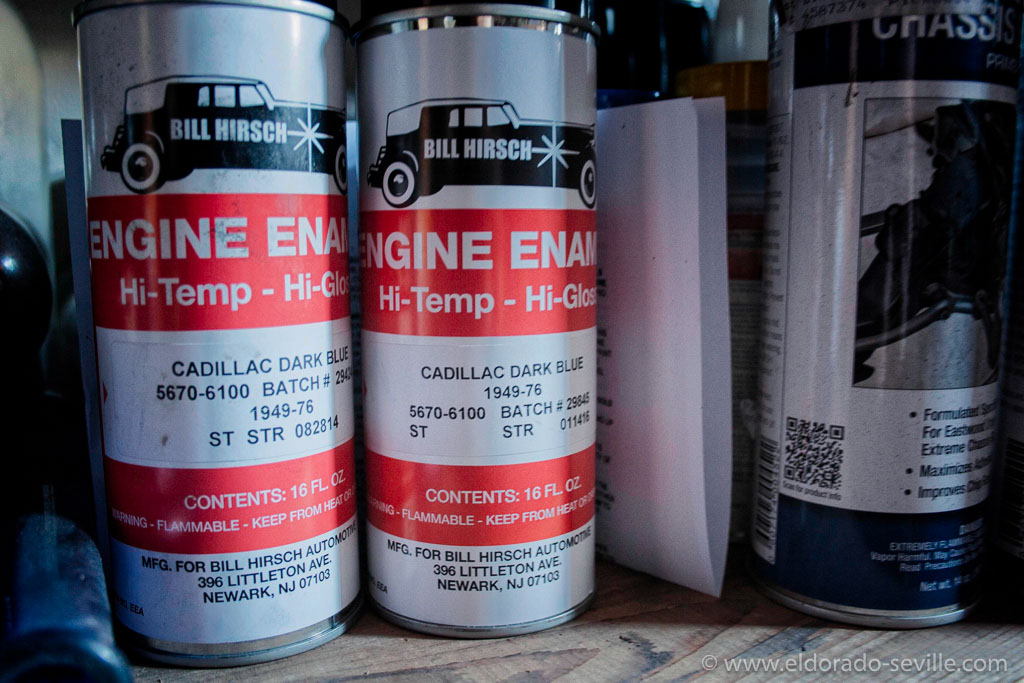
Bill Hirsch Engine Enamel - the perfect color match for the original Cadillac dark blue that was used from 1949 to 1976. Make sure to read the instructions before using this enamel - its quite different to use than other paints…
When I took the covers off my car, I media blasted them, as there was some rust on them where the paint has come off. I then used several coats of filler primer and wet-sanded between coats to fill up the former rust pores. So I got a perfectly smooth surface again.
In the meantime I thoroughly cleaned the surfaces on the rocker arms where the gasket was, to make sure that I would get a good sealing once a new gasket was installed.
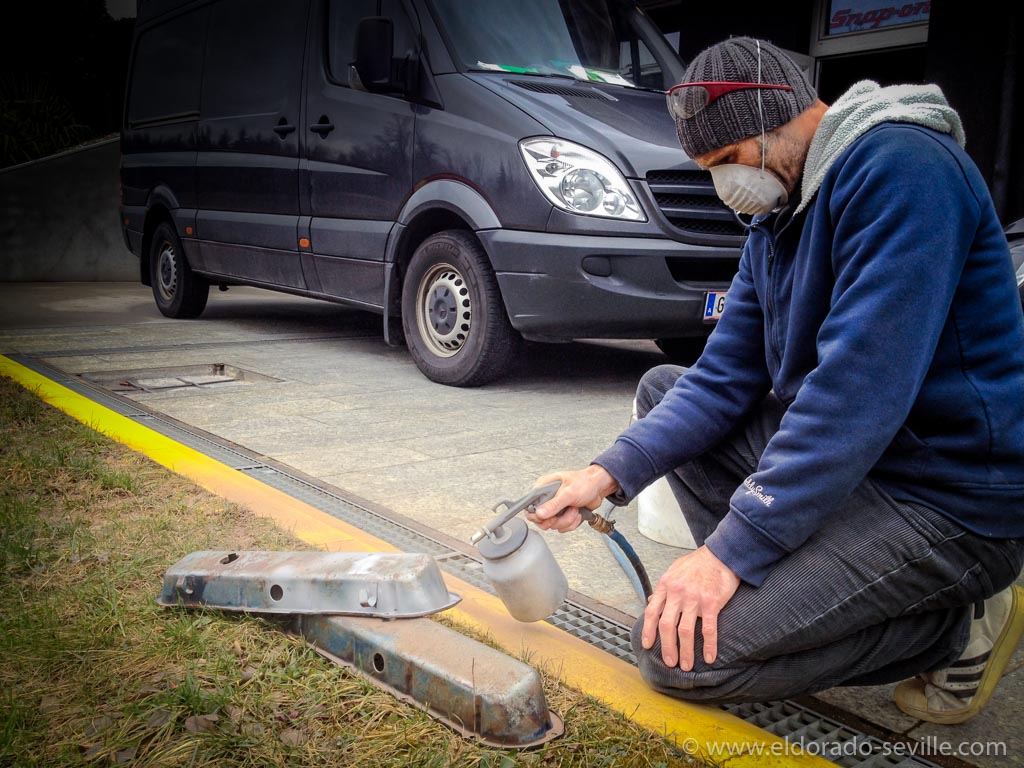
My friend Richard trying to media blast the covers.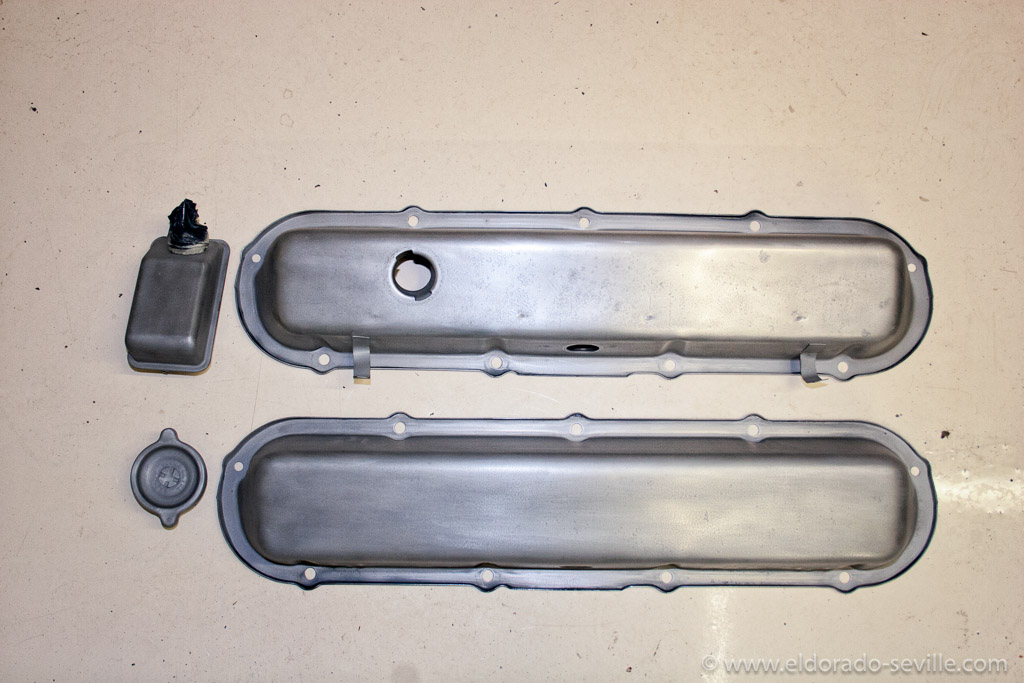
Completely rust free after sandblasting - but one can see where the rust once was…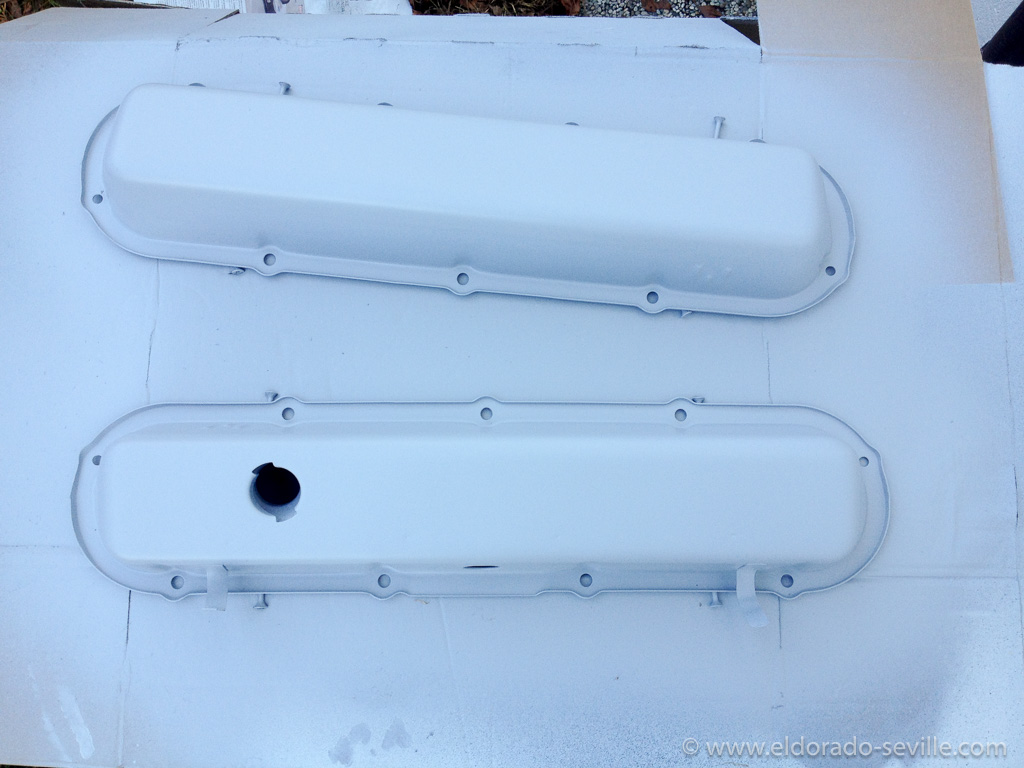
I applied several coats of filler primer and sanded the covers to a perfectly smooth finish.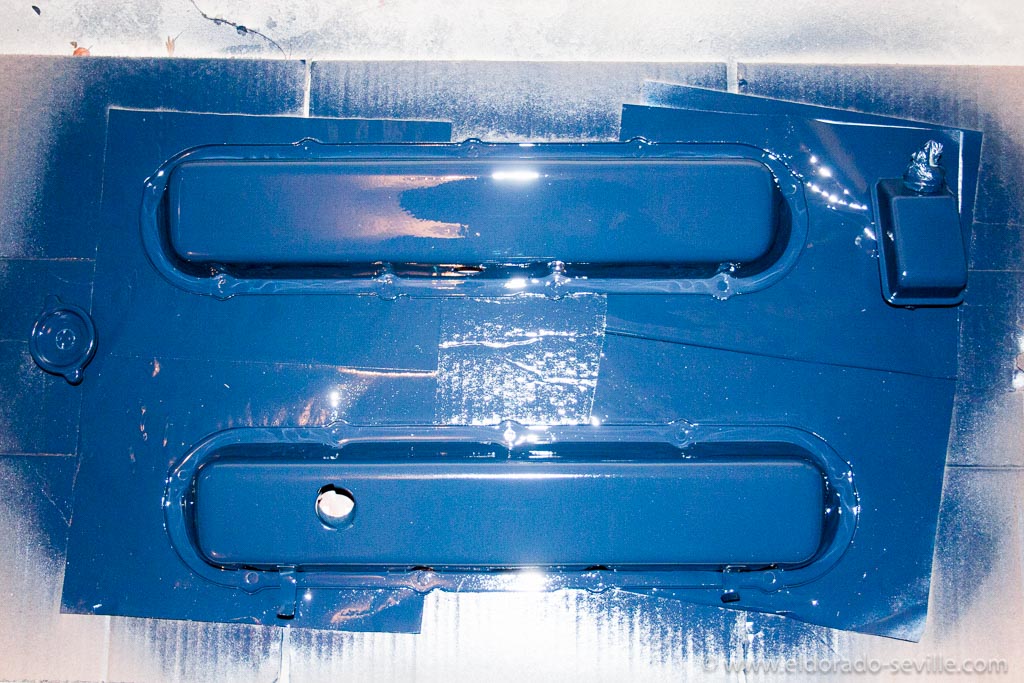
After spraying them with Bill Hirsch Engine Enamel…
After the application of the engine enamel I let the covers dry for 2 weeks before I installed them back into the car. I made sure that the new cork seal was well seated and tightened the screws carefully. You only have to tighten them to 3nm - thats only hand tight. After the first test run they seem to seal perfectly.
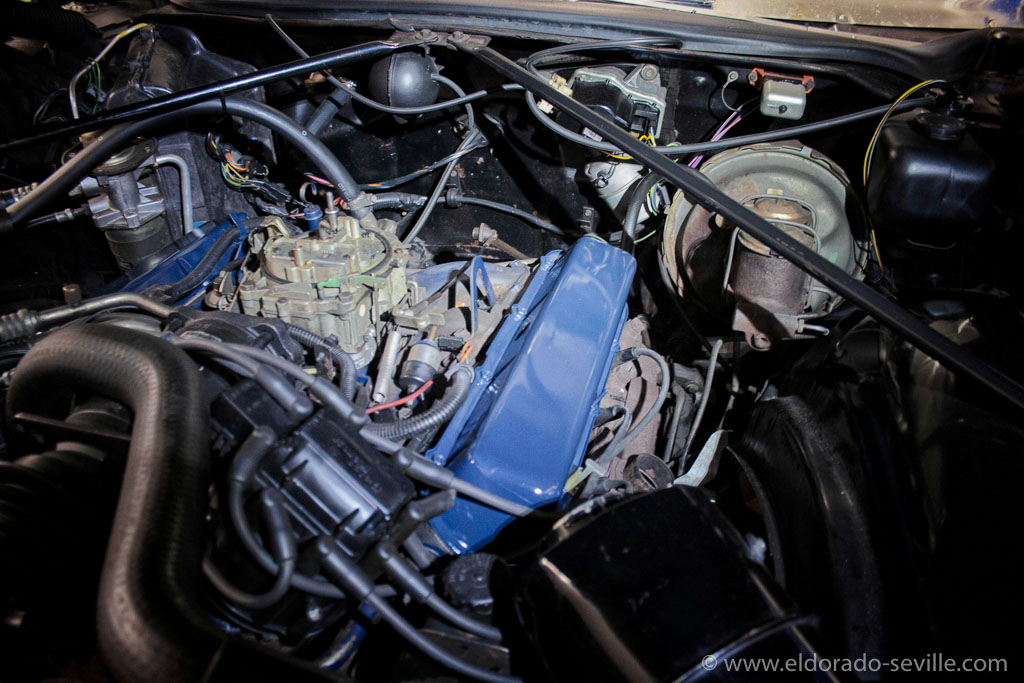
Back in the car.
Back in the car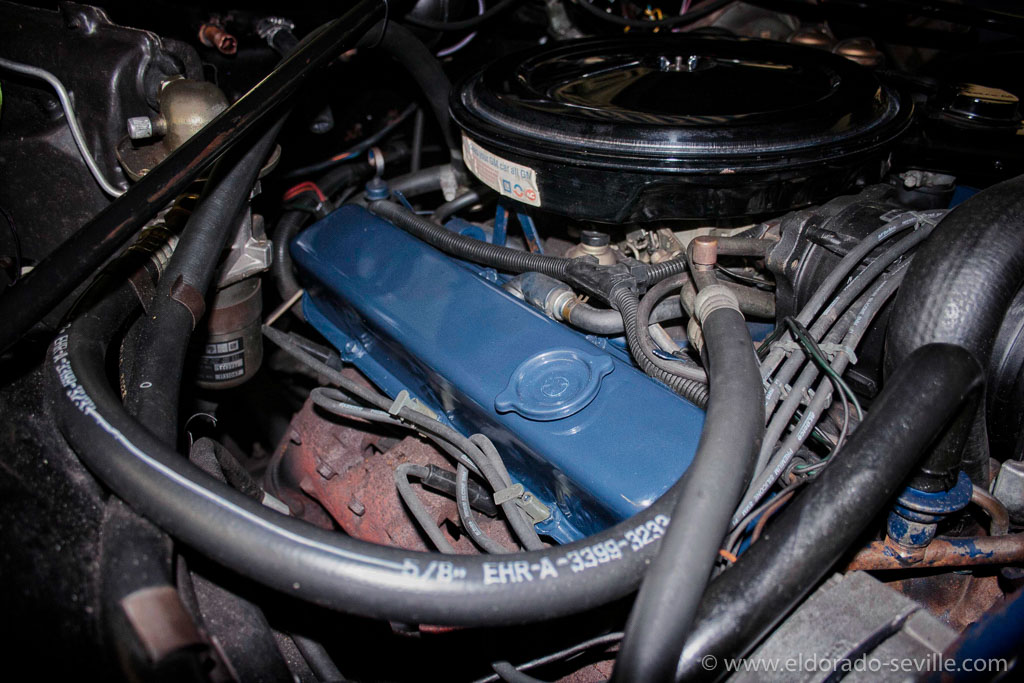
Back in the car - as you can see there are some more areas which could use some fresh paint as well. I will do that later,
1974 CADILLAC SPEAKER REPLACEMENT
I have to repair my radio anyway (see here) as it does not work properly. My friend Steve who is so kind to repair the radio for me already found out that the radio had a defect which caused the speakers to burn through.
So it was clear that I would need new speakers for my car.
In the past I already had to install replacement speakers in most of my cars. I´m always replacing them with replacement speakers from Turnswitch. They do have some really good reproduction speakers which fit perfectly with only minor modifications necessary. I have dealt with them a couple of times and they are always extremely helpful and friendly and their speakers are great. That is why I can truly recommend them and will use them again if I ever need some speakers in the future.
If you have a stereo/tape radio you need their round 3 1/2" speakers with the block cover to be able to reuse the factory mounting clips for the front speakers in the dash.
The mounting ears have to be cut off and the speaker is then held in with the wire clips used on many GM applications.
The cover blocks are the shape of the original magnet structure and go over the magnets for the wire clip. They are made of wood and you have to glue them onto the speaker in the same orientation as the original magnet. Also make sure that polarity is correct - for some reason it's exactly opposite to the original speakers and you have to connect the positive cable (green or blue) to the speaker lead with the red dot. On the original speakers the wires on the front speakers were soldered on - I re-did it with connectors on the new speakers as they are easier to install and to remove with them.
The new front speakers do not have a dust screen on them, so I carefully removed the screen from the original speakers and glued it to the replacements speakers. So they are protected now and it looks factory correct as you could see the missing screen through the speaker grilles on the dash.
To remove the left speaker and install the new one you have to remove the AC hose to get access to the speaker. The speaker cables are relatively short so be careful not to damage them when you pull the speaker out.
For the rear speakers you need their 6x9 speakers which come with a dust screen already installed.
Here you need to do some more modifications as the original speakers have an additional bracket with a bolt, which holds the insulated cardboard cover in the trunk in place. Without this bracket you cant install this cover.
I carefully drilled out the rivet which holds the original bracket in place and also drilled a hole into the metal frame of the new speaker. I then used a small bolt and nut instead of a rivet to install it onto the new speaker. This works really well, but you have to be extremely careful when you drill this hole as you can easily damage the membrane of the speaker underneath if you drill too deep … (I made this mistake when I drilled out the rivet on the old speaker and immediately had a hole in the old membrane…)
The terminals of the rear speakers were connected with a special connector which you can´t reuse with the new speakers unfortunately, so I had to cut the wire and install a supplied connector instead. On the rear speakers you also have to ground the negative terminal to the car. A short ground cable to do this properly is also supplied with the speakers.
Then you can screw the speakers back into the car and connect them.
Here is some more useful info about replacement speakers from the turnkey website:
"Many replacement speakers now sold by the discount stores, auto parts stores and mail order restoration parts houses are labeled as "4 to 8 ohm compatible" and are in fact 4 ohm speakers. These speakers can damage the older transistor radios. 4 ohm speakers will measure around 3.2 ohms with a DC ohmmeter. An 8 - 10 ohm speaker will measure around 7.4 ohms with a DC ohmmeter. The DC resistance is the critical number for the Delco radios as the output transistor is in series with the speaker. A properly operating Delco radio should have 1.5 volts DC across the speaker voice coil. A 4 ohm speaker will draw twice the current of an 8 ohm and cause the amplifier transistor (the half dollar size device mounted to the black finned heat sink on the back of a Delco radio) to run very hot. The speaker cone should be displaced in an upward (away from the magnet) direction about 1/8" when a Delco radio is turned on. If the cone moves down toward the magnet, the speaker leads need to be reversed".
I´m looking forward to installing the hopefully eventually repaired radio into the car and to test the sound of the new speakers. They should normally sound a little better than the original ones.
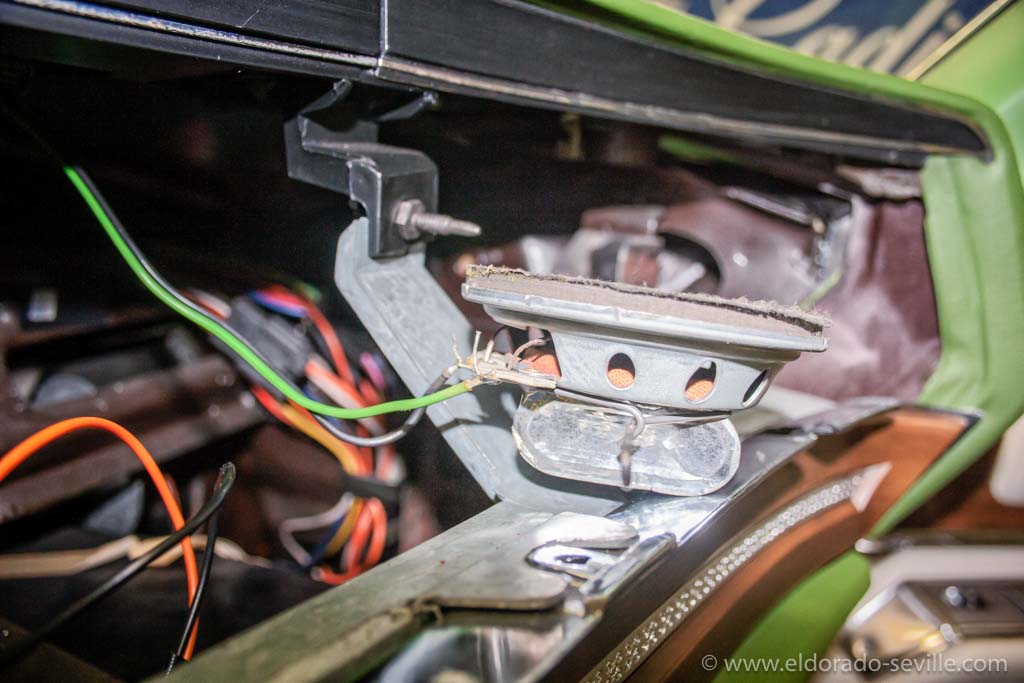
The original right front speaker unclipped from the car.
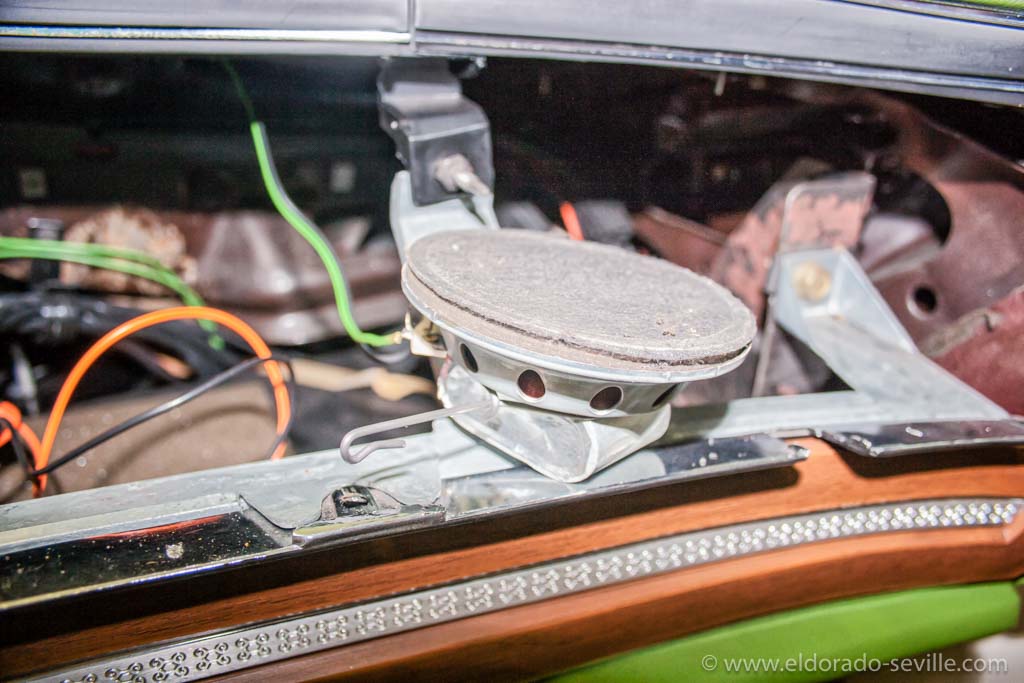
The original right front speaker unclipped from the car. Here you can see the original dust screen which you will have to reuse with the front speakers.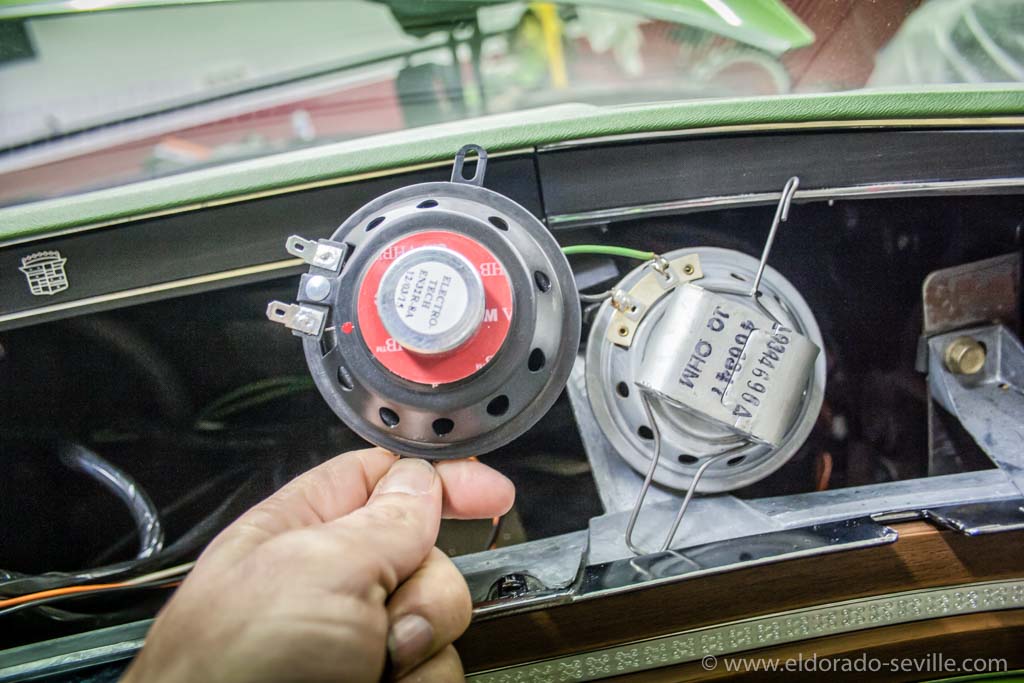
The replacement and the original speaker, as you can see the magnet looks different and you have to cut off the mounting ears.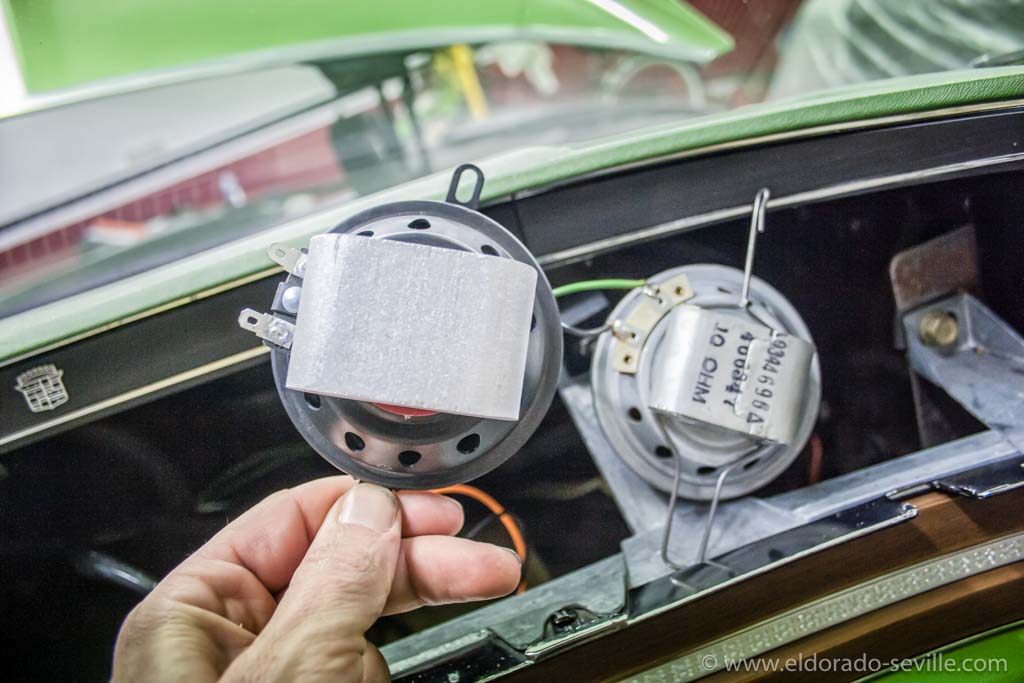
The replacement speaker with the cover block installed. You have to order it separately for your Cadillac.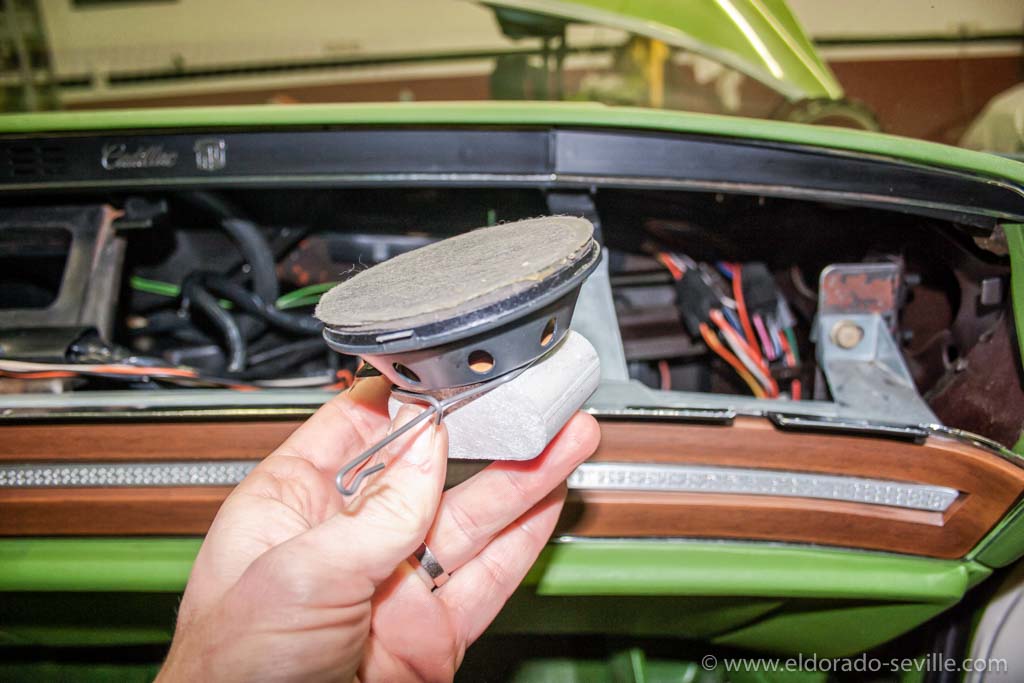
The replacement speaker with the old dust screen installed.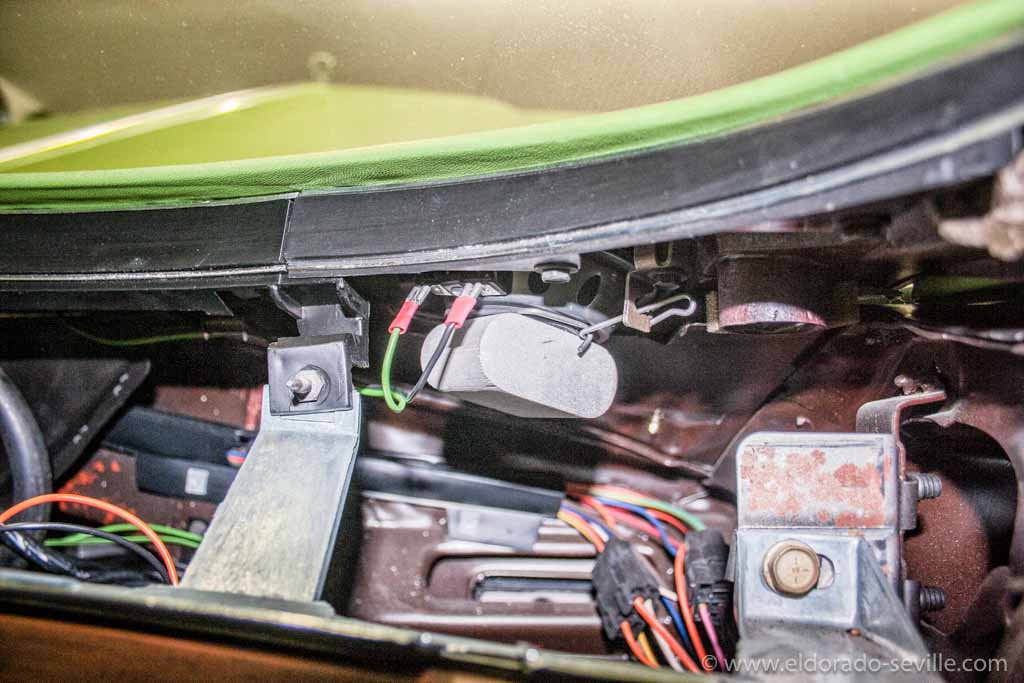
The new speaker back in the car with the supplied connectors.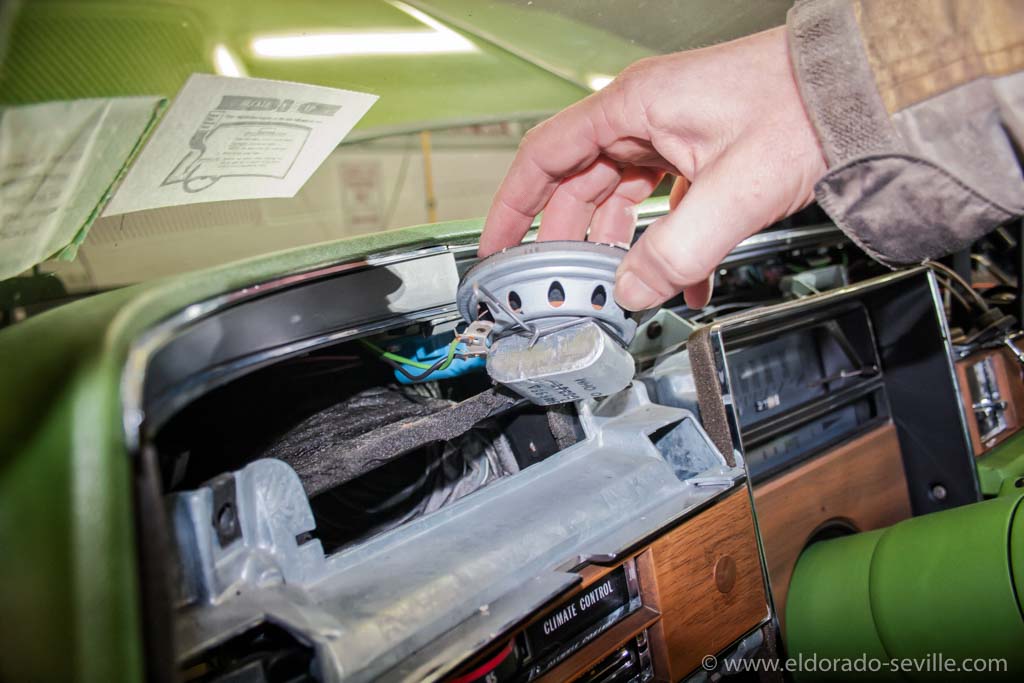
The original left speaker removed - you have to remove the AC hose to get to it.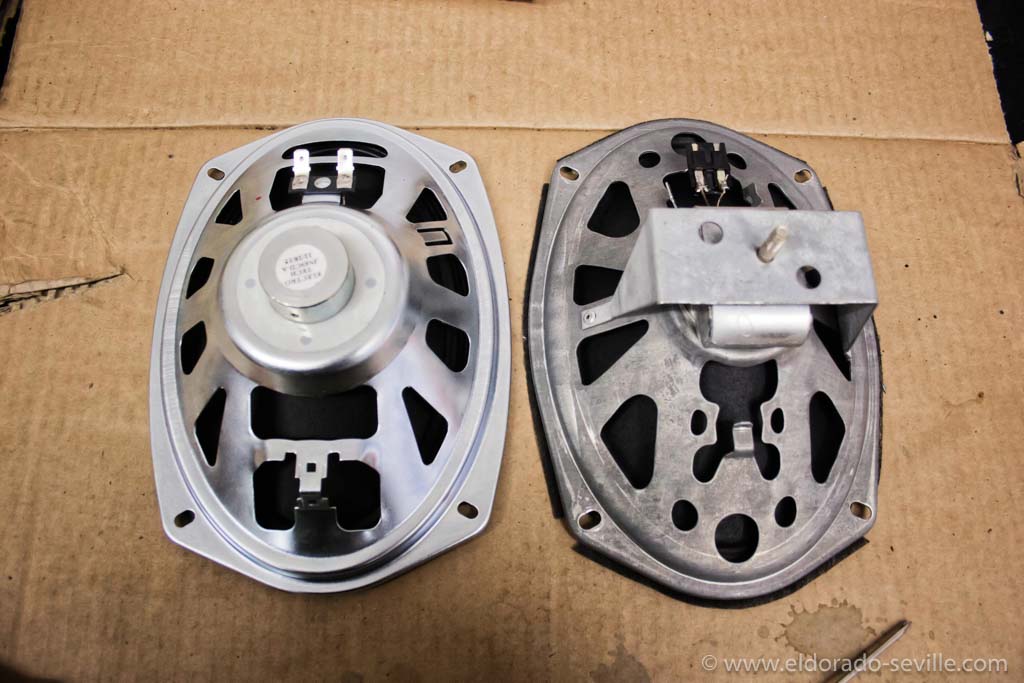
The replacement 6x9 speaker and the factory installed original speaker. Note the bracket - you have to move it to the new speaker and install it there.
The replacement 6x9 speaker and the factory installed original speaker. Note the bracket - you have to move it to the new speaker and install it there.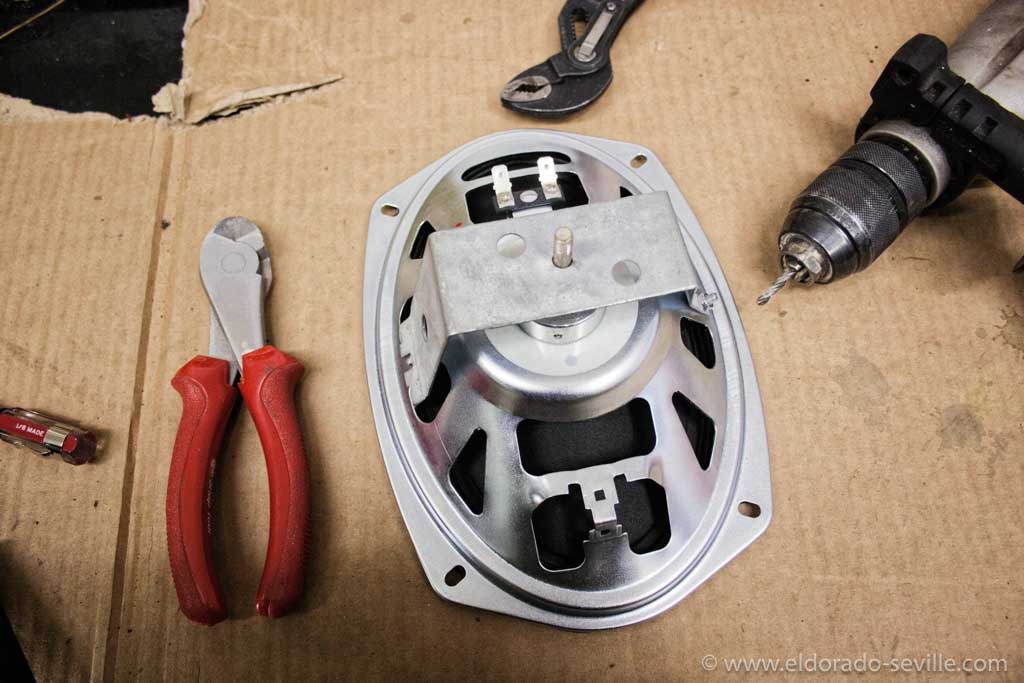
I drilled out the rivet to be able to remove the bracket. Be extremely careful when you drill it out!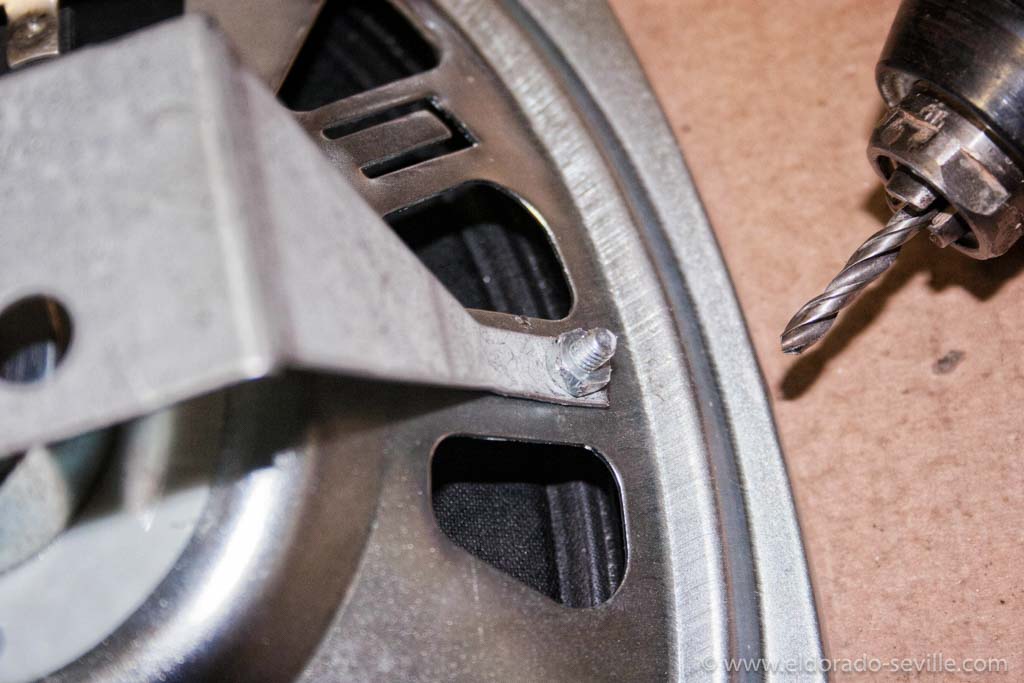
Instead of the original rivet I used a short bolt to install the bracket to the new speaker.
1974 CADILLAC FRONT BUMPER ENDS REPLACEMENT
To remove and to install them you only have to remove two nuts at each bumper. You can reach the one on top from the top of the grille. To get to the other one you have to remove the center splash guard in front of the radiator. You only have to loosen two clips and put the rubber away to get access to the two remaining nuts.
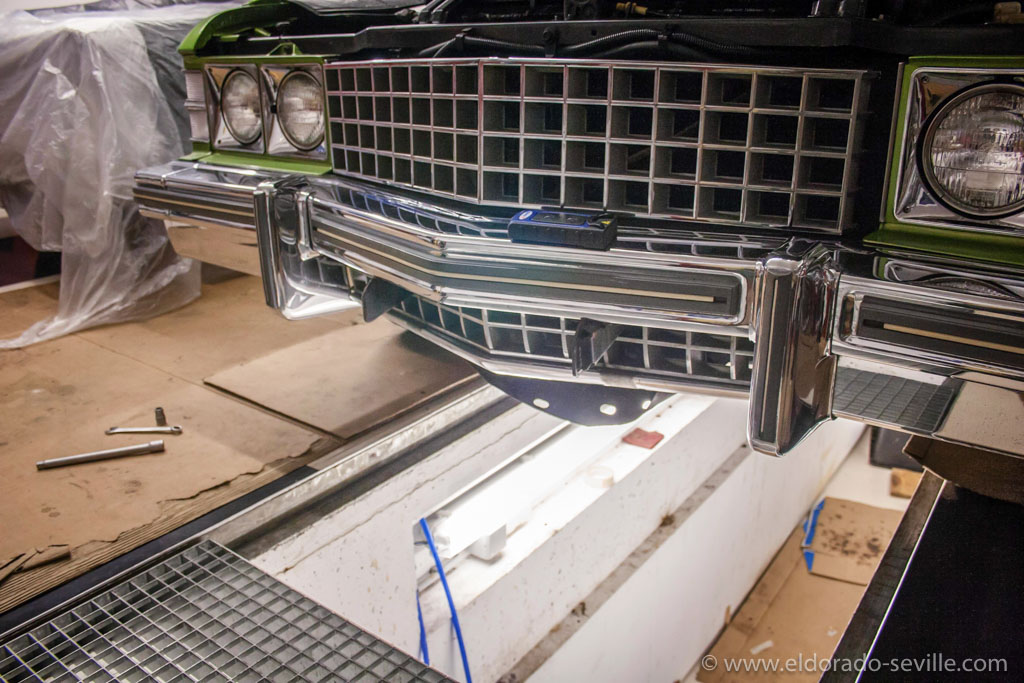
Here I have already removed the original center bumper ends.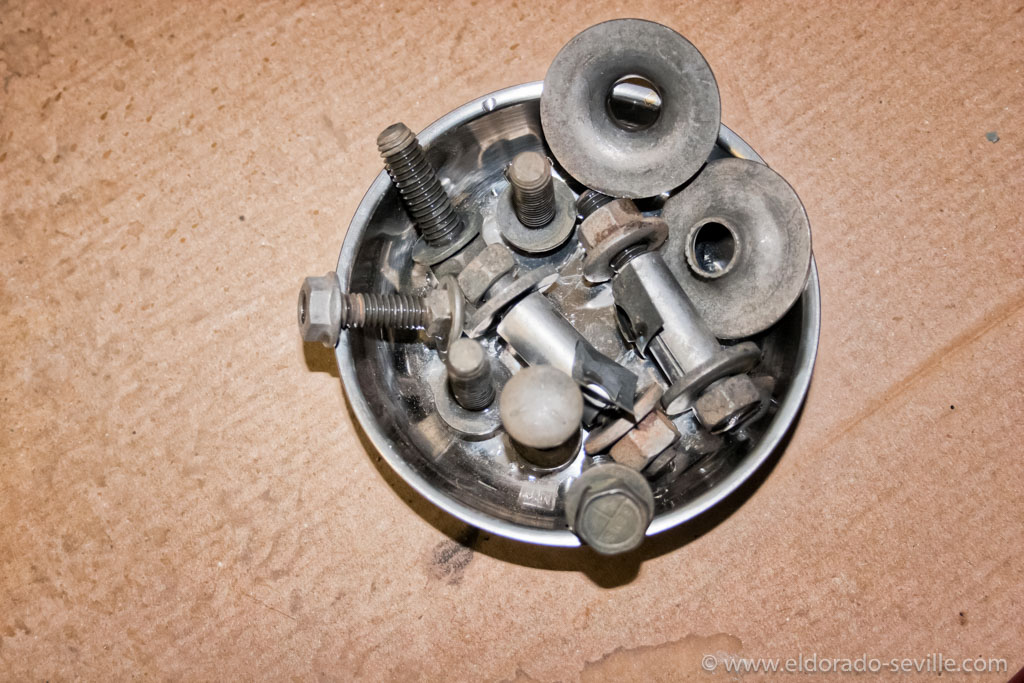
I cleaned the rusty hardware before I put it back together.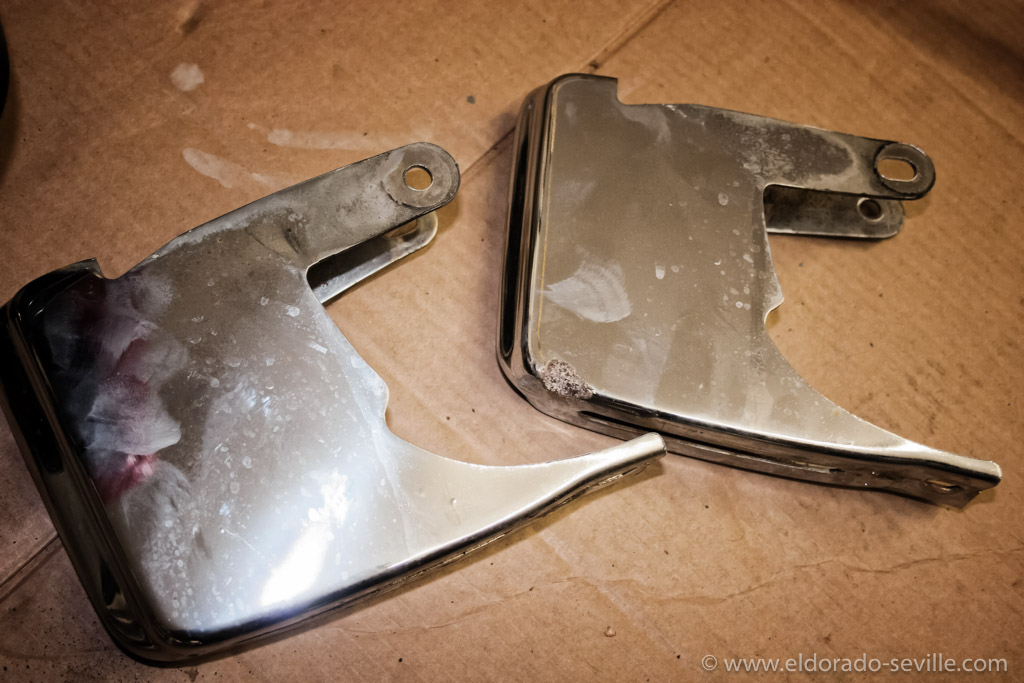
The old bumpers removed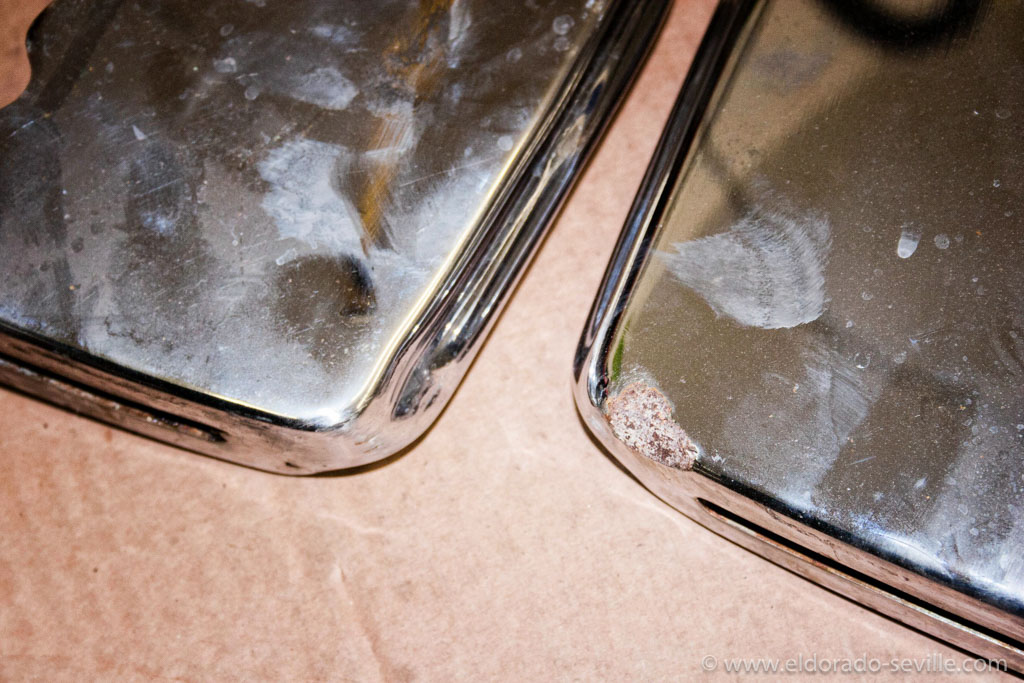
One of the bumpers had deep scratches and the other one was bent and had some dents.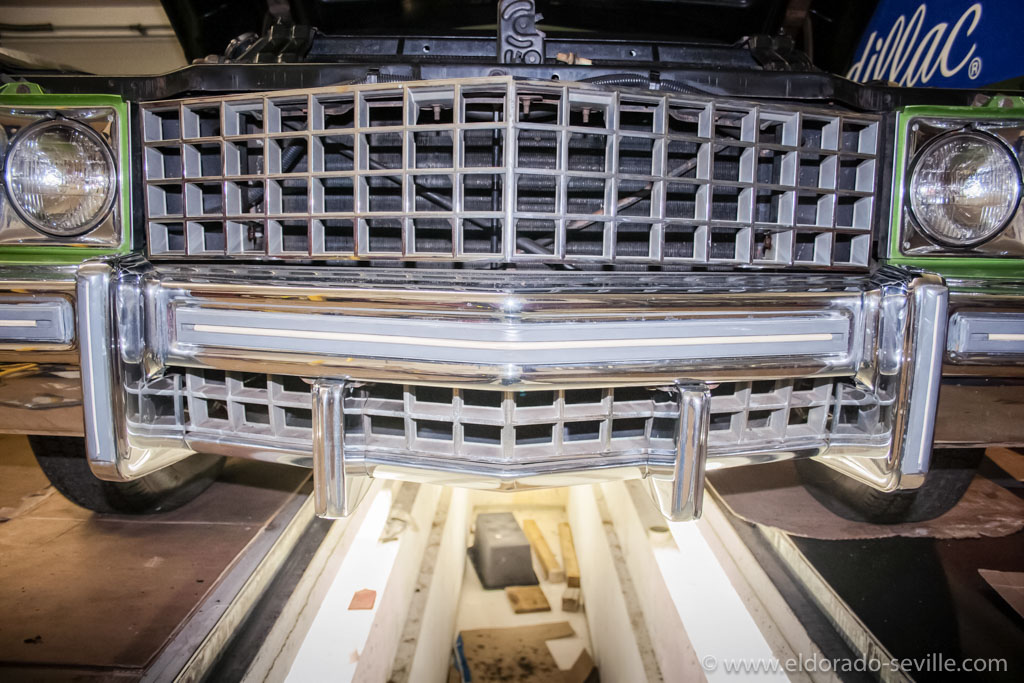
The "new" bumpers in place.
1974 CADILLAC DIGITAL ROTARY DRUM CLOCK REPAIR AND SERVICE
The clock still works on warm summer days or when the heat is on, but it can get stuck from time to time and does not work on colder days at all.
Its a clear sign that it needs a good cleaning and some fresh oil. My guess is that it was never serviced as the car is a low mileage beauty which was stored for longer periods of time.
While I have successfully brought some regular clocks from 1958 to 1967 back to life in the past , I have never worked on a digital rotating drum clock before, and somehow I can't find any information on the internet about it...
I have already showed it to the clockmaker in my town and asked if he could service it, but he did not even want to touch it...
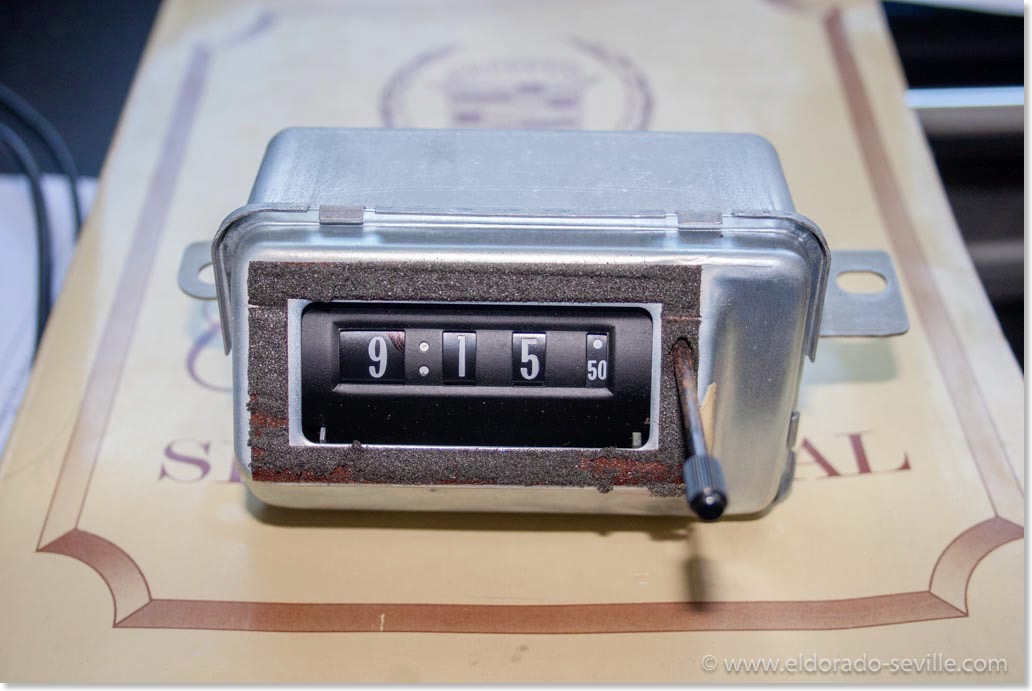
The removed clock out of my 74.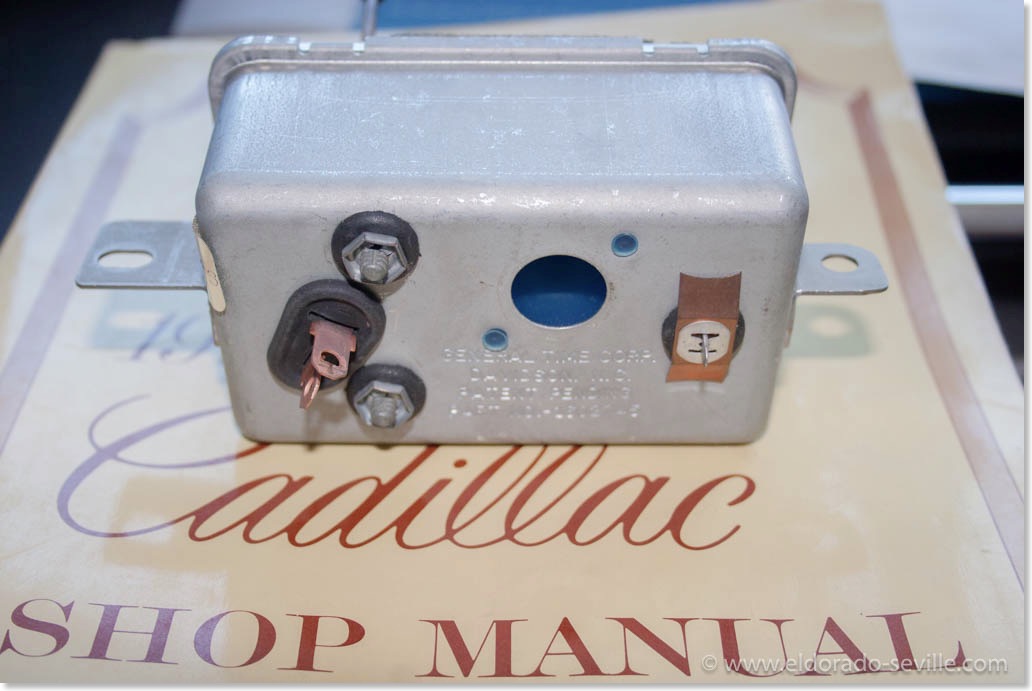
The 1974 Cadillac clocks were produced by General Time Corp. They were used up to 1978, but 1978 had different connectors on the back.
I contacted the excellent Cadillac La Salle Club forum and got valuable tips on how these clocks can be serviced by oneself.
Unfortunately these tips came a little late as I had already sent out the clock to a professional clock restorer in the USA. A company called "The Clockworks" will do the service for me. I cant wait to get the clock back hopefully by the end of February 2016.
Nevertheless here are the instructions on how the clock could be repaired by user "Aprules2" who was so kind to take pictures and upload them to the CLC forum:
All pictures and description © Aprules2
"OK, I finally got around to getting some pictures for you. The clock is super simple, nothing like what you're used to. I apologize that its dirty I apparently took it apart, cleaned and oiled it and never put it back together and it sat in my tool box all this time.So this is a picture of the front of the clock - this part wont come off.
Once this case is open you'll be able to see this. This is the black cover that protects the clock motor. Just carefully get under that silver ring and work it off so you can remove the cover.
Now you'll be looking at this that thin round piece standing in the middle is what I was calling the little record - thats actually the armature of the motor. Try not to get any oil on it but it's not the end of the world if you do. Just drip some on the ends of the shaft it rides on and put a bunch on any gear you see including the one on the end of the shaft the record rides on. If you do get oil on the armature just wipe it carefully with a q tip with rubbing alcohol on it.
Heres another shot of the motor that round brown part is what I called the record.
Make sure to really oil these gears you want to try and get oil on every tooth you see. This isn't like the old school mechanical clocks that wont run right with too much oil. These seem to run better when oiled.
Heres the back side of the clock put a liberal amount of oil between each reel, and you'll notice the real with the seconds on it has a gear built into it try to oil all those teeth too. Sometimes once it's running Ill dribble some on while it rotates.
Once you've done all that plug it in with it still apart. If it doesn't start instantly, give the clock a slight shake or GENTLY roll the record just to get it started, it should start spinning and your clock will now keep time. I usually leave it to run all night, and if it stops in the middle of the night I add some oil and restart it. Im pretty sure it's the same issue as most old mechanical clocks and watches the oil dries up and becomes sticky and because the motor has very little torque it cant keep the clock running. But adding the slot car oil loosens it up, its just got to migrate through all the friction points. So it's not uncommon to have it stop 2 or 3 times, before it starts running reliably, which is why I like to bench test them. "
Thank you Aprules2 for this great description - whenever I need to service another clock like this in the future I will definitely do it myself.
REMOVING AND REPLACING THE 1974 CADILLAC HEATER CORE
There could have been 3 possible scenarios why it was disconnected:
- The heater core is leaking
- The heater core is blocked
- The heat could not be turned off in the heating system due to a problem in the ATC
Most probably the core is leaking on such old cars. So I had ordered a new core a while ago, but I never really wanted to tackle this job as it needs quite a bit of effort to get it done and it is not a very funny job. It's not that technically challenging but very tedious. I finally bit the bullet and decided to finally do it.
You can normally detect a defective heater core by fog build up inside the car and by the smell of coolant.
I studied the shop manual and started to tear the dash apart to get access to the heater box which houses the heater core.
I found out that the shop manual lists a lot of necessary work and does not show all the screws that you have to remove to get the box out. Some of the screws are very well hidden and finding them was the most frustrating part of this job.
Here is how to remove the heater core: (text in black is from the shop manual - my remarks are in green)
First you have to remove the Instrument Panel Pad
Removal of Instrument Panel Pad
- Disconnect negative battery cable.
- Remove three climate control outlet grilles - right, left and right center (see picture below on how it is done with a special tool - I just did it with two flat screwdrivers)
- Working through outlet openings, remove 3 fasteners securing pad to instrument panel support.
- Remove screws securing pad to instrument panel horizontal support.
- Pull pad outward and disconnect electrical connector from windshield wiper switch.
- Remove pad.
Heater Case Removal
- Drain radiator. (not necessary if you just clamp the hoses off, but flushing the system never can hurt)
- Remove hoses from heater core nipples and plug nipples to prevent spilling coolant remaining in core. (Thats indeed extremely important as you have to move the heater case around and it would definitely spill any remains of coolant on your carpet. Also make sure that there are no traces of leaked coolant underneath the carpet from the bad core.)
- Remove instrument panel pad. (As described in the chapter above.)
- Remove center A/C outlet support and connector from position between cowl and horizontal support, Fig. 1-36. (Scroll down to see the illustration, You basically only have to unhook the rubber part of the outlet and push it downwards.)
- Remove left A/C outlet hose from A/C distributor. (There are some steel clips inside the tube where it is mounted to the plastic distributor. You have to reach in and unclip them to be able to remove the hose without using a lot of force and maybe damaging it. See the picture where I put my arm into the opening below.)
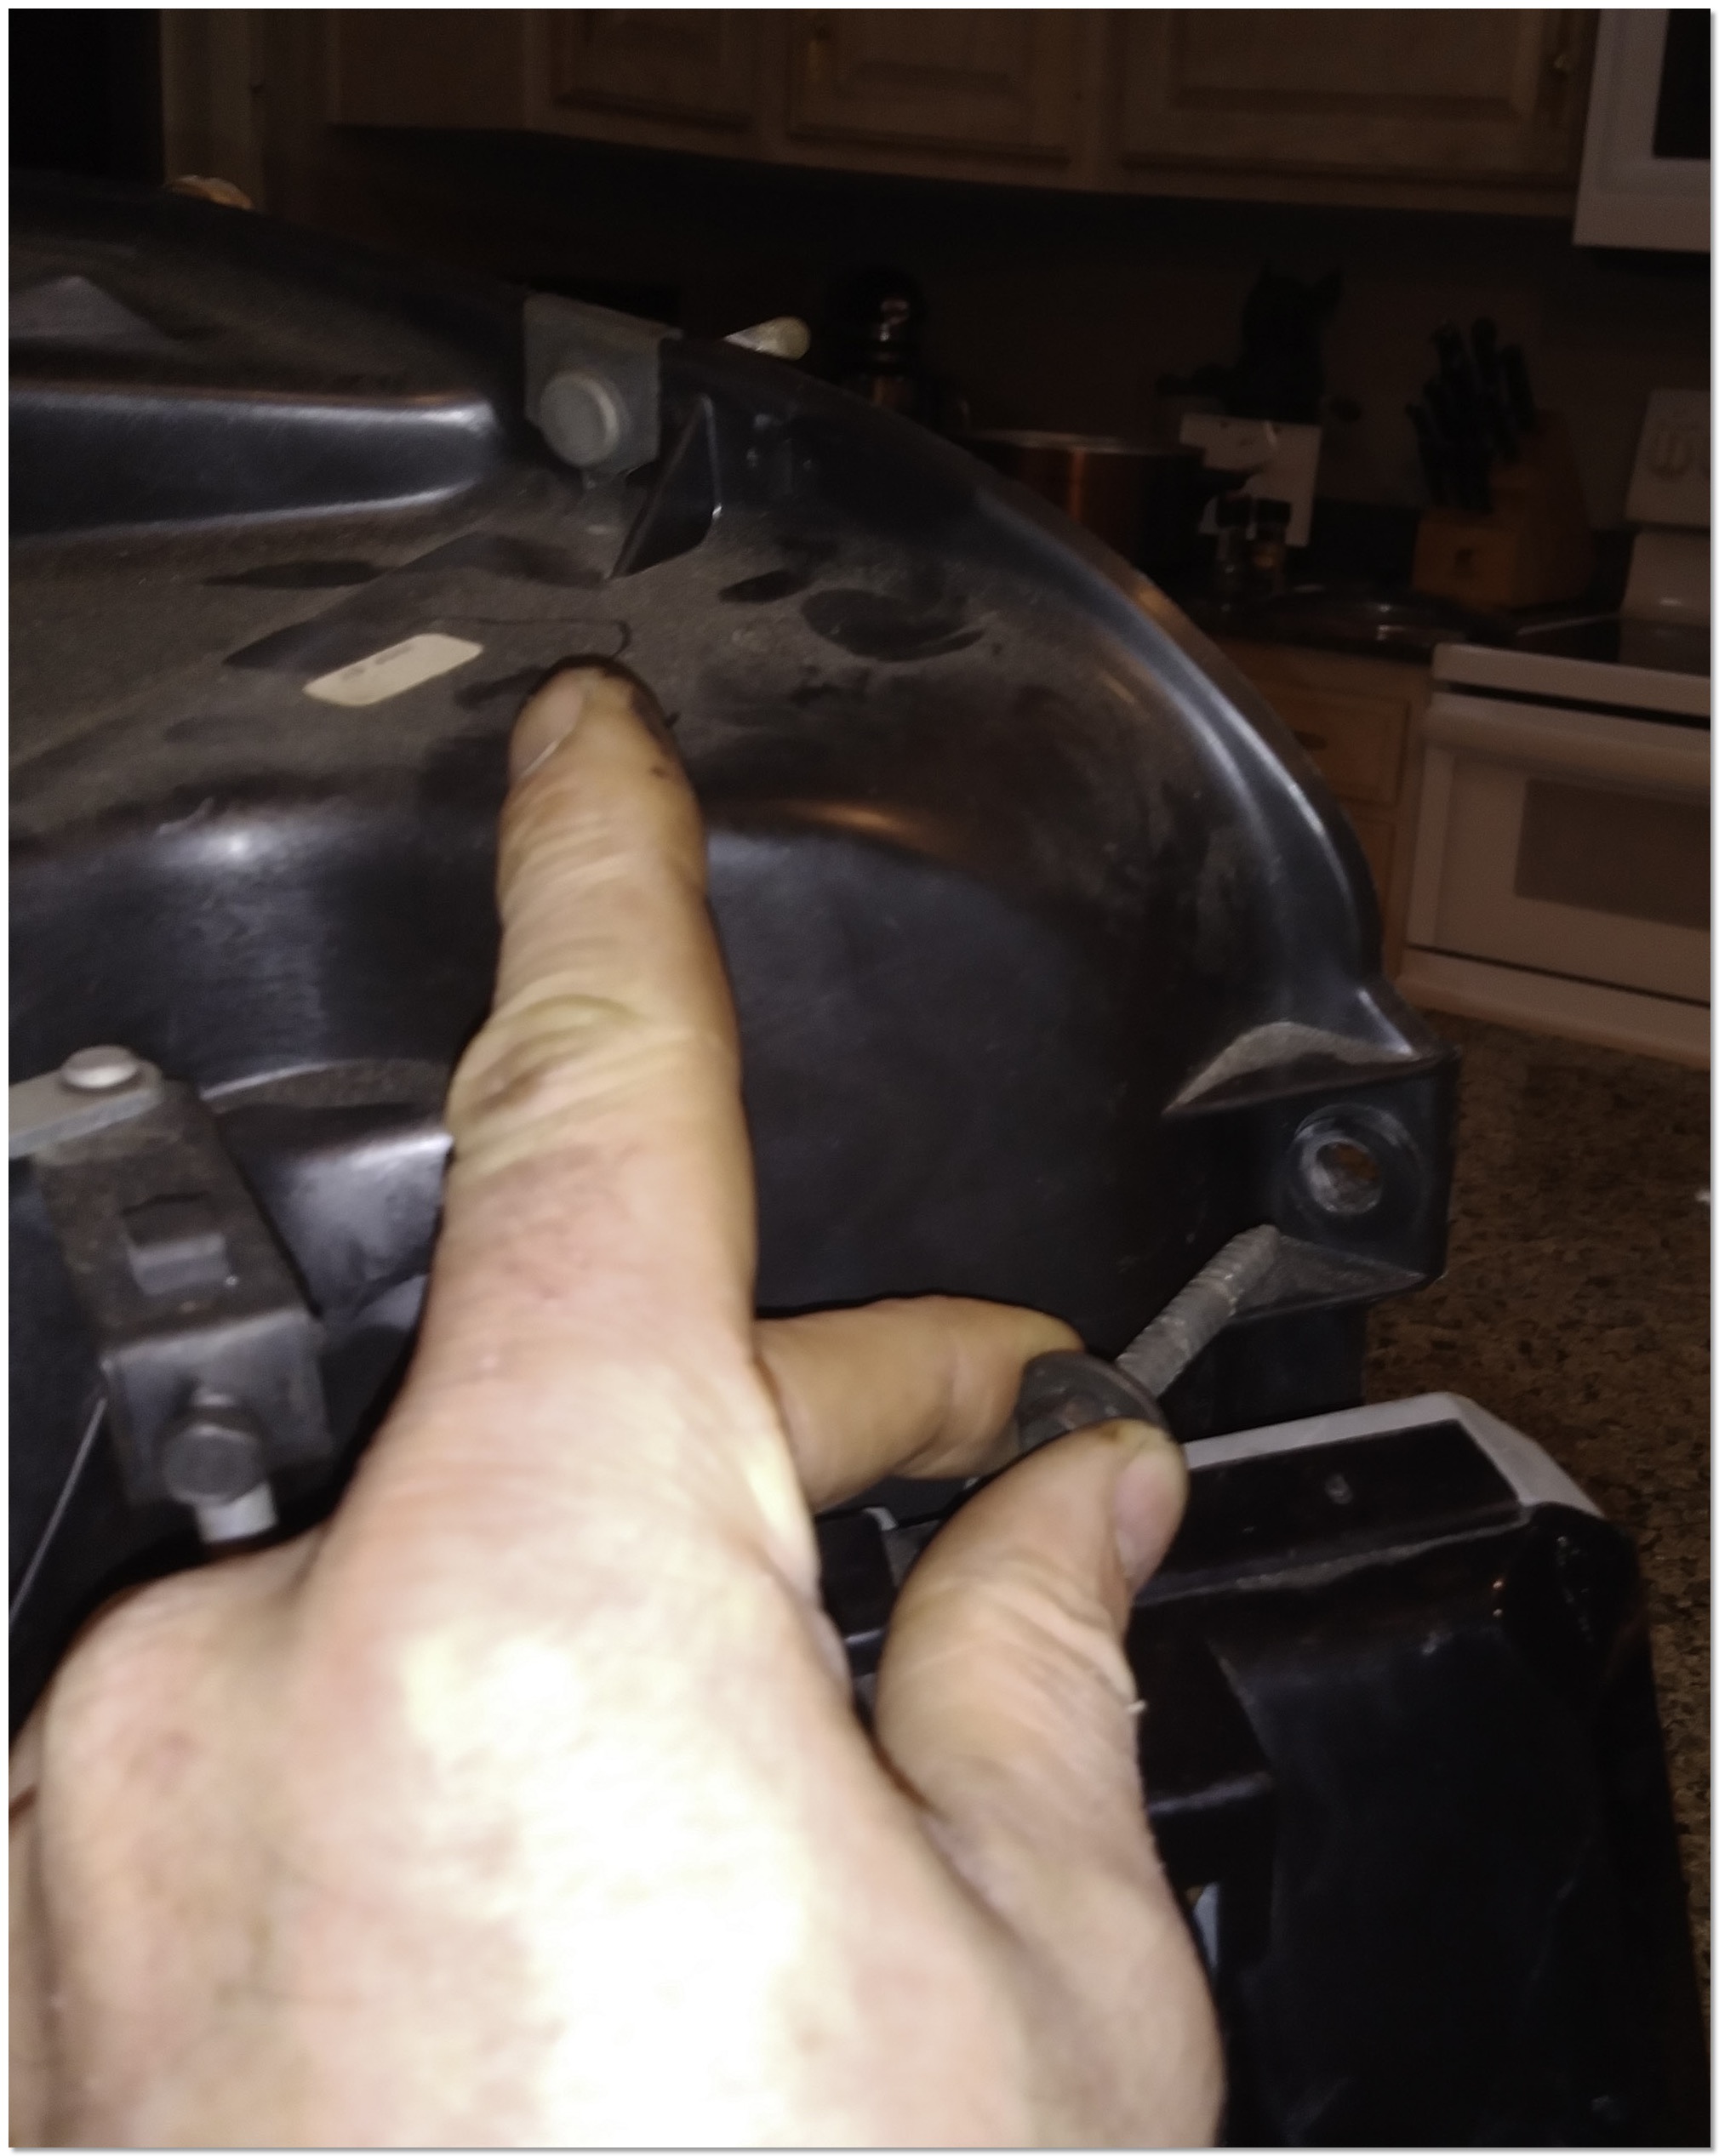
- Remove center support and associated braces as shown in Fig. 1-36. ( I can´t see any reason why this should be done - I removed only one of the braces, and it was completely unnecessary. You only have to remove the round bent brace on the bottom of the heater case as its in the way to get it out - see the picture where I am unscrewing it below.)
- Remove two screws securing A/C distributor to heater case and remove distributor, Fig. 1-36. (If you did not remove the braces mentioned above like I did, you can´t get this part out. I just put it to the side where the glove box normally is, which you will also have to remove anyways - see later.)
- Remove one screw securing defroster nozzle and remove nozzle. (You have to remove the screw - but leave the nozzle in place. There is no whatsoever reason to take it out. And its also impossible to get out if you did not remove ALL the braces and brackets.)
- Remove glove compartment liner. (Its self explanatory - just remove all the philips screws you see inside.)
- Remove vacuum and electrical connectors from programmer. (You can do this now through the glove box opening.)
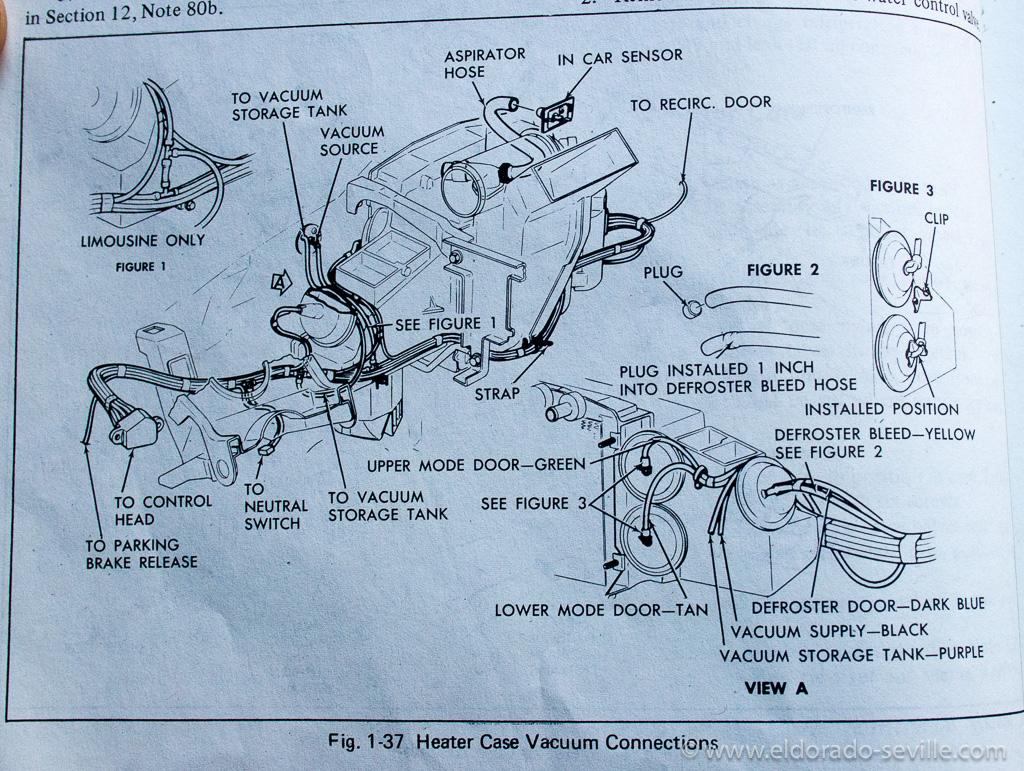
- Disconnect vacuum hose from recirc door actuator (Orange - near the right door kick panel.) , defroster door actuator (You can see it on the left side of the heater box with a blue and a yellow hose going into it.), mode door actuator (There is no way you can remove these hoses now, as they are on the back of the heater case. The upper mode door is green and the lower one is tan. You can really only remove them once the entire box comes out.) and position vacuum harness out of way, Fig. 1-37.
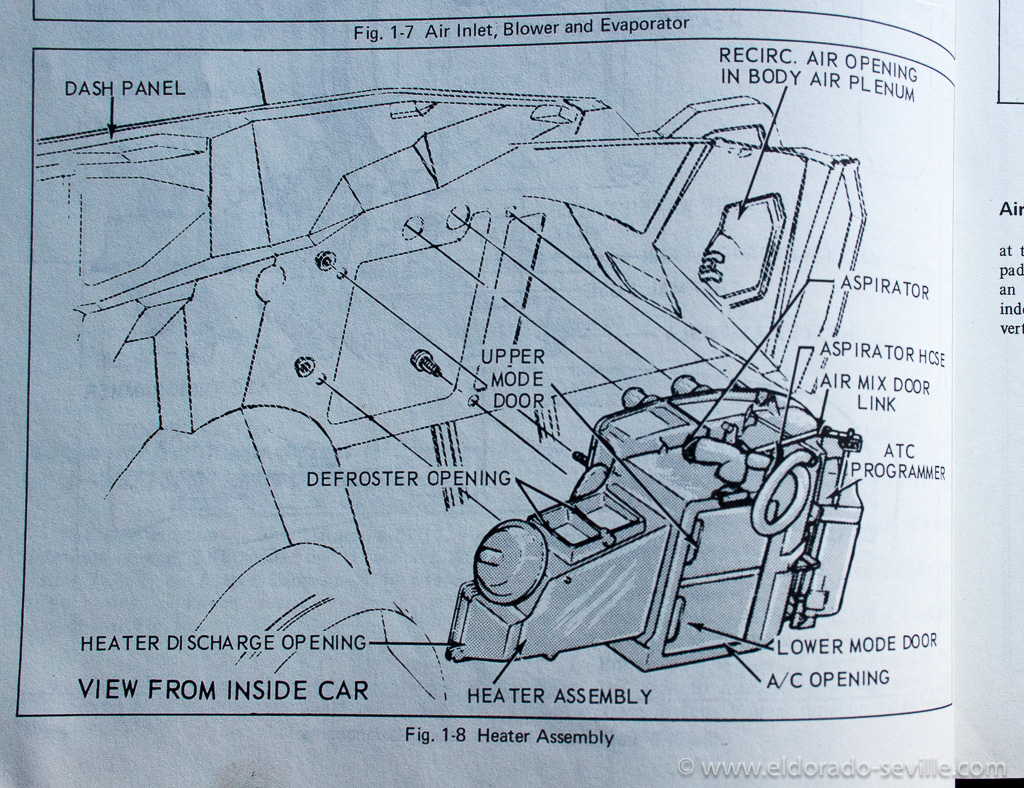
- Disconnect aspirator hose from in car sensor. (The thick black hose on top of the heater box)
- Remove three nuts and one screw securing heater case to cowl on engine side of cowl, Fig. 1-8. (It was the most tricky part for me to find these screws. See my picture below where I have marked the location of the screws as seen from the engine bay.)
- Remove heater case from position under instrument panel .(See picture how you have to position it to get it out - remove the two vacuum hoses mentioned before on the back now. Be careful - they are attached with metal clips)
- Replace heater core. (Only 2 screws - self explanatory - also re-use the rubber seals from your old core around the water nipples.)
You can then put everything back together which should be much faster, but before you could also remove the clock, which is very easily accessible now and clean and lubricate it (the shop manual recommends to do this every 2 years). You also have access to all the dash lights, tell tale and warning lights and to the speakers (which are shot on my car due to a defect in the amplifier in my radio) while everything is apart. While I had the heater box out of the car I also cleaned the inside of the programmer and re-lubricated it with white lithium grease. I used electronic cleaner to clean the electric contacts inside the programmer while it was open, as most probably the contacts will have some oxidation on your car as well. While the heater box is out you can also lubricate the various doors and clean out all the dust which has collected inside the box over the last decades.
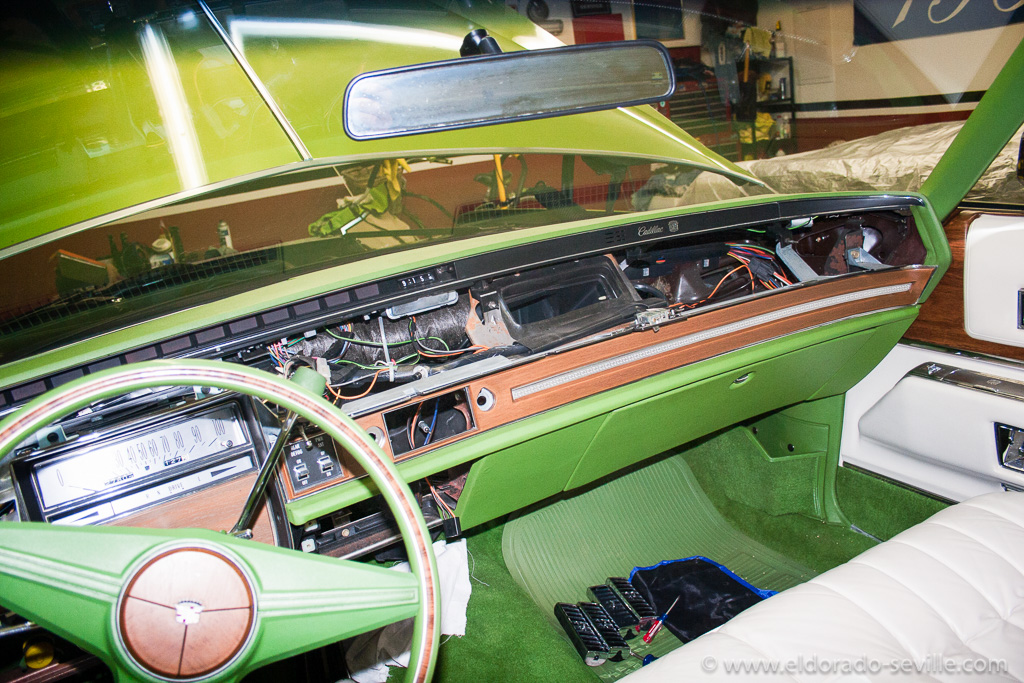
The dash removed. The radio is also out for repair.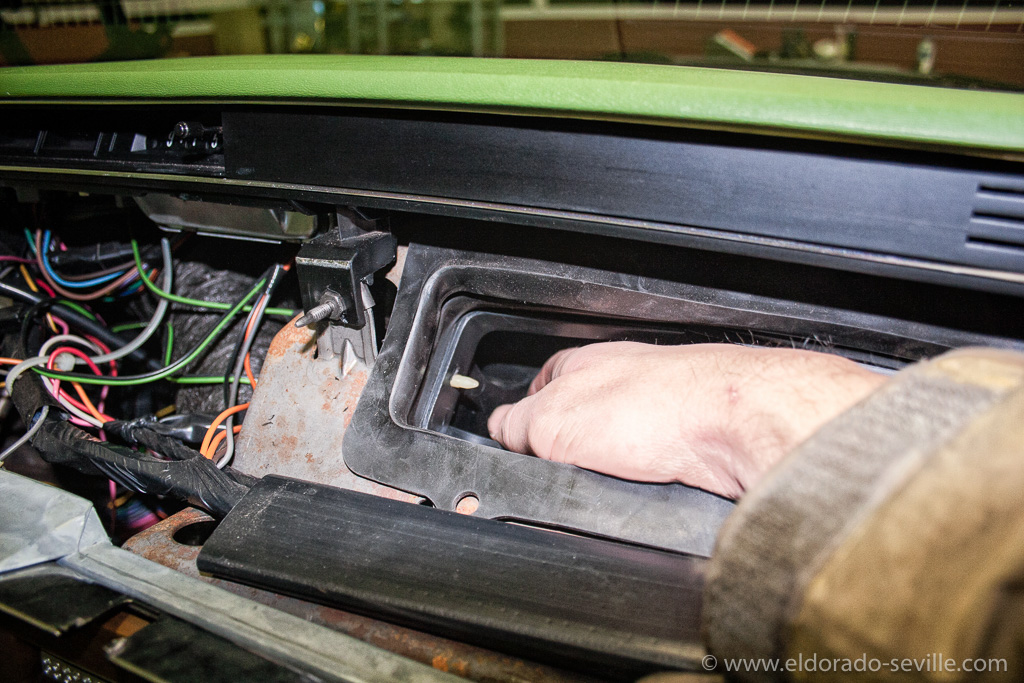
There are metal clips inside holding the left A/C hose in place. You have to reach in and unclip them.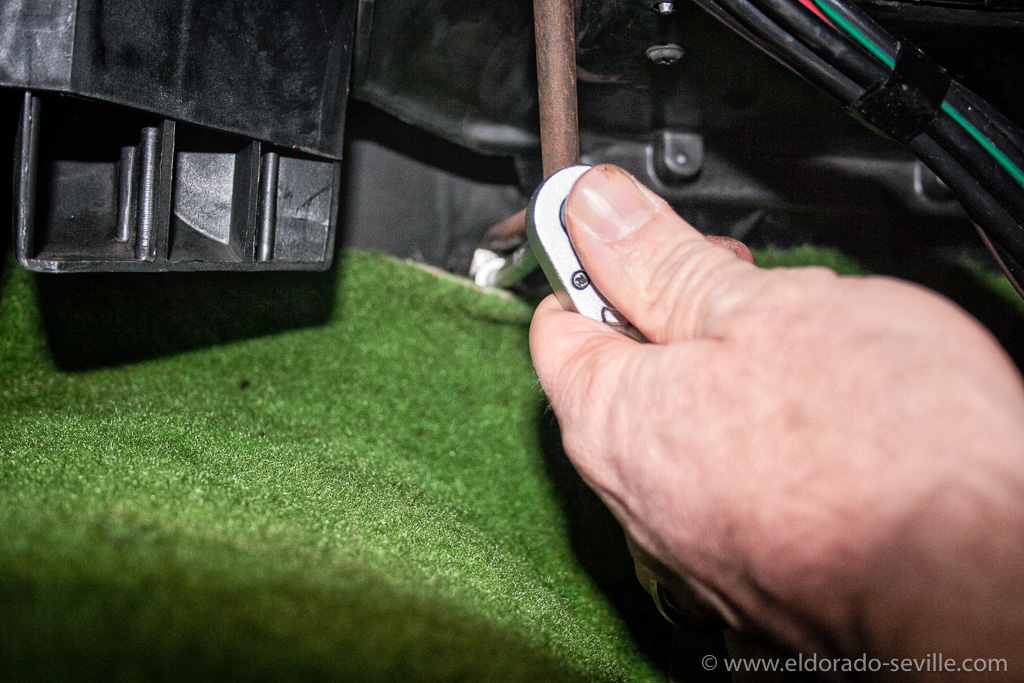
You will have to remove this support bracket.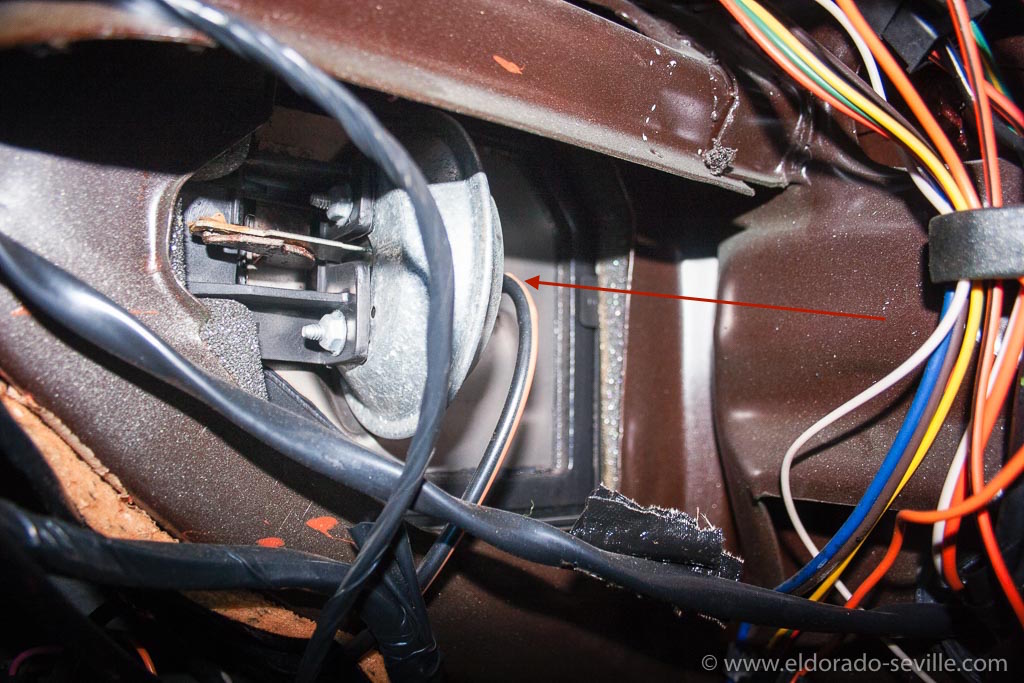
Recirculation door - un-plug the orange vacuum hose.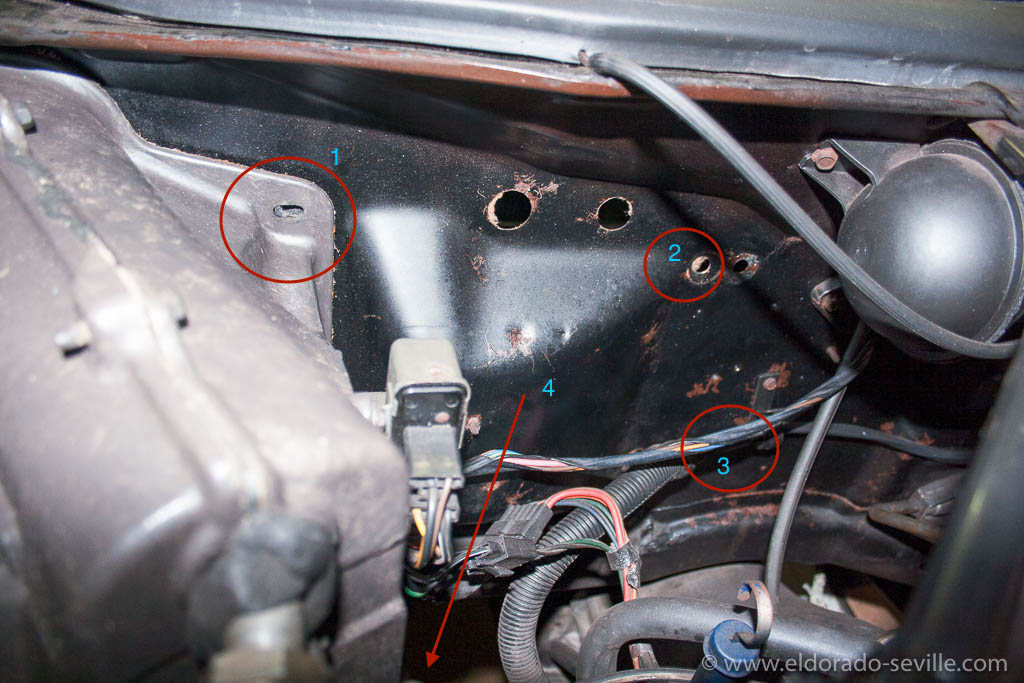
You have to remove these 4 screws/nuts on the firewall. You can access number 4 from underneath the car only. Number 3 is hidden underneath the cables.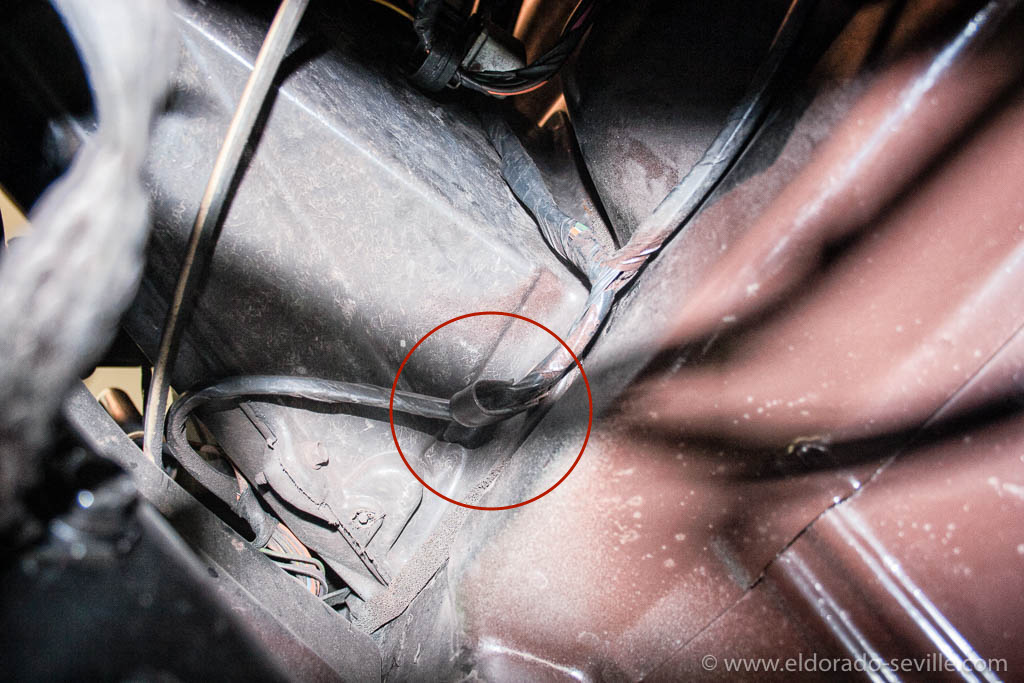
The number 4 screw on the cowl is holding a cable clip in place and the other end is the right bottom screw of the heater box - you need a second person with a 7/8 wrench to release it from the side under the car while you unscrew it from inside the car with a 3/8.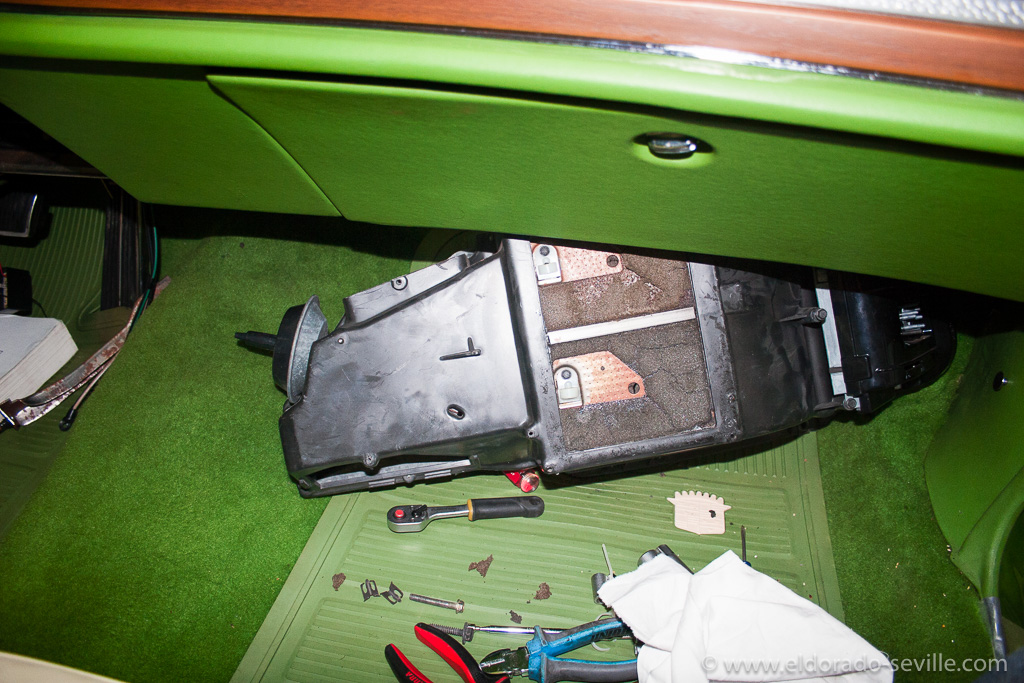
Once all the screws are off you can carefully remove the box. You have to slip it to the passenger side to get it out.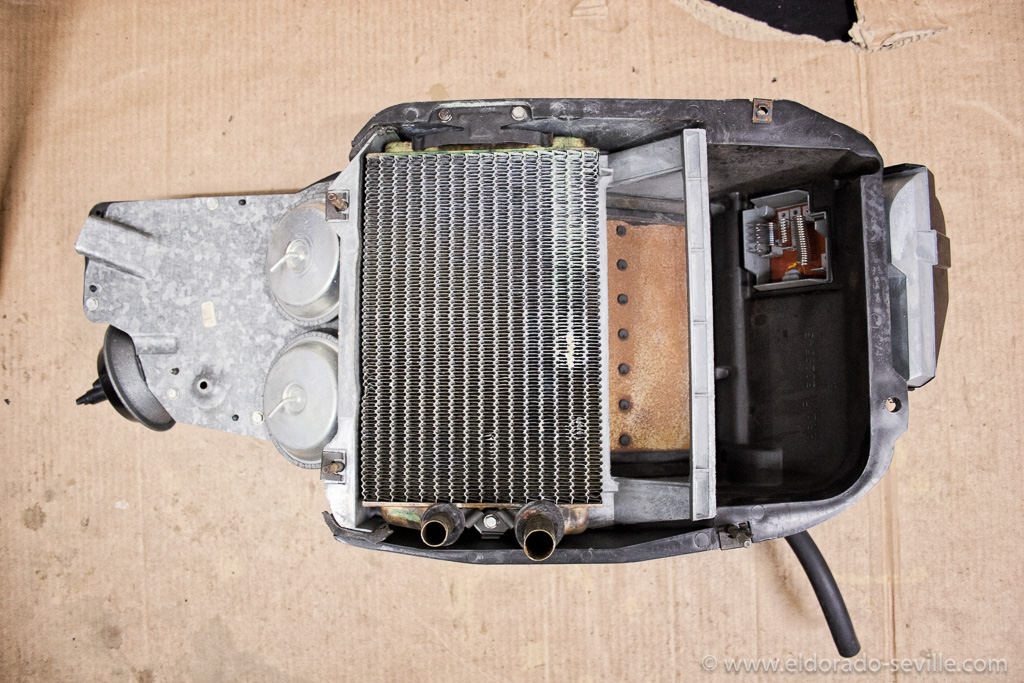
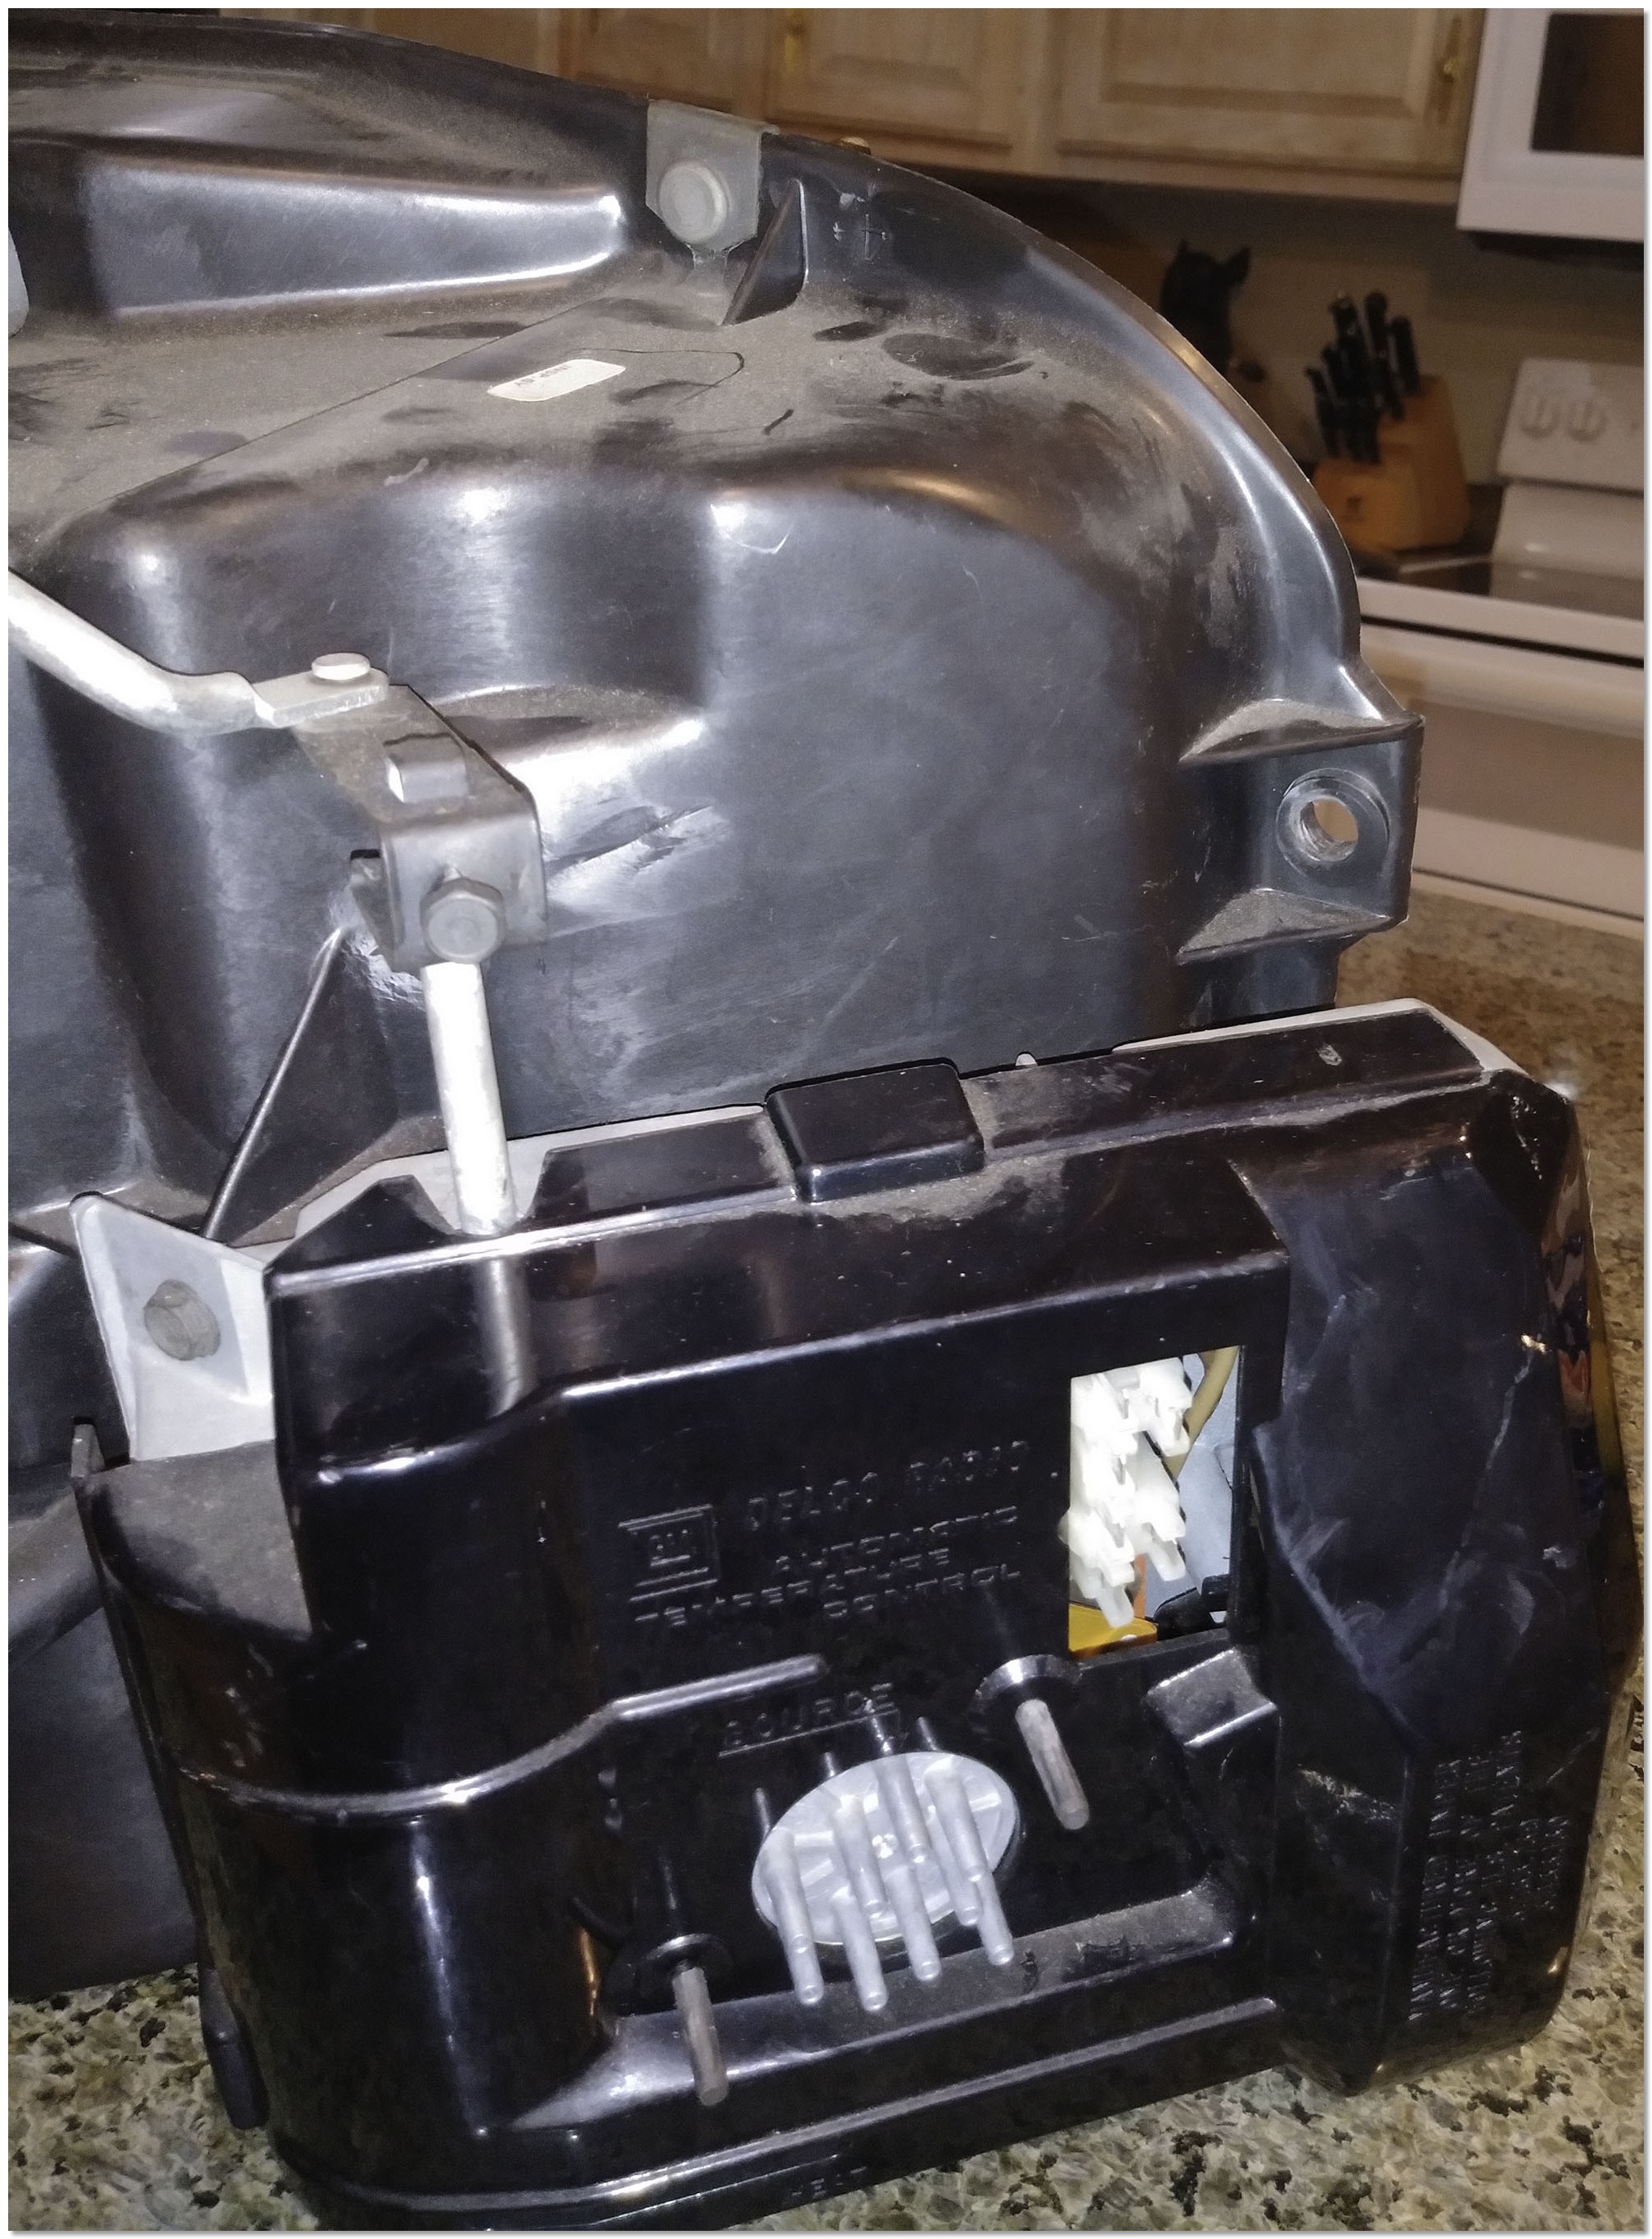
The old core in the heater case.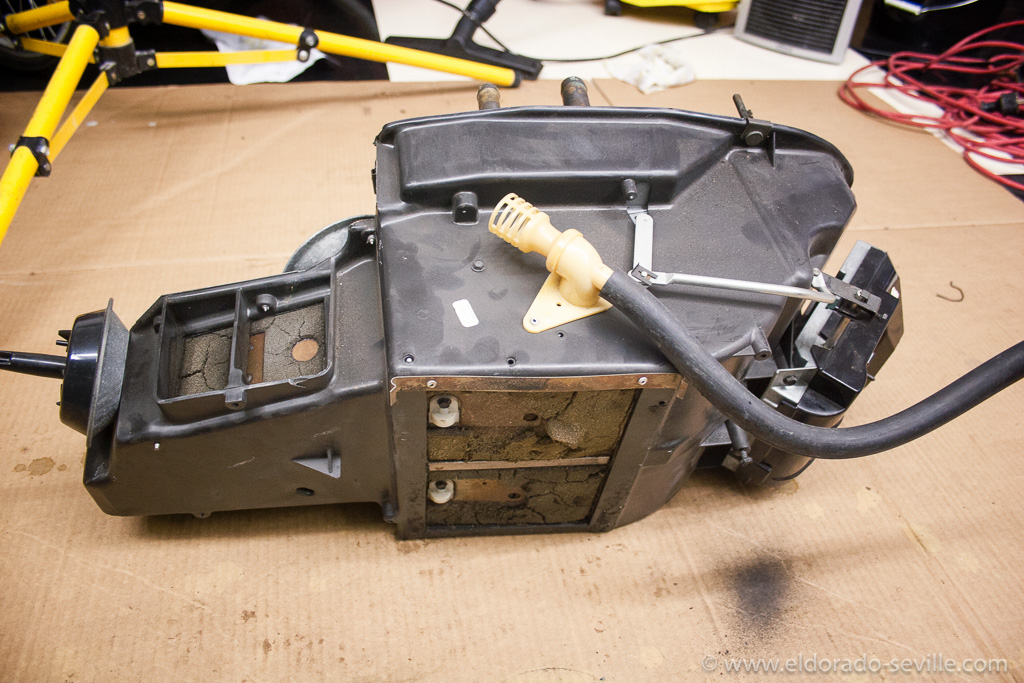
The 1974 Cadillac heater case and heater core. You can see the two mode doors here and on the right is the recirculation door. The thick hose on top is the aspirator hose going to the temperature sensor in the dash.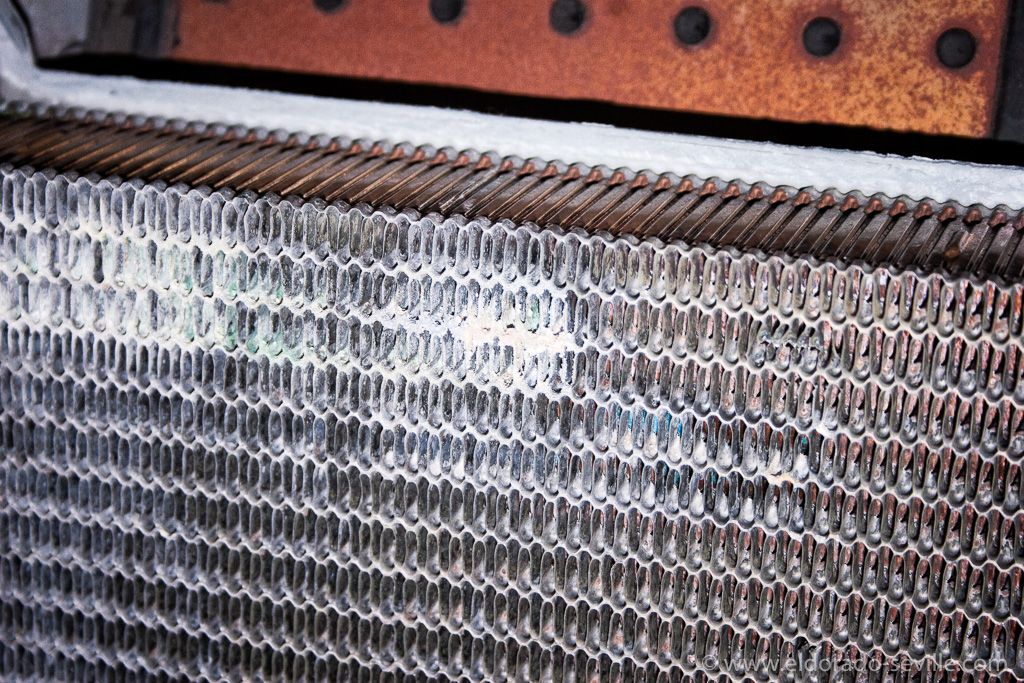
This is where the old core had developed a leak.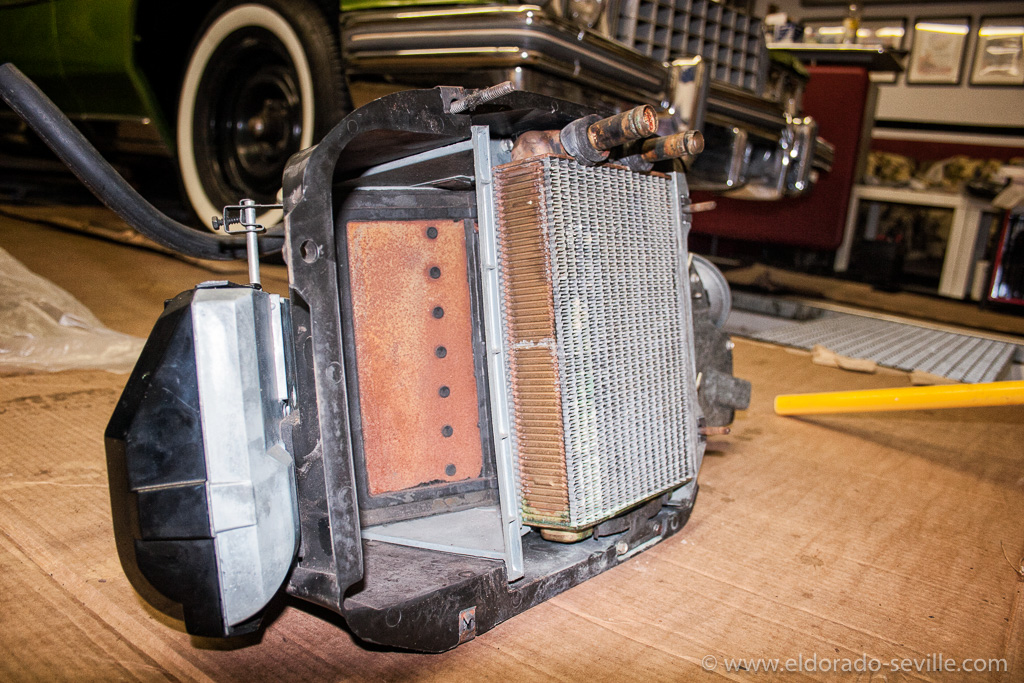
The old core still in place. Note the rubber seals on the tubes of the heater core. You have to move them over to the new core.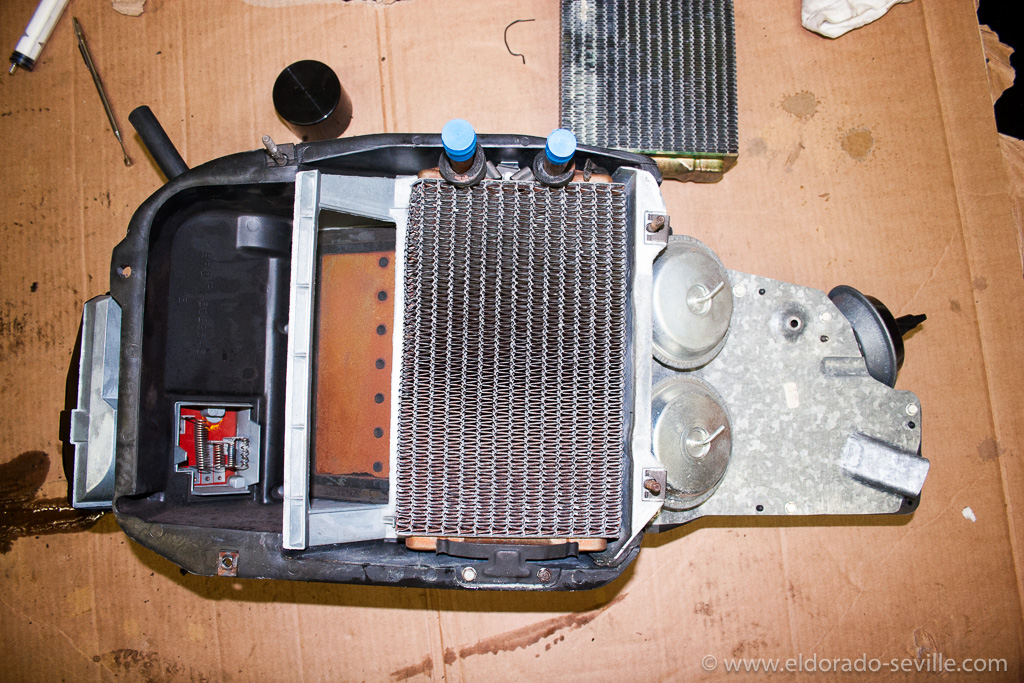
The new heater core in place. I got mine from rockauto.com. Its very similar - the only difference is how the two tubes are braced to the core, but that is no problem at all.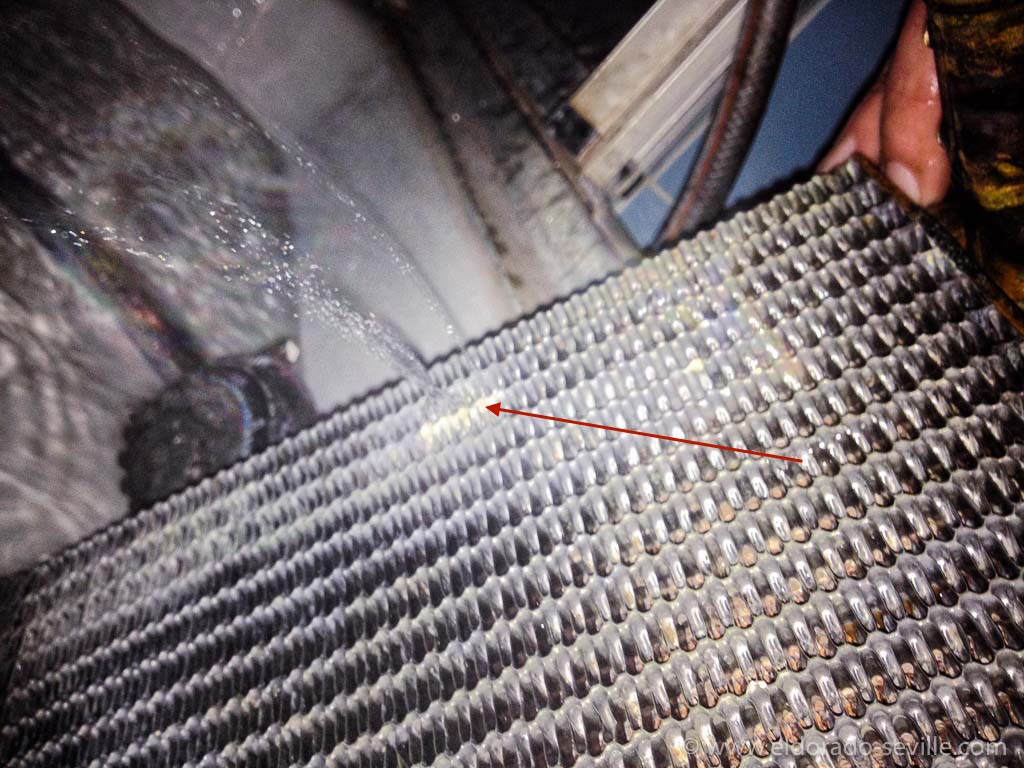
Out of curiosity I checked where the old core was leaking, and the leak was pretty obvious as you can see.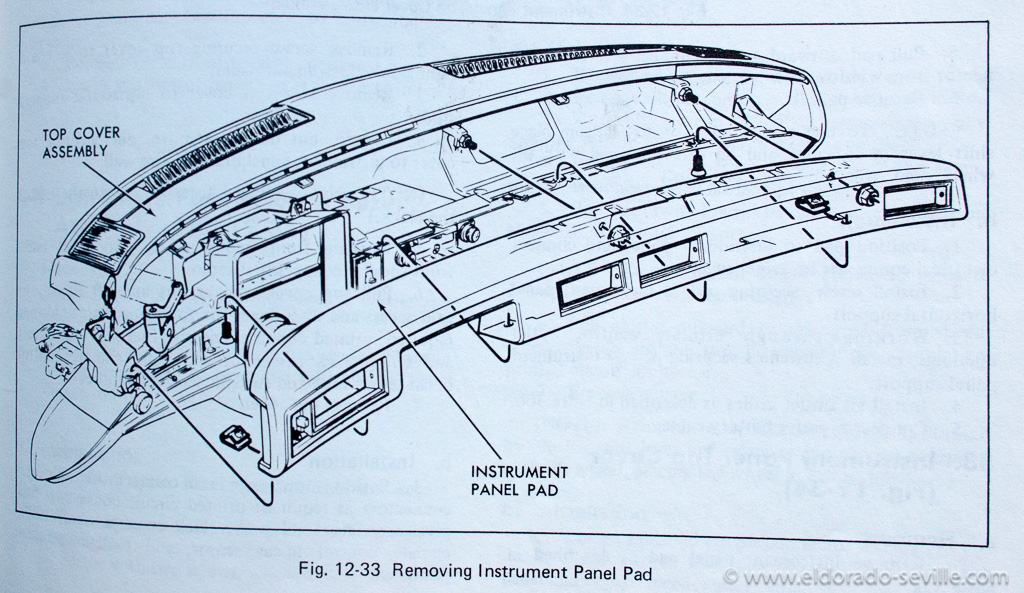
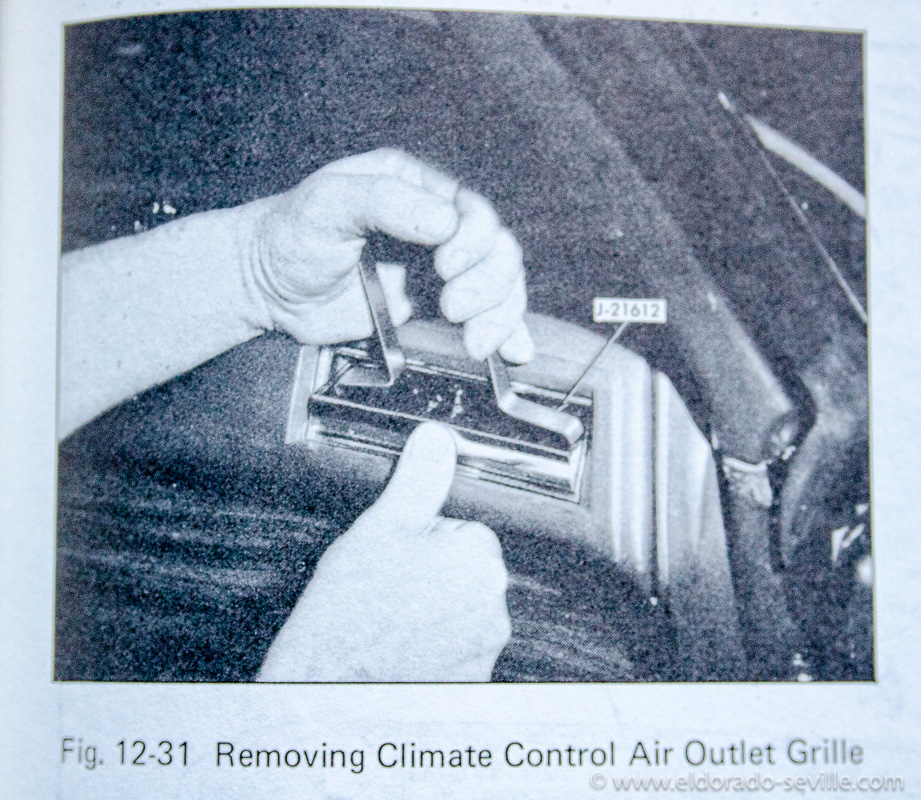
I just used two flat screwdrivers instead of this special tool.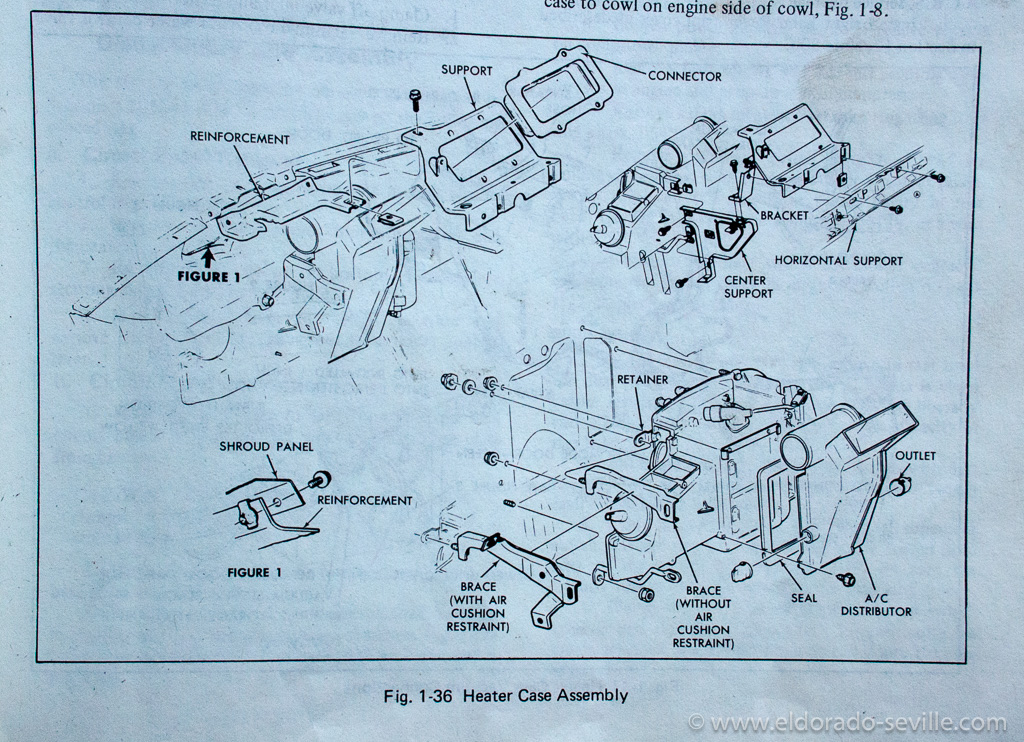
Additional information for Eldorado owners regarding the heater core:
Dan Mercer reached out to me and wrote the following: (Thanks Dan for letting us know!)
As a favor to Eldorado owners who will undoubtedly come across your repair process and use it in the future, would you be so kind as to add one addendum to it?1976 Eldorados have a FIFTH fastener attaching the heater box to the firewall! For the life of me I can't really figure out how this would have been necessary on an Eldorado but not a DeVille, but it's true. The 7/16's screw that needs to be removed is just above the right side of the ATC, in between the upper attachment and the lower one you have to get at underneath the car. Due to where it sits somewhat behind the ATC, it's impossible to see from any angle in the car.
I've attached pictures below.
REMOVING THE 1974 CADILLAC RADIO
The first work in 2016 was to remove the radio of the 1974 Coupe DeVille to repair it.
The radio basically works, but the volume dial is a little quirky and sometimes does not work as it should. The radio sometimes only comes to life if the volume is turned to maximum.
The 8 track and AM/FM reception all work like they should. Also 3 speakers do not work at all, and I have to find out if the speakers themselves are defective, or if the radios output has a problem. Its more likely that the speakers are defective after so many years, as the membrane tends to dry out, get very brittle and tear apart. So far I had to change the speakers and/or repair the radios on most of my cars when I got them.
The radio out of the 74 can be removed pretty easily:
- Remove the lower steering column cover - there are 4 screws on top of the cover and 4 screws on the lower edge and one in the door jamb facing the drivers door.
- Then remove the ash tray assembly. There are 4 screws. You have to put your head underneath the dash to get to all of them. For the one on the right side you need a 5/16" nutrunner or socket with 3" extension. Work from lower edge of instrument panel to get to it. Then disconnect the electrical connector and bulb.
- Remove the radio knobs, wave washers, control rings and hex nuts.
- Remove radio to lower instrument panel support brace nut at rear of radio.
- Loosen brace to support screw and rotate brace to the right.
- Slide radio from instrument panel and disconnect antenna cable, speaker connector and power connector.
- Rotate dial side downward and lower the left hand side of the radio.
- Remove through ash tray opening.
Out of my personal experience its easier to remove the radio than getting it back in. Especially connecting the cables again is a pain…
The radio is now out, and I will hand it over to my friend Steve, who will have a look at it, and see what he can do. He already successfully repaired the radio of my 78 Eldorado. He is a genius, and I´m very glad to have such fantastic and talented friends.
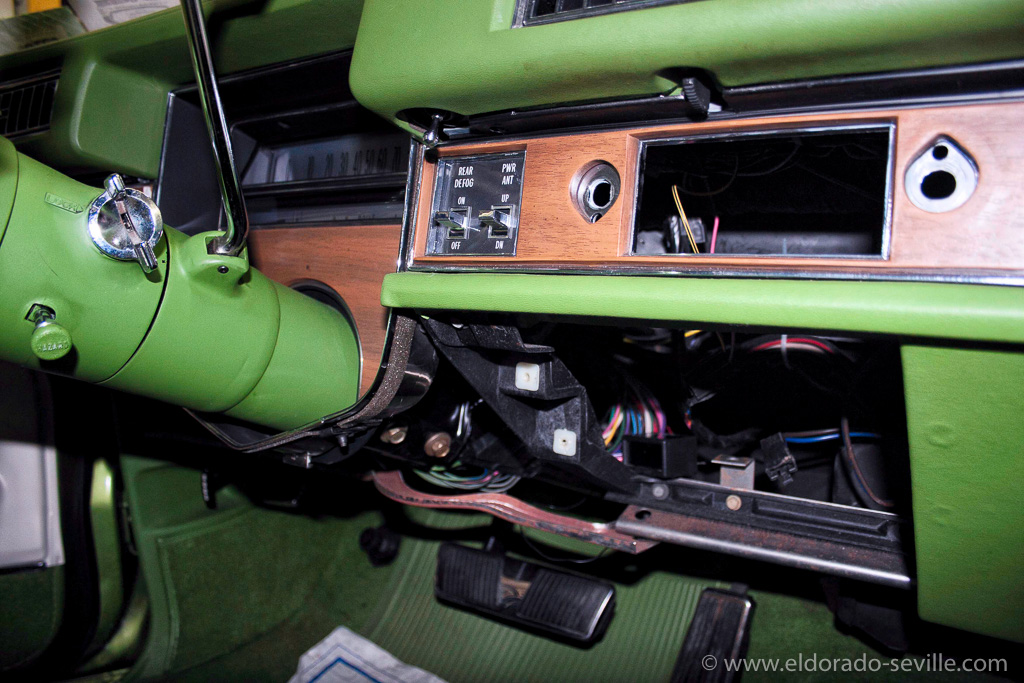
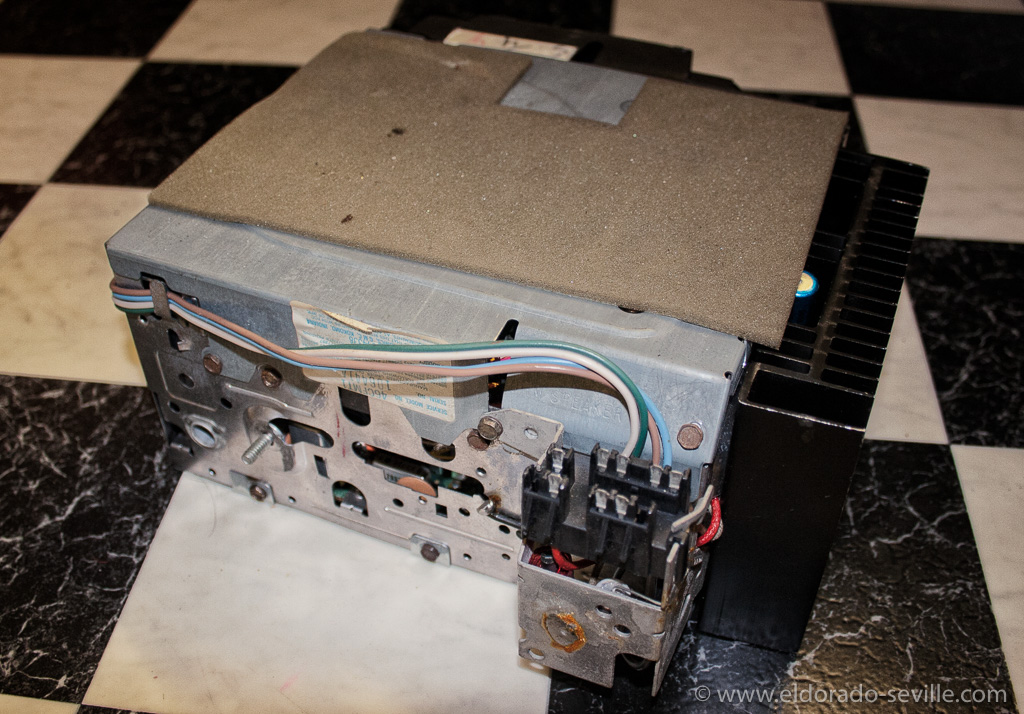
You have to remove the lower steering column cover and the ash tray, to be able to get the radio out. On this picture you can see the removed lower steering column cover and the removed ash tray assembly.
The removed ash tray assembly.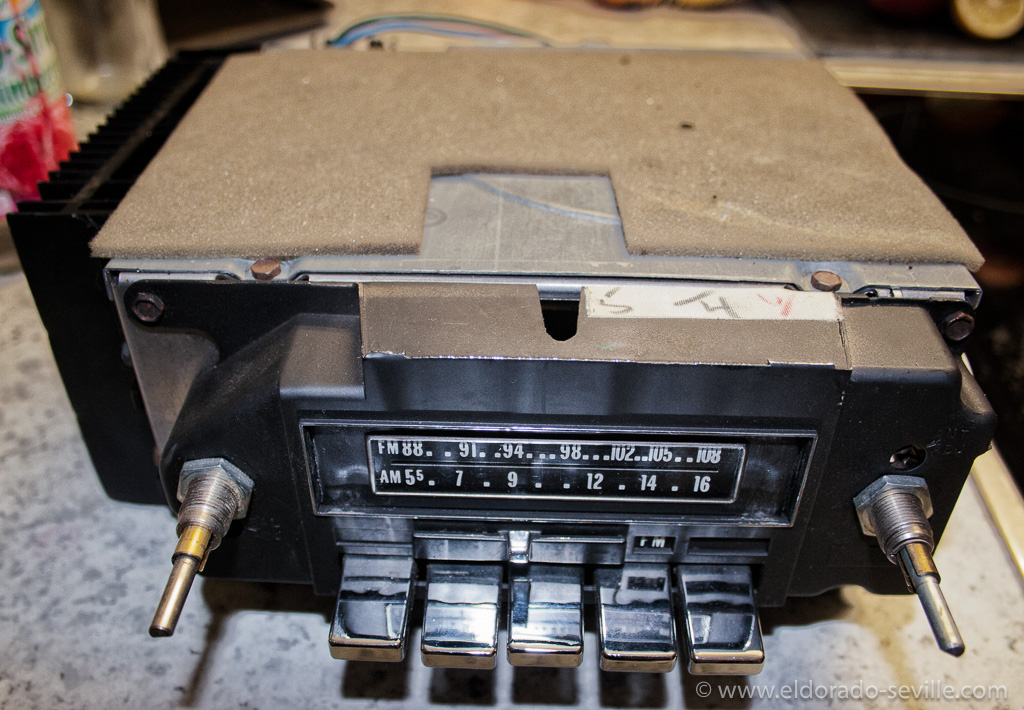
This is the 1974 Cadillac stereo radio with 8 track tape player.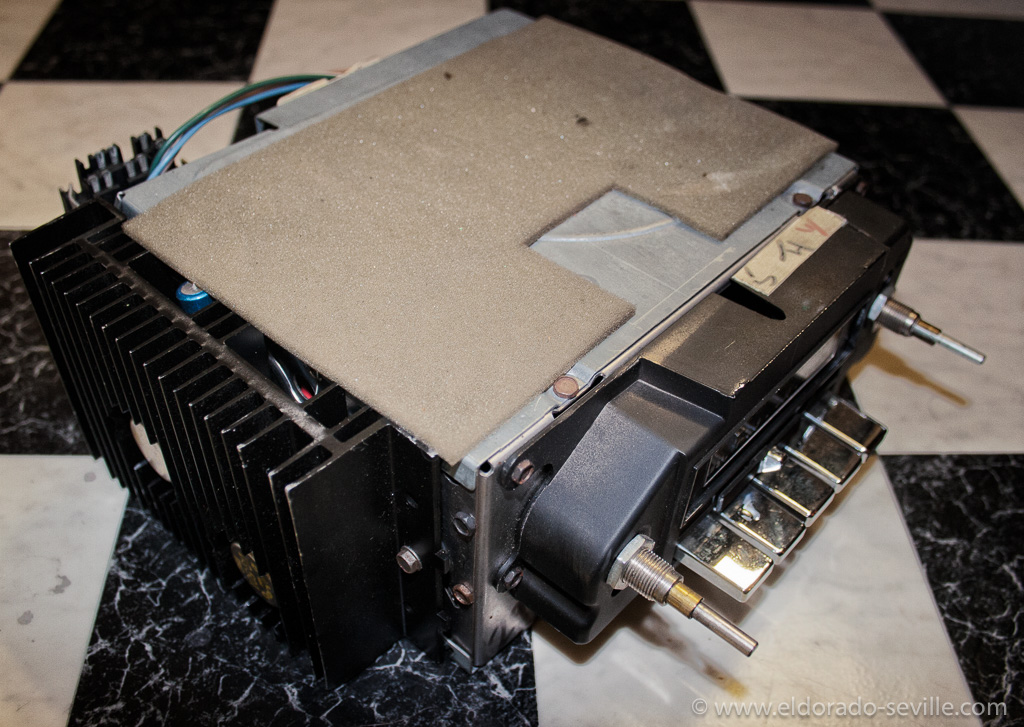
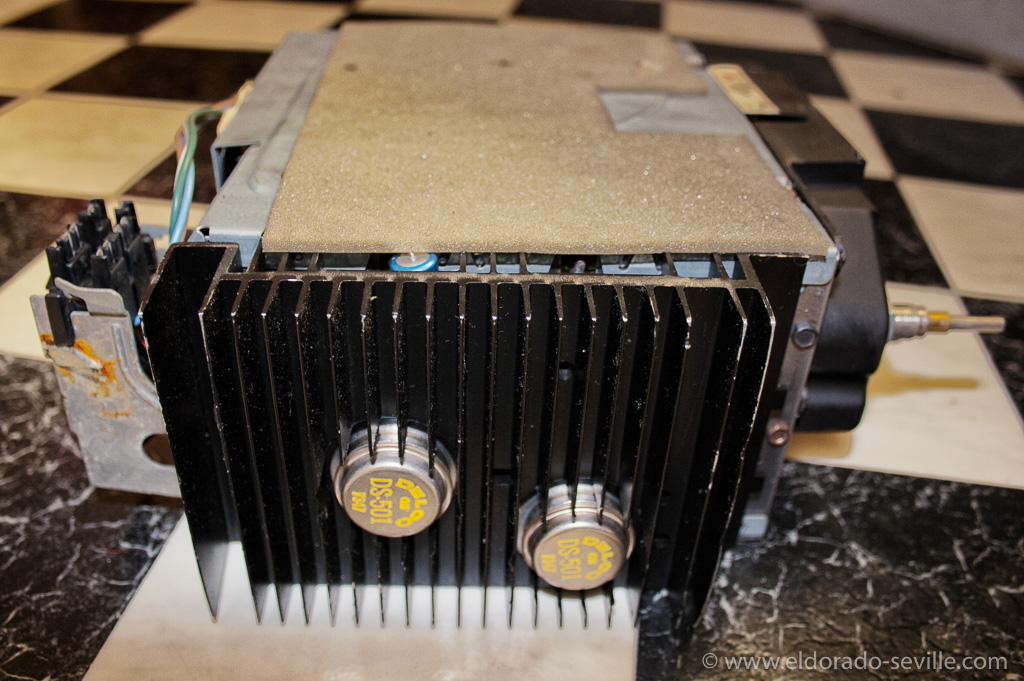
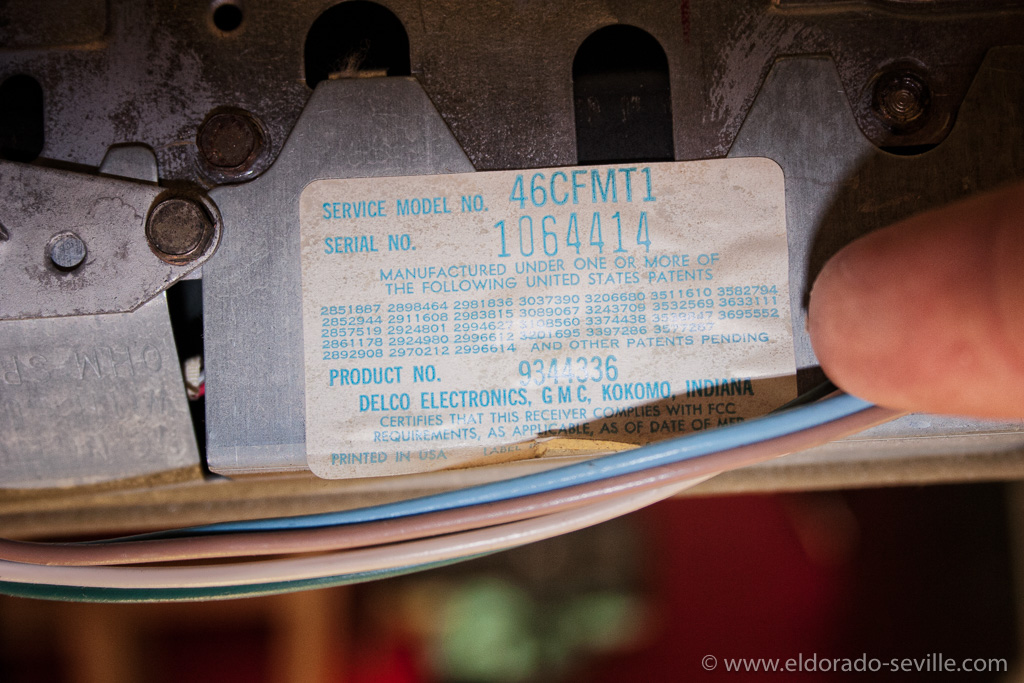
Part # 9344336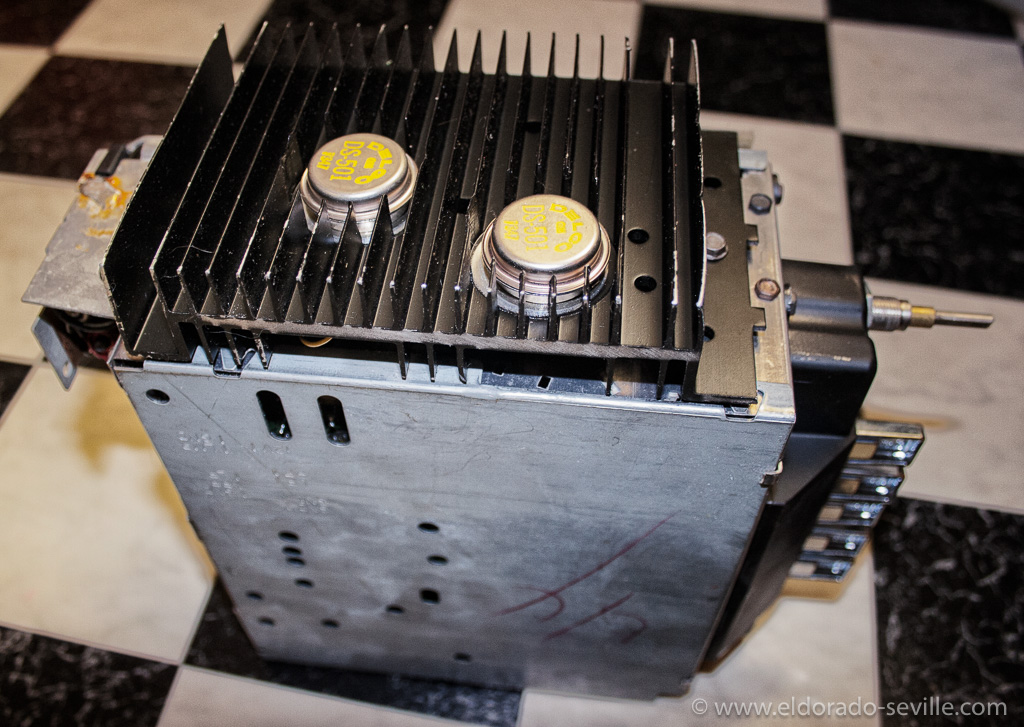
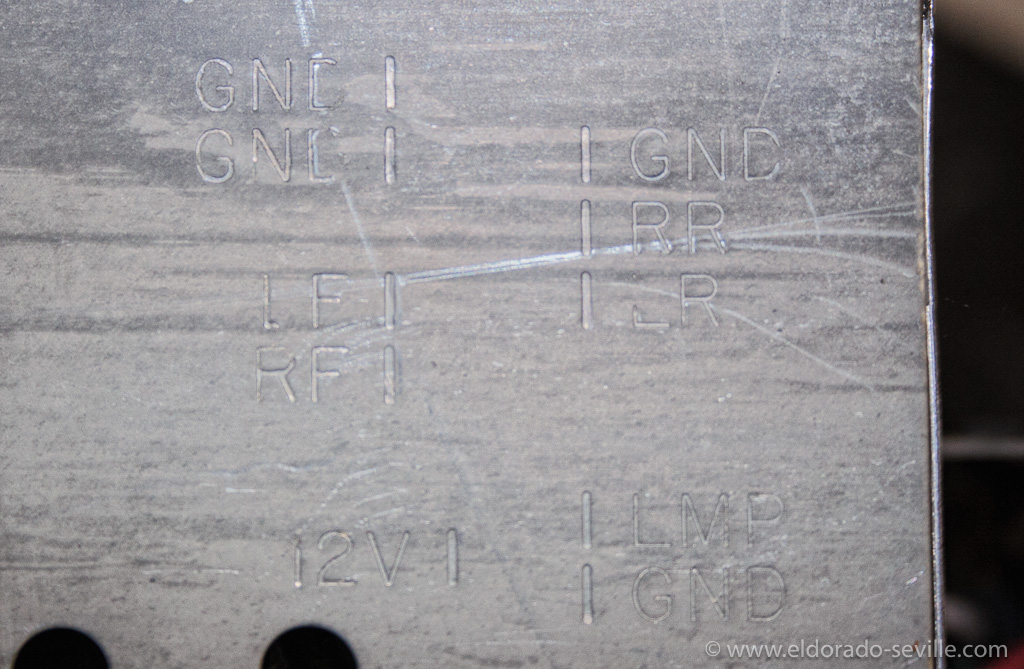
This shows where the wires in the connector are going to.
THE 1974 UNDERCARRIAGE RESTORATION PROJECT - I HAVE TO START ALL OVER AGAIN
As I had put so much effort in totally de-rusting the underbody of this low mileage car, I decided to let a professional body shop re-paint the bare metal frame, suspension parts and floor pans this time. My goal was to have the ultimate quality paint job in the factory correct colors underneath the car. I´m not very good in painting and my attempts often result in runnings, which I have to sand out and other imperfections I wanted to avoid.
So I handed the de-rusted car over to the paint shop.
BACK FROM THE PAINT SHOP
When I got the car back, everything looked o.k. as you can see on the pictures below. I was not too impressed by the work they did, as there were quite a few imperfections and some sloppy paint work visible, if you looked very closely. At this point I was already worried that they maybe did some shortcuts before painting, when they should have properly cleaned the bare metal, before they sprayed the primer.
They used some high quality epoxy primer and 2k paint for the job though.
THE MESSED UP ENGINE BAY - OVERSPRAY HELL
There was a terrible mishap at the shop, as they did not mask off the engine bay properly, so all the paint dust and overspray collected inside of the engine bay, and the entire engine bay looked like somebody emptied a spray can into the engine compartment from about 5 feet away. Everything was covered with paint overspray.
I was so shocked when I opened the hood that I almost passed out. The once perfectly clean, all original engine bay was a total mess. It looked so terrible that I could not even snap a picture. Last year I had spent weeks to clean it to my standards…
I had no idea how I could remove the overspray without damaging the original finish of the engine, rubber hoses, cables, wires, accessories and engine parts. This was a terrible situation for me.
REMOVING OVERSPRAY WITH CLAY
I then remembered that detailing clay can be used to remove overspray from paint, but I was not sure if it would work with this heavy amount of overspray. The paint shop gave me a special clay towel to clean up the engine bay, which works like detailing clay, but can be cleaned more often and is easier to use and more aggressive. This thing really works well, but I had to do so much scrubbing on some parts, that some painted areas, like the wheel wells or the air filter housing, turned a little dull after this tiring work. To get them shiny again, I had to hand polish each and every part after claying it. It took me about 25 hours to remove all the accessible overspray from inside the engine bay. I had to thoroughly scrub each and every part, wires and hoses with the clay towel and all purpose cleaner as a lubricant. The areas which I could not clean good enough by hand will be cleaned with dry ice soon. I´m 100% confident that it will look as good again as it did before this happened - I have already achieved 90%, the rest will get perfect again with some dry ice cleaning…
TIME FOR UNDERCOATING
My plan is to protect the undercarriage with a transparent undercoating, which is as good as invisible if properly applied. It will provide a perfect protective shield against road debris, stones and is rust prohibitive. This high-tech material is far superior than the original tar based undercoating which is normally used, and as an additional bonus you can always see what is going on underneath the undercoating. I decided to use a product from a german company called "Timemax USB Clear". Timemax is one of the leading specialists for rust protection, and their products have won some independent tests, done by classic car magazines.
THE PAINT DOES NOT STICK!
Before spraying on the undercoating, I had to mask off the areas like the frame, drive shaft, axle, suspension parts, fuel tank, brake lines, hoses and brakes. After a day of masking off all the areas, I discovered a small paint chip on the frame. When I inspected it with my fingernail, a bigger chunk of paint flaked off the frame. I then used a scraper to scrape the paint, to see if it was just a small area where the paint would not stick properly. The area where the paint came off got bigger and bigger, and soon it became clear that the paint does not stick properly anywhere…
Of course this was another big shock for me, as this meant that 3 months of work were completely destroyed… When I inspected the areas underneath the removed paint, it quickly became clear that the paint shop did not treat and clean the bare metal before painting, as they should have done. They just did a quick wipe with silicone remover.
Of course the bare metal underneath a 41 year old car is full of oil and grease and needs a lot of cleaning with strong chemicals before paint will adhere to it. Unfortunately they skipped this most important step. Although I brushed away all the rust and everything looked shiny, the oil and grease is in all the pores of the metal.
I HAVE TO START ALL OVER AGAIN - REMOVING THE FRESH PAINT AGAIN
This now means that ALL the paint they sprayed on has to come off once again. Also the brown paint on the floor pans has to be stripped again as well.
I asked a dry ice cleaner to try if it can be removed with his method, and it soon became clear that it is possible, but will take at least one full working day, and this will cost a small fortune.
There will probably be some areas left which I will have to rework by hand.
As you can imagine, this is a huge step back for me. I worked so hard and so many hours, often till late into the night, to finish this project for nothing …
The paint shop knows that they did a lousy job and is very supportive to resolve this issue.
This video shows how badly the paint sticks to some of the frame parts. It can be blown off with the pressurized air on some areas…
WHAT´S NEXT?
Before dry ice blasting the undercarriage once again, we will try to get the paint off with a powerful high pressure washer. Once the paint is gone again, we will clean the bare metal multiple times with acetone, marine clean, a special metal cleaner and metal prep. We will also sand everything with some coarse sandpaper to get a little rougher surface to make sure that the paint adheres much better next time.
I also want to go for a black with less gloss, as it was too glossy and did not look correct.
I hope that the weather will be good enough in January 2016, so that I can start all over again. At the moment I do not have the motivation to do anything on the car, and I do not even want to look at it, as it hurts too much. I still have to recover from the things that have happened. This is so frustrating. I hope that it will look like it should after the second attempt.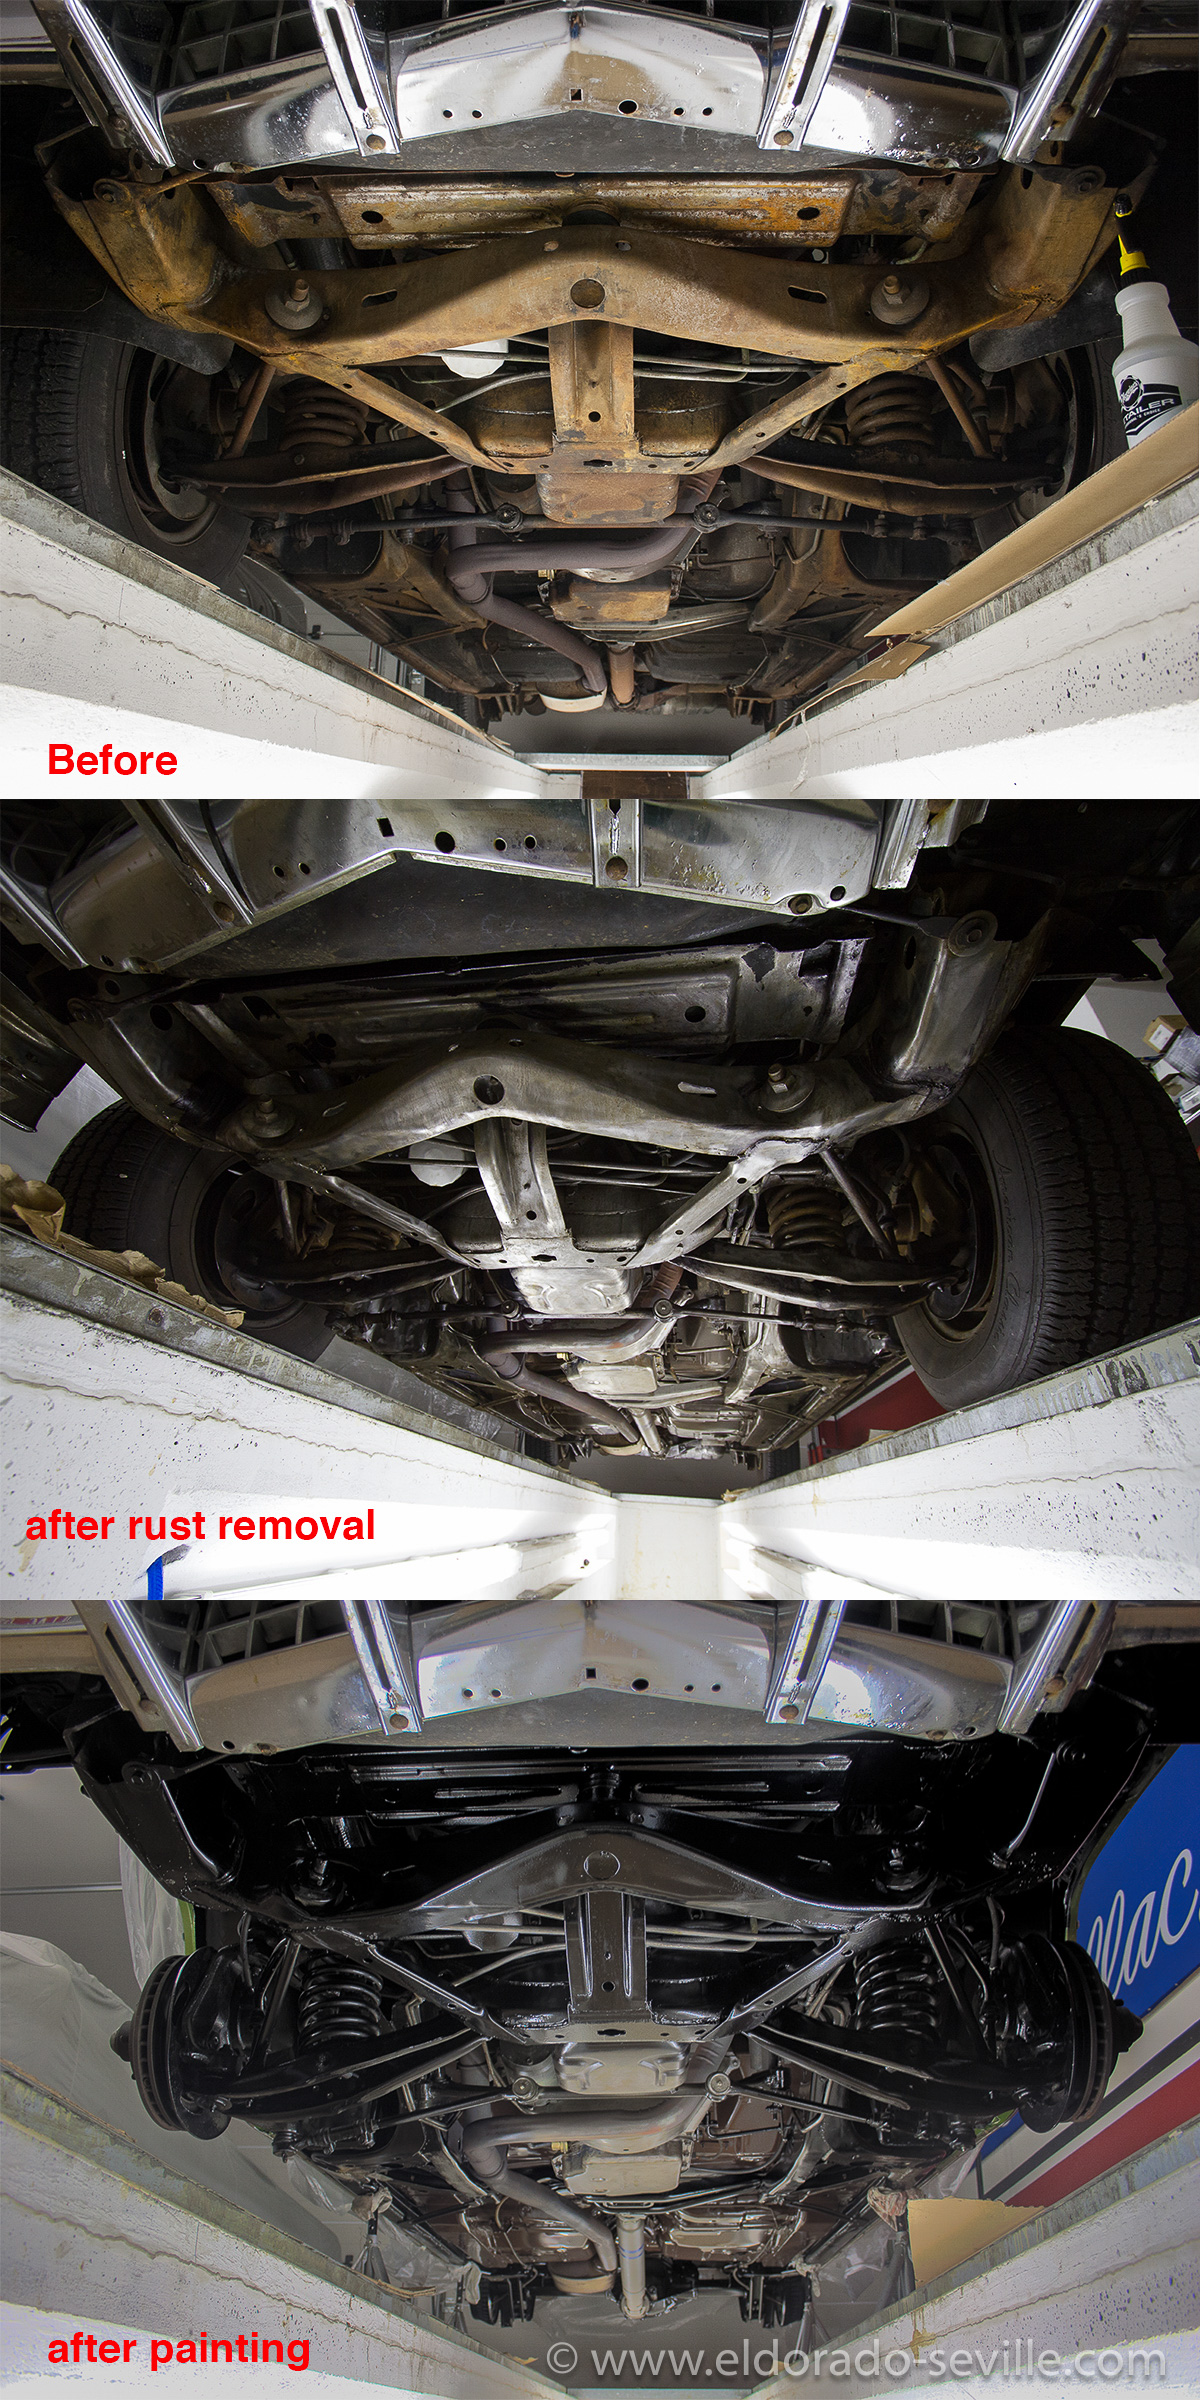
The 3 stages of the project so far.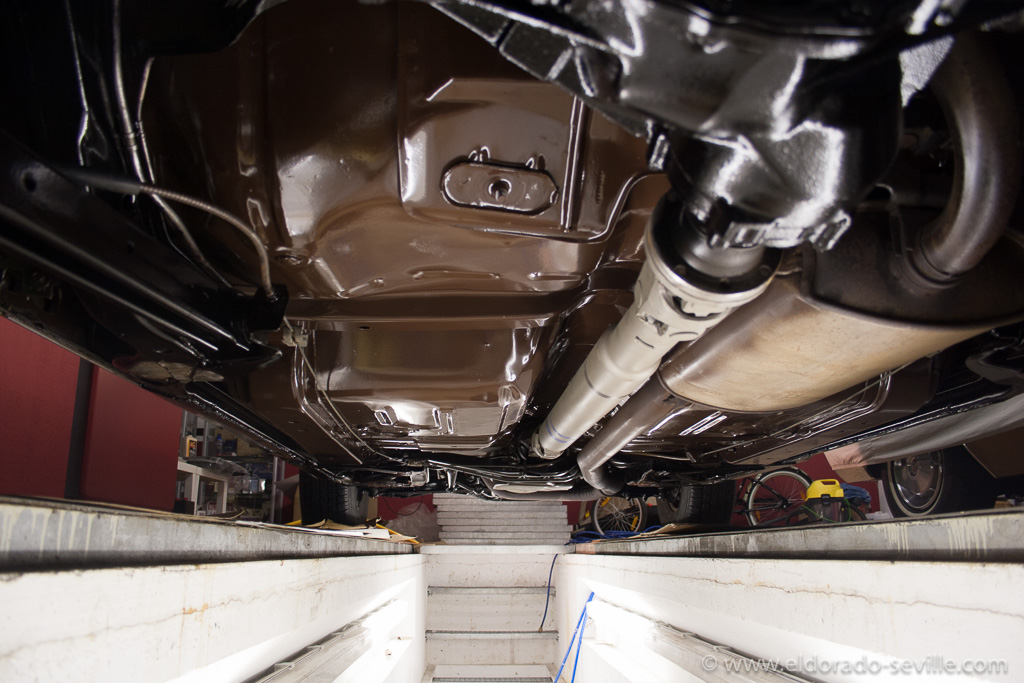
Everything looked o.k. after painting, but the paint does not stick to the metal due to poor cleaning by the paint shop.
This is the transparent undercoating I wanted to apply when I found out that the entire paint on the undercarriage does not stick…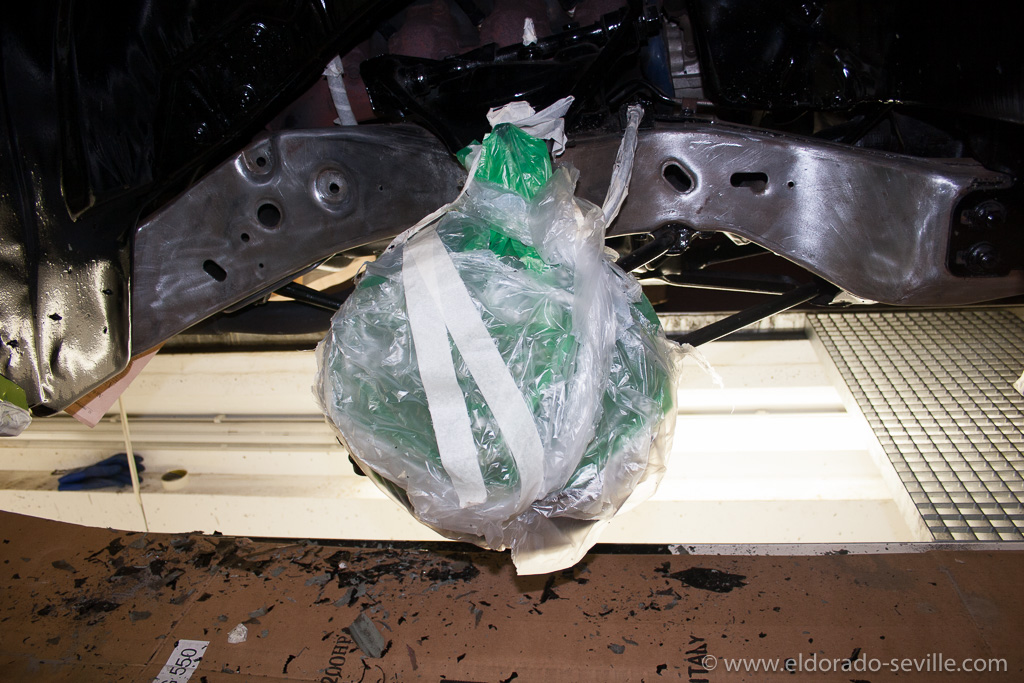
Unfortunately the paint does not stick to the bare metal… I could scrape it of with a simple scraper. You can see all the flaking paint on the floor…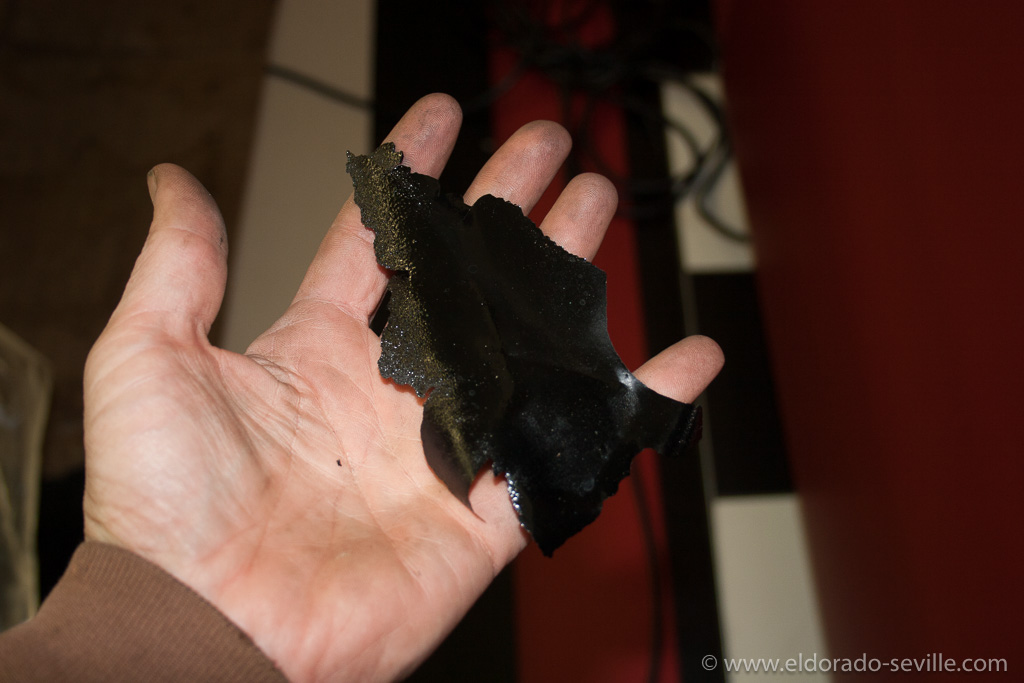
The paint is peeling off in big chunks…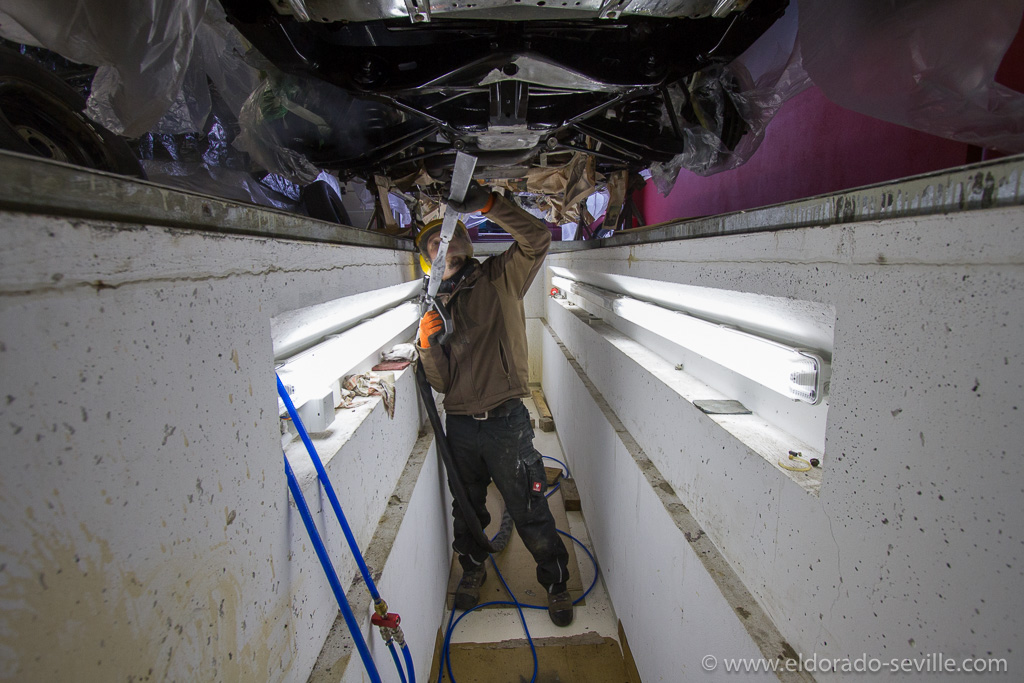
So ALL the new paint has to come off again. Here the dry ice blaster is trying if it can be removed with dry ice cleaning.
BE CAREFUL WITH ZINC PLATED PARTS AND RUST REMOVAL SOLUTIONS
Due to all the problems I had, I completely forgot about some fasteners from the rubber splash guards, which I had soaked in the rust remover solution for more than a week. This long time in the liquid removed all the surface rust, but the acid also ate away the zinc plating. So whenever you try to remove the rust from anodized fasteners and screws, make sure not to soak them for too long.
As I can´t get the fasteners and screws very easily here in Austria, I had to brush away the remnants of the zinc coating with a wire brush, and then painted everything with Eastwoods Silver Cad paint. This does not look 100% correct of course, but will have to do until I find some original replacement hardware. Besides a few washers, these fasteners won´t be visible anyway.

I forgot some of the fasteners for the rubber splash guards in the rust dissolver solution. It ate away the zinc plating. So I had to remove the remains of the zinc plating with a wire brush.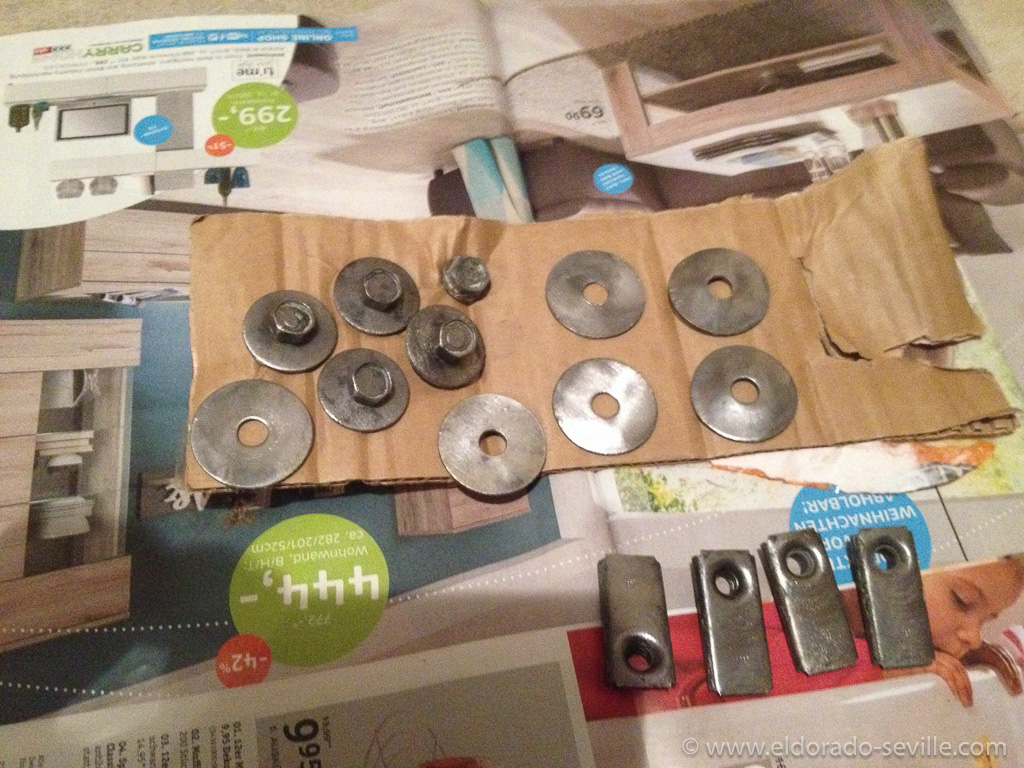
The cleaned fasteners. I spray painted them afterwards with Eastwood zinc paint.
THE 1974 ´S UNDERCARRIAGE GETS REPAINTED
Now that I had removed ALL the rust over the last few weeks the underbody needed a fresh coat of paint.
After dry ice cleaning some light surface rust also showed up under the rear quarter panel ends, the fender skirt area and the lower front fender. All these areas were attacked by water, road debris and other stuff coming from the wheels. These areas suffer the most. Also moisture got trapped underneath the body moldings in this area.
When we removed the moldings fortunately nothing really serious showed up, but only some small spots needed a little attention, more as a preventive and cosmetic measure to make sure that rust can´t spread underneath and show up when its too late to fix it.
The downside of this repair is that I had to sacrifice a small percentage (maybe 5%) of the original paint on the rear quarter panel up to the belt line molding. I do not like this fact very much, as I prefer original paint over repaints, but the other option would only have been to wait for rust damage to happen eventually, but therefore have 100% original paint on the car… As I intend to drive the car I wanted to have everything fixed as good as possible.
A friend of mine is a professional body man, and I asked him to take over from me and do the painting and body work, as I do not have the expertise and skills to do this myself.
The floor pans are now repainted in the correct shade of satin brown, which he had to custom mix, based on "Chocolate Brown" which is a little too bright and contains too much red.
Then the floor had to get taped off again to paint the frame and suspension parts in satin black.
We will even go so far to replicate the factory flaws like green overspray in the rear wheel housings for the authentic look and to remember how these cars were built in 1974…
Next up was the repaint of the repaired areas of the sheet metal in “Persian Lime“. He found the formula for this special green in his computer database and he sprayed a test sheet which was an almost perfect match. He then had to find the perfect match by himself. He succeeded and found the perfect color and the repairs are now invisible. It was my biggest concern that he would have trouble to get the color right and gave me some sleepless nights…
Once the car will be back home, I will re-paint the brake parts in a bare metal look and rebuild the brakes while everything is apart. I also already have new shocks waiting for installation, I will put in new brake hoses, repair the radio and heater core and do a good general tune up and change all fluids. So next spring I should have a car which looks and drives like new :-) You can find all the pictures of this project in a gallery here.
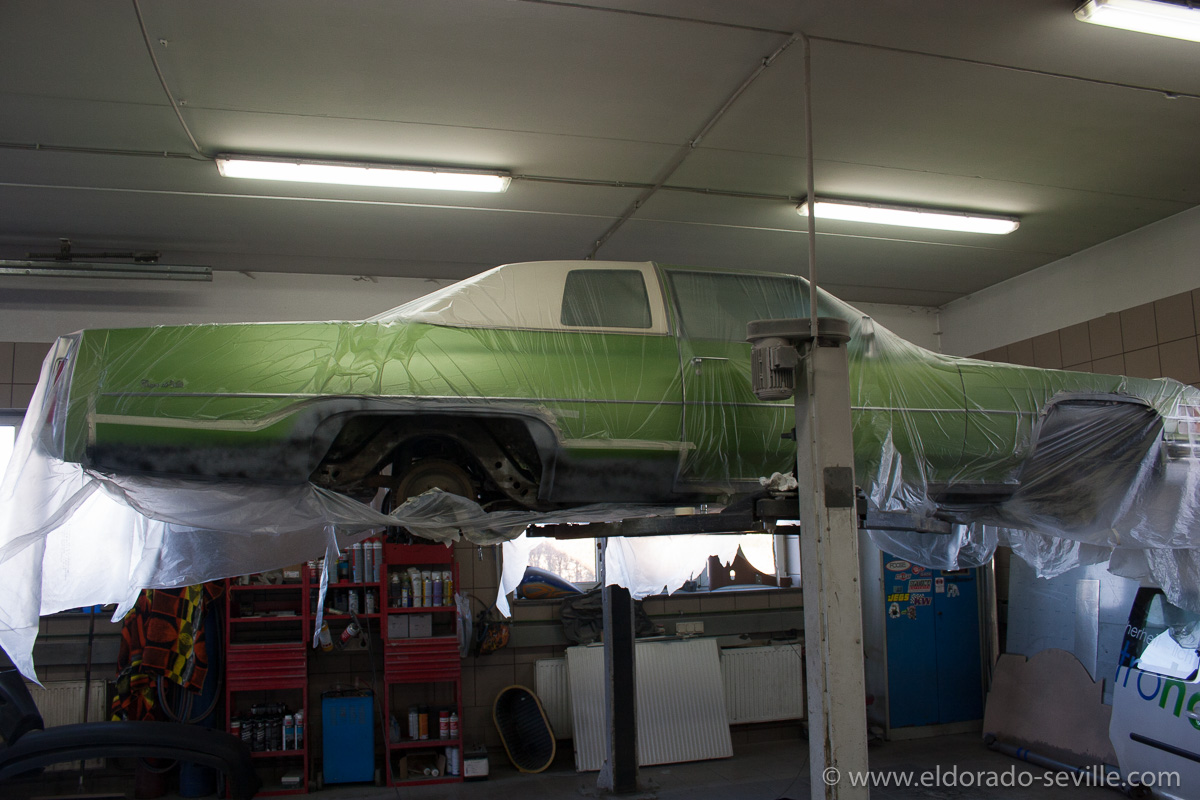 The Cadillac in the paint shop.
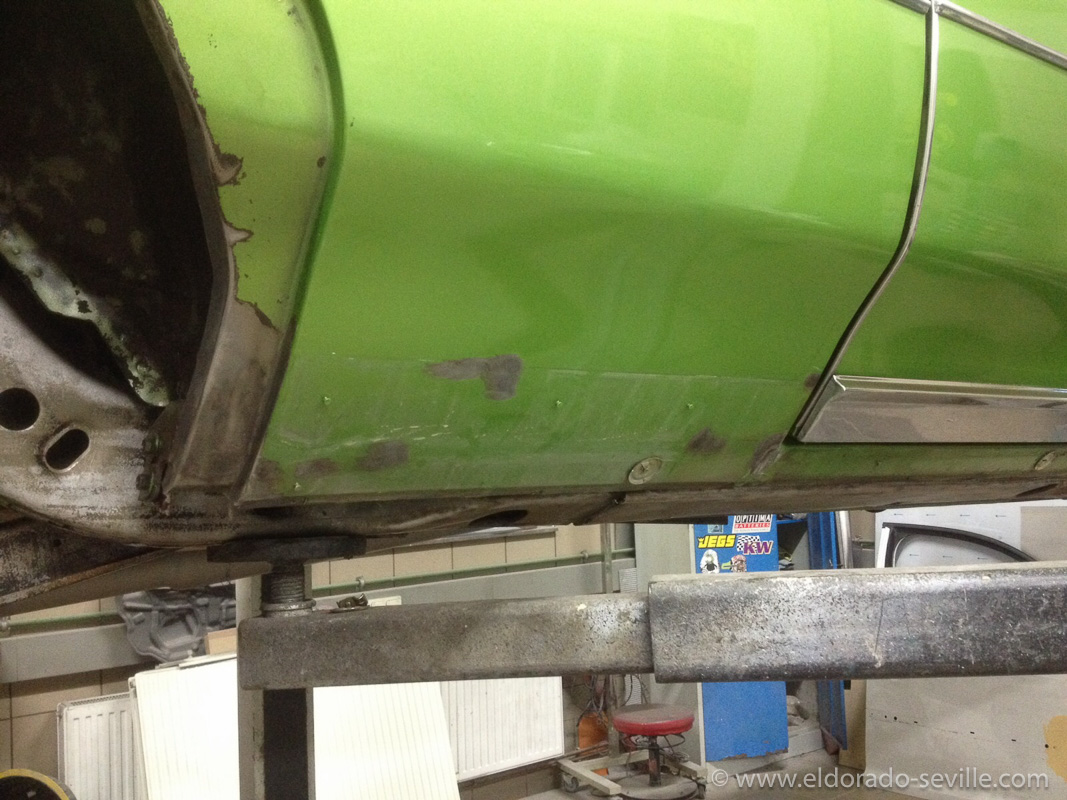
This are the areas on the sheet metal that needed some attention. Nothing serious - but better to fix it now before a problem arises eventually in the future. Here the lower trim is removed to see what is going on.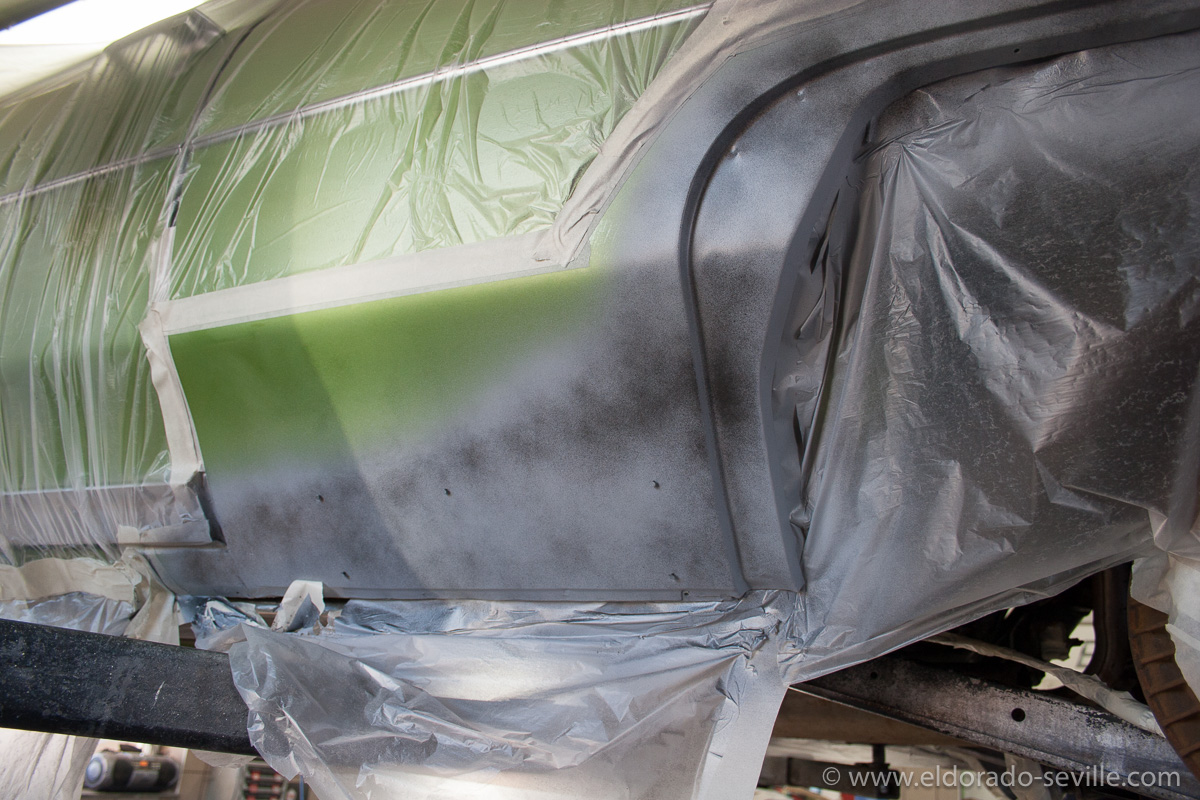
The lower edge behind the rear wheels had suffered a bit over the last 41 years... I decided to have it fixed properly and sacrifice a little of the original paint for this. Also the area around the fender skirts needed a little attention to look like new again. No real severe rust issue, but more of a preventive and cosmetic measure... Fender skirts will be repainted as well... On this picture you can see the primer and a very small amount of filler for a perfect surface.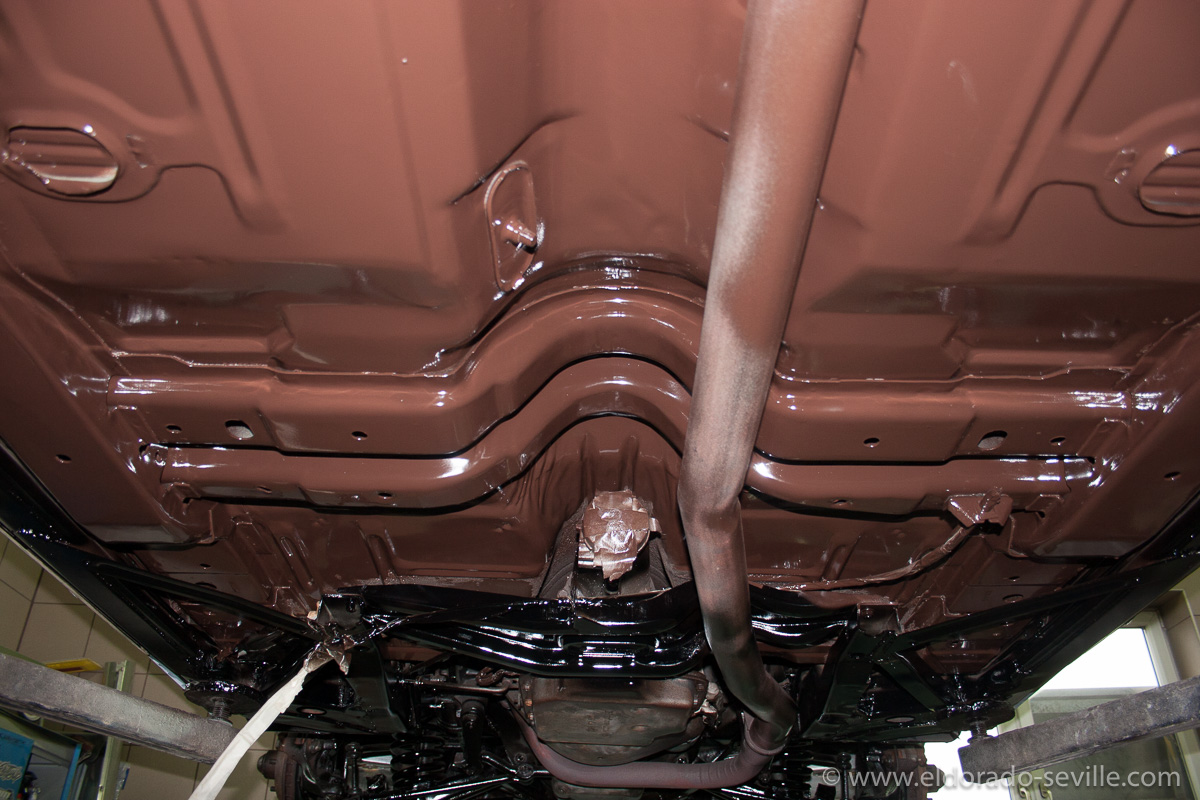
The floor pans are now repainted in the correct shade of brown. It will get a little less glossy once the 3 coats of transparent undercoating are applied.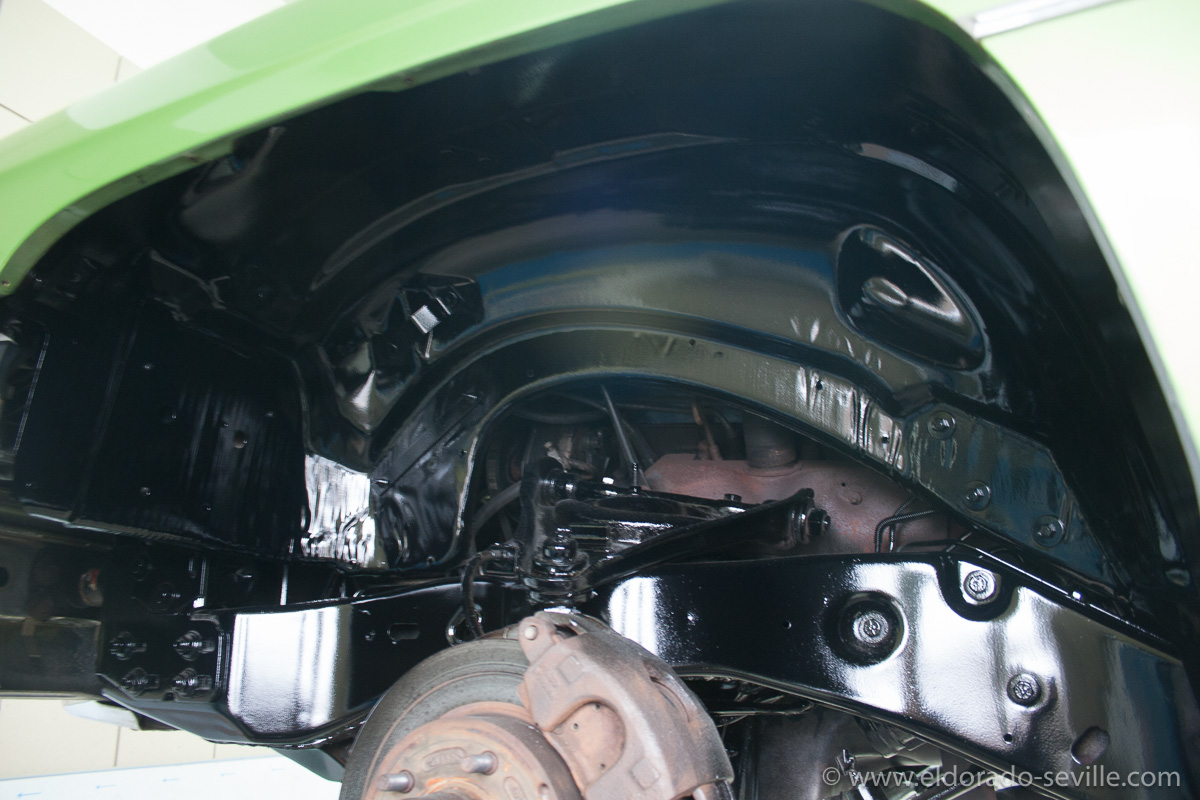
The wheel housing after the first coat of satin black.
The rear axle is back in black. I will paint the rear brake drums in a bare metal look later once the car is back home.
I will also install new shocks and paint the tank with Eastwood Tank Tone paint.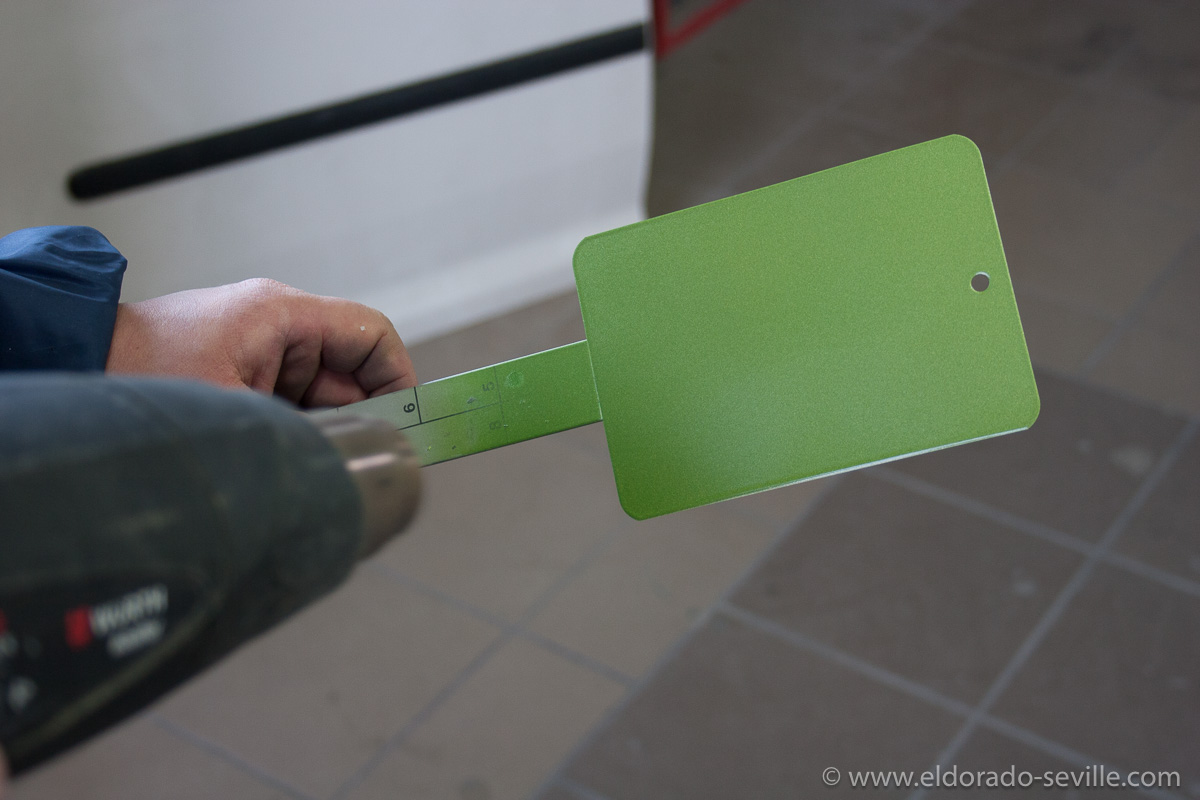
Finding the right shade of Persian Lime for a perfect match. The computer had the color in the system and it already was a very good match.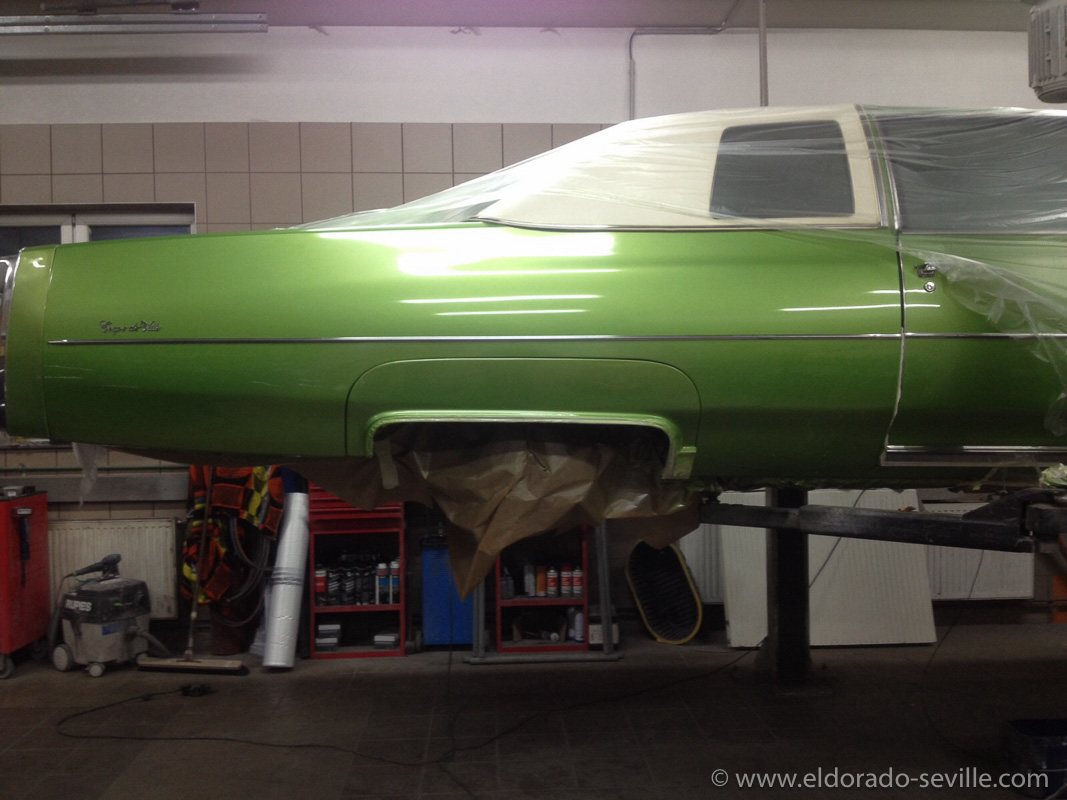
The paint shop found a perfect match for the Persian Lime paint. Great job Jürgen!
You can find all the pictures of this project in a gallery here.
DETAILING THE 1974 CADILLAC DRIVESHAFT
When the car was built, Cadillac and all other car companies did not bother to protect the bare metal driveshafts in any way, so they already had surface rust on them when they were delivered new…
My initial plan was to use a wire brush to knock of the rust and just paint it black like most people would do.
But I then decided that I wanted to go the extra mile, do it properly and put it back into the condition it was when it was built.
I wanted to remove the rust chemically in a rust dissolving fluid that is normally used for de-rusting fuel tanks, but I had no idea how I could soak such a long piece in this fluid.
I came up with the idea to just use a big tarp and put some wood to the sides, put the driveshaft in it and fill it with rust removing liquid. This worked out really well.
It took about 48 hours until all the rust was gone.
After a little of the rust was gone I discovered the remains of the 3 factory markings on the drive shaft. There were three rings painted onto the shaft - two in blue and one in black. I found some small traces of the paint during rust removal. I wanted to re-apply them once the shaft was finished.
When the shaft was fully de-rusted I found out that flash rust would come back literally after only a few minutes. Thats why I decided to paint the shaft to replicate the factory appearance.
I used Eastwood Detail Gray to mimic the original look of bare metal. Before applying the paint, I used self etching primer on the bare metal.
When all the paint was dry, I added the finishing touches with the three color rings.
I´m very happy how it turned out - it looks great. You can see more pictures of this project here.
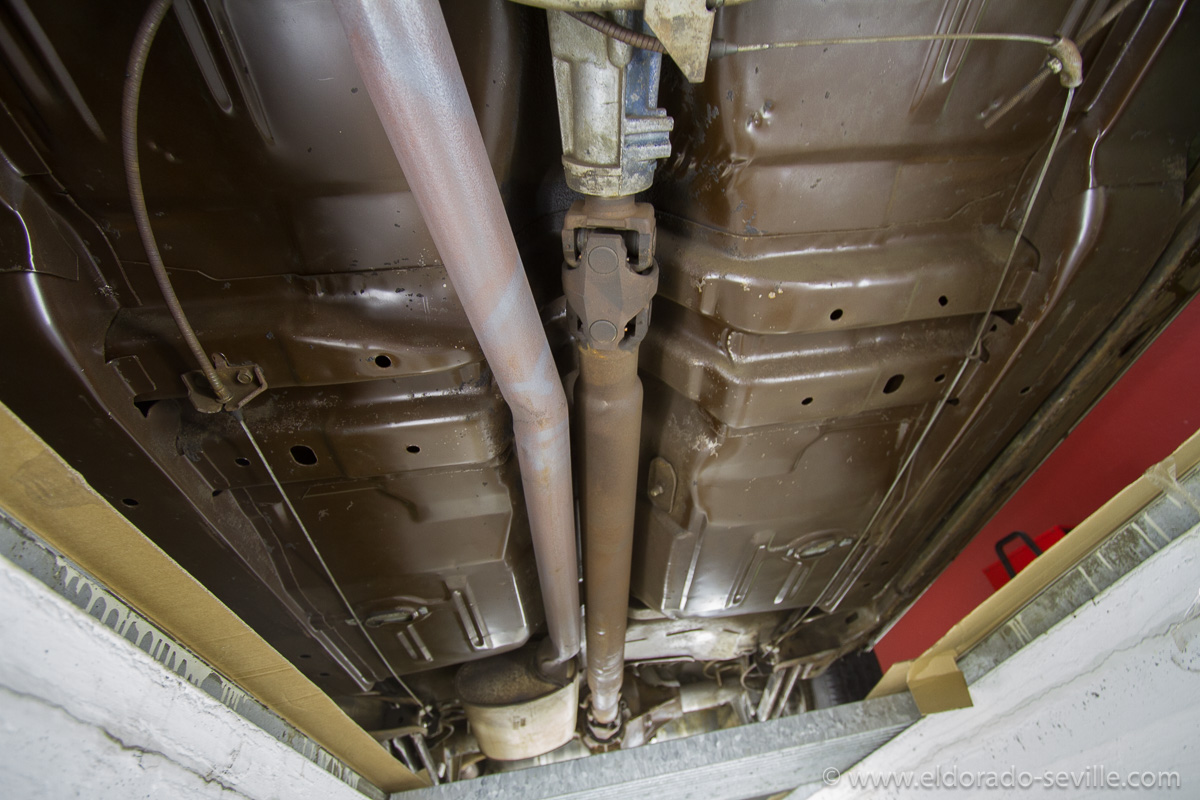
The driveshaft before…
The location of the first two factory markings. I measured them to make sure that I could replicate them when I painted the driveshaft. The first two markings were (light) blue. 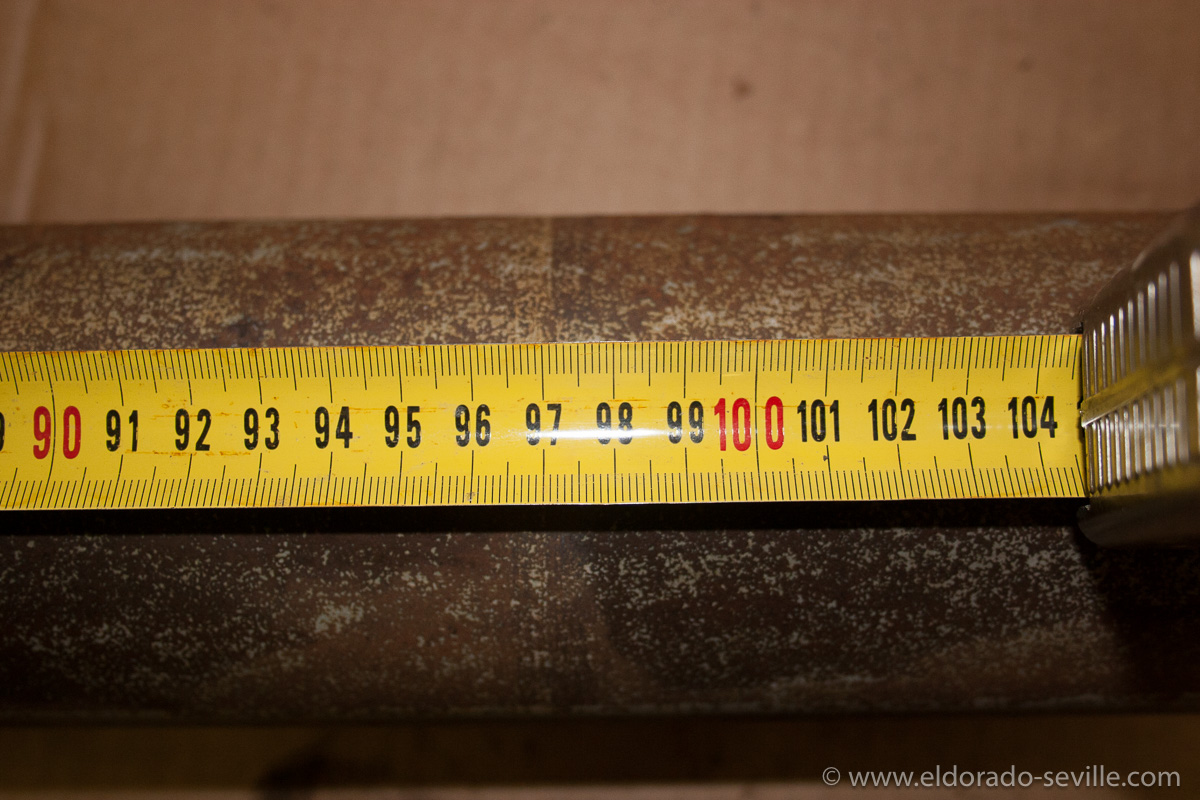
The location of the third factory marking. I measured it to make sure that I could replicate it once I painted the driveshaft. This marking seemed to be black once.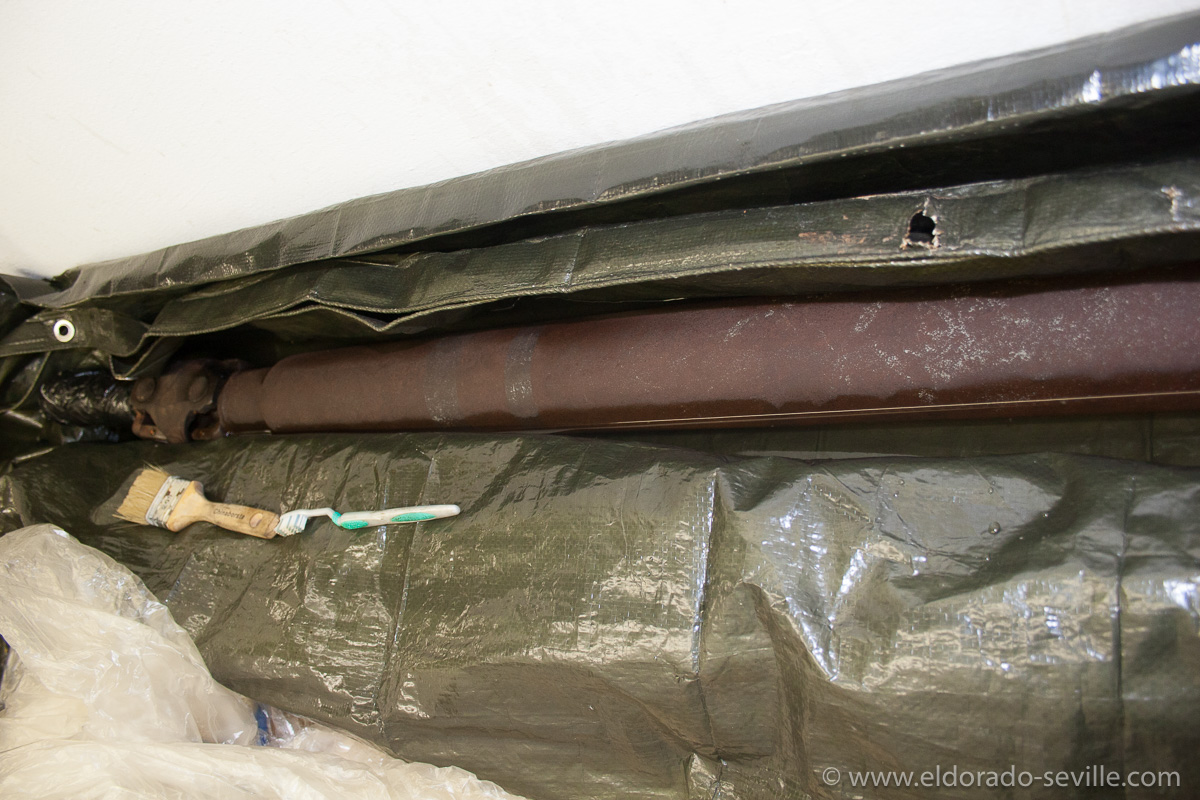
I soaked the driveshaft for 48 hours in rust removing liquid and used these two brushes to agitate it into the rust.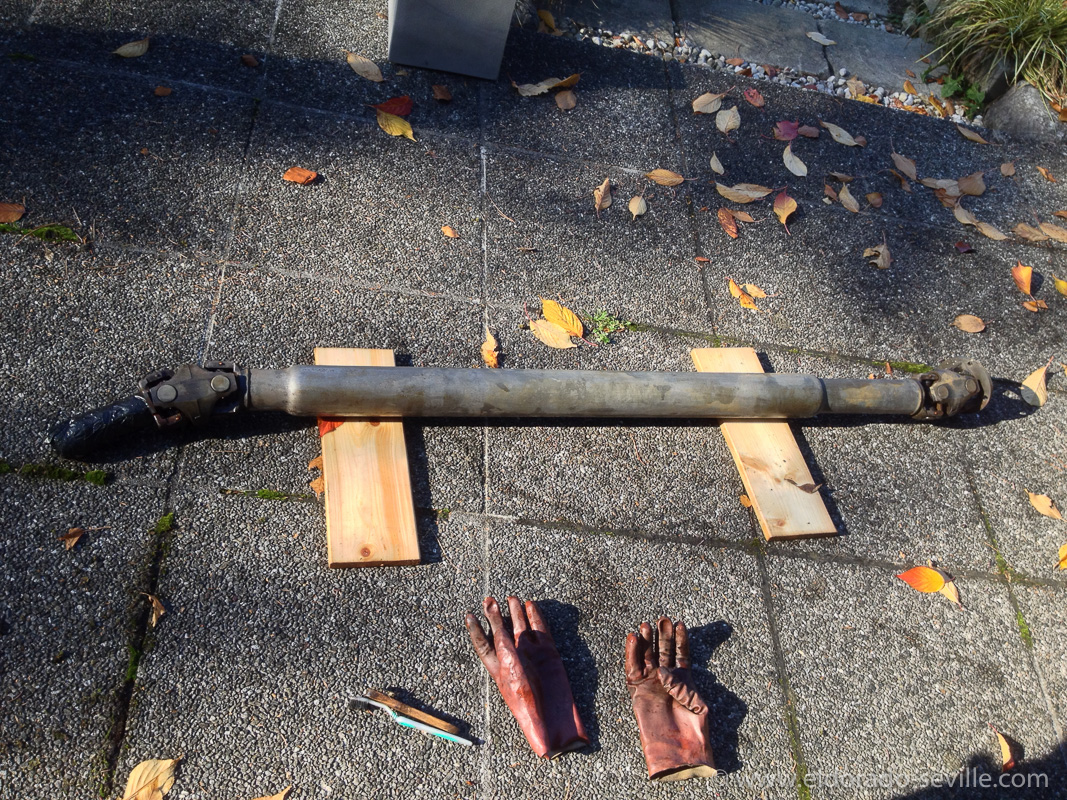
This is how it looked after soaking for 48 hours. All the rust was completely gone and only bare metal was left.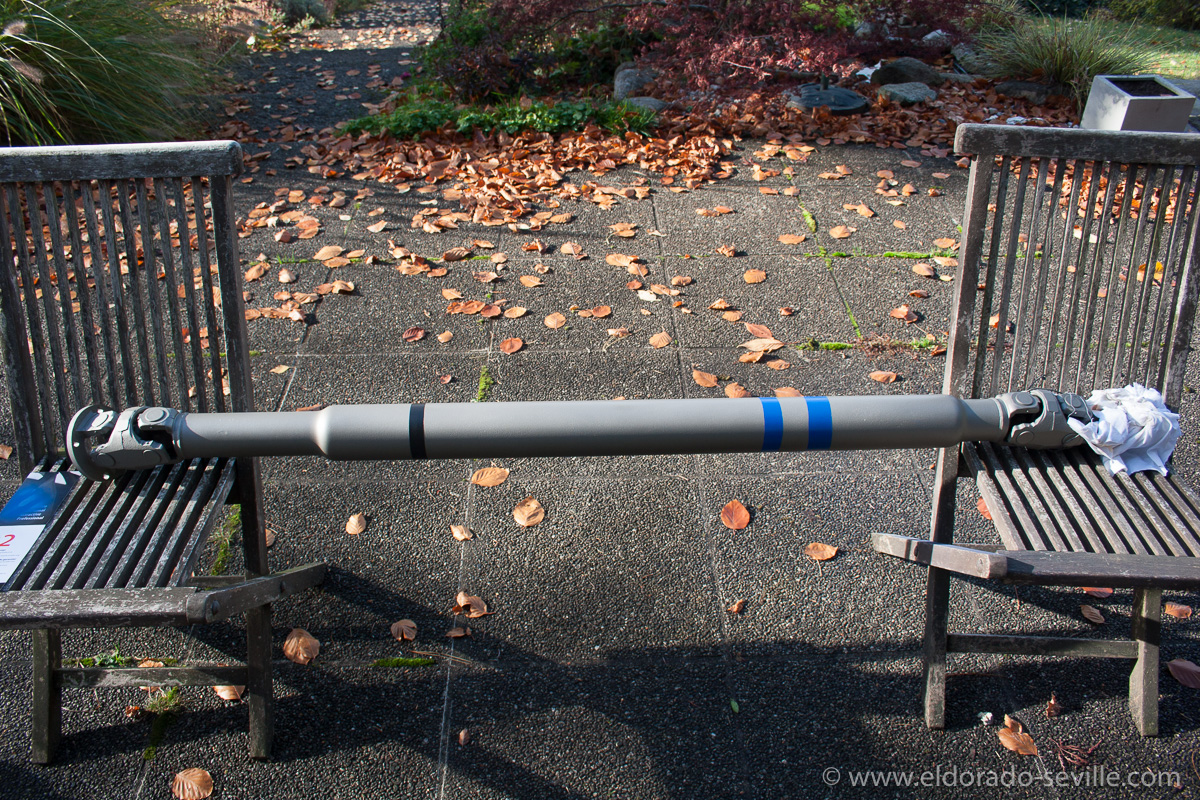
The finished drive shaft.
The replicated factory markings on the drive shaft. The correct shade of blue color was only a good guess - I think it comes pretty close to the traces of paint I had found.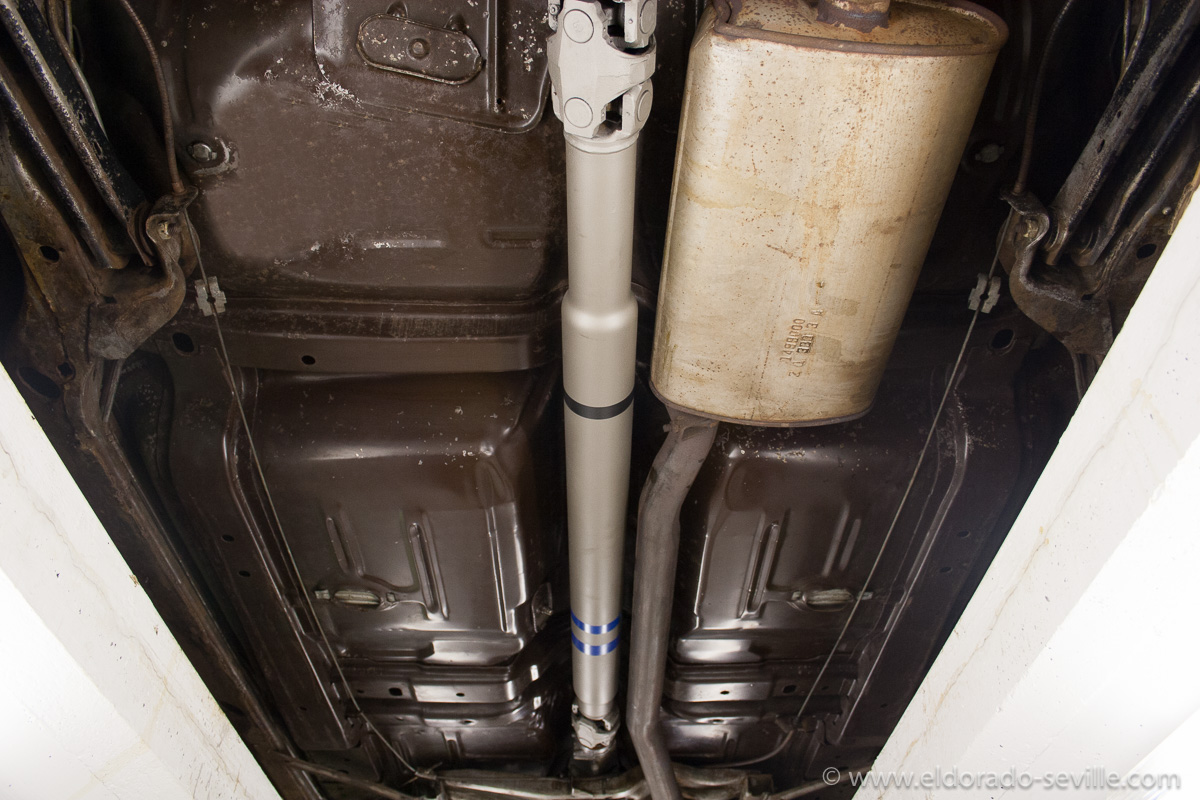
Back in the car to be able to move it around.
MY WINTER PROJECT FOR 2015/16 - I WILL FRESHEN UP THE 74s UNDERCARRIAGE!
Some other smaller things could happen as well…
The plan is to make the car to look and drive like new until next season. It's such a great car!
I think there are many different approaches for removing the rust from the bottom side of a car.
My personal method and plan so far, was to scrape any loose rust off with a wire brush.
I then steam cleaned the undercarriage.
Next step was to apply a rust removing gel, which I let on over night. Then I steam cleaned the car again to get rid of the gel. The gel is a quite a bit of pain to remove if it's getting dry, especially as I had to do the steam cleaning with the car on jack stands and limited access to the undercarriage. (I can't do this inside the garage over the pit)
So a lot of manual cleaning is necessary after the pressure wash to get rid of the gel on areas I cannot hit during the pressure wash... I then applied the gel once again and did the same routine all over again.
I will now mechanically remove the more stubborn rust with some pneumatic tools and wire brushes of various sizes I borrowed from my dear friend Richard.
Once the rust is completely removed, I will use the gel for a last time.
I will then use fine sandpaper to achieve a smooth surface of all metal parts.
If afterwards there is still some minor corrosion left I´m planning to use a rust converter and rust encapsulator to paint everything.
The oil pan and transmission oil pan will be painted in Bill Hirsch Cadillac blue again. I will completely clean up the fuel and brake lines as well.
The frame and chassis parts will most probably get painted with Eastwood Extreme Chassis Paint in satin black. As a last step I will cover everything in a transparent undercoating wax. This project will keep me busy until next spring as I want to do it very thoroughly and as perfectly as possible. The most common approach most people would do, is to knock off any loose rust, and then paint it with rust converter and rust encapsulator. Thats perfectly fine as well - but I want the underside of my car better than new and in perfect show quality like the rest of the car
You can find all the pictures of the “Restoration“ here.
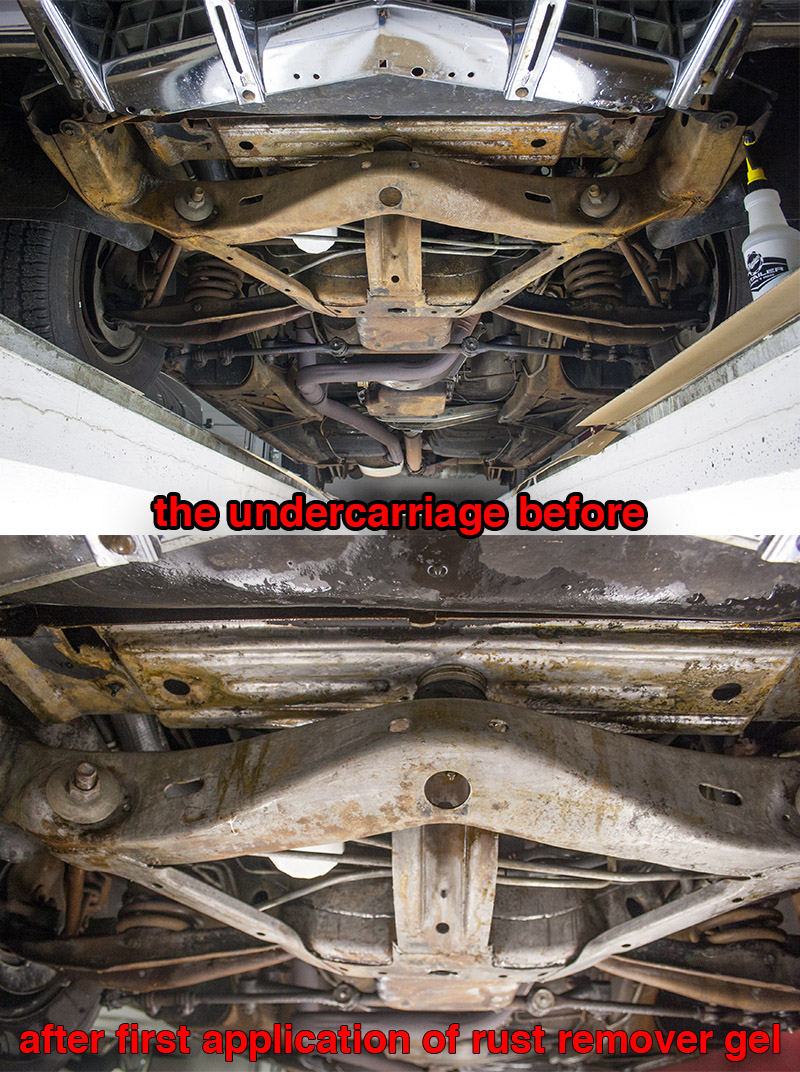
The 74 has some light surface rust on the undercarriage as most areas were left bare metal at the factory. The original owner did not have the car undercoated. Its nothing major - it is more a cosmetic thing than anything else. I want the car to look as good on the underside as it looks from the in and outside. I will remove as much rust as possible with a wire brush and then use rust removal gel to get rid of all the rust. It´s a messy job - but I want to do it as thoroughly as possible. After everything is clean I will paint the frame with rust preventive paint in semi gloss black paint.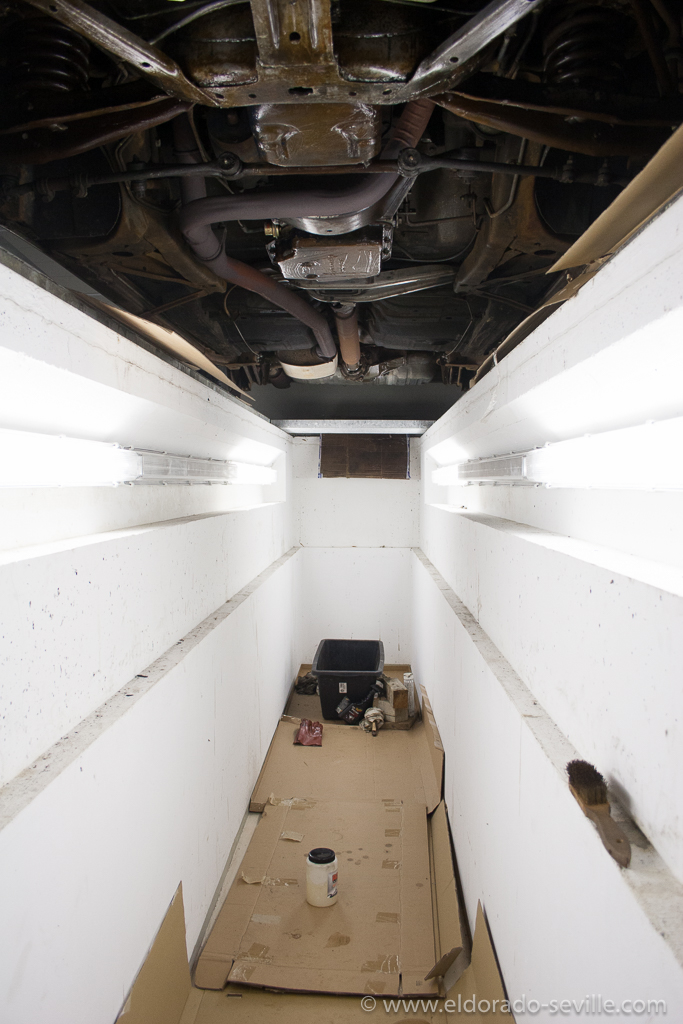
The pit in my garage - this is how I will see my car most of the time for the next months… You can see that I applied some rust removal gel to some areas already. I steam-cleaned the undercarriage before.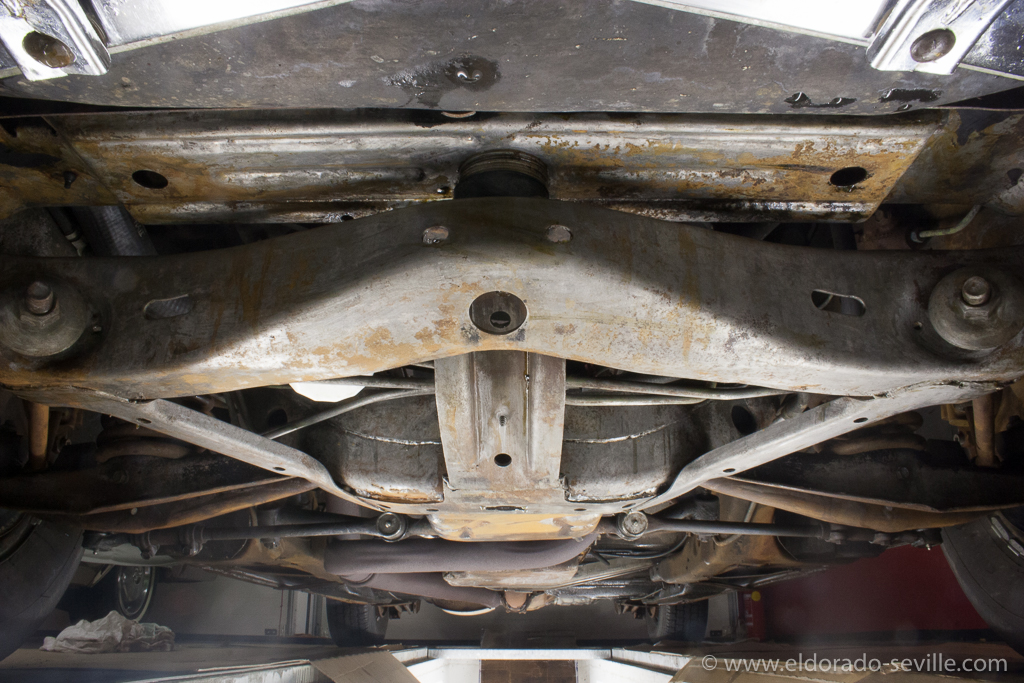
A small test spot after only one application of the gel - 2-3 more are recommended.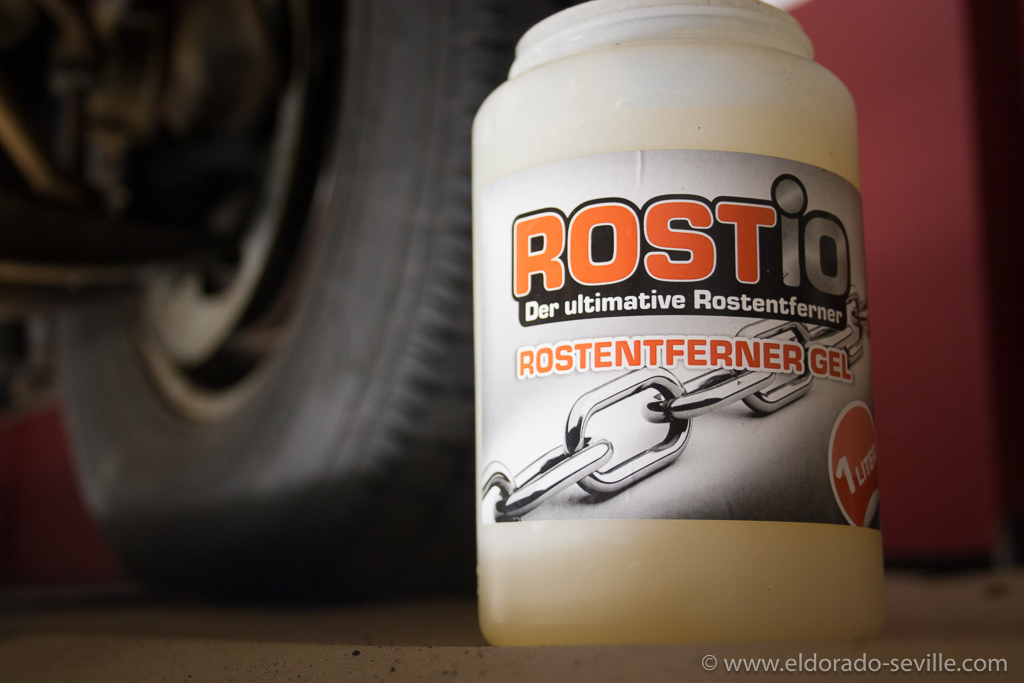
Thats the gel I´m using - it seems to be a great product. I got it through www.rostio.de . 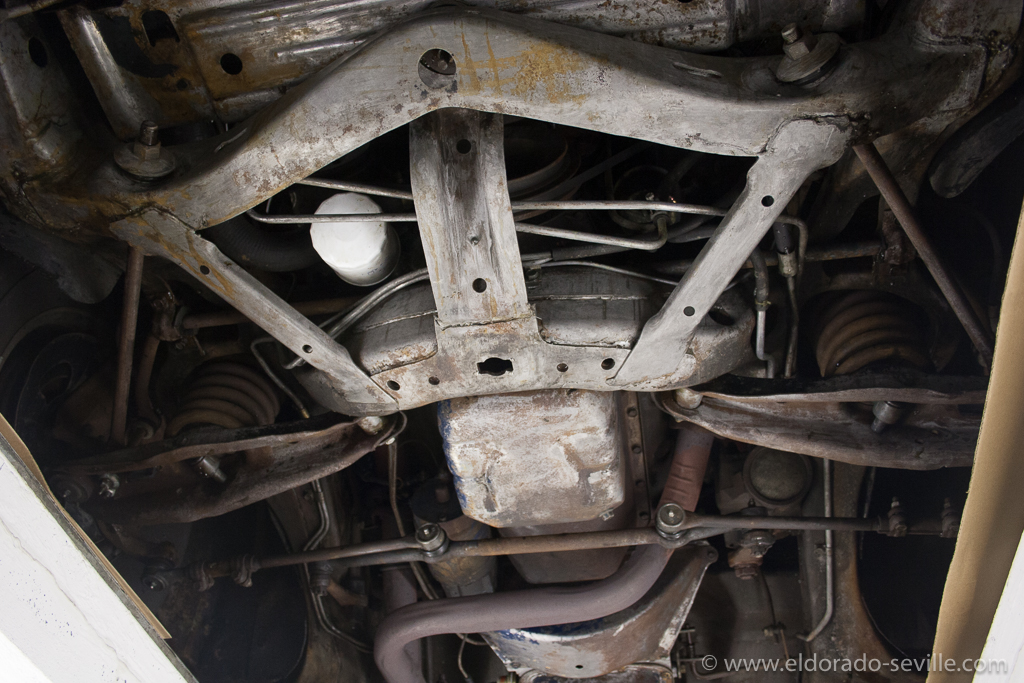
After the first coat of rust remover gel. It looks very promising.
FIXING THE LOW WASHER FLUID INDICATOR ON THE 1974 CADILLAC
On the 74 Coupe deVille the “Washer Fluid" light came on when I turned on the wipers.
When I checked the fluid level, the bottle was full.
I then discovered that the float unit seemed to be missing some parts like the magnet, which activates a reed switch, and the float itself.
Luckily I found all the parts sunken at the bottom of the washer fluid bottle.
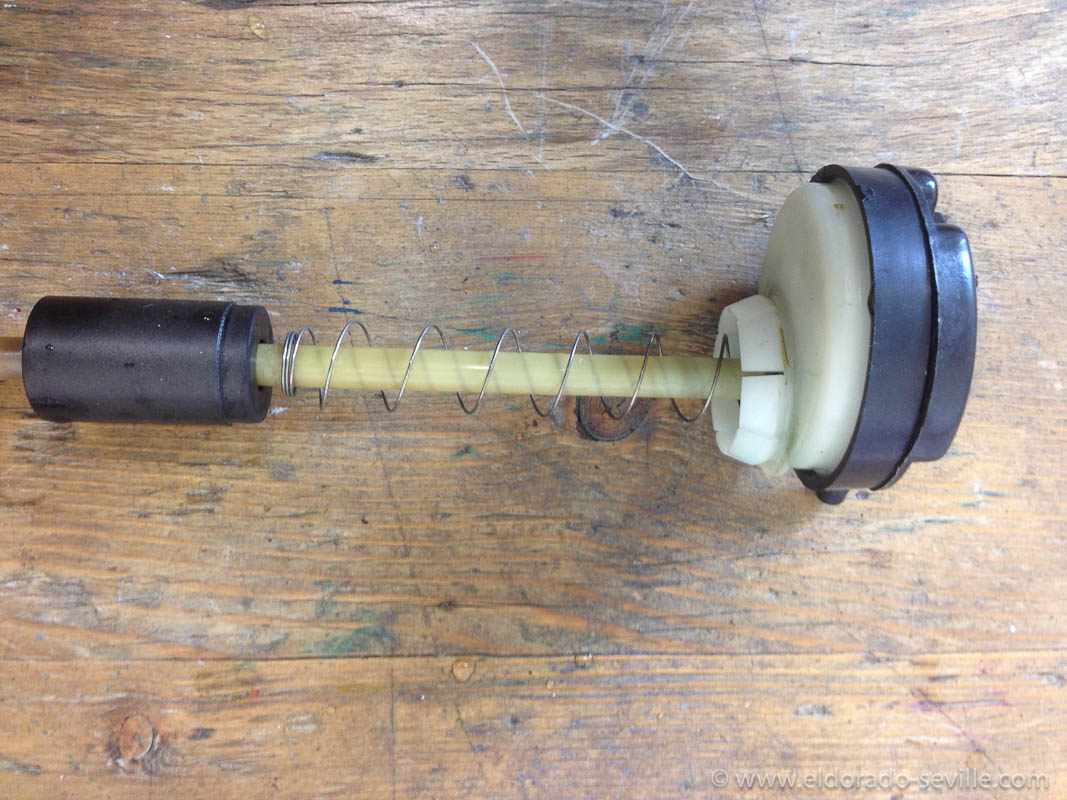
The unit from the 1974 Coupe deVille
When the fluid level in the washer fluid bottle drops below 1/3 full, an amber tell tale light comes on labeled "WASHER FLUID".
Engaging the wipers allows a small amount of current to flow from the wiper motor terminal through a yellow wire to the washer bottle float unit. When the fluid level in the washer bottle is low, the float drops, allowing the circular magnet to separate from the cap assembly. This permits the contact points within the cap to close, bypassing the resistor that is in parallel with the contact points, and causing current to flow to the indicator light.
I had two problems:
- The float itself did no longer float in the washer fluid
- The reed switch in the cap did not deactivate - it was stuck and the contact points in the switch did not open with the magnet.
I got some valuable tips on the CLC forum about what kind of switch is used inside the cap, and how to make the float floating again.
TJ wrote about the switch:
"I don't remember what year it was that I fixed but I don't remember it being that difficult. There was some rivets or something that had to be drilled out or broken off. I think I used screws and nuts to put it back together. The working bit is what is called a reed switch. They are by today's standards old technology but since there is a fair amount of room in there you don't need to find the exact same one. If you do a search for reed switch you should find em. It's usually a greenish glass capsule with 2 leads coming off the ends. "
After I applied an additional, much stronger magnet to the switch, it suddenly came back to life! For whatever reason it is working again. It looks like the stronger magnet opened the stuck contact.
I still had the problem with the sinking float though and got another great tip from Jim:
“After inspecting the assembly and pulling up on the float, the warning light no longer displayed, so I knew the float was bad. I took the float off and dropped it into the reservoir. It sank like lead, so I knew it was a porous material. I knew I had to remove the moisture somehow, so I thought the safest solution was to slowly heat it up so the fluid would evaporate. I figured it was designed to tolerate extremely cold and extremely hot outside temperatures, so figured the lowest oven setting should work. I got lucky in that there was no distortion. I wouldn't recommend leaving it in longer than a few minutes, though. "
I tried the oven drying method mentioned in Jims posting above at the lowest setting. I left it in the oven like Jim recommended, and afterwards the float did not sink any longer, but it still could not hold the magnet up to the switch.
Then I put it into the oven again for an hour. Afterwards it got slightly better, but it was still to weak.
Once again I put it into the oven at a higher temperature (230 degrees Fahrenheit, or 110 degrees Celsius). Luckily the float does not warp or melt at this temperature. I switched the oven off after another hour, and I left it in there to cool down over night.
It indeed is a porous material. It seems like the higher temperature in the oven "fixed" the float for me. It also feels completely different after the cure - when I touch it now it feels much more porous than before, when it felt like a piece of plastic.
It's floating perfectly again - I hope it will stay like this for a long time. If the problem reoccurs it´ll go back into the oven…
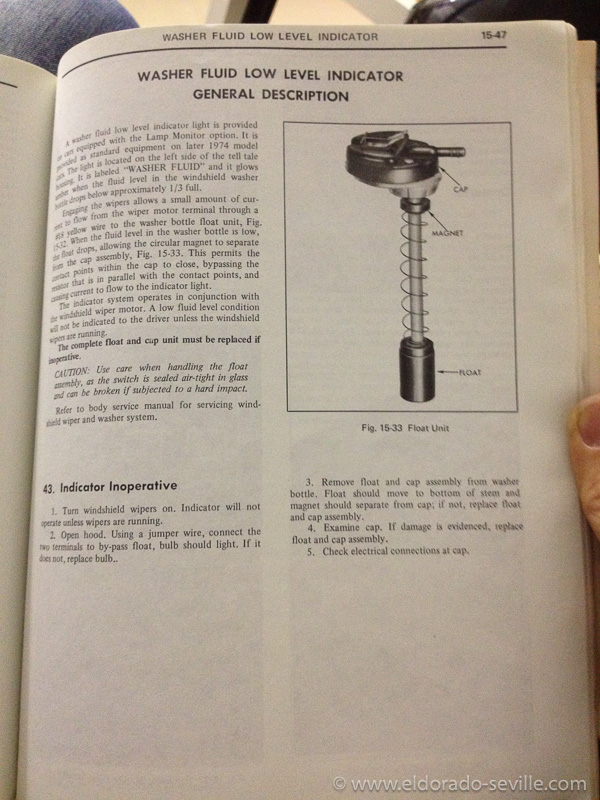
From the 1974 Factory Shop Manual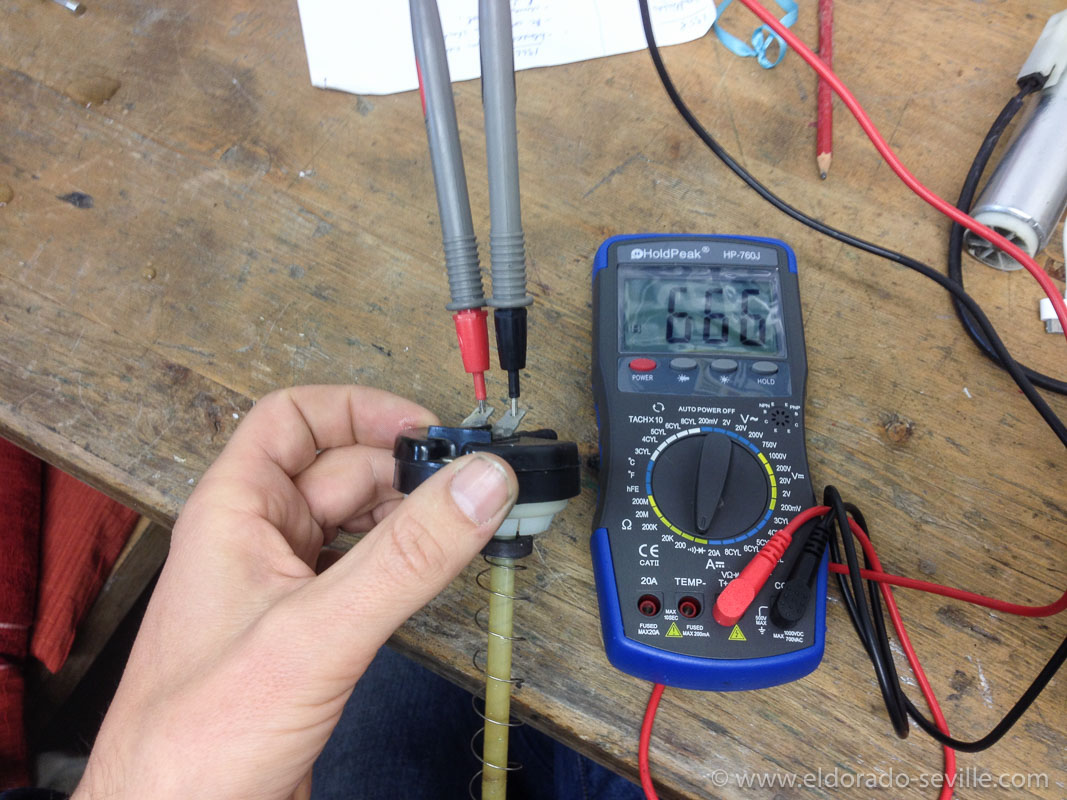
I checked the switch with a voltmeter.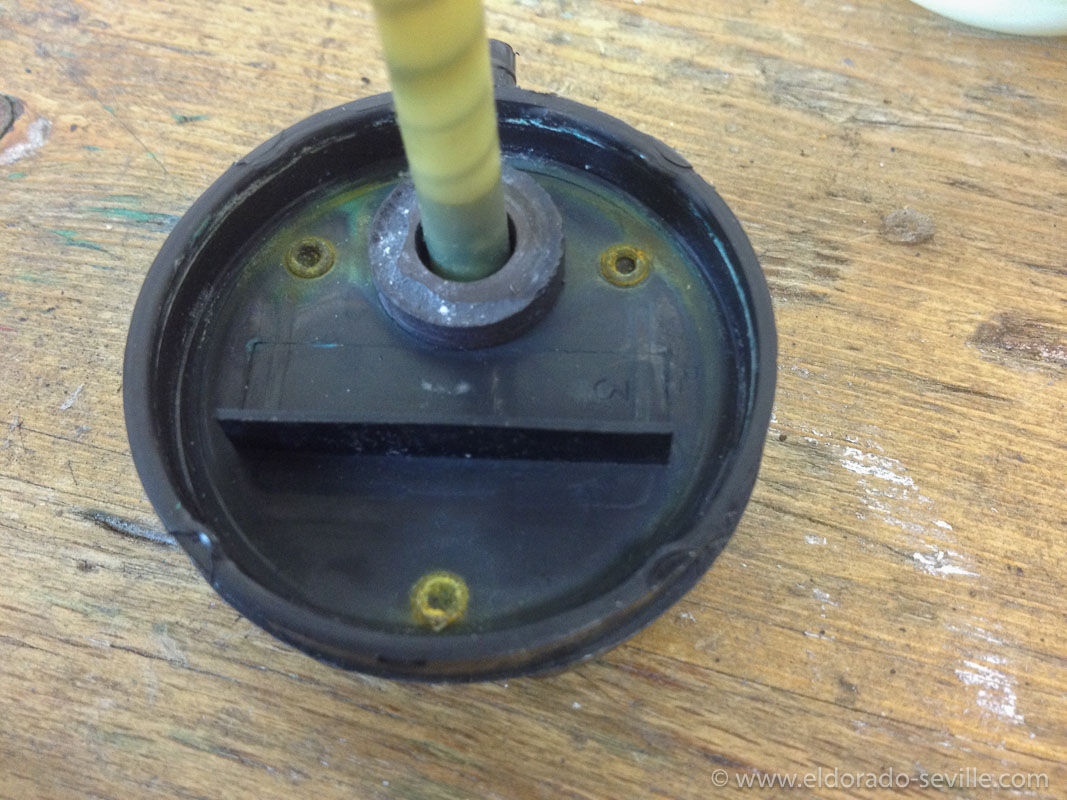
You have to get the rivets out if you want to access the switch.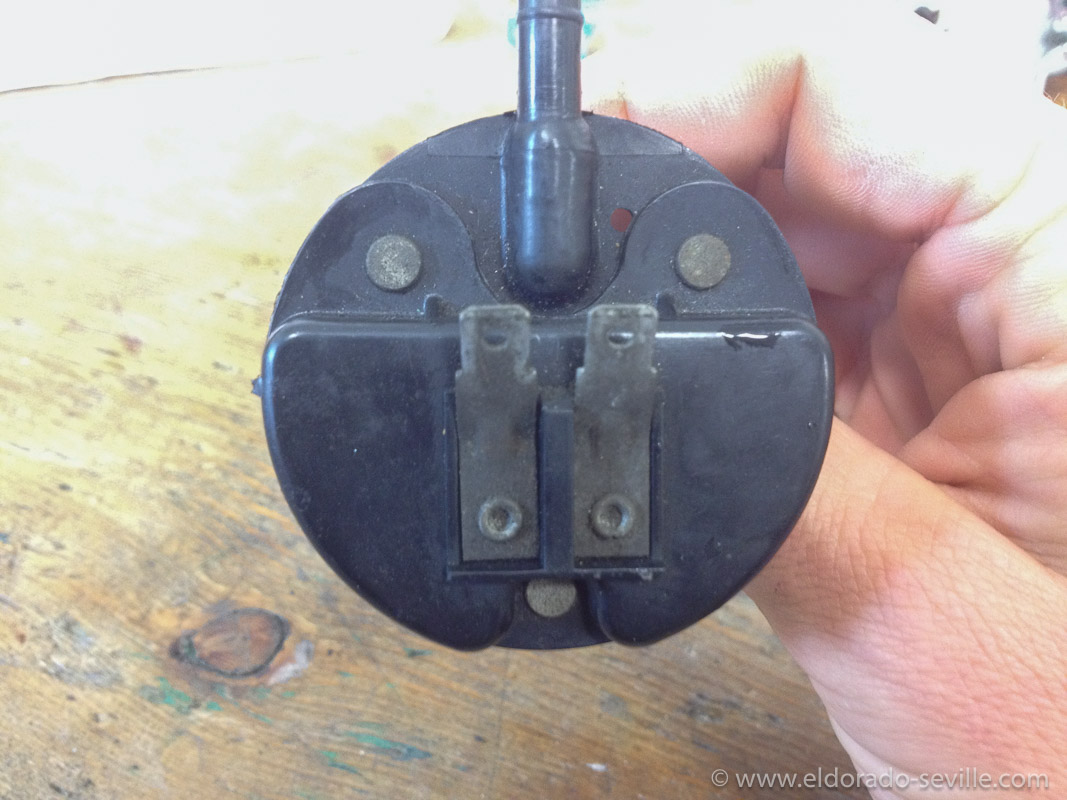
The reed switch is under this cap.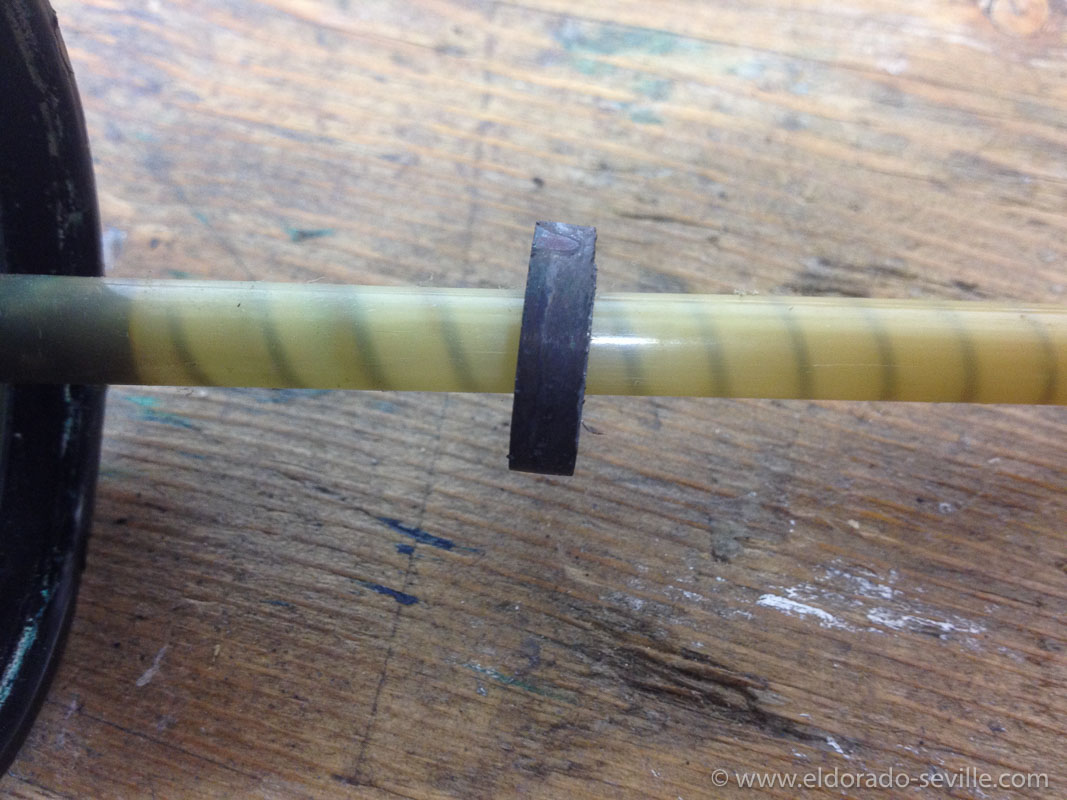
The magnet which is normally activating the reed switch.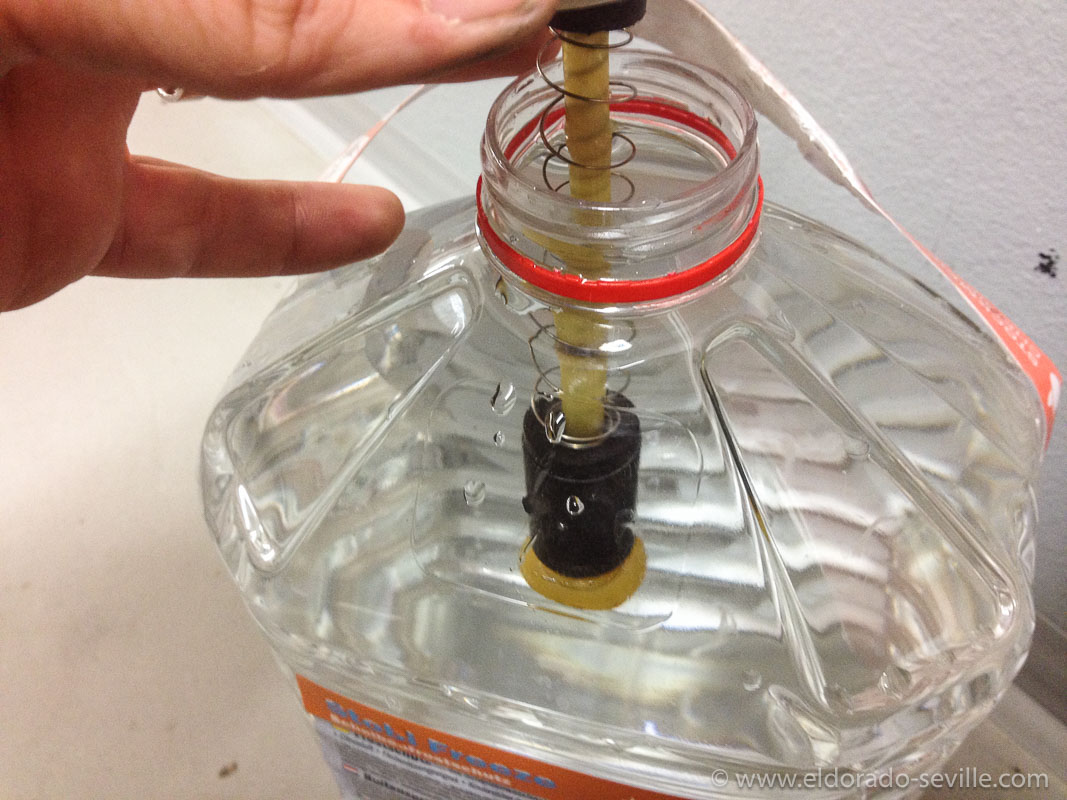
When I tested the float it sank…
REPAIRING THE SEAT BACK LOCKS OF THE 1974 (AGAIN) AND NEW POWER ANTENNA INSTALLED
I found a way to remove the seat back lock mechanism without disassembling the whole front seat and replaced the mechanism with one which I got from my favorite Cadillac Parts vendor - Arizona Vintage Parts. As always they delivered a perfect part and it only took me half an hour to remove the old part and install the new one.
The function of this lock is that it latches the seat backs in place when the doors are closed. The lock disengages and unlatches when the door is opened, so that rear passengers can simply fold the seat backs away when entering or leaving the car, without having to push a button.You can hear this "Automatic Seat Back Release" working when you open or close each door.
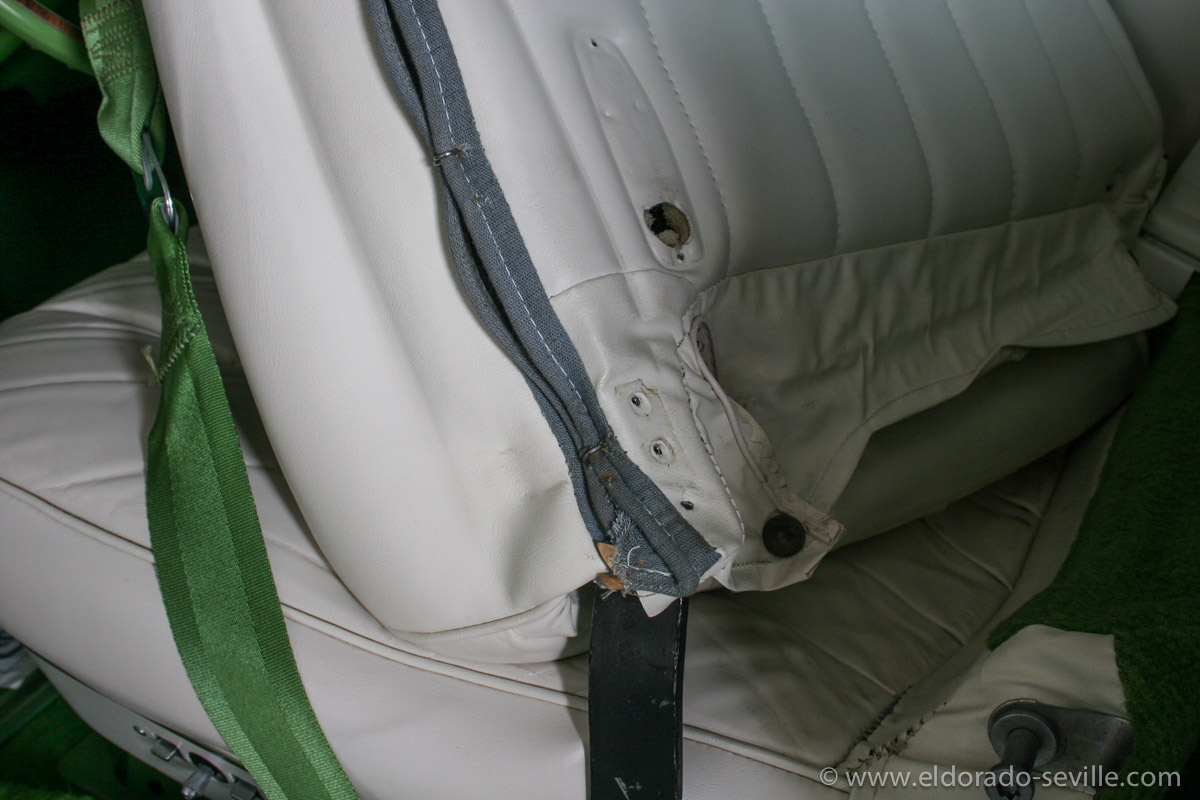
After removing the plastic covers around the seats - it will look like this. The seat back lock mechanism is hiding inside under the seat back.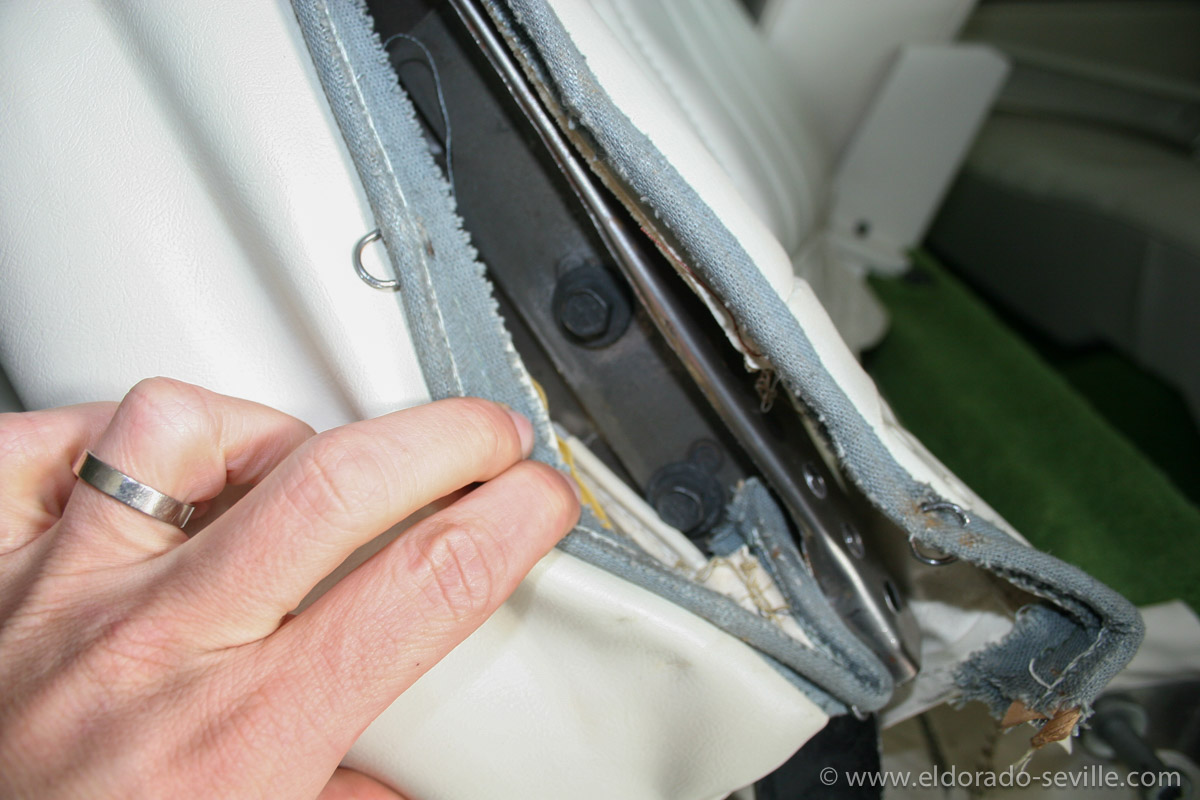
You have to remove the lower 3 hog rings to get access to the two mounting screws.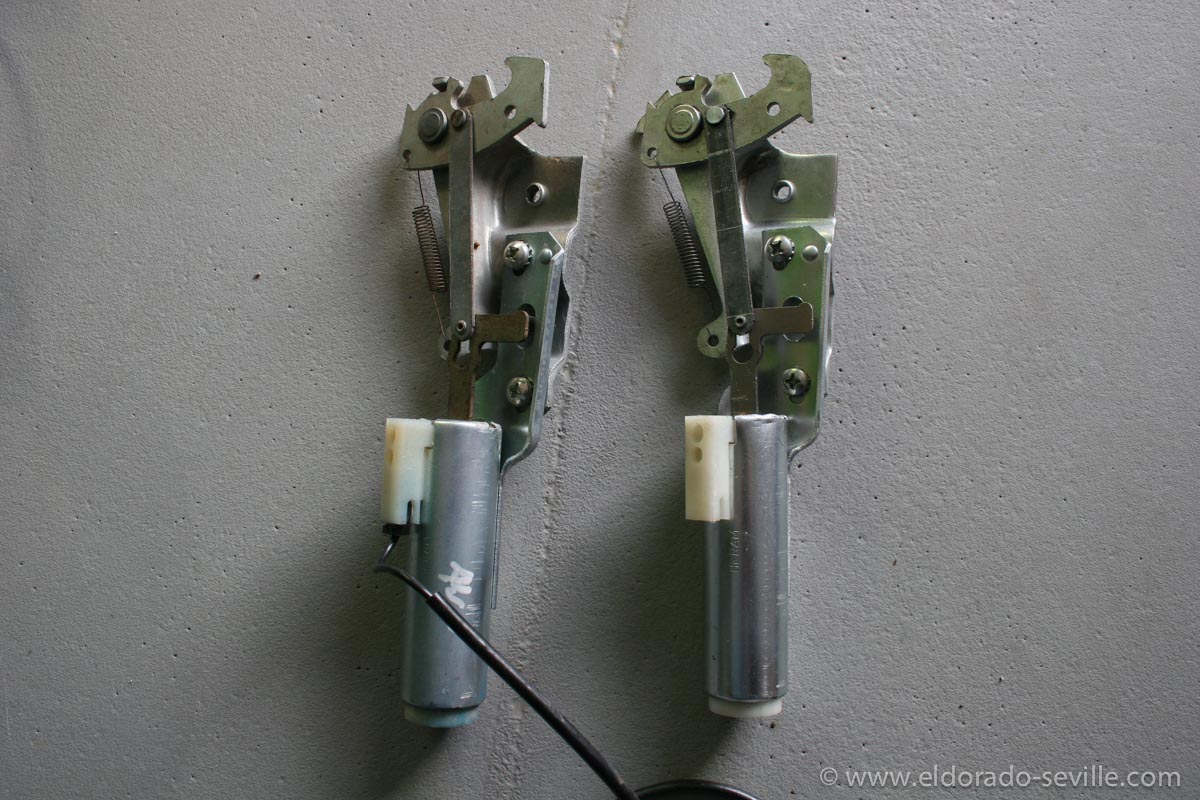
The new mechanism I got from AVP on the left and the old original one which does no longer work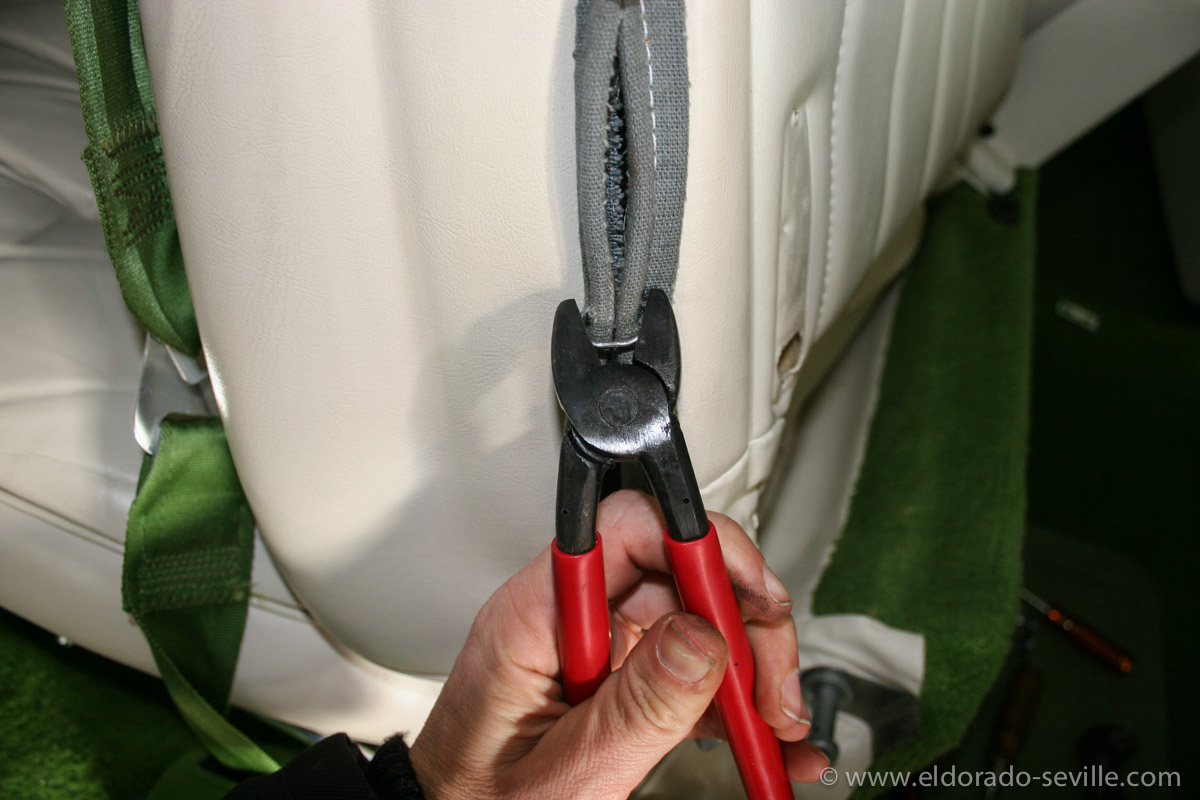
After installing the new part all you need to do is to install the hog rings again and install the seat cover surround moldings. Here I´m using a hog ring plier - but you can use some simple other pliers as well.
DEFECTIVE POWER ANTENNA
I also had to replace the defective power antenna of the 74. The original one had a burnt motor and also the gears and the whole mechanisms were broken. I can´t imagine how this could have happened. When the antenna died it also burnt the fuse. After inspecting the power antenna I decided that it was not rebuildable and ordered a rebuilt one from Arizona Vintage Parts as well.The antenna can be removed very easily on the 74 - so much easier than on my 60s cars. I was able to switch it out within 10 minutes. It works perfectly now.
It´s very important to me that all things on a Cadillac do work like they should.
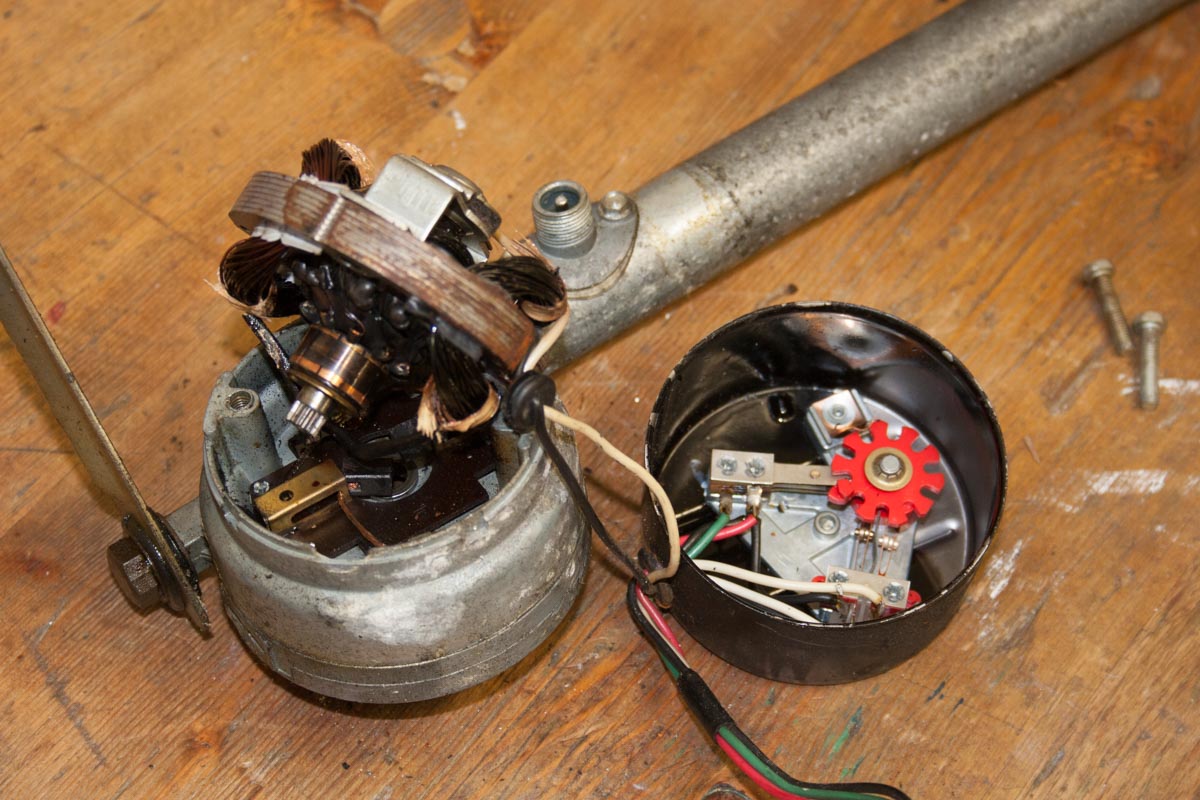
This is how the disassembled original power antenna looked like when taken apart - you can clearly see that the motor was burnt.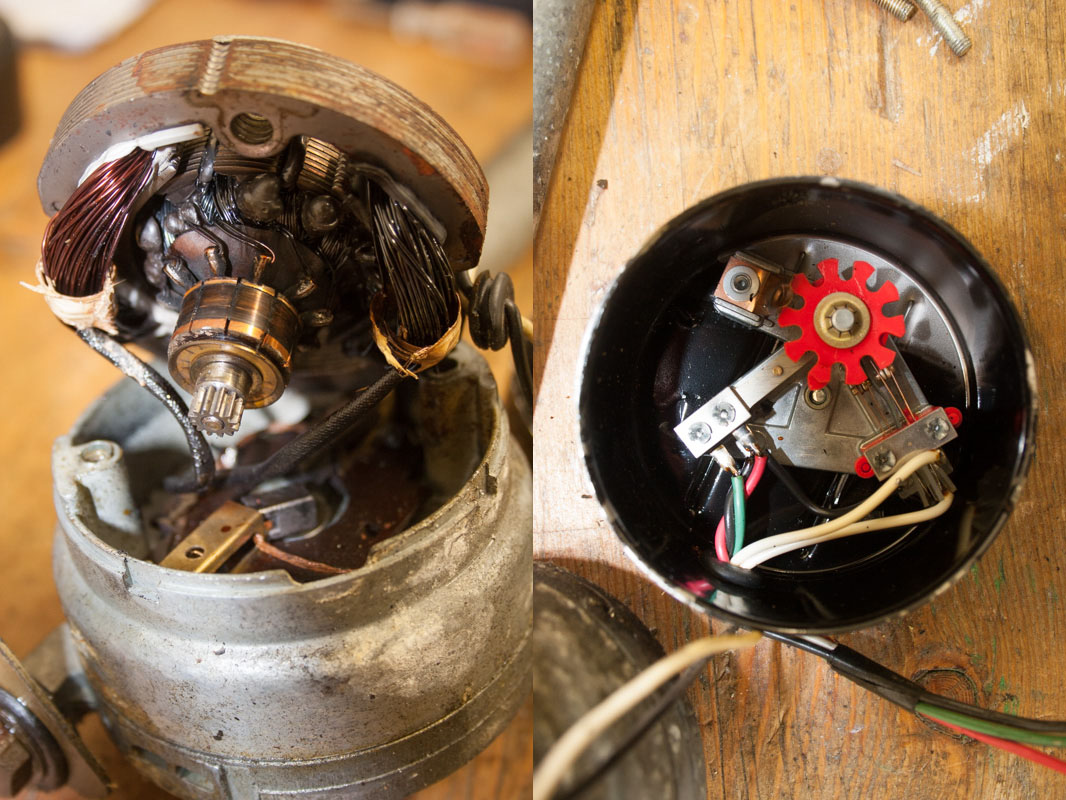
This is how the disassembled original power antenna looked like when taken apart - you can clearly see that the motor was burnt. Also the mechanism itself was damaged.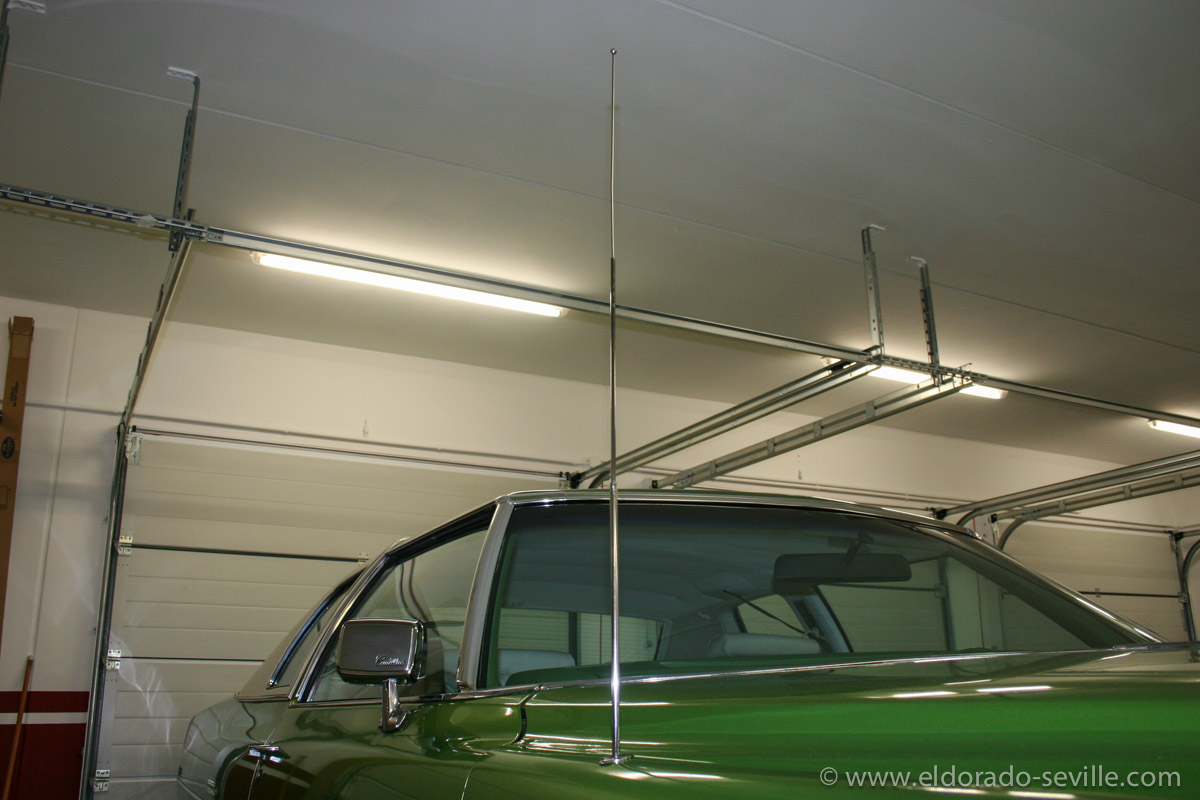
The 74 has a working power antenna again.
HAPPY HOLIDAYS
Happy Holidays to all the visitors of my website.
my little family with the 1974 Cadillac Coupe deVille in Persian Lime - the perfect color for the holidays ;-)
TRYING TO REPAIR THE SEAT BACK LOCK MECHANISM ON THE 1974 CADILLAC
They are actuated by big solenoids which are mounted in the back rest of each front seat.
When you open the door they are actuated, and the seat backs can be folded forwards to allow access to the backseats without having to manually unlock the seat. You can hear this "Automatic Seat Back Release" working when you open or close the according door.
It worked perfectly on the passenger side, and most of the time on the driver side.
When the door was open though you could sometimes hear a rattling sound from the solenoid as it did not make good contact.
That was not acceptable for my standards of course.
You have to remove most of the back seat material to get to the solenoid unfortunately.
Once we got it out, we took the solenoid apart. Some of the actuators insulation foam had crumbled inside the end stop of the solenoid - so we replaced that, cleaned and lubricated everything, and put it back together.
Unfortunately the problem was still there after this.
So we eventually found out that the striker where the seat latches, was not adjusted correctly. Something must have gone wrong at the factory already.
We had to modify it slightly to make it perfect again, so that the solenoid could disengage itself properly when the seat back was in the back position.
When everything was back together it worked for a while before it broke again. I will have to find a good working solenoid now and replace it once again.
UPDATE: You can read about the final repair here!

You have to remove the seat back material to be able to access the solenoid and latch mechanism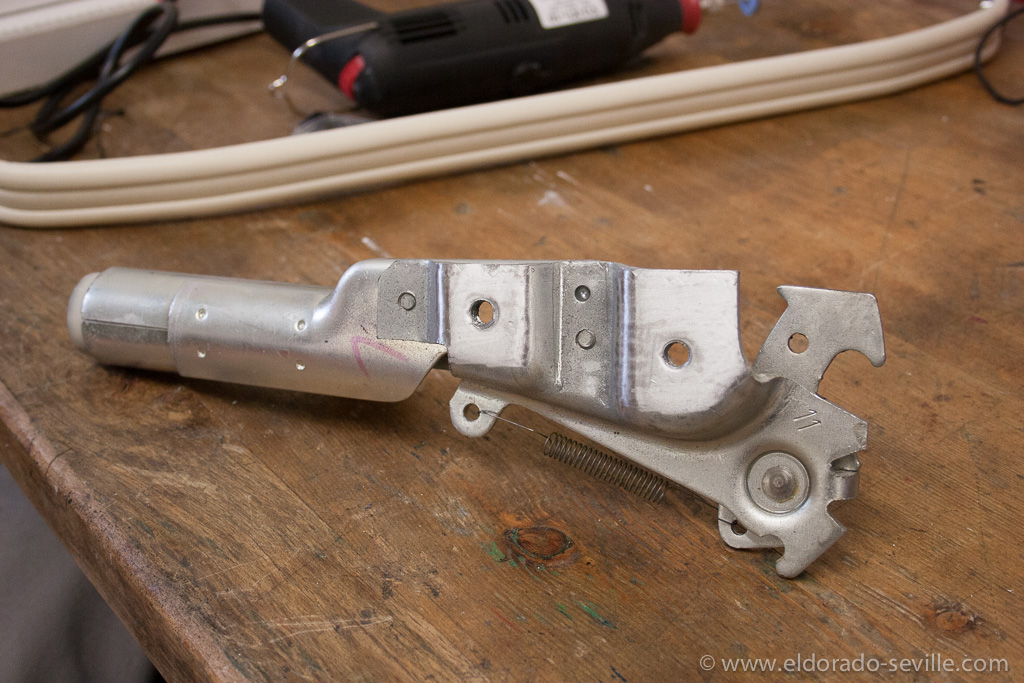
The latch mechanism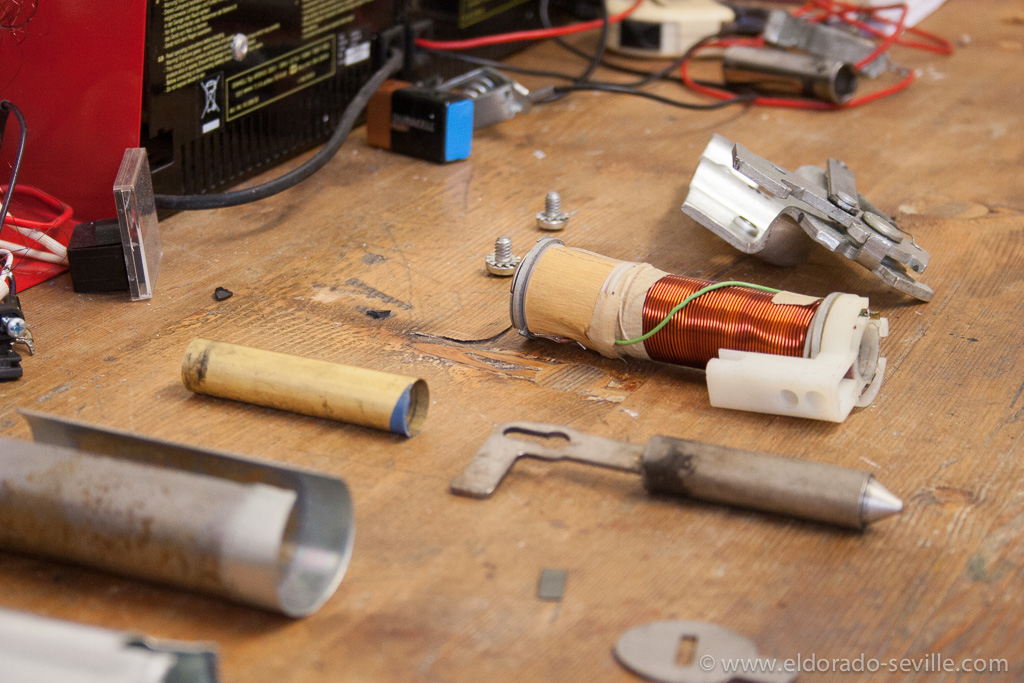
The solenoid disassembled - before cleaning - there are two coils inside.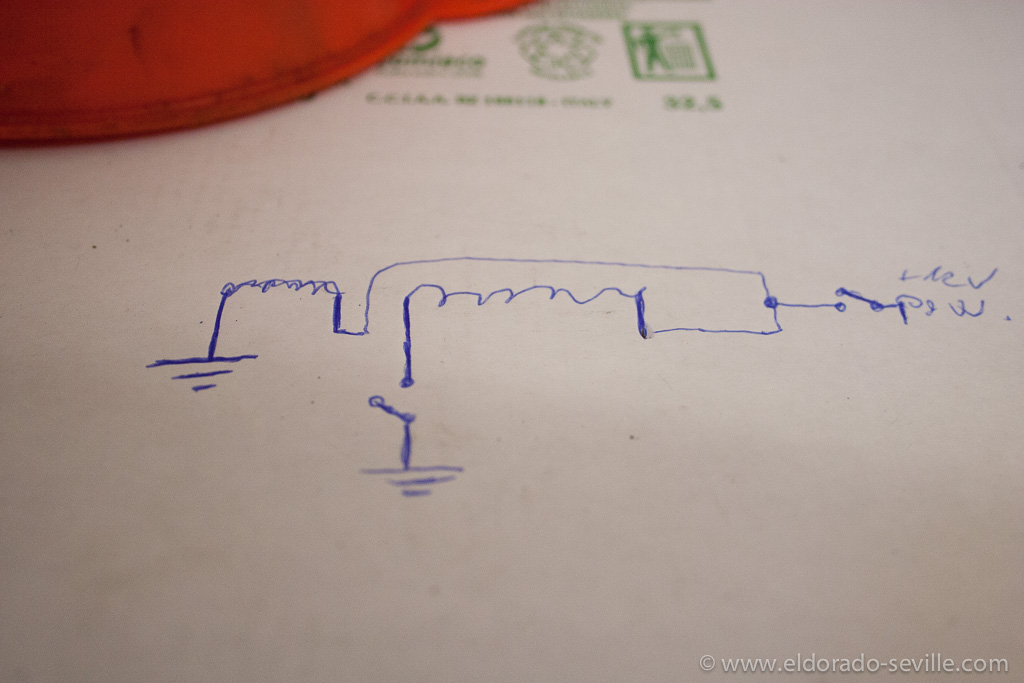
A quick drawing of how the system works.
A super nice 1974 Persian Lime Coupe DeVille is on its way to my garage!
This is a car in spectacular Persian Lime, with white leather interior.
More details will follow once the car has arrived here in Europe by the end of May 2014.
I hope it will have a safe journey across the Atlantic! It will leave the USA via New York.
Check back soon for more info and pictures!
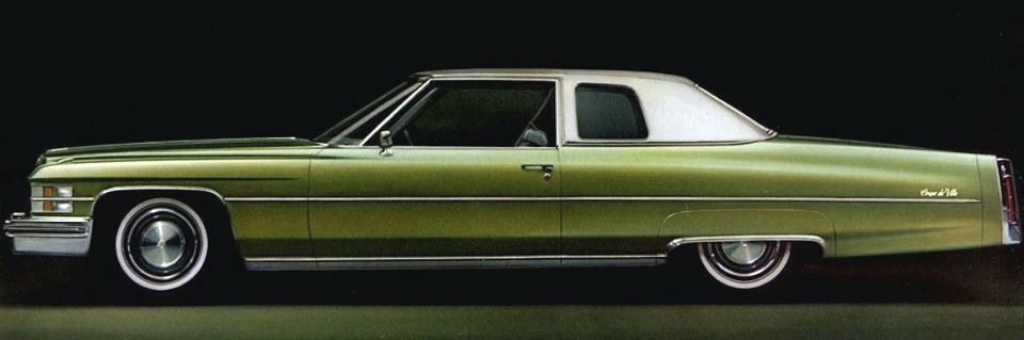
The 1974 Cadillac brochure picture...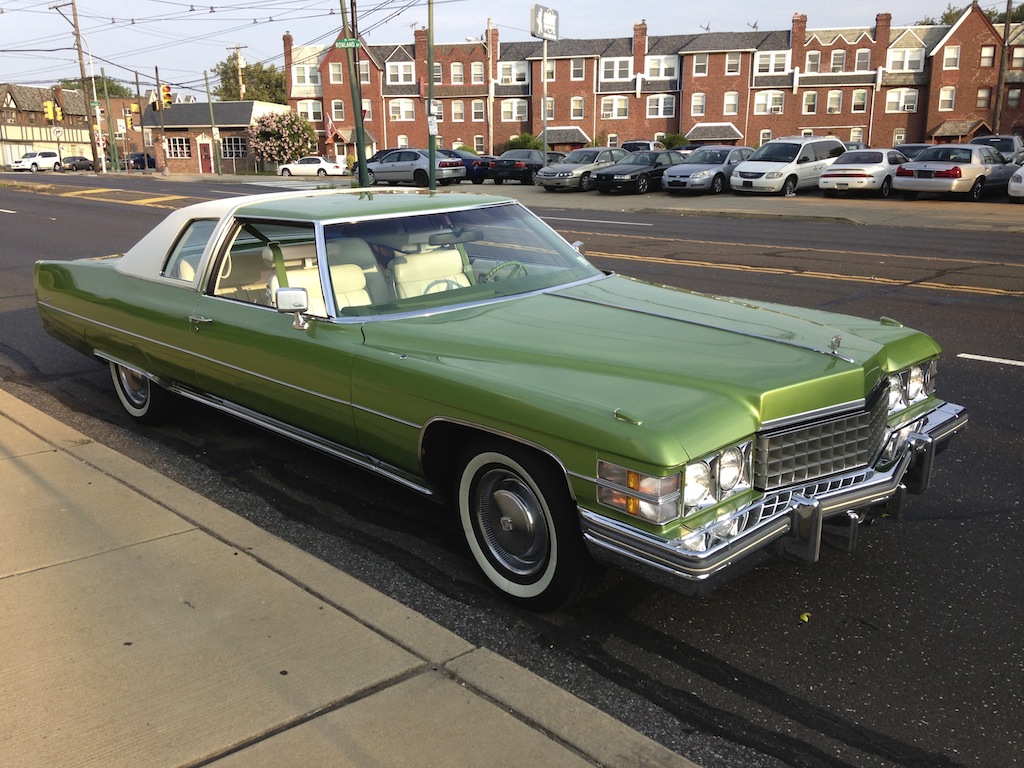
... and the car in real life - yes this is still the original paint - it looks spectacular!
During pick up in Philadelphia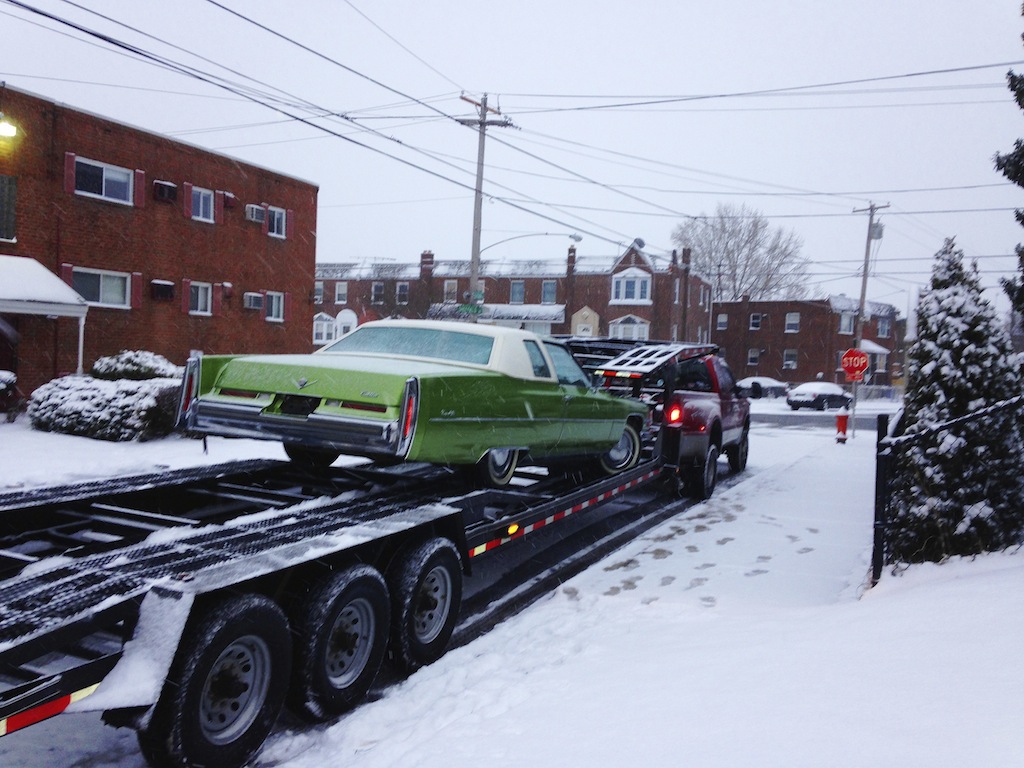
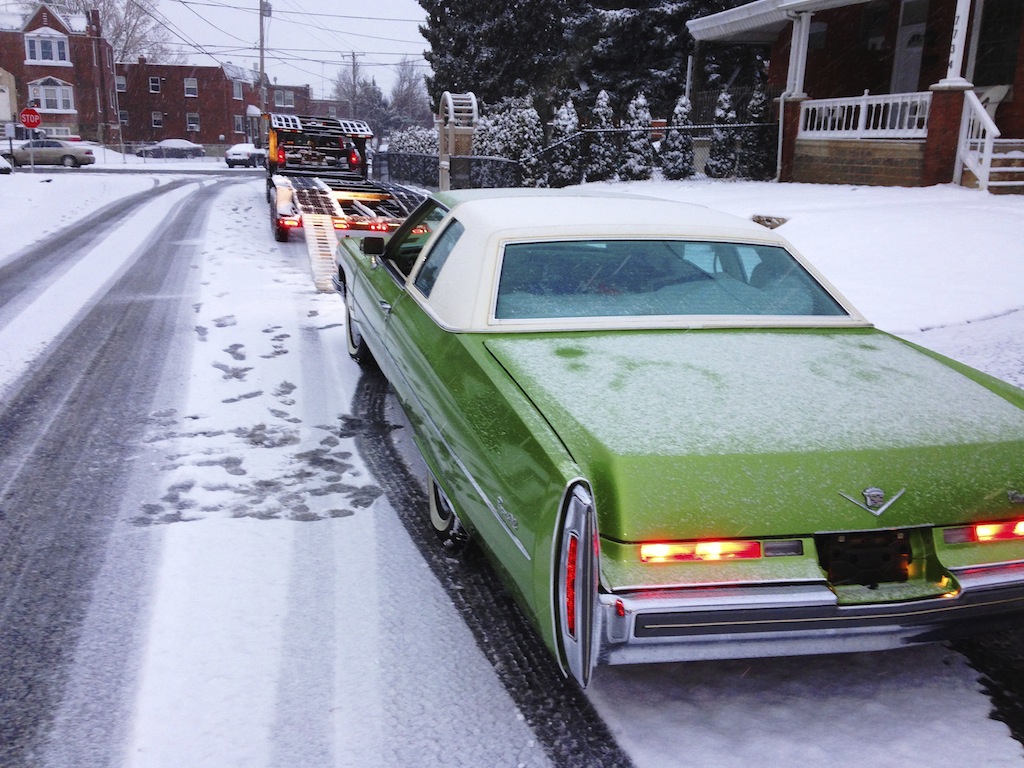
1966 Cadillac Coupe deVille (15)
1967 Cadillac DeVille (54)
1967 Cadillac Eldorado (71)
1971 Lincoln Continental Mark III (23)
1974 Cadillac Coupe deVille (45)
1978 Cadillac Eldorado Biarritz (24)
1996 Buick Roadmaster (19)
Car Shows (53)
Cruising (4)
For Sale (3)
Garage Stuff (32)
Pacer (1)
Restoration (137)
Various (55)
Video (16)
Website News (30)
- 6 way power seat
- 8-track
- 10 Ohm
- 429
- 1932
- 1957
- 1958
- 1958 Cadillac Eldorado Seville
- 1958 Cadillac Repair Tip
- 1959 Cadillac Eldorado Seville
- 1964
- 1965
- 1966
- 1966 Cadillac Coupe deVille
- 1966 Cadillac Repair Tips
- 1967
- 1967 Cadillac DeVille
- 1967 Cadillac Eldorado Repair Tip
- 1967 Cadillac Repair Tip
- 1967 Eldorado
- 1968
- 1970 Cadillac Eldorado
- 1971
- 1971 Lincoln Continental Mark III
- 1974
- 1974 Cadillac Coupe DeVille
- 1974 Cadillac Repair Tip
- 1976
- 1977
- 1978
- 1978 Cadillac Eldorado Biarritz
- 1978 Cadillac Repair Tip
- 1980 Cadillac Eldorado Biarritz
- 1996
- 2012
- 2014
- 2017
- 2018
- 2019
- 2022
- 2023
- 3063206
- 7027235
- 7800483
- 7805675
- 7805676
- 12355706
- 17058531
- 17059968
- 17059969
- 22010515
- 22010661
- A.I.R
- A6
- AC
- AC Compressor
- AC Electrical Diagram
- ACC
- Accelerator Pump
- Accelorator pump
- Actuators
- Adriatic Blue Metallic
- Ads
- Aftermovie
- Air Pump
- Aircondition
- AIRPUMP
- ALC
- Alternator
- AM
- AM-Transmitter
- Antenna
- Anti Rattle Clips
- Antique Gold
- Arizona Vintage Parts
- Arrival
- Article
- ASC
- Ash Tray removal
- ATC
- Atlantis Blue Firemist
- Austria
- Austro Classic
- Autolite SP-459
- Automatic Seat Back Release
- Award
- Banner
- Barn Find
- Battery
- Battery Tray
- Beach Race
- Bearing
- Bendix
- Biarritz
- Bigfoot
- Bill Hirsch Engine Enamel
- Bleeder Screws
- Blower
- Bolts
- Borg
- Brake Booster
- Brake Fluid
- Brake Gray
- Brakes
- Broken Bolt
- Brougham
- Bucket seats
- Buick
- Bumper End
- Bushings
- Cadillac
- Cadillac BIG Meet
- Cadillac BIG Meet
- Cadillac birthday cake
- Cadillac Blue
- Cadillac Color Selections Dealer Book
- Cadillac Coupe deVille
- Cadillac Dealer
- Cadillac Meeting
- Cadillac Mini Meeting
- Camaro RS
- Caorle
- Car Show
- Carburetor
- Card
- Carpet
- Carter AFB
- Cavalry Twill Vinyl
- CB
- CBM
- CCCD
- Choke
- Christmas
- Citizens Band
- Classic Cadillac Club Deutschland
- Clay Towel
- Cleaning
- Clock
- Clockwork
- Clutch
- Clutch Coil
- Collector
- Colonial Yellow
- Color Coded Springs
- Commercial
- Compound
- Compressor
- Condenser
- Continental Mark III
- Control Head
- Conversion
- Convertible top
- Coolant
- Corona
- Cowl
- Cruise Control
- Cruising
- CV Boots
- CV JOINTS
- D6230
- Dash Trim
- Decal Removal
- Decals
- Decoration
- Dehumidifier
- Delco Moraine
- Der Standard
- detailing
- Deville
- Diagnosis Chart
- Diagram
- Dial
- Digital Rotary Drum Clock
- Diner
- Disc Brakes
- Distributor
- Diverter Valve
- Door Jamb Switch
- Door Rubber Conduit
- Dornbirn
- Dot3
- Drive Shaft
- Driving tour
- Drum brakes
- Dry Ice Blasting
- Dry Ice Cleaning
- DVD
- Eastwood
- Eldorado
- Electric Choke Thermostat
- Electrical schematic
- Elvis
- Engine Bay
- Ep
- Epoxy floor
- Europe
- Evaporator
- Exide
- Factory Markings
- Fender Skirt
- Floor
- Flushing
- Foam
- For Sale
- Front AXLE
- Front brakes
- Front bumper filler
- Front Floor
- Front wheel bearing
- Fuel Filter
- Fuel Pump
- Fuel Sending Unit
- Fusible Link
- Garage
- Garage Cabinets
- Gasket
- GE
- Gear indicator
- General Time
- Glove box light
- Grand European
- H4
- Haus of Hot Rod
- Headlight Actuator
- Headlight doors
- Headlights
- Heater Core
- Heater Hose
- Heater Valve
- High Idle
- Holley
- Honest John
- Hood
- Hood Emblem
- Hood Ornament
- Hose Clamp
- Hot Choke
- Hot Water Valve
- HotRod
- How to
- Hödlmayr
- Ignition Diagram
- Illuminated Entry
- John D‘Agostino
- John Foust
- Klassikwelt Bodensee
- Kremsmünster
- LaSalle
- Leather seats
- Light Switch
- Limited
- Lincoln
- Lincoln Mark III Repair Tip
- Low Mileage
- Magazine
- Marilyn Monroe
- Mark III
- Master Cylinder
- Master Switch
- Master Vacuum Switch
- Media Blasting
- Meeting
- Meguiras
- MK II
- Mobile
- Model
- Moldings
- Mom
- Mopar Nationals
- Mostkost Kustom
- Movie
- Neon
- NOS
- Oberösterreicher des Tages
- oilchange
- ORF
- Overspray
- Pacer
- Paint
- Paint correction
- Paintjob
- Part Number
- Parts
- Patch Panel
- Perfect Circle
- Permabag
- Persian Lime
- Photo shooting
- Photoshooting
- Pictures
- PinUp
- POA Valve
- Power Antenna
- Power Servo
- Power Vent Windows
- Power Window
- Printed Circuit Board
- Programmer
- Pulley
- Quadrajet
- Quarter Panel
- Quartz Conversion
- R134
- Radiator
- Radio
- Rattle
- Rear brakes
- Rebuild
- Recalibrate
- RediRad
- Reed Switch
- Relais
- Relaunch
- Removing Overspray
- Repaint
- Repair
- Restoration
- RIP
- Roadhouse
- Roadmaster
- Rochester
- Rocker Arm Cover
- Rocker Panel Extension Clips
- Rostio
- Rotary Valve
- Rotterdam
- Rupes
- Rust removal
- Rust removal gel
- Sabre Wheels
- Sand Blasting
- Sandblasting
- Screed
- Season Greetings
- Seasons Greetings
- Seat Back Locks
- Seat Padding
- Seat Transmission
- See through ornament
- Self adjusters
- Sepp's Garage
- Seville
- Sheetmetal
- Shocks
- shop manual
- short
- Sign
- Solenoid
- Spark Plug Wire Routing
- Speakers
- Special Award
- Speed Bleeder Screws
- Splash Guard
- Starter Diagram
- Starter Motor
- Steering Column
- Storage
- suction throttling valve
- sunroof
- suspension
- Swirl Mark removal
- Switzerland
- T3
- Taillight Cover
- Texan´s Choice Award
- Thermostat
- Tilt and Telescope
- Time capsule
- Tomsclub
- Torque Specifications
- Tower Hose Clamp
- Towtruck
- Transducer
- Transmission
- transmission control selector
- transmission control selector indicator light
- transmission shift indicator
- Treadle Vac
- Treffen
- Tri-Band
- Troubleshooting
- Trunk Cardboard Kit
- Trunk lining
- Trunk to bumper cover
- Turn Signal Switch
- TV
- Typisierung
- Ultimate Garage
- Underbody
- Undercarriage
- Undercoating
- Undercoating Removal
- Vacuum Booster
- Vacuum diagram
- Vacuum hoses
- Vacuum Master Switch
- Vacuum Schematic
- Vacuum Valve
- Valve Cover
- Various
- Vent Window Switch
- Vibration
- Vibrator
- Vicodec roof
- Video
- Vinegar
- Vinyl Roof
- Visitor
- Washer Fluid Float
- Washer Fluid Low Level Indicator
- Water Pump
- Wax
- Weatherstripping
- Website News
- Westclox
- Wheel Bearings
- Wheel Housing
- Wiesbaden
- Windlace
- Winter
- Wiring
- Wiring Diagram
- Wonderbar
- Workbench
- Zurzach