1978 Eldorado - Choke problems.
30 | 01 | 14 | 16:19 | Filed in: 1978 Cadillac Eldorado Biarritz | Restoration
After I cleaned the engine bay of the new Biarritz I drove the car out of the garage. The car started beautifully, but for some reason it would not idle down and run on fast idle speed - even when it was fully warmed up.
The only way I could get it to normal idle speed was to manually release the fast idle cam on the carburetor. For some for me unknown reason it did not release itself - even when the car was fully warmed up...
As I´m not exactly an expert when it comes to carburetors, it took me a while to figure out what was going on and what the problem could be.
I got myself the Rochester M4MC / M4ME Carburetor Manual online and started reading. The trouble shooting section did not mention my problem and symptoms though, at least I learned a lot by reading through the manual...
The carburetor in my 1978 Eldorado is a Rochester M4ME # 17058531 (late Federal).
After a lot of reading I suspected that the electric choke thermostat must be the problem.
I removed it to test it like it is described in the manual.
In order to have good engine performance during warm up and be able to pass Federal exhaust emission standards, the electric choke must function properly .
Possible reasons for the choke not operating properly are listed below.
1. No engine oil pressure.
2. Malfunctioning oil pressure switch.
3. No current to oil pressure switch due to:
a. Burned out 15 amp "radio -idle stop" fuse.
b. Broken wire to switch (18 brown/double white).
4. No current between choke coil and oil pressure switch due to:
a. Broken 18 light blue lead wire.
b. Wire terminal not locked on coil terminal.
c. Ground circuit incomplete between grounding plate of choke assembly and housing.
5. Failed choke coil assembly.
A voltmeter or continuity light may be used to check the circuits for continuity to the oil pressure switch and the choke coil.
If it is suspected that the choke coil assembly has failed, the following check may be made.
1. Remove coil from carburetor and cool to room temperature (above 60°F).
2. Attach a jumper wire between positive battery terminal and terminal of coil assembly. Attach a second jumper wire between negative battery terminal and grounding plate of choke coil assembly.
3. The tang of the coil should rotate 45°in 54 to 90 seconds.
4. If coil fails to rotate or exceeds the above timing specification, replace coil assembly.
5. If coil is within above timing specification then coil is good and problem is elsewhere.
6. Reinstall coil and set to proper index (Fig. 52).
If coil is cooled off sufficiently the choke valve will close when throttle is opened slightly. Attach a jumper wire between the positive battery terminal and choke coil terminal. Choke coil should warm up and the choke blade can be observed opening, indicating a good and properly grounded choke coil assembly. At room temperature the choke blade should be wide open in approximately 90 seconds.
If the choke does not operate properly after the coil has been proven satisfactory , check out the other possibilities that prevent current from getting to the choke coil.
After I performed the test procedure above it was clear that the choke coil was the problem.
I ordered a new one from www.rockauto.com and it arrived within 3 days. The manual mentions the original part #17059968 (the original one on my car showed #17059969 though - but every parts list I checked does not list this number...?).
I got a replacement from Airtex # 2C1045 and it seems to fit.
I installed it today and the choke works as it should again.
The only way I could get it to normal idle speed was to manually release the fast idle cam on the carburetor. For some for me unknown reason it did not release itself - even when the car was fully warmed up...
As I´m not exactly an expert when it comes to carburetors, it took me a while to figure out what was going on and what the problem could be.
I got myself the Rochester M4MC / M4ME Carburetor Manual online and started reading. The trouble shooting section did not mention my problem and symptoms though, at least I learned a lot by reading through the manual...
The carburetor in my 1978 Eldorado is a Rochester M4ME # 17058531 (late Federal).
After a lot of reading I suspected that the electric choke thermostat must be the problem.
I removed it to test it like it is described in the manual.
Electric Choke Diagnosis and Checking
In order to have good engine performance during warm up and be able to pass Federal exhaust emission standards, the electric choke must function properly .
Possible reasons for the choke not operating properly are listed below.
1. No engine oil pressure.
2. Malfunctioning oil pressure switch.
3. No current to oil pressure switch due to:
a. Burned out 15 amp "radio -idle stop" fuse.
b. Broken wire to switch (18 brown/double white).
4. No current between choke coil and oil pressure switch due to:
a. Broken 18 light blue lead wire.
b. Wire terminal not locked on coil terminal.
c. Ground circuit incomplete between grounding plate of choke assembly and housing.
5. Failed choke coil assembly.
A voltmeter or continuity light may be used to check the circuits for continuity to the oil pressure switch and the choke coil.
If it is suspected that the choke coil assembly has failed, the following check may be made.
1. Remove coil from carburetor and cool to room temperature (above 60°F).
2. Attach a jumper wire between positive battery terminal and terminal of coil assembly. Attach a second jumper wire between negative battery terminal and grounding plate of choke coil assembly.
3. The tang of the coil should rotate 45°in 54 to 90 seconds.
4. If coil fails to rotate or exceeds the above timing specification, replace coil assembly.
5. If coil is within above timing specification then coil is good and problem is elsewhere.
6. Reinstall coil and set to proper index (Fig. 52).
If coil is cooled off sufficiently the choke valve will close when throttle is opened slightly. Attach a jumper wire between the positive battery terminal and choke coil terminal. Choke coil should warm up and the choke blade can be observed opening, indicating a good and properly grounded choke coil assembly. At room temperature the choke blade should be wide open in approximately 90 seconds.
If the choke does not operate properly after the coil has been proven satisfactory , check out the other possibilities that prevent current from getting to the choke coil.
After I performed the test procedure above it was clear that the choke coil was the problem.
I ordered a new one from www.rockauto.com and it arrived within 3 days. The manual mentions the original part #17059968 (the original one on my car showed #17059969 though - but every parts list I checked does not list this number...?).
I got a replacement from Airtex # 2C1045 and it seems to fit.
I installed it today and the choke works as it should again.
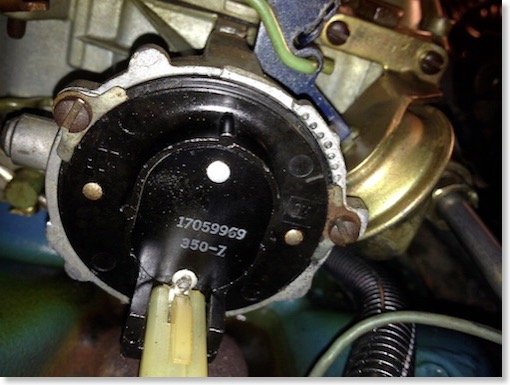
This was the original choke thermostat on the car . #17059969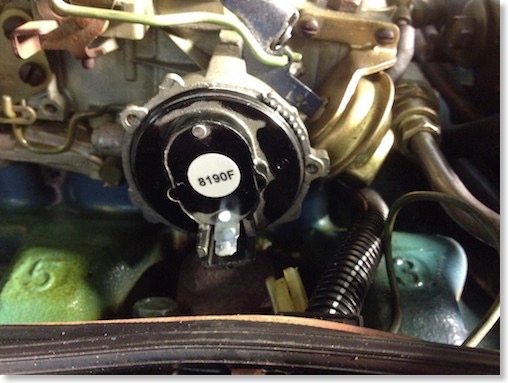
The Airtex replacement part in the car.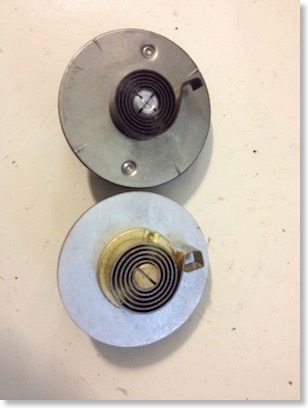
The original part and the new part - slightly different at the tang of the spring - but it works and fits perfectly...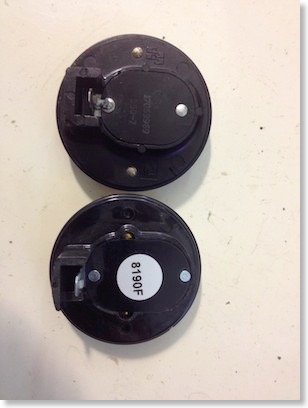
original and new part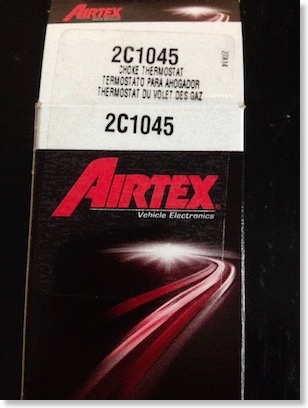
The Airtex replacement choke thermostat
Comments
The 67 Eldorado´s waterpump is defective
02 | 03 | 10 | 20:50 | Filed in: 1967 Cadillac Eldorado | Restoration
When I repaired the seat transmission of my 67 Eldorado I drove the car out of the garage to have more room. When I wanted to drive it back into the garage, suddenly the radiator boiled over and the temperature gage showed full heat. I immediately shut down the engine. The car never had an overheating problem before and the radiator is new as well.
There are only very few possibilities why this could have happened.
So I removed the thermostat housing first to check the thermostat. This is when disaster struck. The two bolts in the thermostat housing snapped off immediately when I tried to unscrew them. *Cr*p”
I then removed the thermostat and put it into boiling water and it worked perfectly. So I think I can rule out the thermostat.
As the upper radiator hose stayed pretty cool and it did not feel like there is any coolant circulating through it, I suspected the water pump. Maybe the impeller does no longer work. I will have to remove the pump to check it.
My friend Richard came over to help me to try removing the broken bolts which got stuck in the cylinder head water outlet pipe. As all methods we tried to remove the broken bolts failed, we began drilling the remains out. This did not turn out very successful either... The threads also got damaged with this method. Of course one could now rethread this part, but I decided to order a good used one.
Once again Arizona Vintage Parts is the company where I ordered all the spare parts. They are really a great company! They are reasonably priced and so far they had everything I ever needed and inquired for. They are a pleasure to deal with and I can highly recommend them. I´m looking forward for the parts to arrive, as the car in its current state is immobile and blocking the garage...
UPDATE 03/09: The parts from Arizona Vintage parts already arrived within a couple of days after ordering! Wow thats fast! Now I need some time and warmer temperatures to install them...
There are only very few possibilities why this could have happened.
- The thermostat did no longer open
- The waterpump failed
- Air was trapped somewhere in the cooling system
So I removed the thermostat housing first to check the thermostat. This is when disaster struck. The two bolts in the thermostat housing snapped off immediately when I tried to unscrew them. *Cr*p”
I then removed the thermostat and put it into boiling water and it worked perfectly. So I think I can rule out the thermostat.
As the upper radiator hose stayed pretty cool and it did not feel like there is any coolant circulating through it, I suspected the water pump. Maybe the impeller does no longer work. I will have to remove the pump to check it.
My friend Richard came over to help me to try removing the broken bolts which got stuck in the cylinder head water outlet pipe. As all methods we tried to remove the broken bolts failed, we began drilling the remains out. This did not turn out very successful either... The threads also got damaged with this method. Of course one could now rethread this part, but I decided to order a good used one.
Once again Arizona Vintage Parts is the company where I ordered all the spare parts. They are really a great company! They are reasonably priced and so far they had everything I ever needed and inquired for. They are a pleasure to deal with and I can highly recommend them. I´m looking forward for the parts to arrive, as the car in its current state is immobile and blocking the garage...
UPDATE 03/09: The parts from Arizona Vintage parts already arrived within a couple of days after ordering! Wow thats fast! Now I need some time and warmer temperatures to install them...
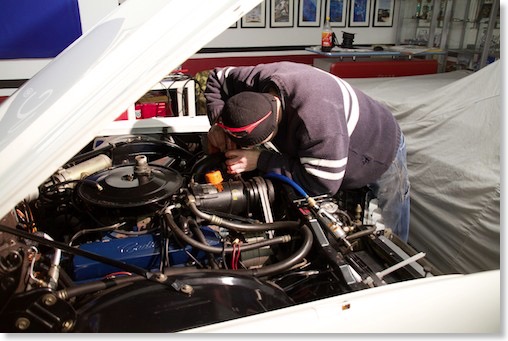
My friend Richard drilling out the snapped off bolts...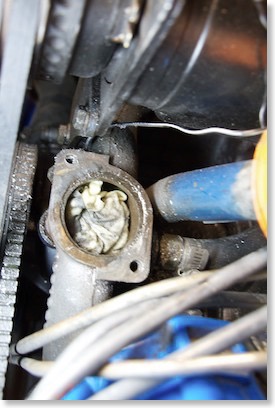
Normally the thermostat is in there. You can see the mounting holes from where we drilled out the bolts. Unfortunately the threads did not survive this treatment...
1958 Cadillac (55)
1966 Cadillac Coupe deVille (15)
1967 Cadillac DeVille (54)
1967 Cadillac Eldorado (71)
1971 Lincoln Continental Mark III (23)
1974 Cadillac Coupe deVille (45)
1978 Cadillac Eldorado Biarritz (24)
1996 Buick Roadmaster (19)
Car Shows (53)
Cruising (4)
For Sale (3)
Garage Stuff (32)
Pacer (1)
Restoration (137)
Various (55)
Video (16)
Website News (30)
- 6 way power seat
- 8-track
- 10 Ohm
- 429
- 1932
- 1957
- 1958
- 1958 Cadillac Eldorado Seville
- 1958 Cadillac Repair Tip
- 1959 Cadillac Eldorado Seville
- 1964
- 1965
- 1966
- 1966 Cadillac Coupe deVille
- 1966 Cadillac Repair Tips
- 1967
- 1967 Cadillac DeVille
- 1967 Cadillac Eldorado Repair Tip
- 1967 Cadillac Repair Tip
- 1967 Eldorado
- 1968
- 1970 Cadillac Eldorado
- 1971
- 1971 Lincoln Continental Mark III
- 1974
- 1974 Cadillac Coupe DeVille
- 1974 Cadillac Repair Tip
- 1976
- 1977
- 1978
- 1978 Cadillac Eldorado Biarritz
- 1978 Cadillac Repair Tip
- 1980 Cadillac Eldorado Biarritz
- 1996
- 2012
- 2014
- 2017
- 2018
- 2019
- 2022
- 2023
- 3063206
- 7027235
- 7800483
- 7805675
- 7805676
- 12355706
- 17058531
- 17059968
- 17059969
- 22010515
- 22010661
- A.I.R
- A6
- AC
- AC Compressor
- AC Electrical Diagram
- ACC
- Accelerator Pump
- Accelorator pump
- Actuators
- Adriatic Blue Metallic
- Ads
- Aftermovie
- Air Pump
- Aircondition
- AIRPUMP
- ALC
- Alternator
- AM
- AM-Transmitter
- Antenna
- Anti Rattle Clips
- Antique Gold
- Arizona Vintage Parts
- Arrival
- Article
- ASC
- Ash Tray removal
- ATC
- Atlantis Blue Firemist
- Austria
- Austro Classic
- Autolite SP-459
- Automatic Seat Back Release
- Award
- Banner
- Barn Find
- Battery
- Battery Tray
- Beach Race
- Bearing
- Bendix
- Biarritz
- Bigfoot
- Bill Hirsch Engine Enamel
- Bleeder Screws
- Blower
- Bolts
- Borg
- Brake Booster
- Brake Fluid
- Brake Gray
- Brakes
- Broken Bolt
- Brougham
- Bucket seats
- Buick
- Bumper End
- Bushings
- Cadillac
- Cadillac BIG Meet
- Cadillac BIG Meet
- Cadillac birthday cake
- Cadillac Blue
- Cadillac Color Selections Dealer Book
- Cadillac Coupe deVille
- Cadillac Dealer
- Cadillac Meeting
- Cadillac Mini Meeting
- Camaro RS
- Caorle
- Car Show
- Carburetor
- Card
- Carpet
- Carter AFB
- Cavalry Twill Vinyl
- CB
- CBM
- CCCD
- Choke
- Christmas
- Citizens Band
- Classic Cadillac Club Deutschland
- Clay Towel
- Cleaning
- Clock
- Clockwork
- Clutch
- Clutch Coil
- Collector
- Colonial Yellow
- Color Coded Springs
- Commercial
- Compound
- Compressor
- Condenser
- Continental Mark III
- Control Head
- Conversion
- Convertible top
- Coolant
- Corona
- Cowl
- Cruise Control
- Cruising
- CV Boots
- CV JOINTS
- D6230
- Dash Trim
- Decal Removal
- Decals
- Decoration
- Dehumidifier
- Delco Moraine
- Der Standard
- detailing
- Deville
- Diagnosis Chart
- Diagram
- Dial
- Digital Rotary Drum Clock
- Diner
- Disc Brakes
- Distributor
- Diverter Valve
- Door Jamb Switch
- Door Rubber Conduit
- Dornbirn
- Dot3
- Drive Shaft
- Driving tour
- Drum brakes
- Dry Ice Blasting
- Dry Ice Cleaning
- DVD
- Eastwood
- Eldorado
- Electric Choke Thermostat
- Electrical schematic
- Elvis
- Engine Bay
- Ep
- Epoxy floor
- Europe
- Evaporator
- Exide
- Factory Markings
- Fender Skirt
- Floor
- Flushing
- Foam
- For Sale
- Front AXLE
- Front brakes
- Front bumper filler
- Front Floor
- Front wheel bearing
- Fuel Filter
- Fuel Pump
- Fuel Sending Unit
- Fusible Link
- Garage
- Garage Cabinets
- Gasket
- GE
- Gear indicator
- General Time
- Glove box light
- Grand European
- H4
- Haus of Hot Rod
- Headlight Actuator
- Headlight doors
- Headlights
- Heater Core
- Heater Hose
- Heater Valve
- High Idle
- Holley
- Honest John
- Hood
- Hood Emblem
- Hood Ornament
- Hose Clamp
- Hot Choke
- Hot Water Valve
- HotRod
- How to
- Hödlmayr
- Ignition Diagram
- Illuminated Entry
- John D‘Agostino
- John Foust
- Klassikwelt Bodensee
- Kremsmünster
- LaSalle
- Leather seats
- Light Switch
- Limited
- Lincoln
- Lincoln Mark III Repair Tip
- Low Mileage
- Magazine
- Marilyn Monroe
- Mark III
- Master Cylinder
- Master Switch
- Master Vacuum Switch
- Media Blasting
- Meeting
- Meguiras
- MK II
- Mobile
- Model
- Moldings
- Mom
- Mopar Nationals
- Mostkost Kustom
- Movie
- Neon
- NOS
- Oberösterreicher des Tages
- oilchange
- ORF
- Overspray
- Pacer
- Paint
- Paint correction
- Paintjob
- Part Number
- Parts
- Patch Panel
- Perfect Circle
- Permabag
- Persian Lime
- Photo shooting
- Photoshooting
- Pictures
- PinUp
- POA Valve
- Power Antenna
- Power Servo
- Power Vent Windows
- Power Window
- Printed Circuit Board
- Programmer
- Pulley
- Quadrajet
- Quarter Panel
- Quartz Conversion
- R134
- Radiator
- Radio
- Rattle
- Rear brakes
- Rebuild
- Recalibrate
- RediRad
- Reed Switch
- Relais
- Relaunch
- Removing Overspray
- Repaint
- Repair
- Restoration
- RIP
- Roadhouse
- Roadmaster
- Rochester
- Rocker Arm Cover
- Rocker Panel Extension Clips
- Rostio
- Rotary Valve
- Rotterdam
- Rupes
- Rust removal
- Rust removal gel
- Sabre Wheels
- Sand Blasting
- Sandblasting
- Screed
- Season Greetings
- Seasons Greetings
- Seat Back Locks
- Seat Padding
- Seat Transmission
- See through ornament
- Self adjusters
- Sepp's Garage
- Seville
- Sheetmetal
- Shocks
- shop manual
- short
- Sign
- Solenoid
- Spark Plug Wire Routing
- Speakers
- Special Award
- Speed Bleeder Screws
- Splash Guard
- Starter Diagram
- Starter Motor
- Steering Column
- Storage
- suction throttling valve
- sunroof
- suspension
- Swirl Mark removal
- Switzerland
- T3
- Taillight Cover
- Texan´s Choice Award
- Thermostat
- Tilt and Telescope
- Time capsule
- Tomsclub
- Torque Specifications
- Tower Hose Clamp
- Towtruck
- Transducer
- Transmission
- transmission control selector
- transmission control selector indicator light
- transmission shift indicator
- Treadle Vac
- Treffen
- Tri-Band
- Troubleshooting
- Trunk Cardboard Kit
- Trunk lining
- Trunk to bumper cover
- Turn Signal Switch
- TV
- Typisierung
- Ultimate Garage
- Underbody
- Undercarriage
- Undercoating
- Undercoating Removal
- Vacuum Booster
- Vacuum diagram
- Vacuum hoses
- Vacuum Master Switch
- Vacuum Schematic
- Vacuum Valve
- Valve Cover
- Various
- Vent Window Switch
- Vibration
- Vibrator
- Vicodec roof
- Video
- Vinegar
- Vinyl Roof
- Visitor
- Washer Fluid Float
- Washer Fluid Low Level Indicator
- Water Pump
- Wax
- Weatherstripping
- Website News
- Westclox
- Wheel Bearings
- Wheel Housing
- Wiesbaden
- Windlace
- Winter
- Wiring
- Wiring Diagram
- Wonderbar
- Workbench
- Zurzach
 GERALD´S CADILLACS - NEWS